SEARCH FINESCALE.COM

Enter keywords or a search phrase below:

Fw 190 Butcher Bird 2013 (extended to June 2014) Group Build

564934 views
5865 replies
1 rating 2 rating 3 rating 4 rating 5 rating
  • Member since
    December 2006
  • From: N. Georgia
Posted by Jester75 on Tuesday, April 30, 2013 1:00 PM

Awesome Bill!! Looking forward to seeing what you can do with that kit!!

Eric


  • Member since
    March 2012
  • From: Corpus Christi, Tx
Posted by mustang1989 on Tuesday, April 30, 2013 1:03 PM

Come on in Bill! I'll get you on the roster right now. Can't wait to see you start breakin the plastic from the sprues on this one. If you have trouble just ask. There's lots of good people here who just loooooooooove to help! Welcome aboard pal, Joe


 Forum | Modelers Social Club Forum (proboards.com) 

  • Member since
    December 2002
  • From: Bury St Edmunds, Suffolk, England
Posted by Bish on Tuesday, April 30, 2013 1:05 PM

Eric, that is one sweet looking build. The paint work is stunning.

I am a Norfolk man and i glory in being so


On the bench: Airfix 1/72nd Harrier GR.3/Fujimi 1/72nd Ju 87D-3

  • Member since
    April 2013
  • From: Minnesota City, Minnesota, U.S.A.
Posted by FlyItLikeYouStoleIt on Tuesday, April 30, 2013 1:27 PM

Hey Joe,

All is still up in the air. I'm not nearly as concerned about the panel lines as I am about the rivets. OMG the flippin rivets on this thing. If they really had skewered these planes with that many rivets, they never would've got off the ground. I'll be sanding her almost smooth so, yeah, I'll need some help on scribing new lines.  But, right now I'm more concerned with researching the exact variant my neighbor wants and all the appropriate details that go with it, like engine, armament, paint scheme and such. I already know, right down to the specific pilot, roughly what my guy expects. I told him I'll get as close as my abilities, time, money and nerves will allow; with the help of all the fine builders in here,of course. I'll edit this post soon with more details. I know if I give too much away right now, I'll be bombarded with suggestions. I wanna do my own research first.

Bill.

On the bench:  Lindberg 1/32 scale 1934 Ford Coupe and a few rescue projects.

In queue:  Tamiya 1/35 Quad Tractor or a scratch build project.

  • Member since
    March 2012
  • From: Corpus Christi, Tx
Posted by mustang1989 on Tuesday, April 30, 2013 2:38 PM

Get the Aero Detail book on it. It's going to be a good paint and detail reference. There are some good ones out there as you will see but the Aero Detail series gets a decent vote here. Not as good as the 109 books from them but decent nonetheless.


 Forum | Modelers Social Club Forum (proboards.com) 

  • Member since
    April 2013
Posted by SchattenSpartan on Tuesday, April 30, 2013 4:24 PM

Eric: That. model. is. just. AWESOME!!!!!

I wont say anymore because all the others have already said that much good stuff about it. I#ll just go ahead and agree on all of that without any exception.

Clemens

  • Member since
    December 2006
  • From: N. Georgia
Posted by Jester75 on Tuesday, April 30, 2013 5:58 PM

Thanks so much Clemens and Bish, I really appreciate it!

Eric


  • Member since
    April 2013
Posted by SchattenSpartan on Tuesday, April 30, 2013 6:20 PM

Just telling the obvious truth...

Clemens

  • Member since
    March 2012
  • From: Corpus Christi, Tx
Posted by mustang1989 on Tuesday, April 30, 2013 9:38 PM

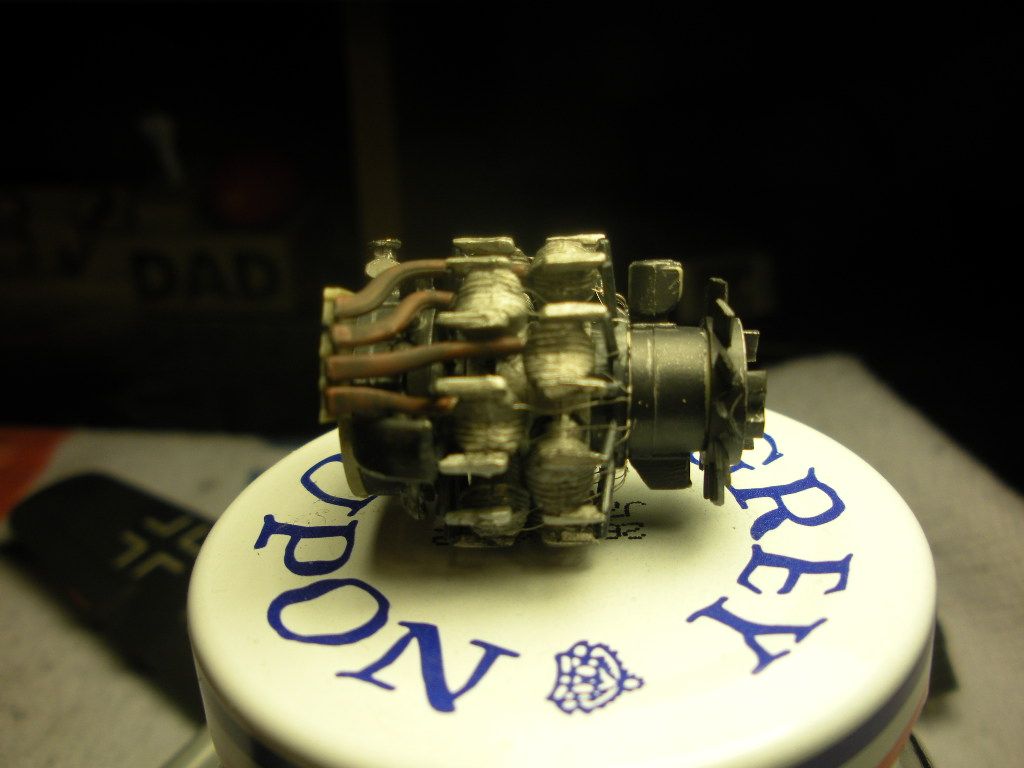
Ok folks. Finished installing the exhaust manifolds/pipes on the R/H side of the engine and am moving on to the L/H side tonight. Just to provide some detail about the process of the painting procedure for the pipes I relied on pictures of aircraft and of my automotive knowledge (since I work in an automotive dealer as a technician). I get to see alot of exhaust manifolds and headers. I painted each pipe a coat of acrylic rust followed by a wash of MIG productions black. I then installed the pipes and treated all pipes to a coating of ground up black pastel applied with a paintbrush to give it that REALLY dull and worn finish. Here goes:
                   

 Forum | Modelers Social Club Forum (proboards.com) 

  • Member since
    March 2010
  • From: MN
Posted by Nathan T on Tuesday, April 30, 2013 10:42 PM

Sweet Stuff Joe! Looks very realistic.


  • Member since
    August 2009
  • From: MOAB, UTAH
Posted by JOE RIX on Tuesday, April 30, 2013 10:43 PM

Oh Man Joe, That looks terrific. You did an excellent job overall but, that extra effort on the exhaust pipes really paid off.

Eric, Thanks for sharing your wheel process. I too am a fan of Tamiya NATO Black for tires.

"Not only do I not know what's going on, I wouldn't know what to do about it if I did". George Carlin

  • Member since
    December 2006
  • From: N. Georgia
Posted by Jester75 on Wednesday, May 1, 2013 7:04 AM

I think you achieved a realistic look on those exhausts, I like it !!!Yes

Eric


  • Member since
    February 2011
  • From: Bent River, IA
Posted by Reasoned on Wednesday, May 1, 2013 12:49 PM

Fantastic Joe!

Science is the pursiut of knowledge, faith is the pursuit of wisdom.  Peace be with you.

On the Tarmac: 1/48 Revell P-38

In the Hanger: A bunch of kits

  • Member since
    December 2002
  • From: Bury St Edmunds, Suffolk, England
Posted by Bish on Wednesday, May 1, 2013 1:01 PM

Joe, that engine is looking really nice.

Guys, what XF number is that NATO black. I keep hearing about that stuff, I think it has to be worth a try at least.

I am a Norfolk man and i glory in being so


On the bench: Airfix 1/72nd Harrier GR.3/Fujimi 1/72nd Ju 87D-3

  • Member since
    March 2010
  • From: MN
Posted by Nathan T on Wednesday, May 1, 2013 1:05 PM

XF-69....lol. Comes in a spray can too I think.


  • Member since
    December 2002
  • From: Bury St Edmunds, Suffolk, England
Posted by Bish on Wednesday, May 1, 2013 1:07 PM

Thanks Nathan, and I can hear that dirty chuckle from here.

So I just need to keep thinking 69, shouldn't be to hard.

I am a Norfolk man and i glory in being so


On the bench: Airfix 1/72nd Harrier GR.3/Fujimi 1/72nd Ju 87D-3

  • Member since
    April 2013
  • From: Minnesota City, Minnesota, U.S.A.
Posted by FlyItLikeYouStoleIt on Wednesday, May 1, 2013 1:23 PM

Alright, it looks like I'll be going for the A5. Straight-up fighter, no drop tanks or bombs. Most likely representing Wilhelm "Wutz" Galland's A5 from II/JG26. Luckily my Hasegawa kit includes the A5 style cowling hood and guns as options ....whew. Thought I was gonna have to hunt some up. I  will havta scrounge up the markings for Wutz's A5, though. Should be fun!

Ripped open the plastic today. Parts look pretty good, not much for excess plastic flash. Decals, the few I'll use, look superb for a nearly 30 yr old kit.

Bill.

On the bench:  Lindberg 1/32 scale 1934 Ford Coupe and a few rescue projects.

In queue:  Tamiya 1/35 Quad Tractor or a scratch build project.

  • Member since
    March 2012
  • From: Corpus Christi, Tx
Posted by mustang1989 on Wednesday, May 1, 2013 3:01 PM

Thanks for the comments you all! Installed two pipes on the L/H side last night and have the other two trimmed up and ready to install tonight/ tomorrow morning. After that I have to work on the rest of the photo etch parts (about another 20 pieces or so).


 Forum | Modelers Social Club Forum (proboards.com) 

  • Member since
    October 2008
  • From: Georgia
Posted by Rigidrider on Wednesday, May 1, 2013 3:27 PM

Hey Bill...

I'm building the same kit but just prior to that box. Slightly older then the boxing you have... 2 hints... Re-enforce the landing gear before assy. It is VERY weak! If displaying cowling and gun bays, Replace the guns with a nice resin set or just barrels if gun bays are to be closed. The supplied MG17s really stink! you can see mine a few pages back, I've since ordered a nice resin set to replace these sad lookin pieces... Just a suggestion brother, looking forward to seeing your build come together! Take Care!

Doug (RR)

When Life Hands You A Bucket Of Lemons...

Make Lemonade!

Then Sell It Back At $2 Bucks A Glass...

  • Member since
    December 2006
  • From: N. Georgia
Posted by Jester75 on Wednesday, May 1, 2013 3:44 PM

I can highly recommend the seller sk1968sk on eBay for any brass barrel needs. They are out of Poland so shipping may take an extra day or two but the quality is great and so are the prices. I used the same barrels on my D9 and they fit like a glove!

Eric


  • Member since
    March 2010
  • From: MN
Posted by Nathan T on Wednesday, May 1, 2013 7:23 PM

Are those Aber barrels Jester?


  • Member since
    December 2006
  • From: N. Georgia
Posted by Jester75 on Wednesday, May 1, 2013 8:13 PM

I think they are Master Model barrels but he sells a couple of different brands. I think some are RB for armor and mostly Master for a/c.

Eric


  • Member since
    December 2006
  • From: N. Georgia
Posted by Jester75 on Wednesday, May 1, 2013 8:14 PM

Here is a link to his eBay store. Some good stuff.

Achtungpanzershop

Eric


  • Member since
    August 2009
  • From: MOAB, UTAH
Posted by JOE RIX on Wednesday, May 1, 2013 10:32 PM

Jester75

Here is a link to his eBay store. Some good stuff.

Achtungpanzershop

Couldn't agree more Eric.  i have purchased from sk1968sk on a few occasions myself and he gives top notch service in addition to having an awesome inventory. He has, on occasion, tossed in an extra goodie with my order.  I feel that considering it is being shipped from Poland that my orders have arrived in a very reasonable time frame.

"Not only do I not know what's going on, I wouldn't know what to do about it if I did". George Carlin

  • Member since
    April 2013
  • From: Minnesota City, Minnesota, U.S.A.
Posted by FlyItLikeYouStoleIt on Thursday, May 2, 2013 12:34 PM

Thanks Doug,

Very helpful tips there. I'm not far enough along to mull over replacing things just yet.

 One thing that you'll learn about me in here is: I'm not real likely to be buying aftermarket parts / accessories. If I dont like what's in the kit or want to add something extra, I tend to make my own or find a "close enough" match in the spares. I know  .... "close enough?!!!"   ..... gasp!!! But hey, this hobby is expensive enough. And, after all, it's all about being creative, right? Not about how much you can spend to make something look the way you want. Well, for me anyway. Hell, I've got planes with toothpicks for gun barrels.

Back to the Fw190 .... I decided to start with the engine and ran into crap right away. When assembling the front and back halves of the cylinder assemblies, both of them have alignment problems. One out of seven of the cylinders, on both engine halves, will not line up when the other six are dead on. Common issue?

And, are they any good web sources for detailed and accurate picsof these engines?

Bill.

On the bench:  Lindberg 1/32 scale 1934 Ford Coupe and a few rescue projects.

In queue:  Tamiya 1/35 Quad Tractor or a scratch build project.

  • Member since
    December 2006
  • From: N. Georgia
Posted by Jester75 on Thursday, May 2, 2013 12:49 PM

In the end, you are right Bill. It all boils down to what pleases the individual hobbyist. If you are doing it to please someone else then you are doing it for the wrong reason! I tend to try and be as 'historical' or 'accurate' as I can be given the resources I have such as the great folks in this group build or the interwebs. By no means though do I have some vast library of information and blueprints that I fret over whether one part matches the plans or not.

Can't help you on the engines, but can't wait to see pics or your build!

Eric


  • Member since
    April 2013
  • From: Minnesota City, Minnesota, U.S.A.
Posted by FlyItLikeYouStoleIt on Thursday, May 2, 2013 1:55 PM

mustang1989

Ok folks. Finished installing the exhaust manifolds/pipes on the R/H side of the engine and am moving on to the L/H side tonight. Just to provide some detail about the process of the painting procedure for the pipes I relied on pictures of aircraft and of my automotive knowledge (since I work in an automotive dealer as a technician). I get to see alot of exhaust manifolds and headers. I painted each pipe a coat of acrylic rust followed by a wash of MIG productions black. I then installed the pipes and treated all pipes to a coating of ground up black pastel applied with a paintbrush to give it that REALLY dull and worn finish. Here goes:

I'm glad I saw your engine pic before continuing on mine. For one, I can see now that my cylinder line-up problem is not really an issue. There's alot going on there. But, my engine has this silly disk thing going between the front and back cylinder halves, yours does not. I really thought that thing didn't belong and your pic confirms that.

Oh and awesome work by the way. I'm finding lots of inspiration here Big Smile

Bill.

On the bench:  Lindberg 1/32 scale 1934 Ford Coupe and a few rescue projects.

In queue:  Tamiya 1/35 Quad Tractor or a scratch build project.

  • Member since
    March 2012
  • From: Corpus Christi, Tx
Posted by mustang1989 on Thursday, May 2, 2013 2:00 PM

Thanks for the comments. I cant think of anything that does go between the radial halves. Will have to look into that. Would be building a 1/32nd scale or larger myself but space is definitely an issue.


 Forum | Modelers Social Club Forum (proboards.com) 

  • Member since
    October 2008
  • From: Georgia
Posted by Rigidrider on Thursday, May 2, 2013 4:47 PM

When Life Hands You A Bucket Of Lemons...

Make Lemonade!

Then Sell It Back At $2 Bucks A Glass...

  • Member since
    April 2013
  • From: Minnesota City, Minnesota, U.S.A.
Posted by FlyItLikeYouStoleIt on Friday, May 3, 2013 11:26 AM

mustang1989

Thanks for the comments. I cant think of anything that does go between the radial halves. Will have to look into that. Would be building a 1/32nd scale or larger myself but space is definitely an issue.

Here's a pic of that mystery piece between the radial halves (it's not glued in). I'm going to eliminate the outer ring of it but keep the inner disc, as I'm sure its needed for the engine's fit into the fuselage.

And . . . . . a couple more pics to comply with WIP rules:

 1.) about to make the 1st cut

2.) These little stringers between the cylinder heads ..... I presume they're really sprue to help the plastic flow through the mold? Hope so cuz they're gone now.....

just a few small items before I start painting engine parts. I was thinking maybe 24 gauge insulated wire for ignition wires??  anybody ??

Bill.

On the bench:  Lindberg 1/32 scale 1934 Ford Coupe and a few rescue projects.

In queue:  Tamiya 1/35 Quad Tractor or a scratch build project.

JOIN OUR COMMUNITY!

Our community is FREE to join. To participate you must either login or register for an account.

SEARCH FORUMS
FREE NEWSLETTER
By signing up you may also receive reader surveys and occasional special offers. We do not sell, rent or trade our email lists. View our Privacy Policy.