SEARCH FINESCALE.COM

Enter keywords or a search phrase below:

Fw 190 Butcher Bird 2013 (extended to June 2014) Group Build

564938 views
5865 replies
1 rating 2 rating 3 rating 4 rating 5 rating
  • Member since
    August 2009
  • From: MOAB, UTAH
Posted by JOE RIX on Thursday, August 8, 2013 12:37 PM

Jester75

Looking pretty good John!!

Nice find on those cals Joe! I have been looking very closely at the Kagero books. They do have some cool markings with them.

Eric they are indeed excellent books if you can find them at a suitable price. Shortly after winning FW 190 Vol.3 I scored Vol.4 on ebay for just over $20.00. Vol.4 covers the D-9 and Ta 152 and comes with some really sweet schemes/markings in 1/48 & 1/72. Oddly enough though I have yet to find a Vol.1 or Vol.2 for under $40.00. But, I do highly recommend them.

"Not only do I not know what's going on, I wouldn't know what to do about it if I did". George Carlin

  • Member since
    December 2006
  • From: N. Georgia
Posted by Jester75 on Thursday, August 8, 2013 1:18 PM

I think there is a 109 book by Kagero that is out of print that contained some 32nd decals for von Werra's 109. Been trying to find that book at a reasonable price with decals but no luck so far.

Eric


  • Member since
    March 2012
  • From: Corpus Christi, Tx
Posted by mustang1989 on Thursday, August 8, 2013 2:42 PM

Hey guys I meant to ask this question earlier. Does anybody have any CLEAR photos of the engine side hinged access doors/ panels in regards to the panel stop cable attachment point at the fuselage? I have the panel eyelet installed already so thats a no brainer but as to where they attach to on the engine/ fuselage I'm left scratching my head. I have one photo but it is very unclear.


 Forum | Modelers Social Club Forum (proboards.com) 

  • Member since
    April 2013
Posted by SchattenSpartan on Thursday, August 8, 2013 2:53 PM

Is this pic of any help, Joe?


  • Member since
    March 2012
  • From: Corpus Christi, Tx
Posted by mustang1989 on Thursday, August 8, 2013 3:00 PM

I'll be able to tell you when I get home to where I can actually view it. Anything is of help right now. Thanks Clemens!


 Forum | Modelers Social Club Forum (proboards.com) 

  • Member since
    May 2013
  • From: Indiana, USA
Posted by Greg on Thursday, August 8, 2013 4:15 PM

John, looking good! I also have yet to attempt preshading so I look fwd to seeing how you get on with it.

Joe (Rix), oh no!!! Not another paint pulling off incident. Hope I'm not contagious.

  • Member since
    October 2008
  • From: Georgia
Posted by Rigidrider on Thursday, August 8, 2013 4:29 PM

Nathan... Thank you! Thats a great shot and related info. Again, I knew she had been caprured in the closing days of the war, and believe it or not I found some Strike Eagle decals last night on Ebay! The short paragraph explains alot of what was puzzling me about some of the pictures I've seen.  Thank you again!

Doug

When Life Hands You A Bucket Of Lemons...

Make Lemonade!

Then Sell It Back At $2 Bucks A Glass...

  • Member since
    March 2012
  • From: Corpus Christi, Tx
Posted by mustang1989 on Thursday, August 8, 2013 6:25 PM

SchattenSpartan

Is this pic of any help, Joe?


Thats a good picture brother Clemens but I can't see where the cable attaches at the fuselage.


 Forum | Modelers Social Club Forum (proboards.com) 

  • Member since
    April 2013
Posted by SchattenSpartan on Thursday, August 8, 2013 7:10 PM

I found some pics of a crashed 190, but I don't think they are what you need:

http://www.flickr.com/photos/strandarchives/9176413557/

http://www.flickr.com/photos/strandarchives/9178631151/

Here's a nice drawing of the inside of a 190: Just click on hte picture to enlarge it...


  • Member since
    March 2010
  • From: MN
Posted by Nathan T on Thursday, August 8, 2013 8:28 PM

Joe, try this pic and zoom in. the cable attaches to a cylinder rocker arm.


  • Member since
    March 2012
  • From: Corpus Christi, Tx
Posted by mustang1989 on Thursday, August 8, 2013 9:17 PM

Now THAT was what I needed!!! Thanks Nathan!! Glad youre here. Thanks for your efforts also Clemens!


 Forum | Modelers Social Club Forum (proboards.com) 

  • Member since
    March 2010
  • From: MN
Posted by Nathan T on Thursday, August 8, 2013 9:25 PM

...Hey, whatever it takes to get that build of yours moving along so we can all see it in its finished glory!


  • Member since
    August 2009
  • From: MOAB, UTAH
Posted by JOE RIX on Thursday, August 8, 2013 11:35 PM

Alrighty, Let's continue on with my efforts to fix the area where the paint lifted off when I attempted to remove the decal. I regret that I did not get a pic of every step but, I believe you'll get the idea. My first attempt was to sand the edges of the paint in hopes of feathering it enough that it would not be apparent. I also chipped more of the paint off to the forward and upper panel lines. Here is what it looked like after masking and prior to painting:

Well, after the paint went on it looked like a big pit. Completely unsatisfactory. So, I further chipped the paint back in a straighter line. Sort of creating a false panel line:

Sanded the edges and painted:

Still looked horrible. So sanded the edges trying to smooth it out. I then considered calling it good and just complete the model and chalk it up to a learning experience. But, last night I I decided that I have invested too much time and effort into this to just accept that big square pit. So, I got serious. Stripped the Balkenkreuz and got with some serious sanding of the whole area in order to smooth it out.

So, this is where I am currently at. The edges are not quite as prominent now but, I'll do some further sanding and then some complete remasking and repainting the afflicted area. At the very least it should look better and not quite as prominent as the first 2 attempts. If any of you have any further ideas on repairing this I greatly welcome them.

This is a perfect example that although something may not be absolutely perfect it's best to LEAVE WELL ENOUGH ALONE!!!!

"Not only do I not know what's going on, I wouldn't know what to do about it if I did". George Carlin

  • Member since
    April 2013
Posted by SchattenSpartan on Friday, August 9, 2013 6:49 AM

That's some really nasty paint chipping you had there, Joe. I'm glad you managed to fix it...

  • Member since
    March 2012
  • From: Corpus Christi, Tx
Posted by mustang1989 on Friday, August 9, 2013 2:58 PM

Hang in there buddy Joe. There's plenty of time left there reverend!!


 Forum | Modelers Social Club Forum (proboards.com) 

  • Member since
    May 2013
  • From: Indiana, USA
Posted by Greg on Friday, August 9, 2013 7:18 PM

Thanks for taking the time to show us your efforts, Joe.

I thought it was just me when I was unable to sand the chip lines smoothly after my problem with paint lifting off. Not to say I'm happy you are having this problem, not at all.

You are showing better stick to it-iv-ness than I, I just sanded, painted, was unhappy with the results and called it good anyway.

  • Member since
    March 2010
  • From: MN
Posted by Nathan T on Friday, August 9, 2013 9:30 PM

Keep at it Joe Rix! I know those sanding edges can be a pain to blend in and hide but try using a primer to help fill in the low areas and make sure you are wet sanding; it seems to work better.


  • Member since
    August 2009
  • From: MOAB, UTAH
Posted by JOE RIX on Friday, August 9, 2013 11:05 PM

Thanks for the encouragement folks.

Clemens - Hold tight on the kudos as I have not fixed it yet. Still sanding.

Greg -  Your Welcome. At the start of this GB I encouraged everyone to try and show their process rather than just show the finished product. I haven't been overly good at it but I try to show what I am doing. We have a tendency to assume everyone knows what were doing yet we have some folks that are new or returning that benefit from a visual "how to". 

Nathan - You are indeed correct. My plan is to run some Mr. Surfacer 1000 along the edges and feather them out. Thank You for the assistance though.

"Not only do I not know what's going on, I wouldn't know what to do about it if I did". George Carlin

  • Member since
    April 2013
Posted by SchattenSpartan on Saturday, August 10, 2013 4:31 PM

I just ordered some small goodies at Hannants.

An Eagle Calsheet for "Black <I" and an Eduard PE set for my A-8/R2.

The PE stuff looks reaally nice and includes parts for dressing up the engine, wheel bays, gun bays and some other stuff, but just have a look at some pics of it on their website:

http://www.eduard.com/store/Eduard/Fw-190A-8-1-48-1-1.html?cur=1&listtype=search&searchparam=fw%20190%20a-8

I'll only use the PE for the engine and the left gun bay on my R2. The rest will be added to the normal A-8.


  • Member since
    December 2006
  • From: N. Georgia
Posted by Jester75 on Saturday, August 10, 2013 5:08 PM

What a gorgeous PE set Clemens!! I guess I know which one I will be picking up for my next A8 project which will be completely opened up. Dayum!

Eric


  • Member since
    April 2013
Posted by SchattenSpartan on Saturday, August 10, 2013 5:34 PM

I wanted to keep the right side of my A-8/R-2 closed up, remember? Not anymore!!! I'll open both engine panels up now. I can build my other A-8 closed up anyway...

  • Member since
    May 2013
  • From: Indiana, USA
Posted by Greg on Saturday, August 10, 2013 5:46 PM

You should have fun with that PE set, Clemens. I look fwd to seeing how the engine detail parts work, never seen it done.

Curious how you acquire your Eduard stuff over there. I ordered direct first time not realising that Squadron and Sprue Bros here in the states carry it. It was kind of fun getting a package from Czechoslovakia, actually. :)

  • Member since
    April 2013
Posted by SchattenSpartan on Saturday, August 10, 2013 6:11 PM

I order it either at Hannants or ask the owner of my LHS (we are pretty good friends by now) to get it for me.

I'm crious about that PE set. I never used any PE stuff for engines (only resin and wire). I just bought the set because of the access panels, but the gun bays are an awesome addition and the engine details look gorgeous! I'll use the PE parts for the gear bays on my other A-8 though...

  • Member since
    May 2013
  • From: Indiana, USA
Posted by Greg on Saturday, August 10, 2013 7:23 PM

Ah, I see. Cool that your LHS can get this sort of thing. At mine (both of them), nobody would have a clue what an 'Eduard' is. Please remember to take some pics whenever you use the engine parts!

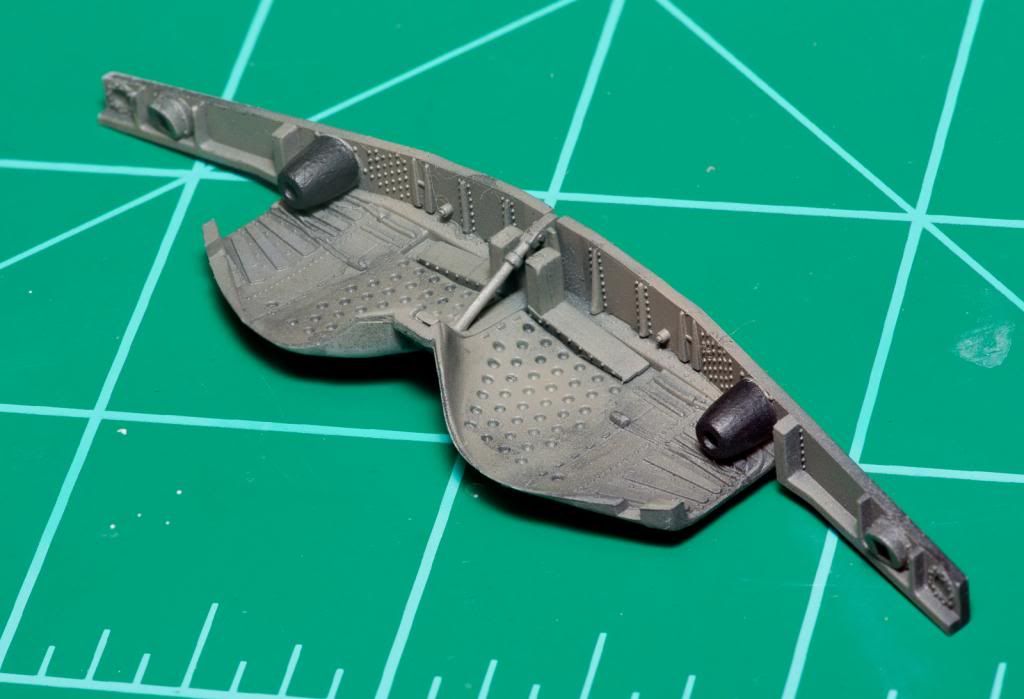
Time for my first progress pic. Not too exciting to view, but doing it was for me.

I'm new to building sub-assemblies then painting them. I was always a paint, scrape, assemble guy. Also new to going beyond painting whatever color instructions say.

My goal was to do this in an afternoon, with some visual interest beyond painting it all RLM 2 and satin black on whatever those two things are. This subassy would have taken me 2 weeks on my previous build.

Not perfect, should have left well enough alone because it looked good before I messed it up playing with another new product (Vallejo black wash), but it looks better in person (really, it does), and I am ready to move on. :)

Base coat of Vallejo black primer (because I just got it today and wanted to play)

Uneven coat of Vallejo RLM 2

Some light and dark drybrushing with Vallejo Model colors

Make a mess with Vallejo wash, forgetting it needs to be gloss coated. D'oh!

Spot spray some RLM 2 to hide some of the mess

Get called to dinner

Hey, I had fun! (got a bunch of Vallejo colors, primers, mediums, etc to play with today). Thanks for looking and tolerating my ramble.
  • Member since
    April 2013
Posted by SchattenSpartan on Saturday, August 10, 2013 7:32 PM

Looking really nice, buddy!

  • Member since
    May 2013
  • From: Indiana, USA
Posted by Greg on Saturday, August 10, 2013 8:04 PM

Thanks Clemens. :)

  • Member since
    October 2008
  • From: Georgia
Posted by Rigidrider on Saturday, August 10, 2013 9:35 PM

    Greg... Good looking start, I've not used Vallejo paints, as until just recently I was having trouble locating, but finally found a local source. They appear to be great paints from every thing Ive seen them used on.I will try some soon,

Clemens... My deal with PE parts (I love PE) is that sometimes the tweezers are slightly magnetic from being ground on, and the @#*%%^ PE sticks magneticly instead of to the super glue! (LOL) I do have one good set of stainless tweezers that work pretty well though.

Well, I'm going to try to post a little more progress, Not much to post this weekend, Yard work between the rain drops, and the high humidity has made paint very iffy...

When Life Hands You A Bucket Of Lemons...

Make Lemonade!

Then Sell It Back At $2 Bucks A Glass...

  • Member since
    October 2008
  • From: Georgia
Posted by Rigidrider on Saturday, August 10, 2013 9:41 PM

Well since I cant figure out how to comment on pictures as they are being posted... I started the Gun Deck assy, Got the firewall started which also contains the back half of the Jumo engine since there is no engine intended, but the back half is visible through the landing gear area. I had to cut off the back half of the resin engine and attach to the mount, then cut, sand and file to make it look like a complete engine, those pictures to follow soon.

Doug

When Life Hands You A Bucket Of Lemons...

Make Lemonade!

Then Sell It Back At $2 Bucks A Glass...

  • Member since
    March 2012
  • From: Corpus Christi, Tx
Posted by mustang1989 on Saturday, August 10, 2013 10:00 PM

Good progress Doug. Nice work on that gun platform and guns. I'm liking the engine too but there's just something about that platform. Lookin good!


 Forum | Modelers Social Club Forum (proboards.com) 

  • Member since
    August 2009
  • From: MOAB, UTAH
Posted by JOE RIX on Saturday, August 10, 2013 11:17 PM

Greg - Impressive start. You indeed, flat coats and washes do not mix well. Yet, you did a nice job in painting to rectify the mess.

Doug - Ho hum, just some more magnificent, awesome, remarkable, fantastic modeling from you. LOL. Seriously, very very nice work.

"Not only do I not know what's going on, I wouldn't know what to do about it if I did". George Carlin

JOIN OUR COMMUNITY!

Our community is FREE to join. To participate you must either login or register for an account.

SEARCH FORUMS
FREE NEWSLETTER
By signing up you may also receive reader surveys and occasional special offers. We do not sell, rent or trade our email lists. View our Privacy Policy.