SEARCH FINESCALE.COM

Enter keywords or a search phrase below:

FSM New Years Resolution — Build More Models GB

18786 views
374 replies
1 rating 2 rating 3 rating 4 rating 5 rating
  • Member since
    April 2010
Posted by Theuns on Sunday, January 22, 2017 9:10 AM
Two weeks and a day after I cut first parts off the sprue here it is.
Image

Image

Image

note the oil pooling in the pannel line from a leaky oil ring on the right hand bank :wink: 
Image

Image

Theuns


  • Member since
    November 2003
  • From: Naples, FL
Posted by tempestjohnny on Sunday, January 22, 2017 2:26 AM

Bish excellent finish on the shuttle. Base is just right

Steve the first plane coming off the deck makes the whole thing look alive


  • Member since
    December 2002
  • From: Bury St Edmunds, Suffolk, England
Posted by Bish on Sunday, January 22, 2017 1:11 AM

Theuns, thanks. Doesn't take much for me to hear the Imperial march Big Smile

Cheers Jack. For the base i was just thinking of the hanger on the Death Star, but your right about how it helps the kit stand out.

I am a Norfolk man and i glory in being so


On the bench: Airfix 1/72nd Harrier GR.3/Fujimi 1/72nd Ju 87D-3

  • Member since
    December 2002
  • From: Bury St Edmunds, Suffolk, England
Posted by Bish on Sunday, January 22, 2017 1:06 AM

Steve, another really nice water build, and can't believe you have done this in 3 weeks. And great job on the Hornet. Had not realised it would be camoflaged like that. Really nice display all round.

I am a Norfolk man and i glory in being so


On the bench: Airfix 1/72nd Harrier GR.3/Fujimi 1/72nd Ju 87D-3

  • Member since
    December 2002
  • From: Bury St Edmunds, Suffolk, England
Posted by Bish on Sunday, January 22, 2017 1:03 AM

Thanks bad. Thats a lot of blue there. Be nice to see all that come together.

I am a Norfolk man and i glory in being so


On the bench: Airfix 1/72nd Harrier GR.3/Fujimi 1/72nd Ju 87D-3

  • Member since
    April 2006
  • From: ON, Canada
Posted by jgeratic on Sunday, January 22, 2017 12:40 AM

Hi Bish, great job with the shuttle, and good call with a dark base - helps pick out the intersting lines of the subject. Yes

regards,

Jack

  • Member since
    April 2010
Posted by Theuns on Saturday, January 21, 2017 11:44 PM

"Fantastic ,that shuttle looks hmm"

I can just about hear the dark march that playd when the emperor gets off the ramp to inspect his Imperial gaurd in their red uniforms :-)


The water on that carrier build it just so cool!


Theuns

  • Member since
    July 2014
Posted by modelcrazy on Saturday, January 21, 2017 10:58 PM
I’m almost done. I need to finish the small boats, add some rigging and weather the hull a little more. The base also need a little more work. You can see the milky acrylic varnish drying. I will add just a little more cotton to areas like the wake to show churn and foam on the surface.


As soon as I get the crew I’ll add them to the deck servicing and launching the bombers and standing along the sides watching this historical event.
Steve

Steve

Building a kit from your stash is like cutting a head off a Hydra, two more take it's place.


http://www.spamodeler.com/forum/

  • Member since
    April 2011
  • From: Silver Spring, MD
Posted by badlanguage on Saturday, January 21, 2017 10:49 PM

I love the shuttle, Bish. I remember building that one back in the day when I was a kid!

I put a couple coats of dark blue on some of the Dom parts:


  • Member since
    December 2002
  • From: Bury St Edmunds, Suffolk, England
Posted by Bish on Saturday, January 21, 2017 6:50 PM

Thanks buddy.

I am a Norfolk man and i glory in being so


On the bench: Airfix 1/72nd Harrier GR.3/Fujimi 1/72nd Ju 87D-3

  • Member since
    November 2010
  • From: Florida-West Central
Posted by Eagle90 on Saturday, January 21, 2017 6:32 PM

Bish...brilliant!  Simply brilliant!  Love it!  You are a credit to the Empire.  LOL!  Great base too!


Bobby


  • Member since
    December 2002
  • From: Bury St Edmunds, Suffolk, England
Posted by Bish on Saturday, January 21, 2017 6:20 PM

Thanks guys.

Well John, you never know, its been a while since we saw one in a movie.

Steve, he is a bit over shadowed by my other one, but i like him.

I am a Norfolk man and i glory in being so


On the bench: Airfix 1/72nd Harrier GR.3/Fujimi 1/72nd Ju 87D-3

  • Member since
    July 2014
Posted by modelcrazy on Saturday, January 21, 2017 5:50 PM

Looks great Bish! And I love your Darth.

Steve

Building a kit from your stash is like cutting a head off a Hydra, two more take it's place.


http://www.spamodeler.com/forum/

  • Member since
    December 2002
  • From: Northern California
Posted by jeaton01 on Saturday, January 21, 2017 4:46 PM

Bish, maybe we will see your shuttle in the next movie, eh?  Well done!

John

To see build logs for my models:  http://goldeneramodel.com/mymodels/mymodels.html


  • Member since
    August 2014
  • From: Willamette Valley, Oregon
Posted by goldhammer on Saturday, January 21, 2017 3:30 PM

Nice work folks.

Got all the antennas on the BUFF fuselage, and the horizontal stabs on.  Wings, flaps and pylons are together. Once the wings are on and the main gear doors are on, off to paint.  Engines are together and seams are sanded, as are the tip tanks.  Not going to make the end of month deadline, just too much going on at work, and add in being gone for four days in the next week.Sad

Pics will be up once the wings are on.

  • Member since
    December 2002
  • From: Bury St Edmunds, Suffolk, England
Posted by Bish on Saturday, January 21, 2017 3:23 PM

I am calling the shuttle done. After the re-paint, i added some flry wash and then went over that with a thinner coat of the base colour to give a bit of a grubby finish. Some of the panels were done in a slightly differant shade of greay then the whole thing was finished with a couple of coats of Alclad Light Sheen. This has brought out some of the colours and i really like the look.

I also removed the canopy and sanded down the front edge. It was sticking up quite a bit. Its still not perfect but better than it was.

The last thing was to finish off Darth himself, and the figure really shows how big the shuttle is, even thoguh darth would have to duck to get under the front.

So here she is.

Looking forward to seeing the rest of the great work come together over the next week and a bit.

I am a Norfolk man and i glory in being so


On the bench: Airfix 1/72nd Harrier GR.3/Fujimi 1/72nd Ju 87D-3

  • Member since
    November 2010
  • From: Florida-West Central
Posted by Eagle90 on Saturday, January 21, 2017 2:37 PM

Man, there is some spectacular work here.  Awesome work everyone!

Have a couple of progress pics.  Got some paint on the I-16 's.  Doing one in the traditional Dark Green over Light Blue and going to try my hand on a "winter washed" plane!  Wish me luck!

Bobby


  • Member since
    April 2011
  • From: Silver Spring, MD
Posted by badlanguage on Saturday, January 21, 2017 9:35 AM

Nice Spitfire, Theuns. I haven't built a WWII airplane in a long time, but I'm being inspired! Lots of really nice builds on here! In contrast, I've just gotten the dark blue parts of my Dom primed and preshaded. Hope to get the dark blue color on them today!

  " alt="" />


There are just a lot of parts in this kit, but once they're all painted the thing will go together pretty quickly. That's the hope, at least.

  • Member since
    April 2010
Posted by Theuns on Friday, January 20, 2017 10:59 PM

Getting the engine to fit was really an issue, It had the wrong upwards angle when mated to the firewall, this had the effect that the side cowls had a gap between the top and bottom cowls at the front.

Eventually with enough cyno and force I got this sorted out but I can still not get all of the cowls to fit correctly at the same time, my P-51 had the same issues.


My plan was to leave off the one side and bottom anyway so i can live with that. Sofar this is the second "issue" I had with the kit but overall a very pleasant build.

I started exactly 2 weeks ago and I plan to complete it this weekend :-)


Theuns

  • Member since
    April 2006
  • From: ON, Canada
Posted by jgeratic on Friday, January 20, 2017 10:17 PM

Hi John, thanks, and excellent work on yours - looks to be a fine example of the Meteor. Yes  I like the the splash of yellow on the tail.

regards,

Jack

  • Member since
    December 2002
  • From: Bury St Edmunds, Suffolk, England
Posted by Bish on Friday, January 20, 2017 6:34 PM

Great work there John, she's looking really nice.

I am a Norfolk man and i glory in being so


On the bench: Airfix 1/72nd Harrier GR.3/Fujimi 1/72nd Ju 87D-3

  • Member since
    December 2002
  • From: Northern California
Posted by jeaton01 on Friday, January 20, 2017 6:21 PM

Jack, the 109 is going to be exceptional as always from you.

After several days of applying decals (I didn't count but it was well north of 100) I think I am done with the F.8.  I always find things to touch up after the pictures are taken, like the scratches on the drop tank pylon.  At this point it is called weathering.   This was a fun kit to work with.   There were a few minor issues that just seem odd considering the overall quality.  The ejection seat sat up too high, the mounting lugs were trimmed a little to fix that.   The seat was not permanently installed until the masking was removed after the final matte clear coat (Alclad Matte Clear) as that made it easier to mask the cockpit opening.  The nose gear door would not fit until I trimmed back the mounting lug on the strut and opened up more of the nose gear bay in front of the strut.  The nose was attached for painting with UV glue and then after painting the nose was popped off and the nose gear strut assembly was added and the nose reattached permanently.  This was done to avoid the potential breakage of the strut during handling.  The model sits a little more nose low than I thought it would, but many pictures of Meteor F.8's show this posture.  The wing tip position lights were represented as scribed marks.  They were cut out and white glue was applied to simulate clear lenses.


John

To see build logs for my models:  http://goldeneramodel.com/mymodels/mymodels.html


  • Member since
    December 2002
  • From: Bury St Edmunds, Suffolk, England
Posted by Bish on Thursday, January 19, 2017 11:54 PM

Thanks Jack. Its just about done now, just sitting in the shed drying after a clear coat last night. Just got the base and vader figure to finish off.

Nice work there, looking forward to seeing how you do the moving prop. I have never done that either and want to do one on the floatplane later this year.

I am a Norfolk man and i glory in being so


On the bench: Airfix 1/72nd Harrier GR.3/Fujimi 1/72nd Ju 87D-3

  • Member since
    April 2006
  • From: ON, Canada
Posted by jgeratic on Thursday, January 19, 2017 11:50 PM

Bish

Jack, greats posts as always and again great attention to detail.


Hi Bish, thanks.  Look forward to more of your shuttle work - I like the slight staining of the main colour you have got going on there.

--------------------------

Construction of the 109F-1 is pretty much done.  Wheels, exhaust and prop nose will be painted separately before final assembly.

The kit had no gunsight nor balance arms for the ailerons, so those were scratchbuilt.  I've filled the holes in were the prop blades would sit in the nose.  Trying this method for the first time, as the build will be an inflight pose.

regards,

Jack


  • Member since
    November 2003
  • From: Naples, FL
Posted by tempestjohnny on Thursday, January 19, 2017 4:40 AM

Steve you are truly the master of water. Bish nice save on the shuttle. Bobby the I-16 twins are coming along nicely. BD now that's a paint job. John great Meteor.  Theuns really like the desert scheme. Scott you've really done justice to the old kit. Dave good start


  • Member since
    April 2010
Posted by Theuns on Wednesday, January 18, 2017 10:11 PM

Dang that water looks so cool, I have never tried it , but oneday I will have a go LOL


Theuns

  • Member since
    December 2002
  • From: Bury St Edmunds, Suffolk, England
Posted by Bish on Wednesday, January 18, 2017 3:23 PM

Theuns

Funniest movie he ever made was "Clockwize" where he is a school head master...can just see it now LOL

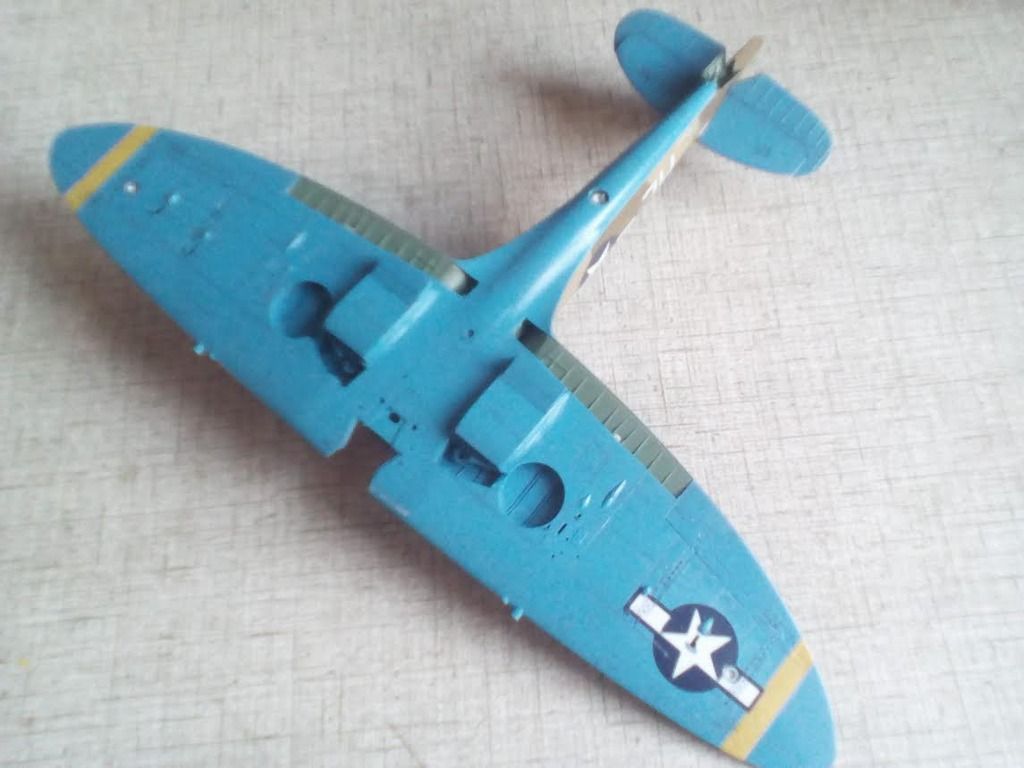
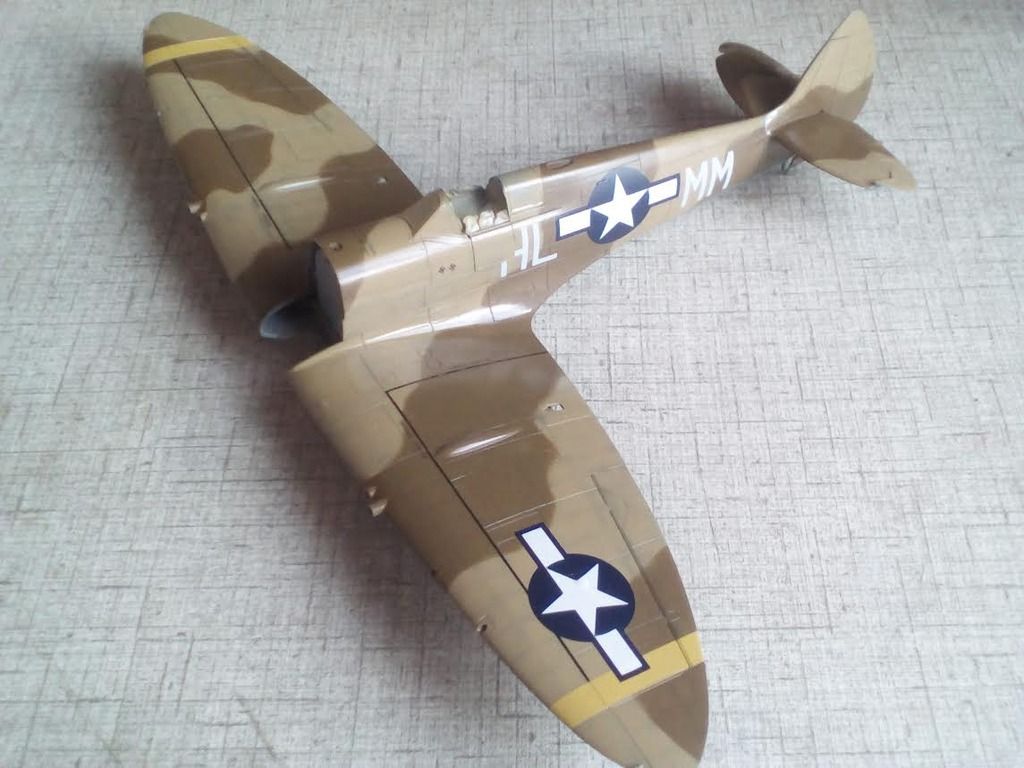
As for the decals, I used tamiya thin cement applied CAREFULLY to the stencles and the walkways to desolve the carrierfilm. It was risky but I think after this and an application of microsol it will be OK I hope.


Theuns


I like that but its not my favorite. I do like his Centurion in Life of Brian.

Thats looking really nice, didn't realise you were doing a US version. Nice job.

I am a Norfolk man and i glory in being so


On the bench: Airfix 1/72nd Harrier GR.3/Fujimi 1/72nd Ju 87D-3

  • Member since
    December 2002
  • From: Bury St Edmunds, Suffolk, England
Posted by Bish on Wednesday, January 18, 2017 3:20 PM

Looking really nice there BD, great job on the paint work and those decals look to have gone down really well.

I am a Norfolk man and i glory in being so


On the bench: Airfix 1/72nd Harrier GR.3/Fujimi 1/72nd Ju 87D-3

  • Member since
    January 2015
Posted by BrandonD on Wednesday, January 18, 2017 3:07 PM

Just a small update on the 1/48 Hobbycraft French Hawk 75 – decals and panel line wash are on.

-BD-

  • Member since
    December 2002
  • From: Bury St Edmunds, Suffolk, England
Posted by Bish on Wednesday, January 18, 2017 2:51 PM

Great info Steve, thanks. I am planning to do a 72nd Ar 196 on the ocean for the float plane GB, so i'll be picking your brains Wink

I am a Norfolk man and i glory in being so


On the bench: Airfix 1/72nd Harrier GR.3/Fujimi 1/72nd Ju 87D-3

JOIN OUR COMMUNITY!

Our community is FREE to join. To participate you must either login or register for an account.

SEARCH FORUMS
FREE NEWSLETTER
By signing up you may also receive reader surveys and occasional special offers. We do not sell, rent or trade our email lists. View our Privacy Policy.