SEARCH FINESCALE.COM

Enter keywords or a search phrase below:

British Army Group Build 2020

61477 views
1206 replies
1 rating 2 rating 3 rating 4 rating 5 rating
  • Member since
    November 2009
  • From: SW Virginia
Posted by Gamera on Monday, February 3, 2020 7:10 AM

Ouch Ziggy, looking at those it gives me a headache... Great job! 

"I dream in fire but work in clay." -Arthur Machen


  • Member since
    March 2019
  • From: Post Falls, Idaho
Posted by Sigep Ziggy on Monday, February 3, 2020 6:52 AM

Bish your Landy build is impressive, great job!

Theuns, I love the wood on your Camel, another great job!

All the builds so far are amazing, everyone should be proud of their builds.

I have been adding details to the cockpit and created a compass, more to follow.

your shipmate,

Ziggy


  • Member since
    December 2002
  • From: Northern California
Posted by jeaton01 on Sunday, February 2, 2020 6:40 PM

Martin, that looks like a repurposed bread truck!  Nice work.


The camel looks real good too.  I can see the extra effort going in to it.

John

To see build logs for my models:  http://goldeneramodel.com/mymodels/mymodels.html


  • Member since
    December 2002
  • From: Bury St Edmunds, Suffolk, England
Posted by Bish on Sunday, February 2, 2020 3:22 PM

Cheers mate.

I am a Norfolk man and i glory in being so


On the bench: Airfix 1/72nd Harrier GR.3/Fujimi 1/72nd Ju 87D-3

  • Member since
    November 2009
  • From: SW Virginia
Posted by Gamera on Sunday, February 2, 2020 3:06 PM

Oh wow guys! Those look great!

Theuns: Great job with the paint, I too love the wood effect.

Bish: Nice work, love the crew's kit and the dust on the seats.

"I dream in fire but work in clay." -Arthur Machen


  • Member since
    December 2002
  • From: Bury St Edmunds, Suffolk, England
Posted by Bish on Sunday, February 2, 2020 2:23 PM

I have worked with pl;enty of resin AM parts and built 2 resin engines. You just have to take thing slower and check everything. I have some 72nd resin aircraft kits, i will get to one of those soon.

I am a Norfolk man and i glory in being so


On the bench: Airfix 1/72nd Harrier GR.3/Fujimi 1/72nd Ju 87D-3

  • Member since
    April 2015
Posted by Mopar Madness on Sunday, February 2, 2020 1:31 PM

Oh I see now.  I've never worked with a resin kit before. I just can't muster the courage!

Chad

God, Family, Models...

At the plate: 1/48 Airfix Bf109 & 1/35 Tamiya Famo

On deck: Who knows!

  • Member since
    December 2002
  • From: Bury St Edmunds, Suffolk, England
Posted by Bish on Sunday, February 2, 2020 12:14 PM

Thanks Theuns. Thats looking very nice, love the wood effect.

I am a Norfolk man and i glory in being so


On the bench: Airfix 1/72nd Harrier GR.3/Fujimi 1/72nd Ju 87D-3

  • Member since
    December 2002
  • From: Bury St Edmunds, Suffolk, England
Posted by Bish on Sunday, February 2, 2020 12:13 PM

Thats what the steering wheel attaches to, i just had not fitted it in that pic, it did get attached before i put it together but you can't see it in the last 3 pics.

From what i can see, they have not missed anything out. It doies include a very nice engine. I didn't fit it as its a bit of a squeeze and as you can't see it, i didn't see the point. But its all there. Would be a nice scene with the bonnet raised.

I am a Norfolk man and i glory in being so


On the bench: Airfix 1/72nd Harrier GR.3/Fujimi 1/72nd Ju 87D-3

  • Member since
    April 2015
Posted by Mopar Madness on Sunday, February 2, 2020 10:59 AM

Bish, is that control stick in front of the instrument panel the steering mechanism?  I've never seen anything like that before. So much detail! 

Chad

God, Family, Models...

At the plate: 1/48 Airfix Bf109 & 1/35 Tamiya Famo

On deck: Who knows!

  • Member since
    April 2010
Posted by Theuns on Sunday, February 2, 2020 10:33 AM

That is a cool looking Landy :-)


I got the basic scheme on the camel, this is one of those where one can do a top colour from almost chocolate brown to olive green and it will be right.

I took the green a little arround the bottom edges of the tail , fuse and wings to look like the tapes that would have been doped on all the joints. The SE5 in our local meusum has it the same.

 IMG_20200201_095625 by Theunis van Vuuren, on Flickr

 IMG_20200202_063117 by Theunis van Vuuren, on Flickr


Theuns

  • Member since
    December 2002
  • From: Bury St Edmunds, Suffolk, England
Posted by Bish on Sunday, February 2, 2020 9:51 AM

Finally got a chance to get in an update. Been a bit of a struggle with parts fit, buts its getting there.

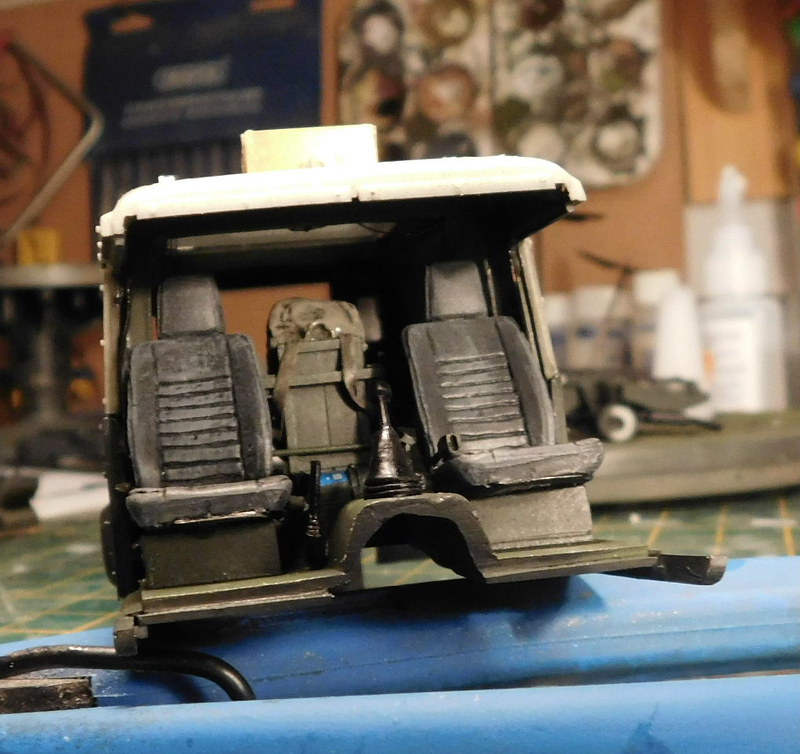
Got the insids painted with some light wear. The instructions say to paint NATO green, but from my memory and pics i could find, these were darker than that. On the Airfix forum in an old thread about British Army colours, some one claimed that vehicles in Ireland were painted darker to distinguish ones used for internal security duties from conventional warfare. Not sure if this is true, but they were certainly darker. I made my own mix useing Tamiya's NATO green, Dark Green and a touch of NATO black. Seems pretty good to my eye. I addd some wear to the flor, mainly where the top cover would stand as well as in the front foot wells.

The upper body was also painted and just got a light dry brush.
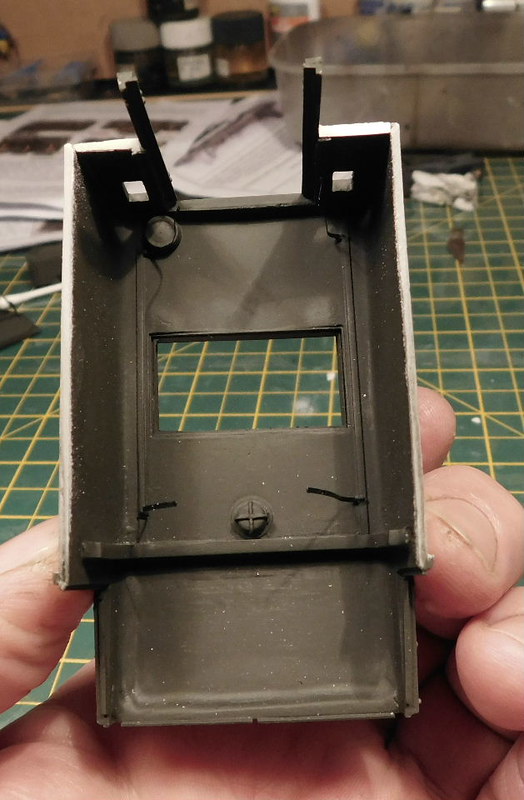
Then the seats and belts were fitted. I also added a bergan on the ECM frame. Someone on Britmodeller mentioned that they used to put there ECM in vehicles like this and that remindd me that we did as well. easier than trying to scratch a bit of kit. Also addd a set of rocket pouches. I went for the early 90's single colour packs rather than the DPM ones introduced later. I added some wire from the ECM pack which will be run up to the roof. This shows the colour much better than the previous pic.

I then got the roof on being careful not to completly fill in the join.

And the front of the cab with decals added.
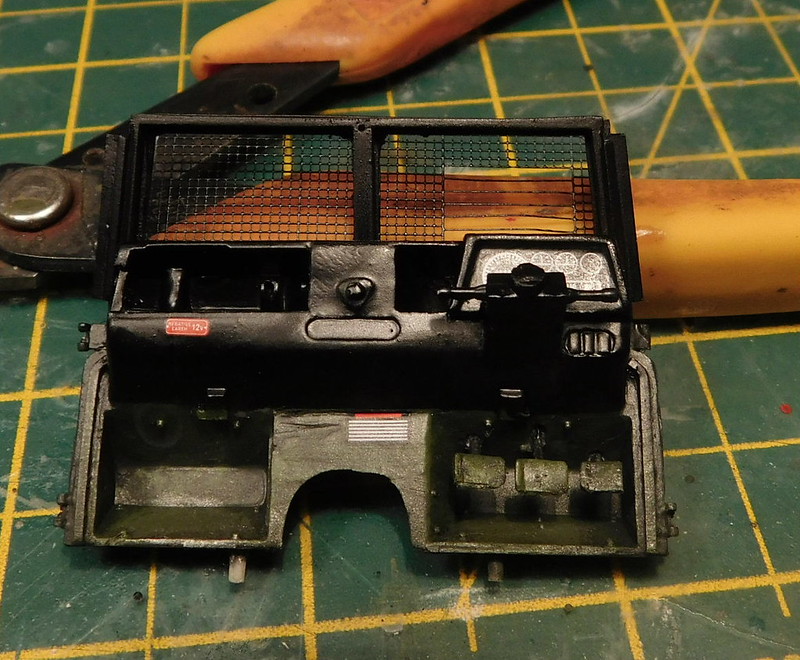
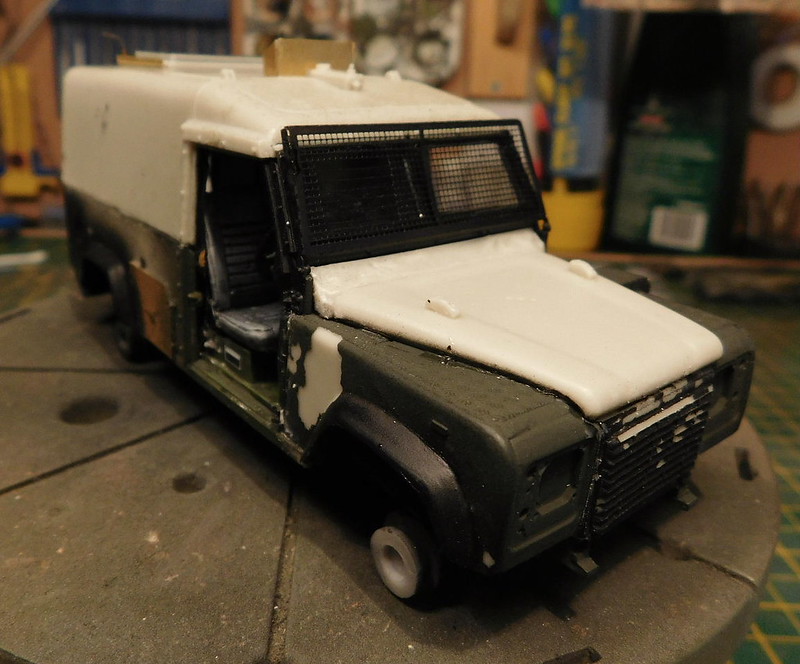
With all that, the body was fitted to the chassis, followed the the forward bulkhead, after front wind screns were added, and then the front of the body. Fit was tight, had to do some sanding, bending and clamping, but it got there.
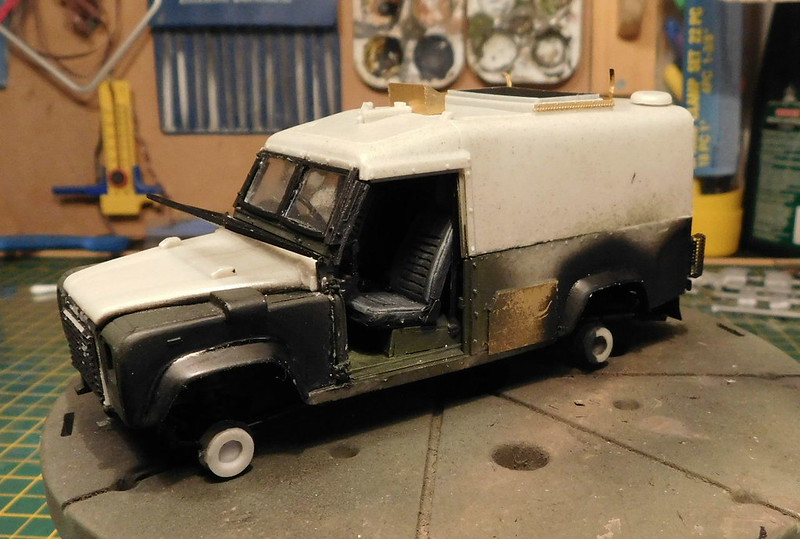
Got a bit of clean up to do before masking and painting.

I am a Norfolk man and i glory in being so
 

On the bench: Airfix 1/72nd Harrier GR.3/Fujimi 1/72nd Ju 87D-3

  • Member since
    December 2002
  • From: Northern California
Posted by jeaton01 on Saturday, February 1, 2020 11:31 AM

Thanks, everyone!

John

To see build logs for my models:  http://goldeneramodel.com/mymodels/mymodels.html


  • Member since
    December 2002
  • From: Bury St Edmunds, Suffolk, England
Posted by Bish on Saturday, February 1, 2020 9:40 AM

Thats a lovely bild there John, thank you for shareing that here. I will get it added to the front page.

Great line up of gliders.

I am a Norfolk man and i glory in being so

 

On the bench: Airfix 1/72nd Harrier GR.3/Fujimi 1/72nd Ju 87D-3

  • Member since
    April 2015
Posted by Mopar Madness on Friday, January 31, 2020 4:01 PM

Well done John!

Chad

God, Family, Models...

At the plate: 1/48 Airfix Bf109 & 1/35 Tamiya Famo

On deck: Who knows!

  • Member since
    April 2006
  • From: ON, Canada
Posted by jgeratic on Friday, January 31, 2020 10:50 AM

Hello John, that Horsa looks right on, excellent work! Yes


regards,

Jack

  • Member since
    November 2009
  • From: SW Virginia
Posted by Gamera on Friday, January 31, 2020 8:57 AM

Jeaton: She looks friggin' perfect from here. If you hadn't said so I'd had idea that you'd had such issues with the decals. And those balances on the aileron etc, I'd have broken them off and lost them about a dozen times each. 

"I dream in fire but work in clay." -Arthur Machen


  • Member since
    March 2019
  • From: Post Falls, Idaho
Posted by Sigep Ziggy on Friday, January 31, 2020 6:40 AM

John, great job on the Sioux!

Chad, your build is amazing!

John, great photos of your other builds with your glider.

Well done guys! It will motivate me to keep going on my D.H. 2.

your shipmate,

Ziggy


  • Member since
    April 2003
  • From: USA
Posted by keavdog on Friday, January 31, 2020 1:24 AM

Turned out great John.  Details make it pop.  I like the collection pics, great for scale comparison and really cool to see and the invasion stripes.  

Thanks,

John

  • Member since
    December 2002
  • From: Northern California
Posted by jeaton01 on Friday, January 31, 2020 12:57 AM

I think it's done.  I didn't put all the antennas on it that Italeri called for as I couldn't find any pictures of operational Horsas that had any more than the pitot mast and venturi on top.  Hope you can see the tiny venturi, I'm real proud I got it on there.  You'll also have to look pretty close to see the two wires that hold up the ramp, but they are there and reasonably tight.  I drilled some holes and bent some fine wire to attach the ramp to the fuselage.  The rudder counterbalance is .032 wire with a drop of white glue on the end.  I put the aileron mass balances on opposite to the instructions.  No where in nature or aviation will you find an aileron that needs additional aft weight, you need it forward to prevent flutter.

I don't think I mentioned much about the decal process, but the out of 3 sets of Italeri and or Testors decals, I was able use the tail markings and the lower wing roundels.  Everything else on every sheet literally shredded to slivers when it loosened from the paper.  So the upper roundels are from the spares bin and the side roundels I made with a laser printer, as I had already painted on white backgrounds there because of the black undercoat.  I also made the serial numbers and ended up with some silvering there.  Way under the tail and only seen in the proper light which I will not be providing save in a couple of these photos.


http://goldeneramodel.com/mymodels/gliders/horsa/1horsa/0161horsa.jpg


With a General Aircraft Hotspur from the old airlines kit


With a D-Day C-53 and CG-4A.


And with the Messerschmitt 321.

John

To see build logs for my models:  http://goldeneramodel.com/mymodels/mymodels.html


  • Member since
    December 2002
  • From: Bury St Edmunds, Suffolk, England
Posted by Bish on Thursday, January 30, 2020 1:46 PM

Loving that with the decals on John, can't be far from done.

I am a Norfolk man and i glory in being so


On the bench: Airfix 1/72nd Harrier GR.3/Fujimi 1/72nd Ju 87D-3

  • Member since
    November 2009
  • From: SW Virginia
Posted by Gamera on Thursday, January 30, 2020 11:16 AM

That looks great Jeaton- so close- almost there! 

"I dream in fire but work in clay." -Arthur Machen


  • Member since
    June 2014
Posted by BrandonK on Thursday, January 30, 2020 9:37 AM

Chad and John, you both built some mighty fine looking kits. And fast too. Well done!!

BK

On the bench:

A lot !! And I mean A LOT!!

2024 Kits on deck / in process / completed   

                         14 / 5 / 2  

                              Tongue Tied

  • Member since
    July 2004
  • From: Sonora Desert
Posted by stikpusher on Wednesday, January 29, 2020 10:05 PM

Chad, your Saladin  looks excellent! That came out perfect.

John, the H-13/AH.1 is a beauty as well!

John, I can’t wait to see that Horsa finished. 


F is for FIRE, That burns down the whole town!

U is for URANIUM... BOMBS!

N is for NO SURVIVORS...

       - Plankton

LSM


  • Member since
    April 2015
Posted by Mopar Madness on Wednesday, January 29, 2020 8:17 PM

Wow John! Looks like you can see the finish line.

Chad

God, Family, Models...

At the plate: 1/48 Airfix Bf109 & 1/35 Tamiya Famo

On deck: Who knows!

  • Member since
    December 2002
  • From: Northern California
Posted by jeaton01 on Wednesday, January 29, 2020 7:50 PM

Wings are looking much better, Theuns.

Got the decals on the Horsa,  Now I have to start putting on all those little bits that will get broken off right away.


http://goldeneramodel.com/mymodels/gliders/horsa/1horsa/0141horsa.jpg


http://goldeneramodel.com/mymodels/gliders/horsa/1horsa/0151horsa.jpg

John

To see build logs for my models:  http://goldeneramodel.com/mymodels/mymodels.html


  • Member since
    November 2009
  • From: SW Virginia
Posted by Gamera on Monday, January 27, 2020 7:31 PM

Theuns: Yeah, that looks good!!

"I dream in fire but work in clay." -Arthur Machen


  • Member since
    December 2002
  • From: Bury St Edmunds, Suffolk, England
Posted by Bish on Monday, January 27, 2020 1:39 PM

Looks nice Theuns, i think you have pulled that effect off nicely.

I am a Norfolk man and i glory in being so


On the bench: Airfix 1/72nd Harrier GR.3/Fujimi 1/72nd Ju 87D-3

  • Member since
    April 2010
Posted by Theuns on Monday, January 27, 2020 4:24 AM

Here are a few pix og my revell/aurora cammel. The moldongs are quite chunky and lack detail. The rib detail however was way overdone so I sanded it down a little.

 IMG_20200120_081546 by Theunis van Vuuren, on Flickr

 IMG_20200127_071311 by Theunis van Vuuren, on Flickr

To try simulate the clear doped linnen on the bottom I first sprayed the bottom with tamiy tan and then masked toe tapes.

Then mixed some hu 93 into some of the tan to give it a little more dark tone.

The effect works well I think.

 IMG_20200127_102052 by Theunis van Vuuren, on Flickr

 IMG_20200127_115959 by Theunis van Vuuren, on Flickr


This is all paint practice for my WNW SE5 I will still do oneday LOL


Theuns

  • Member since
    November 2009
  • From: SW Virginia
Posted by Gamera on Sunday, January 26, 2020 6:28 PM

Chad: Whoa!!! That's beautiful! Love the shading and the slight dust without too much! Love her! Heart

Keavdog: Wow!!! Beautiful work there too! All the delicate parts in the tail spar and the skids came out perfect!!!

"I dream in fire but work in clay." -Arthur Machen


JOIN OUR COMMUNITY!

Our community is FREE to join. To participate you must either login or register for an account.

SEARCH FORUMS
FREE NEWSLETTER
By signing up you may also receive reader surveys and occasional special offers. We do not sell, rent or trade our email lists. View our Privacy Policy.