SEARCH FINESCALE.COM

Enter keywords or a search phrase below:

The Weekend Madness GB.

15060 views
305 replies
1 rating 2 rating 3 rating 4 rating 5 rating
  • Member since
    November 2008
  • From: Hatboro, PA
Posted by Justinryan215 on Saturday, November 28, 2020 3:28 PM

Eagle....That thing is GORGEOUS!

I completed the Eduard X-1 earlier this year, to display in conjunction with my Revell B29..javent started that big boy yet (I am searching for drawing/pictures/whatever I can find to modify the Superfort to Mothership status)...I love the X Planes!

-------------

Here is one last photo of my wildcat as it went into the food dehydrator for a light bake at 95 (or so)degrees to dry the Tamiya primer for seam repairs....

...and now the primer has been sanded and airframe smoothed, and sprayed in Army Painter Satin Black as the base for the paint to come...

Now this will sit in the dehydrator for an hour or so at 105 degrees to dry, and I will start the paint job!

"...failure to do anything because someone else can do better makes us rather dull and lazy..."

Mortal as I am,I know that I am born for a day.  But when I follow at my pleasure the serried multitude of the stars in their circular course, my feet no longer touch the Earth...


  • Member since
    December 2016
Posted by dwsrazor on Saturday, November 28, 2020 3:27 PM

That X-15 is looking pretty sweet Eagle!  Ryan looking forward to your F4F and for everyone else your work has been spectacular for the given time frame and I'm looking forward to going through these pages more thouroughly in the coming days.

Here is where I am at after this mornings decal session.  One of my commitments this evening fell through so I will have lots of time to finish her up before the deadline.

  • Member since
    November 2010
  • From: Florida-West Central
Posted by Eagle90 on Saturday, November 28, 2020 2:41 PM

Great work everyone!  Loving the builds!

I should be done shortly.  Letting the decals dry, then a couple of hits with some Micro Sol.  One more coat of clear and she will be done.  Hoping to get it done tonight, but I've got until 0715 tomorrow.  LOL!  Enjoy!


  • Member since
    November 2008
  • From: Hatboro, PA
Posted by Justinryan215 on Saturday, November 28, 2020 2:29 PM

huge photo dump here from me on my first post...my computer was being a phallus and hasnt let me get on to post pics....

I started around sven this morning, EST.

and decided on the Airfix 1/72 scale F4F Wildcat!

As suspected, I started with the 'pit:

I primed in black, looking to develop natural shadows, but I feel like all it did was darken my Chromate Green....


built up the landing gear mechanics and attached them to the cockpit ub and then into the fuselage:

Here is where I stand at 3:30 pm:


my goal for today is to get the main assembly complete and get it primed and hopefully painted so that tomorrowI can do decaling and weathering...


"...failure to do anything because someone else can do better makes us rather dull and lazy..."

Mortal as I am,I know that I am born for a day.  But when I follow at my pleasure the serried multitude of the stars in their circular course, my feet no longer touch the Earth...


  • Member since
    July 2014
Posted by modelcrazy on Saturday, November 28, 2020 2:11 PM

Sweet looking Yak BK

Well the tracks out bested me. Epic fail. There is no way I will be able to finish before I go to work tonight 

I'll look through the stash and see if I can find something else. I'll just have to see when the next window is. 

I have several 1/72 tanks but I may do an AC

Steve

Building a kit from your stash is like cutting a head off a Hydra, two more take it's place.


http://www.spamodeler.com/forum/

  • Member since
    July 2006
  • From: San Francisco Bay Area
Posted by bufflehead on Saturday, November 28, 2020 1:38 PM

Thanks for the kind words Lewbud!  I wish both my work desk AND my model bench looked that clean!!

Nearly 28 hours in and the T-70 has paint on it! 

First, a pic with all the parts primed and ready.  I assembled the tracks/wheels as one unit so it could be removed to facilitate painting, same with the muffler assy:

Some preshading using the black/white method:

For the main color I mixed approximately 40/40/10  Tamiya Flat Acrylics (Field Gray, Olive Green, Cockpit Green).

When using the black/white preshade technique I've learned to allow the preshading to be more pronounced as the subsequent gloss/flat coats will tone it down dramatically.

The goal for the end of day is to have all the painting done, gloss coated and apply the few decals.  That will leave tomorrow morning (8 AM end time) for just a flat coat.  BUT, I may get that all done today.


Ernest

Last Armor Build - 1/35 Dragon M-26A1, 1/35 Emhar Mk.IV Female


Last Aircraft Builds - Hobby Boss 1/72 F4F Wildcat & FW-190A8


  • Member since
    January 2015
Posted by TheMongoose on Saturday, November 28, 2020 10:39 AM

Glad I haven't started yet as this gives me time to ogle these builds! That Yak is sweet. Bold move you guys doing tank tracks!

In the pattern: Scale Shipyard's 1/48 Balao Class Sub! leaning out the list...NOT! Ha, added to it again - Viper MkVii, 1/32 THUD & F-15J plus a weekend madness build!

  • Member since
    June 2008
Posted by lewbud on Saturday, November 28, 2020 9:54 AM

Steve,

The Elefant is looking great!  Looking forward to more.

Ernest,

The T-70 is outstanding!  I really like the grille work you did.

Razor,

The Jack looks great!  She's coming along nicely.  Enjoy your grandkids.

TJ,

Looking forward to your build.  What kit are you building?

Brandon,

Congratulations on finishing the Yak!  Looking forward to your armor car.

Started my build at around 0900. One of the good things about my new job is that I get to work from home for now.  One of the bad things is that I didn't have a dedicated computer desk for my work computer, so I had to convert my work table into a desk.  I now have a computer desk and one of the benefits of that is that I now have a totally clean work table again.  Here is a picture.

Proof of unstartedness on the Mustang.

To make things a little more interesting, I'm adding the two Corsairs from the Korean War group build.  I figured since they'd be using the same colors as the Mustang, I'd give the threesome a shot.

Will post pics when there is something picworthy.  Looking forward to more of you guys' builds.


Buddy- Those who say there are no stupid questions have never worked in customer service.

  • Member since
    January 2015
Posted by BrandonD on Saturday, November 28, 2020 4:44 AM

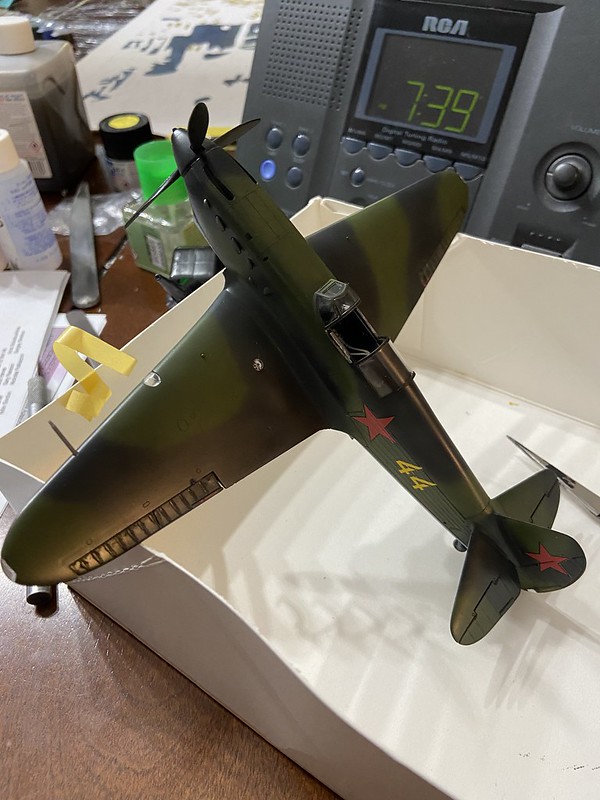
Ok, it's 2:30 a.m. and this one is done. I began at 11:30 a.m. on Thanksgiving, so that puts me at 39 hours from start to finish. Once again this is the Accurate Miniatures Yak-1 flown by Lilya Litvyak, a Soviet female ace who went missing during the war, and was presumed dead, though there's some speculation she survived and lived the rest of her life peacefully in Switzerland, having escaped the Soviet regime when she became disenfranchised with it.

Probably not, but it makes a good story, and I hope she did.

Anyway, the only aftermarket was a Sutton harness I stole out of an Eduard Spitfire Mk.I.

Untitled

Untitled

Untitled

Untitled

Untitled

Untitled

Thanks for hosting the group build, Lewbud, and I plan on coming back for some more with my armored car, still.

Good luck to all the great builds going on, and still to come It's a blast.

-BD-

  • Member since
    November 2003
  • From: Naples, FL
Posted by tempestjohnny on Saturday, November 28, 2020 3:52 AM
These are looking good guys. I'm going to try and start my little J-21 tonight. Being a mail carrier this has been a crazy weekend so far.


  • Member since
    December 2016
Posted by dwsrazor on Saturday, November 28, 2020 2:44 AM

Man there are some really nice builds going on here.  When I have more time I will have a better look.

Eagle, Thanks for sharing your Raiden Jack build.  It is a decent kit and a very interesting aircraft given the larger engine and wider body.

I am about 28+ hours into the build and should have been able to cruise to the finish from here but my day is filling up tomorrow.  My daughter gave birth to Identical twin girls a couple weeks ago so I have grandpa duty for a few hours tomorrow morning.  I should have enough time to put the decals on in the morning before I go and should have an hour or two before my 8pm deadline to glue on the landing gear and prop and pick out some paint details.  Here is where I am at tonight.


Good luck everyone.  Keep at it!

  • Member since
    July 2006
  • From: San Francisco Bay Area
Posted by bufflehead on Saturday, November 28, 2020 2:32 AM

Steve, you're a brave man to do zimmerit on a 1/72 scale tank!!  I'm liking the Elephant....I may have to get one of those kits!

Midnight in Cali and assembly on the MiniArt T-70M is done!  All the assorted tools and stuff will be installed later.

Last step today is primer.   I used Mr. Surfacer 1500 Blk.

Tomorrow will be all about painting!

Ernest

Last Armor Build - 1/35 Dragon M-26A1, 1/35 Emhar Mk.IV Female


Last Aircraft Builds - Hobby Boss 1/72 F4F Wildcat & FW-190A8


  • Member since
    July 2014
Posted by modelcrazy on Saturday, November 28, 2020 1:01 AM

Ok here's the pics. So far I'm not supper happy with the Zim, I didn't give the filler enough time to dry Sad But Oh well. 

Tomorrow I add the rest of the camo and  start on the treads

Steve

Building a kit from your stash is like cutting a head off a Hydra, two more take it's place.


http://www.spamodeler.com/forum/

  • Member since
    June 2008
Posted by lewbud on Friday, November 27, 2020 10:37 PM

BrandonD

I'm approaching the finish line with this one. I've got the landing gear legs installed, and the reason it's sitting at this awkward angle is because I stupidly put the tailwheel in with liquid cement instead of super glue, and that's the angle it needs to dry at. I'll hit the joint with super glue later tonight to finish it up.

I got the washes done, some light staining on the underside with some oils, and once everything is attached, I'll dirty up the underside a bitmore.

wingtip light lenses, fuel sight gage covers and the rudder light lens are all in place, as well as the landing light in the wing, which fortunately still fit well despite the sanding I had to do on the wing leading edges yesterday.

Looks like I'm on track to finish tonight.
Untitled

-BD-


Brandon,

The Yak is looking good.  Can't wait to see her done.

Buddy- Those who say there are no stupid questions have never worked in customer service.

  • Member since
    June 2008
Posted by lewbud on Friday, November 27, 2020 10:32 PM

Caveman

Done and done.  A little time to spare but can't fiddle with it anymore.  I'll post some better pics. in the morning.


 Done 1 by Tim Bowers, on Flickr

 Done clock by Tim Bowers, on Flickr


Tim,

Great job on the Camaro!  Looking forward to more pics.

Buddy- Those who say there are no stupid questions have never worked in customer service.

  • Member since
    June 2008
Posted by lewbud on Friday, November 27, 2020 10:29 PM

modelcrazy

Wow, you guys are really moving along.

I'm going slow on the Elephant and not sure I'll finish in time but I still have 23 hours. I'm working right now and will get back to it sometime around 9 or 10 tonight. I put some filler on to simulate zimmerit and will place the scratches on it and paint the base yellow. Hopefully I'll get on the camo, tracks and fidely bits.

Pics when I get a chance. 


Steve,

I got faith in you pal.  Looking forward to pics.

Buddy- Those who say there are no stupid questions have never worked in customer service.

  • Member since
    June 2008
Posted by lewbud on Friday, November 27, 2020 10:28 PM

bufflehead

I like the 00 Crusader Tony!  Very nice and kudos on getting it in within the timeline!

Brandon, that's some sweet work on the Yak-1!  I really like the camo pattern!

Caveman, the Camaro is coming along great!  Paint work is fantastic!

8 hrs into my T-70 and its coming along nicely.  I expected the indie track links to slow me down and they did, but I've got a plan and executing it.  So far only one side is done, but now that I know how the first side went together the other side should be a snap!  BTW the kit instructions does not indicate how many links to use...Super Angry

Oh, and I didn't like the plastic engine screens so I took the time to cut away the plastic on the engine deck and cut some PE screens to fit.  I will add the necessary support strips just before primering which should be right before bedtime!


Ernest,

That little tank is looking great!  Nice touch with the screens!

Buddy- Those who say there are no stupid questions have never worked in customer service.

  • Member since
    June 2008
Posted by lewbud on Friday, November 27, 2020 10:23 PM

taxtp

I eventually got the decals to lay down with sme very careful dabbing of liquid cement. It's a high risk approach that I only use when I have to.

I've gone on to weather and finish it with about 2.5 hours to spare.

Cheers

Tony


Congratulations Tony!  She looks great!

Buddy- Those who say there are no stupid questions have never worked in customer service.

  • Member since
    June 2008
Posted by lewbud on Friday, November 27, 2020 10:16 PM

Eagle,

The X-15 is looking good.  Razor is building the Jack, not me.

Buddy- Those who say there are no stupid questions have never worked in customer service.

  • Member since
    January 2015
Posted by BrandonD on Friday, November 27, 2020 10:07 PM

Caveman

Done and done.  A little time to spare but can't fiddle with it anymore.  I'll post some better pics. in the morning.


 Done 1 by Tim Bowers, on Flickr

 Done clock by Tim Bowers, on Flickr


Congrats, dude. Nicely done!

-BD-

  • Member since
    January 2015
Posted by BrandonD on Friday, November 27, 2020 10:06 PM

I'm approaching the finish line with this one. I've got the landing gear legs installed, and the reason it's sitting at this awkward angle is because I stupidly put the tailwheel in with liquid cement instead of super glue, and that's the angle it needs to dry at. I'll hit the joint with super glue later tonight to finish it up.

I got the washes done, some light staining on the underside with some oils, and once everything is attached, I'll dirty up the underside a bitmore.

wingtip light lenses, fuel sight gage covers and the rudder light lens are all in place, as well as the landing light in the wing, which fortunately still fit well despite the sanding I had to do on the wing leading edges yesterday.

Looks like I'm on track to finish tonight.

Untitled

-BD-

  • Member since
    July 2006
  • From: San Francisco Bay Area
Posted by bufflehead on Friday, November 27, 2020 10:02 PM

Congrats on the completion Caveman!! I'm impressed with your speed and skill!  I want to take that Camaro for a spin!!

Toast doing a mini toast to you!

Ernest

Last Armor Build - 1/35 Dragon M-26A1, 1/35 Emhar Mk.IV Female


Last Aircraft Builds - Hobby Boss 1/72 F4F Wildcat & FW-190A8


  • Member since
    March 2008
Posted by Caveman on Friday, November 27, 2020 9:44 PM

Done and done.  A little time to spare but can't fiddle with it anymore.  I'll post some better pics. in the morning.


 Done 1 by Tim Bowers, on Flickr

 Done clock by Tim Bowers, on Flickr

  • Member since
    July 2014
Posted by modelcrazy on Friday, November 27, 2020 8:33 PM

Wow, you guys are really moving along.

I'm going slow on the Elephant and not sure I'll finish in time but I still have 23 hours. I'm working right now and will get back to it sometime around 9 or 10 tonight. I put some filler on to simulate zimmerit and will place the scratches on it and paint the base yellow. Hopefully I'll get on the camo, tracks and fidely bits.

Pics when I get a chance. 

Steve

Building a kit from your stash is like cutting a head off a Hydra, two more take it's place.


http://www.spamodeler.com/forum/

  • Member since
    July 2006
  • From: San Francisco Bay Area
Posted by bufflehead on Friday, November 27, 2020 6:35 PM

I like the 00 Crusader Tony!  Very nice and kudos on getting it in within the timeline!

Brandon, that's some sweet work on the Yak-1!  I really like the camo pattern!

Caveman, the Camaro is coming along great!  Paint work is fantastic!

8 hrs into my T-70 and its coming along nicely.  I expected the indie track links to slow me down and they did, but I've got a plan and executing it.  So far only one side is done, but now that I know how the first side went together the other side should be a snap!  BTW the kit instructions does not indicate how many links to use...Super Angry

Oh, and I didn't like the plastic engine screens so I took the time to cut away the plastic on the engine deck and cut some PE screens to fit.  I will add the necessary support strips just before primering which should be right before bedtime!

Ernest

Last Armor Build - 1/35 Dragon M-26A1, 1/35 Emhar Mk.IV Female


Last Aircraft Builds - Hobby Boss 1/72 F4F Wildcat & FW-190A8


  • Member since
    January 2015
Posted by BrandonD on Friday, November 27, 2020 6:30 PM

Got the decals down on the 1/48 Yak-1. One of them tore, but fortunately the tear was right in the panel line for the rudder, so it snugged back down and will be hidden by a wash anyway. Whew.

Anyway, it now belings to Lilya Litviak, and it's almost ready to go blast some Bf-109s out of the sky.

Untitled

-BD-

  • Member since
    March 2008
Posted by Caveman on Friday, November 27, 2020 4:52 PM

Good looking builds guys!

With 6 hours left I'm in pretty good shape with the exception of a missing headlight lens.  Grrrrr.  The kit also didn't come with a side view or rear view mirror.  Beware to me when looking at these re-pop kits I guess.  Going to take a bit of a break then put the last three parts together. 

 Interior by Tim Bowers, on Flickr

 Rolling Chassis by Tim Bowers, on Flickr

 Engine In by Tim Bowers, on Flickr

 Engine In2 by Tim Bowers, on Flickr

 Body  Done 2 by Tim Bowers, on Flickr

 Body Done by Tim Bowers, on Flickr


Should be done soon.


  • Member since
    January 2015
Posted by BrandonD on Friday, November 27, 2020 4:14 PM

Alright, so last night I got the Yak-1 in primer, but the port horizontal stabilizer had no panel line where it joins the fuselage, and in attempting to rescribe it, I messed it up. So I put down a layer of sprue goo and went to sleep to let it harden overnight.

I got to it again today around 11:30, and sanded the stanilizer joint, then used my scribing tape and MRP scriber to rescribe th eline correctly.

That done, I shot the AMT-7 Grey-Blue from MRP on the underside.

Untitled

Once that was dry, I masked it, then went back and painted the upper surfaces NATO Black, then followed up with some random shading of Dark Gray. As soon as I cleaned the brush, I put MRP AMT-4 Camouflage Green into the brush and freehanded the camouflage pattern on the upper surfaces.

I shot a couple of quick touch-ups with the AMT-7, then coated the whole thing in Tamiya X-22 in prep for washes and decals.

Untitled

Fun fact: You can use a cordless drill as an airplane holder by chucking the prop shaft into the drill. It was a handy save when I realized I had the whole plane in wet paint and nowhere to put it.

-BD-

  • Member since
    January 2015
Posted by BrandonD on Friday, November 27, 2020 4:08 PM

Eagle90

Lewbud....I just did that exact kit a couple of weeks ago....I loved it! 

Yours is looking great!

Here is another progress pic for you.  I'm almost ready to paint.  I'm letting all the little bits and bobs dry proper, give it a seam check and then paint.  So far it's been a great little kit!


At first I thought that was a completion on the Japanese plane and I was totally astounded haha.

-BD-

  • Member since
    April 2005
  • From: Australia
Posted by taxtp on Friday, November 27, 2020 2:44 PM

I eventually got the decals to lay down with sme very careful dabbing of liquid cement. It's a high risk approach that I only use when I have to.

I've gone on to weather and finish it with about 2.5 hours to spare.

Cheers

Tony

I'm just taking it one GB at a time.

JOIN OUR COMMUNITY!

Our community is FREE to join. To participate you must either login or register for an account.

SEARCH FORUMS
FREE NEWSLETTER
By signing up you may also receive reader surveys and occasional special offers. We do not sell, rent or trade our email lists. View our Privacy Policy.