SEARCH FINESCALE.COM

Enter keywords or a search phrase below:

Fw190D/Ta-152 "Langnase" Group Build

23162 views
356 replies
1 rating 2 rating 3 rating 4 rating 5 rating
  • Member since
    April 2003
  • From: NSW, Australia
Posted by pingtang on Thursday, June 9, 2005 7:18 AM
Fair enough......I'm not saying the Tamiya kit is no good, I'm sure you'll do a great job of it. My PE set is designed for the Italeri D-9 kit, but seeing as though the Revell D-11 is pretty much the same kit, I'll use it on that instead.
-Daniel
  • Member since
    November 2005
Posted by Anonymous on Thursday, June 9, 2005 8:45 AM
Pingtang, and anyone else building the Trimaster/DML/Dragon/Italeri/Hasegawa/Revell Fw 190 kit:

If you glue the wingtops to the assembled fuselage halves, you won't have to do any filling at the wingroot. There is enough flex in the fuselage to align the bottom wing when you add it. I tacked the forward edge with a drop of CA to keep the wing in place, then I applied Tenax from below.
This is the Trimaster kit I built a while ago:


I needed no filler, and just a few swipes with a buffing stick to get this wingroot:


This works on the BMW-engined Fw 190s as well. Hope this avoids any troubles you may have with this great kit !
  • Member since
    April 2003
  • From: NSW, Australia
Posted by pingtang on Thursday, June 9, 2005 9:09 AM
I followed the advice you gave me on the Dragon FW-190A-5 I did a month ago. I glued the wingtops to the fuselage first, and it worked out great. Thanks for the advice. This time, I'll make sure I glue them in the right place (last time I glued them a bit too far forward which caused a few hassles elsewhere).
-Daniel
  • Member since
    January 2004
  • From: Westland. MI USA
Posted by mkhoot on Thursday, June 9, 2005 9:44 AM
I tried that it may have just been my example but when I did that the wings were swept back and the panel lines didnt come close to lining up.
When in doubt just build it. Mark http://www.ipmslivonia.org/ipms/
  • Member since
    April 2003
  • From: NSW, Australia
Posted by pingtang on Saturday, June 11, 2005 10:06 AM
I think I've found the camo scheme I want to try. It is a pretty famous aircraft and has been done thousands of times before, but I still wanna try that crazy crazy camo. I'm talking about "Yellow 10" a FW-190D-13. Here's a page with pics of the restored aircraft if you want to see it:

http://www.cebudanderson.com/yellow10.htm

Only problem is I don't have any decals for it, and money is a bit tight at the moment so I can't buy any. I've got the swastika's, insignia's and serial's covered. Might have to try masking and painting the yellow 10's and find some other way of doing the Pik As symbols. Hopefully I'll run into some money before I get to decalling......Big Smile [:D]
-Daniel
  • Member since
    December 2002
  • From: Aaaaah.... Alpha Apaches... A beautiful thing!
Posted by Cobrahistorian on Saturday, June 11, 2005 3:40 PM
Pingy,

I think I may have an extra set of Yellow 10's markings in my decal file in NY. If you're willing to wait until late August, I can probably get them to you. There are several decal sheets with accurate markings for Major Gotz's bird, both the Eagle Cals and Kommandeur sheets are top notch.

I understand if you don't wanna wait, but I'll see what I can do as soon as I get back to NY on 14 August.

Later guys, talk to you all in late July when I get back from camp.

"1-6 is in hot"
  • Member since
    September 2003
  • From: Northern hemisphere - most of the time-
Posted by blkhwkmatt on Saturday, June 11, 2005 4:32 PM
Pingy - I am looking at doing the same bird, love that scheme!!!

Update - I have the EagleParts cockpit installed (still working on getting pics), and have begun work on the fusalage and other bits. Still am debating on the rutman resin replacement parts, mainly since they are rather high priced, but all reviews that I have seen say they are very high quality parts.

FYI - if you are planning on converting the 1/32 D-9 to a 11 or 13 he has a kit for that, among his many parts that he offers.

Quidquid latine dictum sit, altum videtur!!! - Anything said in Latin sounds profound!


  • Member since
    April 2003
  • From: NSW, Australia
Posted by pingtang on Saturday, June 11, 2005 7:22 PM
Thanks for the offer Jon. Hopefully by then I will have enough money to justify buying a set for myself. But, if I don't, I might wait til august. At least I can paint that camo before then........
-Daniel
  • Member since
    November 2005
Posted by Anonymous on Sunday, June 12, 2005 6:31 AM
Nice looking "Dora" that one Daniel thanks for the linkThumbs Up [tup] The scheme is very similar to the one i'm looking at doing, should be a good test for my airbrushing skills,,,
  • Member since
    September 2003
  • From: Northern hemisphere - most of the time-
Posted by blkhwkmatt on Sunday, June 12, 2005 1:11 PM
Guys -

Feel like Banged Head [banghead] right now with my 1/32 Dora. Love the Eagleparts cockpit, absolutley crowded with detail. I have been using some very crappy super glue to work on this kit. It's the 3m gel superglue and it is horrible for modeling. I think that I've seen stronger bonds with spit than with this glue.

Does any one have any recommendations on what glue would be best for glueing resin parts, and for white metal parts. I love it when i get the PE laid just where I want it and two days later i can peel it off with very litte effort.

Also because of the glaring problems with the wing, and my desire to convert the D-9 into the D-13 "yellow 10" I will be putting this build on the back burner for a while( until the resin parts that I'm contemplating arrive), but will check in on a regular basis to see everyones builds.

Pix - do you know if the wing technique would work on the 1/32 scale kits as well? I think that it should but am not sure, would have loved to have known this about 4 months ago when i was building my A-8.

best of luck with your builds!!

Quidquid latine dictum sit, altum videtur!!! - Anything said in Latin sounds profound!


  • Member since
    November 2003
  • From: houston,texas
Posted by ghettochild on Monday, June 13, 2005 7:07 PM
finally got my parts and decals. picked up the eduard color zoom, and squadron vac canopy. here is the plane im doing

i hope to get started in a couple weeks
-Josh
  • Member since
    November 2005
Posted by Anonymous on Wednesday, June 15, 2005 4:12 PM
The engine and cockpit have been installed in the right fuselage half, so I thought I'd take a couple pics before I close the fuselage. The cowl panels will be open, but the cockpit will be less visible. I added more plumbing and wiring, along with a white metal 30mm cannon left over from a Trimaster Me 262.
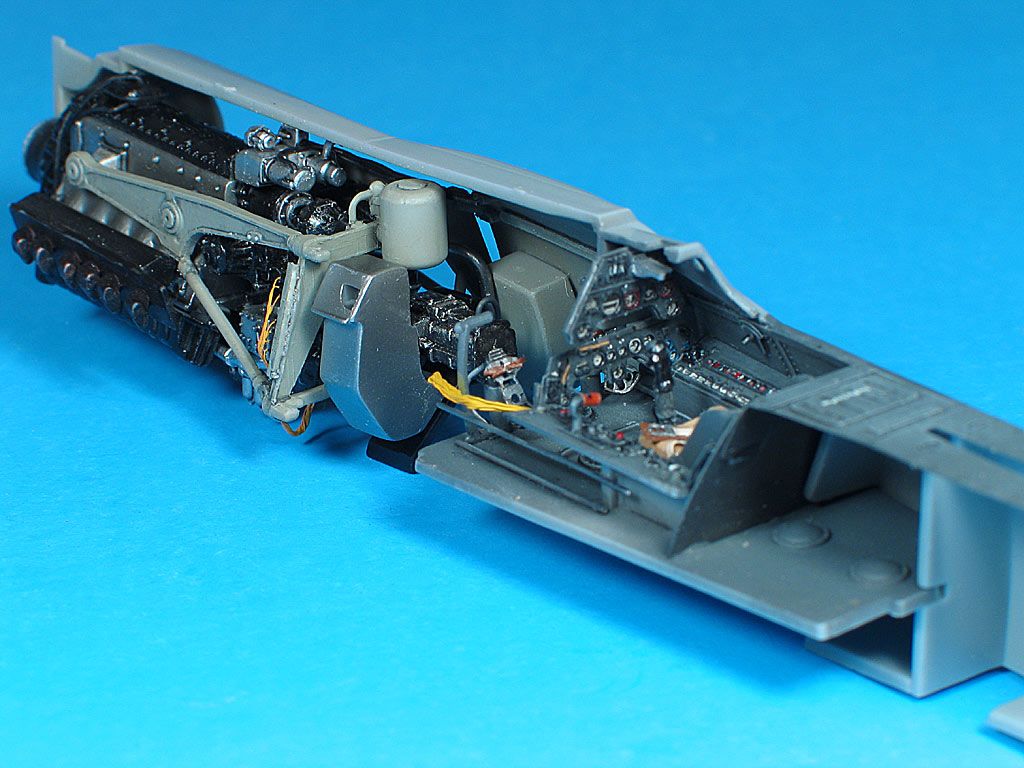
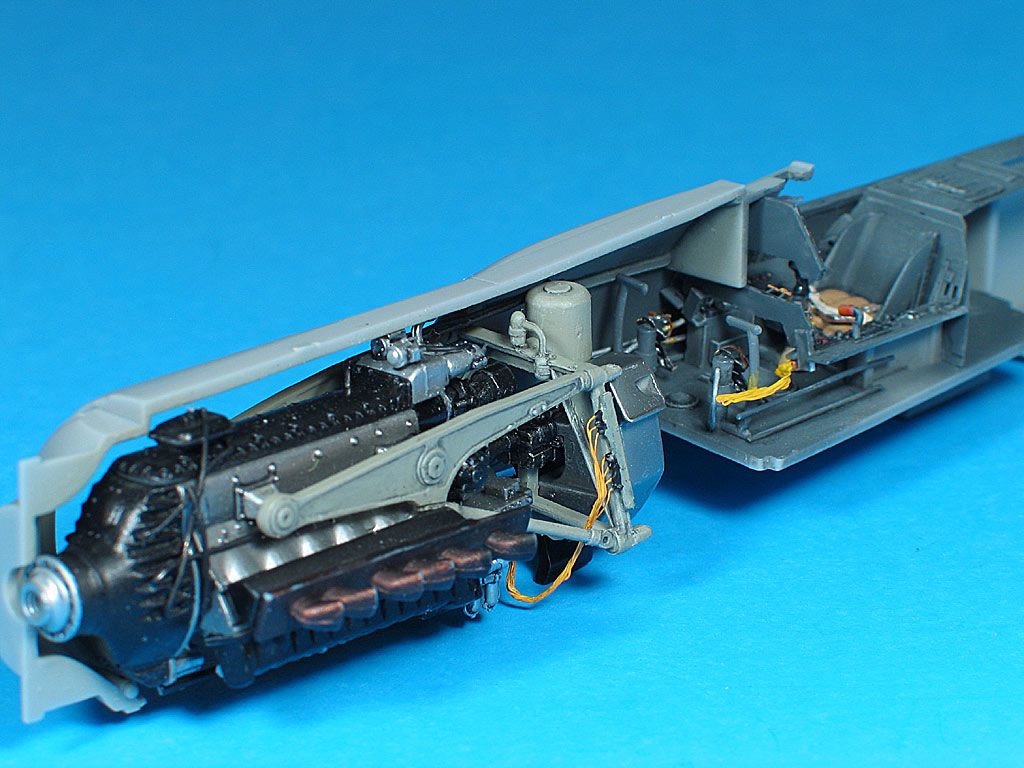

The engine is a pretty tight squeeze.

blkhwkmatt - tape the fuselage halves together, then tape the wing tops to the fuselage (on the inside). Then dryfit your bottom wing. This will let you know if it all lines up well. There's a lot of detail on the wing fillets of a 190 that can be lost to filling and sanding.

I just put the fuselage together, and I thought it better to edit it into this post. You can see how much of the engine will still be visible.
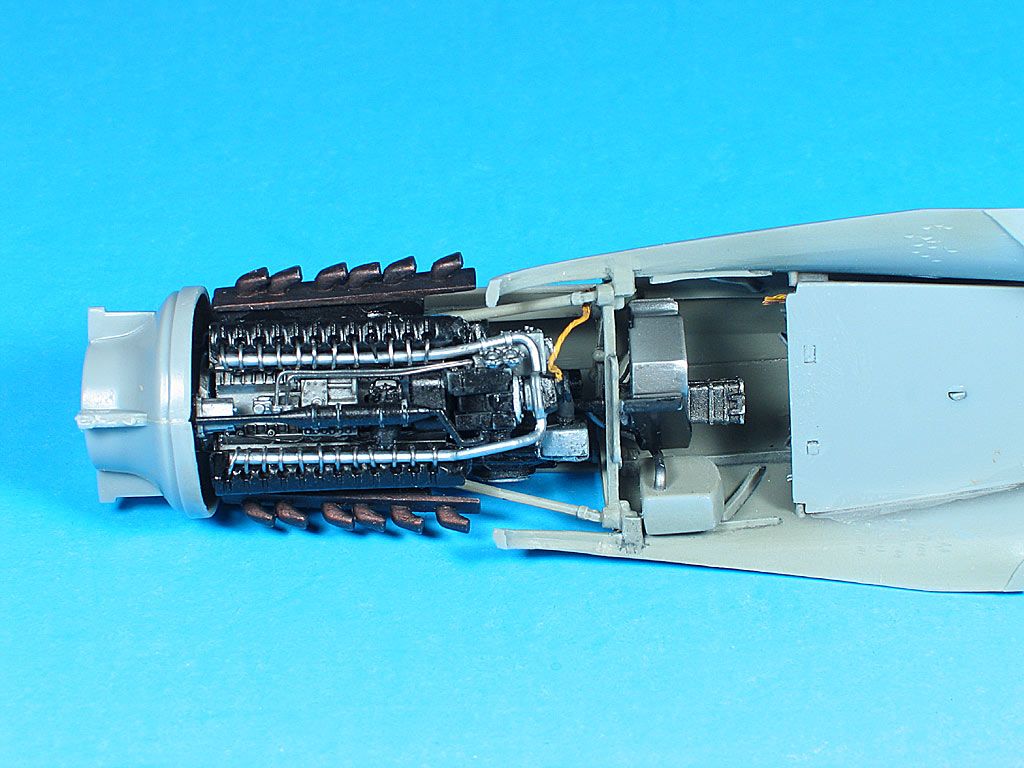
That's fresh Tenax in the seam there. Haven't gotten the sanding impliments out yet.
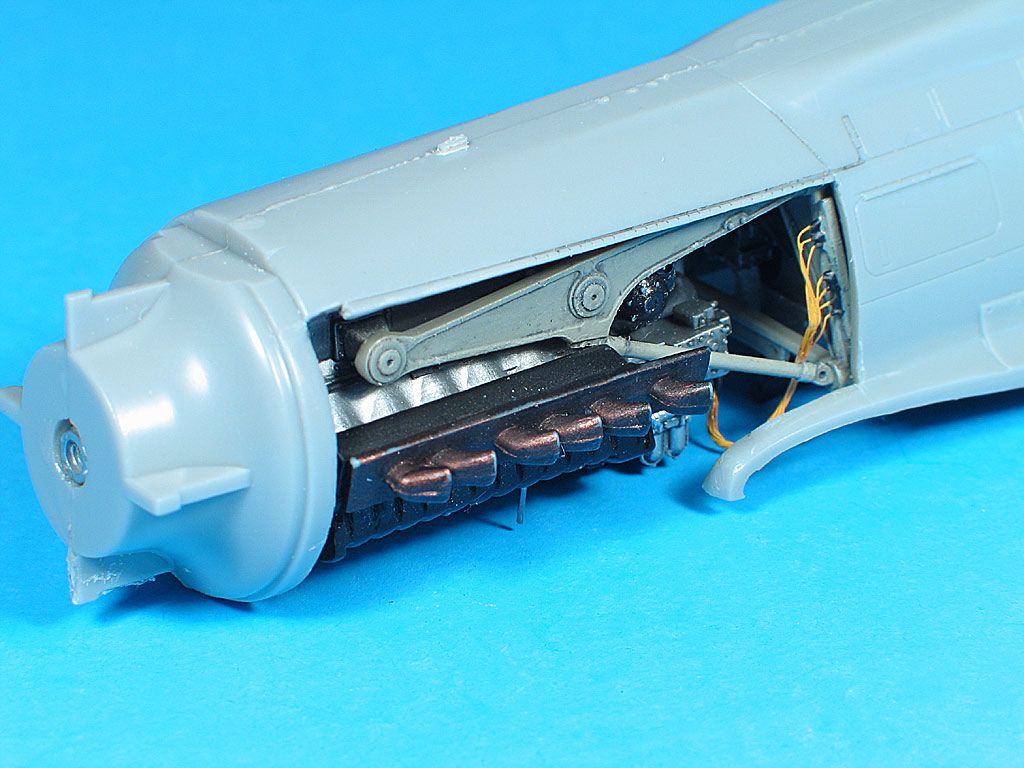

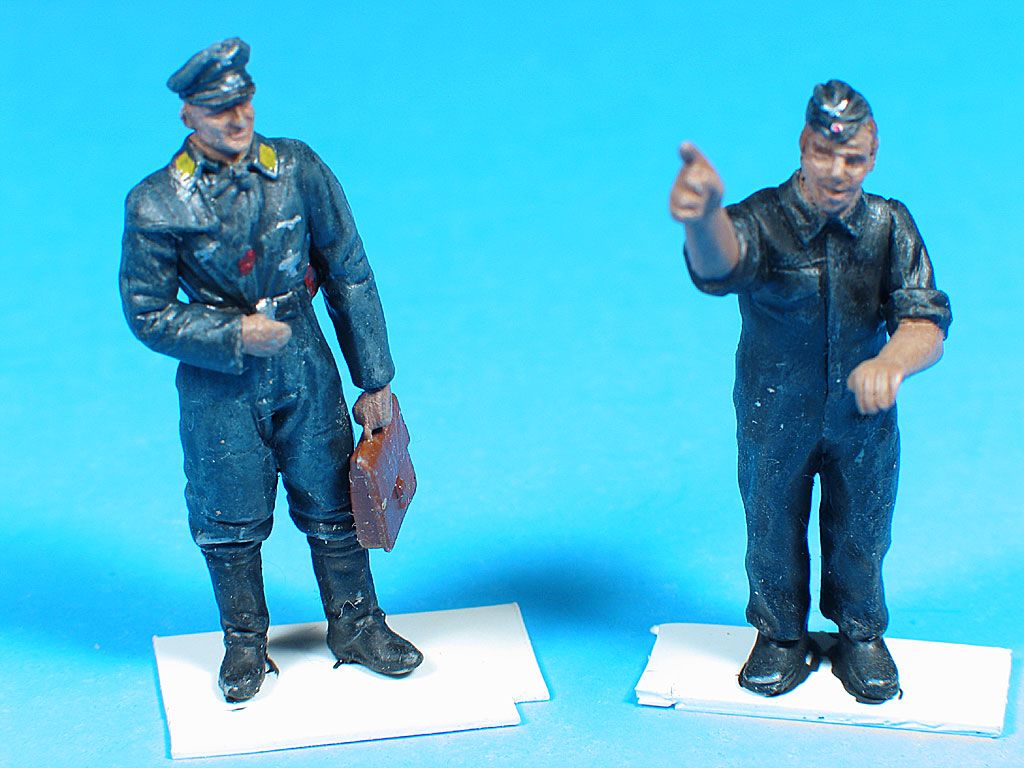
I'm not a fan of models "opened up" just to show detail, I need to have a reason why it's open. This will be displayed on a piece of tarmac, with an officer (from the ProModeler He 111H-22 kit) and a "blackbird" (from a Trimaster Me 262 kit). These have just had basic colors applied. There's a lot more brushwork to go !
  • Member since
    January 2004
  • From: Westland. MI USA
Posted by mkhoot on Wednesday, June 15, 2005 9:21 PM
Very nice as usual Pix. I can't wait to see the finished A/C. My d-11 is painted and glossed ready for decals. I'm sure it won't be as nice as yours but I'm happy the way its turning out.
When in doubt just build it. Mark http://www.ipmslivonia.org/ipms/
  • Member since
    November 2003
  • From: houston,texas
Posted by ghettochild on Wednesday, June 15, 2005 10:24 PM
again very nice job pix
mkhoot build looks great so far
-Josh
  • Member since
    November 2005
Posted by Anonymous on Wednesday, June 15, 2005 11:54 PM
Looks great, mkhoot !

I don't believe that one person's model looks "better" than another's. A person can do a "better" job than their last one, but it isn't something that can be compared to another's work. As long as you do your best, they are all equal. Different people just have different preferances, which can't be converted into terms of "better." It would be like asking: "Who's the 'better' guitarist - Eric Clapton or Joe Satriani?" You may have a preferance, but neither is "better." Same goes for models. It's all art, open to interpretation.

Looking forward to seeing some decals !
  • Member since
    April 2003
  • From: NSW, Australia
Posted by pingtang on Thursday, June 16, 2005 2:40 AM
Pix Looks beautiful so far. Gotta ask, how do you do your wiring? It always looks so good. BTW, I'll say to you that Joe Satriani is probably the technically 'better' guitar player, but I like listening to Clapton 'better'.......If you know what I mean.Big Smile [:D]

mkhoot Your camo looks great. Can't wait to see it done.Thumbs Up [tup]

I should be able to start my D-11/13 pretty soon. I'm working on the cockpit for the round the world GB, so when I get around to painting that RLM 66, I'll paint the dora's internals too. Can't wait to start it.
-Daniel
  • Member since
    March 2005
  • From: Seeing Eye Dog Central
Posted by mpartric on Thursday, June 16, 2005 7:03 PM
Eric Clapton is clearly better....hahah just kidding I love them both. I have a strat for when I'm in a clapton mood and a les paul when I'm in a Jimmy Page mood.

Seriously, I have an important question for you all. I have not bought the 190 kit yet and was researching it last night. I wanted to narrow it down to a 1/48 D9. From what I can tell, the selection is a DML, two Tamiyas, and the Trimaster. I think the trimaster's too expensive for my tastes, and I've never built a DML but am comfortable with Tamiya. Therefore I was going to go with one of the two Tamiyas with some aftermarket stuff like a resin engine, cockpit, wheels, and PE. That way I'll probably be up to the price of the Trimaster but with more "fun stuff." Any suggestions from the peanut gallery? Thanks in advance.

EDIT: p.s. wasn't there some issue with one of these kits not being accurate in terms of open wheel wells?
Matthew Morristown, NJ Mediocrity--- it takes a lot less time and most people won't notice until it's too late.
  • Member since
    April 2003
  • From: NSW, Australia
Posted by pingtang on Thursday, June 16, 2005 9:30 PM
If you want a "tri-master" kit, have a look for the Italeri boxing of it. You could probably find that one pretty cheap somewhere (ebay maybe). Revell also do a boxing of the tri-master molds, but they only do a D-11. But, if you are more comfortable with the Tamiya kits, go with them. They are alot easier to build than the "tri-master" kits from what I here. Bothe will build into a good looking model, so go with what you're comfortable with.

QUOTE: Eric Clapton is clearly better....hahah just kidding I love them both. I have a strat for when I'm in a clapton mood and a les paul when I'm in a Jimmy Page mood.


Me too..........Wink [;)]
-Daniel
  • Member since
    March 2005
  • From: Seeing Eye Dog Central
Posted by mpartric on Sunday, June 19, 2005 7:22 PM
Hey, have you guys seen www.stormbirds.net ? someone over in the A/C forum just posted a link to this site that talks about a bunch of different luftwaffe stuff, but in particular talks about a build project in Oregon where a private company is building replica ME 262's. It's pretty cool. Anyhoo why it's relevant to this GB is there are several sections dedicated to JG 44 squadron and the D-9's used to protect the Schwalbes when they were taking off and landing. Also a great section dedicated to decals for these planes. Just FYI. I my try these decals out.
Matthew Morristown, NJ Mediocrity--- it takes a lot less time and most people won't notice until it's too late.
  • Member since
    April 2003
  • From: NSW, Australia
Posted by pingtang on Sunday, June 26, 2005 1:48 AM
How's everyone going with their builds? I'm getting some alright progress done on mine. I've ggot the fuselage together and the top wings glued to the fuselage. The fuselage pieces have quite a bend in them so I'm glad I did it that way. It'll make it much easier to pull the fuselage into the correct shape later. I might post some pics one day to show you what I mean.
-Daniel
  • Member since
    January 2004
  • From: Westland. MI USA
Posted by mkhoot on Sunday, June 26, 2005 6:09 PM
I'm making some progress I've got it decaled and the gear installed. I'm using the blown canopy from the Tamiya F-8 kit. I need to do some weathering and add all the fiddly little bits.

When in doubt just build it. Mark http://www.ipmslivonia.org/ipms/
  • Member since
    April 2003
  • From: NSW, Australia
Posted by pingtang on Sunday, June 26, 2005 9:36 PM
Looks great so far mkhoot. Is that the Revell kit you are building? If so, did you use the kit decals? What are they like? I'm gonna use a canopy from a Tamiya kit too. There is no blown canopy in the Revell kit, so a apare one from a Tamiya A-3 will come in handy.
-Daniel
  • Member since
    January 2004
  • From: Westland. MI USA
Posted by mkhoot on Monday, June 27, 2005 11:57 AM
Yeah it's the Revell kit with kit decals, The decals woked just fine with a little solvaset.
When in doubt just build it. Mark http://www.ipmslivonia.org/ipms/
  • Member since
    April 2003
  • From: NSW, Australia
Posted by pingtang on Monday, June 27, 2005 9:20 PM
The decals with my kit were pretty badly out of register. It didn't really matter on the decals for "white 61", but on the Red 4 decals it is really noticable. I'm not gonna use them anyway, but I would have liked to have the option of using them if I couldn't get AM decals.
-Daniel
  • Member since
    January 2004
  • From: Westland. MI USA
Posted by mkhoot on Thursday, June 30, 2005 4:19 PM
Finished up my d-11. I'm happy with the way it turned out. I used Moskit exhaust and Eduard belts. The Blown canopy is from the Tamiya F-8 kit.


When in doubt just build it. Mark http://www.ipmslivonia.org/ipms/
  • Member since
    November 2005
Posted by Anonymous on Thursday, June 30, 2005 5:04 PM
Nice job, mkhoot !
I like the camo and markings. Nice to see one of the high numbers.
Well done !


I haven't got much done lately, too many things going at once. I did manage to get the pe in the wheel wells and assemble the wing halves. The way the PE is designed, the halves need to be glued together. The wing is a nice tight fit to the fuselage, so there won't be any filler needed.


The wells and wing bottom will be done in Alcad.
I'm in the middle of doing the flaps now. 21 ribs in each one. Patience test !
  • Member since
    August 2004
  • From: Nowhere. (Long Island)
Posted by Tankmaster7 on Thursday, June 30, 2005 5:44 PM
mkhoot, looks very nice! What kit is that BTW? I ask because the propellers seem a bit short and stubby and I remember something about the Revell kit needing the propeller to be replaced.
-Tanky Welcome to the United States of America, a subsidiary of Exxon Mobil Corporation, in partnership with Halliburton. Security for your constitutional rights provided by Blackwater International.
  • Member since
    April 2003
  • From: NSW, Australia
Posted by pingtang on Thursday, June 30, 2005 9:34 PM
mkhoot Looks great. The camo job looks very nice. Hope mine turns out as nice.Thumbs Up [tup]

Pix looks like you've got some good progress going there. Did that PE for the wheel wells come with the kit? Or are they an AM set?

Tanky I think those props look alright. If you were going to convert the Revell kit to a D-13, then I think you'd need to modify the prop blades.

My Dora is coming along okay. I've got the cockpit mostly assembled and nearly ready to go in the fuselage. I've found somewhere to get the decals for 'Yellow 10', so I'll be doing mine as a D-13. Trying to decide now whether to have a go at scratch-building the engine compartment above the wheel wells. It just doesn't feel right to have the enclosed wells, and I can't afford the resin set. So it looks like scratch-building it is the only way.......
-Daniel
  • Member since
    November 2005
Posted by Anonymous on Thursday, June 30, 2005 10:43 PM
pingtang - the flaps are from the Eduard PE set. I have an "in progress" page on my site for this bird. I haven't added the text yet, but there are pics there. In the first pic, the two smaller frets on the left are what comes with the kit. The other two are Eduard. I just finished one of the flaps, and it's posted there also.

http://www.pix.prettyneatinc.com/ta152build.htm
  • Member since
    March 2005
  • From: Seeing Eye Dog Central
Posted by mpartric on Friday, July 1, 2005 2:51 PM
MKhoot, great job. I have yet to actually buy the kit yet but a large squadron order is in the works for sometime tomorrow. I have to organize all the crappo I'm going to order so I only have to pay shipping once. Which kit has the inaccurate wheel wells, and which resin engine kit are people using?

BTW, Pix, what tool do you use to fold your PE? I'm having some trouble getting mine to look good. In general I can't get the folding/bending to come out right and the CA glue just isn't doing it for me. Your wheel wells have turned out marvelously and I was just wondering what techniques you use.

Thanks
Matthew Morristown, NJ Mediocrity--- it takes a lot less time and most people won't notice until it's too late.
JOIN OUR COMMUNITY!

Our community is FREE to join. To participate you must either login or register for an account.

SEARCH FORUMS
FREE NEWSLETTER
By signing up you may also receive reader surveys and occasional special offers. We do not sell, rent or trade our email lists. View our Privacy Policy.