SEARCH FINESCALE.COM

Enter keywords or a search phrase below:

Moto GP group build '05

81328 views
723 replies
1 rating 2 rating 3 rating 4 rating 5 rating
  • Member since
    November 2005
  • From: Kalmar, Sweden
Posted by joelrydh on Tuesday, May 16, 2006 12:27 AM

This was really stunning work! I have to agree with the others that you have really done a master piece here Andrew. It will be very fun to see them installed!

As for the cowling color issue I agree with Erik that a grey plus white primer job would take care of the problem. If you want a correct match with other parts you can prime these white as well as the different plastic colors will affect the final result. This primarily happens with translucent colors like red, yellow and some of the blues. Red is also a night mare to photograph by the way...

/Joel

  • Member since
    January 2006
  • From: Central Florida
Posted by wolfpac on Monday, May 15, 2006 6:12 PM
 Andrew Collodel wrote:

Suzuki RGV500

I tried a new technique which I borrowed from the Armour and Aircraft modelers. Big Smile [:D]  I basically sprayed the exhausts with fairly bold blue, purple and yellow bands to simulate the burnt metal effect and the toned down the whole lot with smoke. When completed I “misted” a much diluted X32 (about 1 paint to 20 thinners) over most of the exhausts leaving only exposed the places where the real exhaust showed discoloration. Since the X32 is very thin it allows the underneath tones to subtly show through improving the impression of burnt metal


See pictures below

Andrew


Absolutley stunning.  Were all the parts painted with Tamiya Acrylics?  If so please list the color codes you used, I'd kill to produce such fine results.  I was going to experiment with some of the Alclad II paint such as jet exhaust, pale gold titanium and clear blue.  But If you are able to obtain these results with Tamiya paints screw $7.50 a bottle Big Smile <img src=">
If you love your bike let it go. If it comes back to you, you've highsided. http://public.fotki.com/luke76/
  • Member since
    January 2006
  • From: Central Florida
Posted by wolfpac on Monday, May 15, 2006 6:06 PM
I've read (the key work there) that others will lay down a grey primer and than a white primer prior to paint.  I've often wondered why someone would bother putting down so many coats of primer but this may be the reason.  You guys have forgotten more about modeling than I know, so I hope this helps Smile [:)]
If you love your bike let it go. If it comes back to you, you've highsided. http://public.fotki.com/luke76/
  • Member since
    February 2004
  • From: Quantico, VA
Posted by Yamafreak72 on Monday, May 15, 2006 6:03 PM

I feel like a pre-schooler smashing together crayons, paste and tongue depressors after seeing this.

Right now, I've got to make a decision about my Duc.  I painted the insides of the fairings flat black as per the instructions, then a coat of Testor's Guard's Red on the outside of the panels to include the frame.  Now, those panels that are black on the inside seem to be translucent enough to allow some of the black to shine through, which is darkening the red significantly.  You can really tell the difference between parts like the frame and fender (which I haven't painted the inside black yet) and the rest.  I suppose I'll try another coat of red on the outside and see how it goes, but do you all have any suggestions as to how to avoid this in the future?  I'm just really afraid of losing surface detail by laying on too much paint. 

Status: Nastro Azzurro NSR 500- finis!
  • Member since
    November 2005
Posted by Anonymous on Monday, May 15, 2006 6:08 AM

Suzuki RGV500

I tried a new technique which I borrowed from the Armour and Aircraft modelers. Big Smile [:D]  I basically sprayed the exhausts with fairly bold blue, purple and yellow bands to simulate the burnt metal effect and the toned down the whole lot with smoke. When completed I “misted” a much diluted X32 (about 1 paint to 20 thinners) over most of the exhausts leaving only exposed the places where the real exhaust showed discoloration. Since the X32 is very thin it allows the underneath tones to subtly show through improving the impression of burnt metal


See pictures below

Andrew

  • Member since
    January 2006
  • From: Central Florida
Posted by wolfpac on Saturday, May 13, 2006 7:49 PM
 Yamafreak72 wrote:

Great build, Erik!  I really like how you did the weld seams on the exhaust pipes.  I'll have to incorporate some of what I've seen on yours into my next M1.  What brand of C/F decals did you use?  I'm considering mixing scales/brands in the future to make things more interesting visually.  No building for me this week, I'm in lovely Philadelphia for business, but I did put the first coat of Guards Red on my Duc before I took off.  Gotta post pics when I get back.
S/F


Thank you!

The CF is from scale motorsports.  I purchased the template to do the exhaust cover, heal garuds, fork covers and ram intake (the kit is in 1:20 scale).  The kit also includes the rear fender however, I used the 1:12 scale pattern to break it up.  I also used the 1:12 for all of the fairings.  The Data boxes in the rear cowel are from spare parts of a NSR 500.  The speedo data box are peices cut from a YSR 500.  The steering damper is also from a YSR 500.  I was originaly going to tape off and air brush the weld marks in the pipe however, I assembled the pipe and realized that I was not going to be able to get the tape tucked into certain areas.  I have the PE exhaust springs and rotors, I just cannot figure the stuff out.  I really need to find a group who builds autos and bikes and have someone show me how to do it.  I've wasted too much money trying to get it right.


Thank you again!
Erik
If you love your bike let it go. If it comes back to you, you've highsided. http://public.fotki.com/luke76/
  • Member since
    February 2004
  • From: Quantico, VA
Posted by Yamafreak72 on Thursday, May 11, 2006 2:16 PM

Great build, Erik!  I really like how you did the weld seams on the exhaust pipes.  I'll have to incorporate some of what I've seen on yours into my next M1.  What brand of C/F decals did you use?  I'm considering mixing scales/brands in the future to make things more interesting visually.  No building for me this week, I'm in lovely Philadelphia for business, but I did put the first coat of Guards Red on my Duc before I took off.  Gotta post pics when I get back. 


S/F

Status: Nastro Azzurro NSR 500- finis!
  • Member since
    November 2005
  • From: Kalmar, Sweden
Posted by joelrydh on Wednesday, May 10, 2006 12:29 AM

Erik: This is really great! You've done so much progress in your building skills. This is one terrific M1.

my best regards

Joel

  • Member since
    January 2006
  • From: Central Florida
Posted by wolfpac on Tuesday, May 9, 2006 9:33 PM
Here's some pics of a project I've been working on.  CF decals can be your best freind or your worst nightmare.  I still have a lot of detailing to do (clip ons, bolts, etc), but I figured I would share some progress pics.  I did my best with scratch building the data collection unit in front of the speedo.  Not a perfect match but I think it looks better than nothing.  The CF raidiator covers were a pain in the butt, and I think I may have some fitting problems with applying the upper.  The CF of the rear cowel and fuel tank was not as painful as I expected.  The nice thing about the decals was being able to cut a scrap peice and match it up, micro sol does a fine job of making the seam line disappear. I've done so many little things outside of the text build I cannot remember them all.  I still need more practice, I do not feel my builds are coming out as clean as everyone elses, but that's the fun part about this........practice Big Smile [:D]


All comments welcome, good and bad.  Somehow the CF decal for the silencer shifted while Sol was applied.  Any tips on getting it moved back without screwing up the decal?

Thank you,
Erik


*edit*  I just realized I forgot to paint the raidiator cap Oops [oops]
If you love your bike let it go. If it comes back to you, you've highsided. http://public.fotki.com/luke76/
  • Member since
    December 2002
Posted by shayne wright on Tuesday, May 9, 2006 5:30 PM
well guys have got a bit done ,have got final coat of paint on kawa kr500 only have to decal now so post some pic's soon.
In mean time have finished a 1/9 duke gp
decals to go on 1/12 Tamyia duke.

Next projects inline
spiderman M1-superdetail job (well to my limits it will be Evil [}:)].
2005 Movistar RCV
2006 ducati?
+ 2-3 older gp bike's, the way be going with the kr500 all of these will keep me busy for years and years
Big Smile [:D]
Shayne
forgot have also started a 1/6 cbr750 racer
[
  • Member since
    February 2004
  • From: Quantico, VA
Posted by Yamafreak72 on Thursday, May 4, 2006 6:44 PM
Thanks Andrew for the pics and references.  I probably will stick with the early cowl and low exhaust to avoid what I'm sure will be a painful and frustrating modification to the Tamiya decals.  Sorry to sound discouraged, but this kit has been a bad luck charm from the first cut of part from sprue.  I'm more than ready to get knee-deep in the Ducati, which so far is an outstanding kit.  Prepped and painted the insides of the cowlings black last night, and will probably airbrush on some Testors Guards Red tonight.  Looks to be pretty close to Ducati red, really bright.  If things go well, I'll try and post pics, even though it seems like there's quite a few Desmo's under construction already. in the meanwhile, anyone heard news as to what's next MotoGp-wise from Tamiya?
Status: Nastro Azzurro NSR 500- finis!
  • Member since
    November 2005
  • From: Kalmar, Sweden
Posted by joelrydh on Thursday, May 4, 2006 1:49 PM

Interesting discussion, this sort of stuff has become really confusing over the last few years. In my opinion it started when the rcv:s entered the arena, a lot of teams and a lot of in-between races changes to the cowlings. Makes it harder for us rivet counters but if you get your references straight you can easily make a more personalized build.

Talking about the two pipe under seat exhausts of the 04 repsol machine there is a japaneese transkit that is shown on Max Motomodelling. Looks really good to me. Hope to get my hands on one.

best regards
Joel

  • Member since
    November 2005
Posted by Anonymous on Thursday, May 4, 2006 5:10 AM

Hi Yamafreak72

Have gone back to MotoGP website and traced the exhaust cowl situation as follows:


Early Cowl means (like the cowls provided by Repsol kit 14096)

Late Cowl means the more enveloping cowl (like the cowls provided by Valencia kit 14097)


From what I can trace the exhausts and cowls developed as follows:


Round 8 British          Rossi ran high exhaust early cowl Repsol kit 14096

Round 9 GER             Rossi ran low exhaust early cowl

Round 10 CZE            Rossi ran low exhaust early cowl

Round 11 POR           Rossi ran low exhaust late cowl same as setup in Valencia kit 14097

Round 12 Brazil         Rossi ran low exhaust late cowl

Round 13 MAL          Movistar ran low exhaust early cowl and Camel sill on high exhaust early cowl

Round 14 AUS           Camel sill on high exhaust early cowl

Round 15 VAL           Movistar ran low exhaust early cowl


So from a modeling perspective you could use the Repsol kit 14096 with the low exhaust and early cowls for rounds 9 and 10 after that it would be the low exhaust and late cowls as per the Valencia kit 14097 but some mods to the decals would be necessary as the cowls are more enveloping


You could model the Movistar with low exhaust and early cowls as of round 13

The Camel from what I can tell ran the high exhaust early cowls throughout the season but this could still be incorrect as Pit Walk shows pictures of a Camel with low exhaust and late cowls


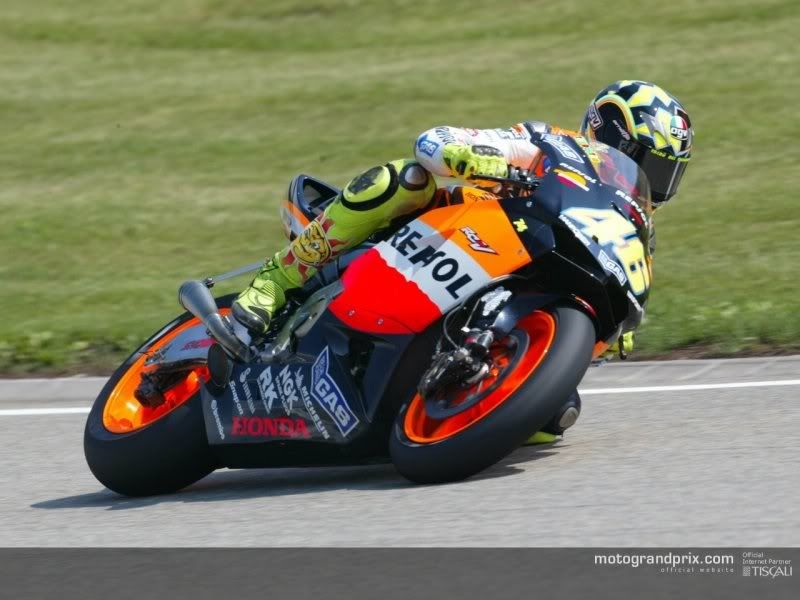
Picture 1: Rossi in Germany running low exhaust and early cowls


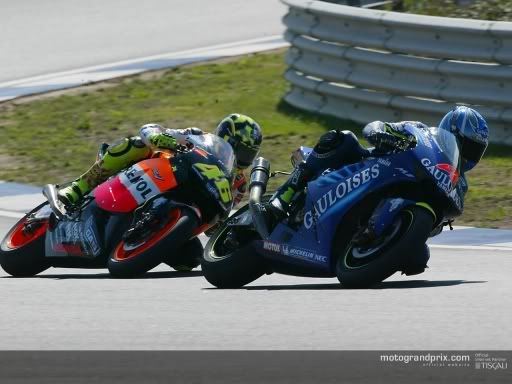
Picture 2: Rossi in Portugal running low exhaust and late cowl


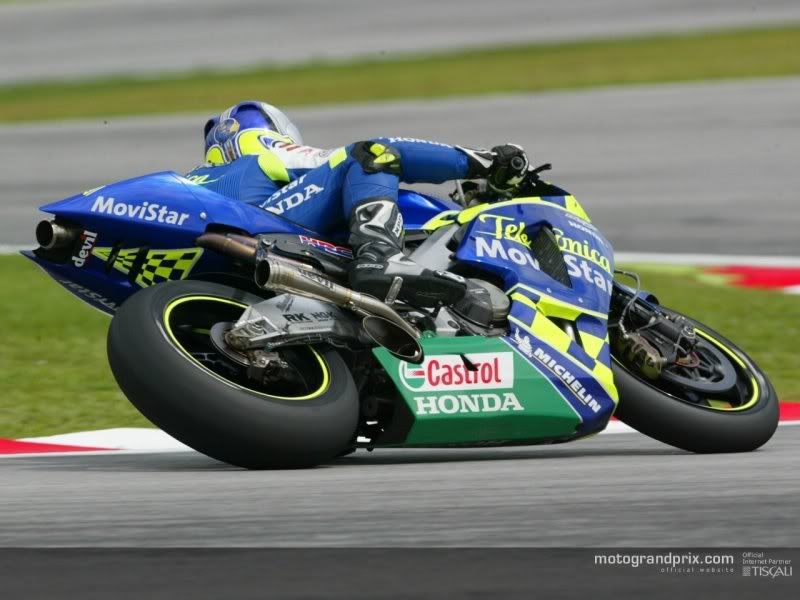
Picture 3: Movistar in Mal running low exhaust and early cowls
 

Hope this has helped clarify what to model; it is none the less interesting to say the least!


Andrew

  • Member since
    November 2005
Posted by Anonymous on Thursday, May 4, 2006 3:30 AM

Hi Yamafreak72

Here is some more info that might help. Smile [:)] Shown below in picture 1 from the 2003 Official MotoGP website showing Rossi at the Chec Grand Prix. The picture 1 below (in typical Rossi style) clearly shows the use of low exhausts and the oldish style cowlings. Pit walk 2003 shows from what I can tell the low exhausts being used about from Round 11. Later in the season for example at the Portuguese Round Rossi was running the low exhausts and the revised cowlings that are more enveloping (see picture 2 below), this would then be like Tamiya's Valencia Kit 14097.

The version I am modelling is the Repsol 2003 with the low exhaust but still the old style cowlings like the version shown in picture 1 below, since I can still use the decals from the Tamiya Repsol 2003 (kit 14096) as they will fit the cowlings since they are the same, and have used the low exhausts, heat guard and lower RHS belly cowling from the Tamiya Valencia Kit 14097. This in effect produces a more or less accurate version of the 2003 Repsol Honda shown in picture 1 Big Smile [:D]

Picture 1: Reposl Honda low exhaust and still old style cowlings as at Chec Round

Picture 2: 2003 Reposl Honda low exhaust and new cowlings as at Portuguese Round

Hope this helps!Tongue [:P]

Andrew

  • Member since
    November 2005
Posted by Anonymous on Thursday, May 4, 2006 1:50 AM

Hi Yamafreak72

The decals with the kit will fit the revised 2003 early low exaust version because the cowlings are still the same except for the lower belly cowl which has the cutaways for the exhausts, so the sponsor decals while still the same need to move, but this is simple enough to do. If you do the later cowlings like the Valaenci bike then the decals are too small. I have painted all the cowlings but not appled the decals yet, but I do not forsee any problems Big Smile [:D]

Good luck futher. I am also busy with the Ducati doing the Pramac version Whistling [:-^]

Andrew

  • Member since
    February 2004
  • From: Quantico, VA
Posted by Yamafreak72 on Wednesday, May 3, 2006 7:54 PM
So, did the decals from the Tamiya kit (14096) fit the Valencia fairings?  I'm confused.  I think since I already have the early cowl painted, I'm just going to stick with it.  I'm getting pretty frustrated with this build, and am shelving it until my decals show up from HLJ, hopefully soon.  Thanks Andrew for the explanation and reference to the books, I'll be checking ebay for them.  Speaking of changing exhausts every race, remember the twin undertail exhausts they ran a couple times in 04, I think it was?  Kinda neat, haven't seen a conversion kit though.  But after six of them, I think I'm going to take a break from RC211Vs for a while.  Off I go to the Duc!
Status: Nastro Azzurro NSR 500- finis!
  • Member since
    November 2005
Posted by Anonymous on Wednesday, May 3, 2006 2:16 AM

Hi Yamfreak72


Pictures that I downloaded from the Official GP web site show the low exhausts with the old style fairings as early as the Chec GP and certainly before Valencia where the bike had lower exhausts and the more enveloping cowlings (Like those presented in the Tamiya Valencia kit). Wink [;)]


Pit Walk Collection Vol 2 MotoGP 2003 shows lovely views of Hayden’s bike with low exhausts and sill the early 03 cowlings. Similarly the Camel and Movistar Hondas were also running low exhausts before the end of the 2003 season but with what appears to be the older 2003 cowls. There is also a Movistar version that ran a single “low exhaust different to all the other bikes. Confused [%-)] I can e-mail you the Repsol pictures if you provide me your address. A copy of the abovementioned book will be a great help. I have bought them all as they are so useful for reference Big Smile [:D]


I am modeling Hayden’s 2003 bike based on the pictures in the 2003 Pit Walk book as it covers all the views and also matches the decals provided in the 2003 Repsol Honda (kit 14096) i.e. the decals will fit on the old style cowls but I used the low exhausts and the one side cowl from the Valencia kit (bought just the sprue with the required parts from HLJ) Hope this helps, it is very confusing without references and even then you could get it wrong, they seem to do modifications at almost every race. Whistling [:-^]


Andrew

  • Member since
    February 2004
  • From: Quantico, VA
Posted by Yamafreak72 on Tuesday, May 2, 2006 9:17 PM
So, can anyone determine if the open exhausts first showed up in the Valencia race?  My Hayden bike also has the shorter fairings and open pipes.  I e-mailed HLJ and hopefully soon will get the decals from the Tamiya kit.  I just don't want to go through all this and build an inaccurate bike.  Oh well, I'm reasonably sure Big T will release a newer version of Hayden's RC, so EVENTUALLY I'll have an accurate bike.  For now, on to the Desmo!
Status: Nastro Azzurro NSR 500- finis!
  • Member since
    November 2005
Posted by Anonymous on Tuesday, May 2, 2006 6:02 AM

Hi Yamafreak72 sorry to hear about your bad luck with the Museum Collection decals. Sad [:(]  I have a couple of sets which I have not used yet (put off by all the bad reports) and I do not buy them any longer. Dead [xx(]


Progress so far is:

Telefonica Suzuki RGV 2000

Model is all painted and decaled just needs assembly.Smile [:)]

Hayden Repsol Honda RC211V 2003

Building the version with low exhausts but still older cowlings i.e. the sort of in between version pre Valencia. Painting completed allowing the paint to cure for about a month before decaling Sleepy [|)]

Ducati GP4 Pramac

Assembled all body parts and sprayed the primer coats, just waiting for some warmer weather to spray the final gloss coats Wink [;)]


Andrew

  • Member since
    February 2004
  • From: Quantico, VA
Posted by Yamafreak72 on Thursday, April 27, 2006 2:02 AM

Good to have you back, Ping. 

So I go to start decaling my Hayden RC with the Museum Collection decals I spent $15.69+ shipping from HLJ and I have one thing to say about them...GARBAGE! I mean, CRAP! I've never experienced such bad fitting, unable to handle Micro-sol, inaccurate decals in all my years of modeling.  I swear they must be for a 2002 RC, even though they're marked for '03 and have Nicky's numbers and such.  The red and white stripe for the side fairings isn't even CLOSE to the right shape, and forget about trying to get them to go around the complex curves of the radiator outlets, flakes of color coming off...etc.  So now I've got a half-built RC that's gone pretty OK up until now- even the paint wasn't a bad experience- and no decals for it.  I think I'll continue my rant over at HLJ's website, and see if I can't get the Repsol decals that came with the '03 Rossi RC211V.  They've been pretty good before- I got them to send me the late '03 open exhausts for the bike I'm doing now.  It cost a few bucks, but cheaper than bashing a whole kit.  Sorry for the rant, I will now cease venting.  Hope you all are having better luck.

Sean

Status: Nastro Azzurro NSR 500- finis!
  • Member since
    March 2004
  • From: Paarl, South Africa
Posted by SeaBee on Tuesday, April 25, 2006 1:24 AM
Whoo-hoo! He's back! Was wondering what happened to you, mate!

Welcome back and enjoy the "fresh start"... a break never did anyone harm.
  • Member since
    April 2003
  • From: NSW, Australia
Posted by pingtang on Monday, April 24, 2006 7:19 AM
Hi fellas,

I sort of forgot about modelling for a few months, but I'm back into now. Still got my M1 under way. Don't know when I'll get around to finishing it, but I'll let you all know when it's done. There's some great looking progress been happening while I was away. Good work everyone.
-Daniel
  • Member since
    November 2005
  • From: Kalmar, Sweden
Posted by joelrydh on Monday, April 24, 2006 5:41 AM

I'd say it's not possible to build the ´05 Marlboro Desmosedici on the ´04 Tamiya kit. They'll be out with a ´05 Roberto Rolfo scheme soon wich uses the ´04 set up but I'd say the ´05 has a different look. I'll get back on in what way they differ.

Joel

  • Member since
    November 2005
Posted by Anonymous on Tuesday, April 18, 2006 5:16 AM

Hi Wolfpac, 

                    nothing like a challenge I say. I am getting some in a few weeks so will do a reveiw of the t/kit. Going by Renaissance standards they will be very good and I use the same printer so they are amongst the bestus.

Cheers  Rod.


  • Member since
    January 2006
  • From: Central Florida
Posted by wolfpac on Monday, April 17, 2006 9:54 PM
 This hobby is becoming more and more expensive.  Now I have to find a way to fit this one in Big Smile [:D]

http://www.renaissance-models.com/wip_proto_nsr_2001.htm

The decals seem highly complex.  I'm not sure if I have enough skill and Micro Sol to be able to build it Sad [:(]


If you love your bike let it go. If it comes back to you, you've highsided. http://public.fotki.com/luke76/
  • Member since
    January 2006
  • From: Central Florida
Posted by wolfpac on Sunday, April 16, 2006 8:22 AM
 Yamafreak72 wrote:
Nice one.Thumbs Up [tup] I like the blueing on the exhaust especially.  So am I to assume that the only difference between the '04 and '05 Desmo is in the markings? 


Thank you.

I do not believe that there were any bodywork modifications done between 04-05.  None that I could point out from a picture anyway.
If you love your bike let it go. If it comes back to you, you've highsided. http://public.fotki.com/luke76/
  • Member since
    February 2004
  • From: Quantico, VA
Posted by Yamafreak72 on Saturday, April 15, 2006 11:55 PM
Nice one.Thumbs Up [tup] I like the blueing on the exhaust especially.  So am I to assume that the only difference between the '04 and '05 Desmo is in the markings? 
Status: Nastro Azzurro NSR 500- finis!
  • Member since
    January 2006
  • From: Central Florida
Posted by wolfpac on Saturday, April 15, 2006 11:43 AM
 Yamafreak72 wrote:

Looks great, Wolfpac!  Quick question- I've read through our thread and I'm still a little confused, I've got Tamiya's Duc Desmo 14101, and I'm looking to get the Marlboro decals for it.  What year do I get?  Am I correct in assuming that the model is an '04?  I've already got the fork set, and that's about all the mods I plan on doing to this one meaning I don't want to do a bunch of chopping and pasting to make it an '05.  All I want is to make sure the markings are accurate. 

The Hayden RC's progressing just fine, pipes are painted and looking pretty good.  Might post pics later on. 


The Tabu Designs decals come with the option of the 04 and 05 set ups.  The nice thing about the Tabu decals is that they give you the option to paint the white potion of the side fairing by supplying extra decals for the black outline stripe and the solid black Marlboro decals.


Thank you BTW!  Here's a pic of the finished product


Here's the link to all the build pics
http://s63.photobucket.com/albums/h158/wolfpac52/

Erik
If you love your bike let it go. If it comes back to you, you've highsided. http://public.fotki.com/luke76/
  • Member since
    February 2004
  • From: Quantico, VA
Posted by Yamafreak72 on Friday, April 14, 2006 11:54 PM

Looks great, Wolfpac!  Quick question- I've read through our thread and I'm still a little confused, I've got Tamiya's Duc Desmo 14101, and I'm looking to get the Marlboro decals for it.  What year do I get?  Am I correct in assuming that the model is an '04?  I've already got the fork set, and that's about all the mods I plan on doing to this one meaning I don't want to do a bunch of chopping and pasting to make it an '05.  All I want is to make sure the markings are accurate. 

The Hayden RC's progressing just fine, pipes are painted and looking pretty good.  Might post pics later on. 

Status: Nastro Azzurro NSR 500- finis!
  • Member since
    January 2006
  • From: Central Florida
Posted by wolfpac on Sunday, April 9, 2006 3:46 PM
She's starting to look like a race bike!!!!!


If you love your bike let it go. If it comes back to you, you've highsided. http://public.fotki.com/luke76/
JOIN OUR COMMUNITY!

Our community is FREE to join. To participate you must either login or register for an account.

SEARCH FORUMS
FREE NEWSLETTER
By signing up you may also receive reader surveys and occasional special offers. We do not sell, rent or trade our email lists. View our Privacy Policy.