SEARCH FINESCALE.COM

Enter keywords or a search phrase below:

Winter Warriors GB 2008

82843 views
855 replies
1 rating 2 rating 3 rating 4 rating 5 rating
  • Member since
    November 2006
  • From: Coastal Maine
Posted by dupes on Friday, January 11, 2008 8:19 PM

Dahut, didn't you order that back in November?

Another big NFL weekend...looks like I'm going to be assembling the traveling workbench and heading downstairs for at least 4 games worth of coffee-table Panther building. Wink [;)]

  • Member since
    January 2007
  • From: Glue and paint smeared bench, in La La Land
Posted by dahut on Friday, January 11, 2008 7:08 PM
Still waiting on the Jaguar...
Cheers, David
  • Member since
    December 2002
  • From: Reno, NV
Posted by espins1 on Friday, January 11, 2008 12:17 PM
 dupes wrote:

Scott, thanks for posting those WIP shots - very interesting to see how you managed to achieve that great scheme. Are you going to go the same route on the Pz.III? 

I'm going to do something similar, but as to application of the white wash I haven't decided whether to brush or paint on the whitewash.  I need to find some reference photos of the scheme I'm doing so it will depend on the "look and feel" of the whitewash in the photos.  Burger [BG]

Scott Espin - IPMS Reno High Rollers  Geeked My Reviews 

  • Member since
    November 2006
  • From: Coastal Maine
Posted by dupes on Friday, January 11, 2008 8:34 AM

Good progress SMJ! Glad to see you're about to hit the painting...that's where it gets fun. Big Smile [:D]

Scott, thanks for posting those WIP shots - very interesting to see how you managed to achieve that great scheme. Are you going to go the same route on the Pz.III? 

  • Member since
    April 2007
  • From: Schroon Lake, NY
Posted by SMJmodeler on Friday, January 11, 2008 12:31 AM

Guys:

WIP-SU122.  I'm just about ready to start painting:
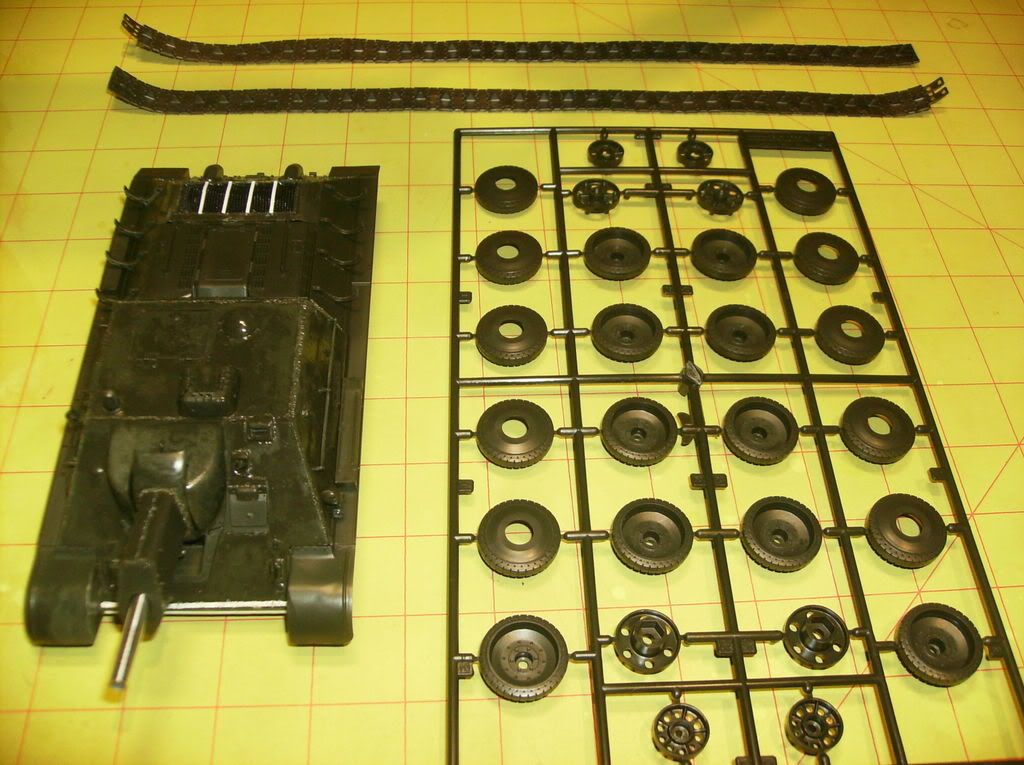
The assembly was a piece of cake on this kit.  The two areas of concern, which I knew were coming because I just built the T34 (SU122 is based on that kit), were the rear deck grill and the gap below the fenders.  Instead of spending the $ to buy the PE grill (mistake) I cut out the plastic and fashioned my own:
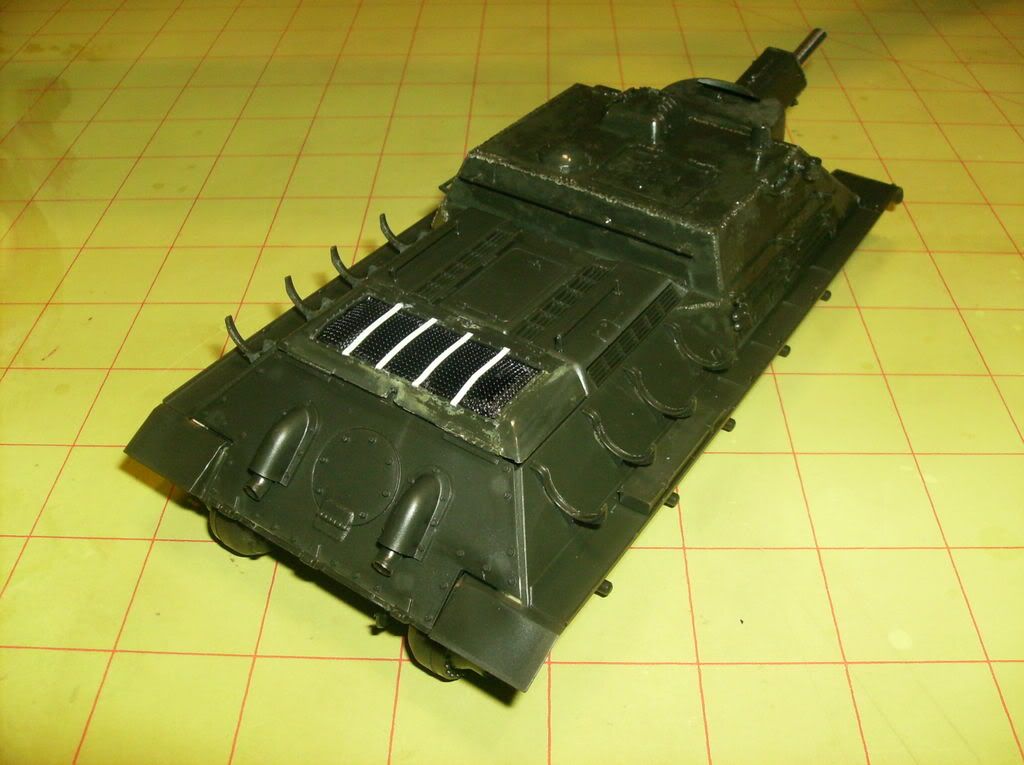
I am not real happy with the results, but from past experience I learned it's best to sometimes leave well enough alone and see if an idea comes along as I build to "improve" the situation.  I fixed the fender problem by adding styrene strips:
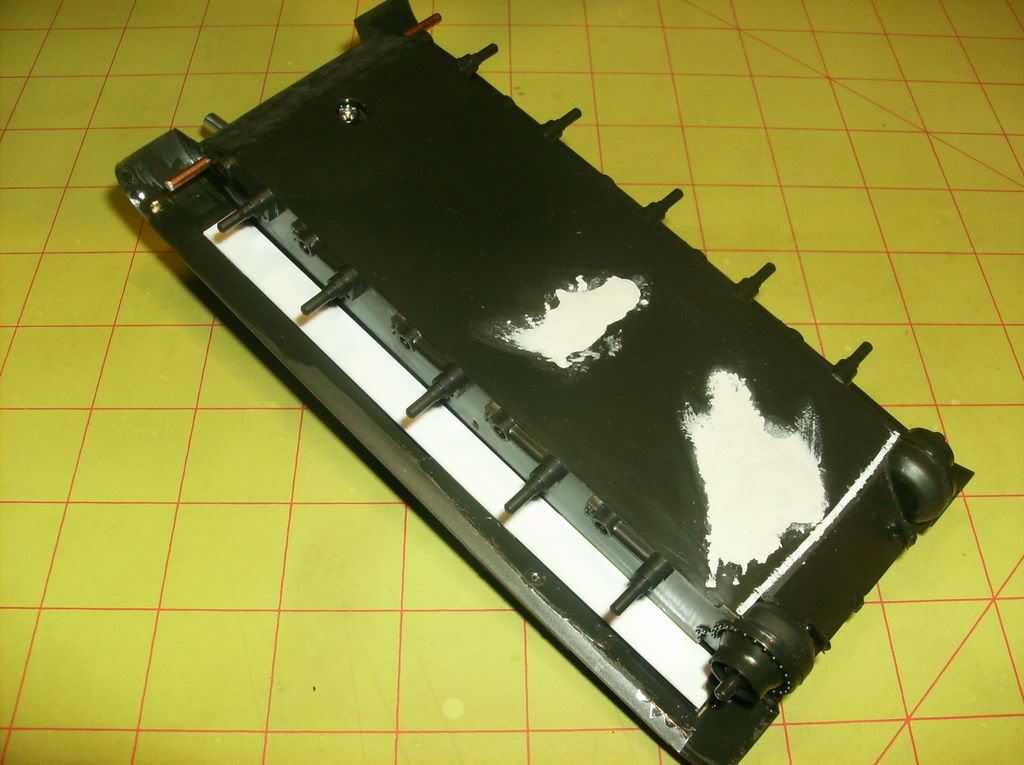
I'm not worried about small gaps or seam lines because they will get mud and/or snow later.   The putty will be sanded and the screw and hole, which adjusts track tension,  will get filled later too.

I added a strip of styrene at the front of the lower hull for some relief.  The kit had some weld seams molded in the plastic, but again from the experience with the T34, I found these were lost in the all the paint and weathering layers.  To accentuate those seams I added a styrene strip where I felt a seam was missing and then used a hot-tipped wood burning tool and burned the "welds" where appropriate:
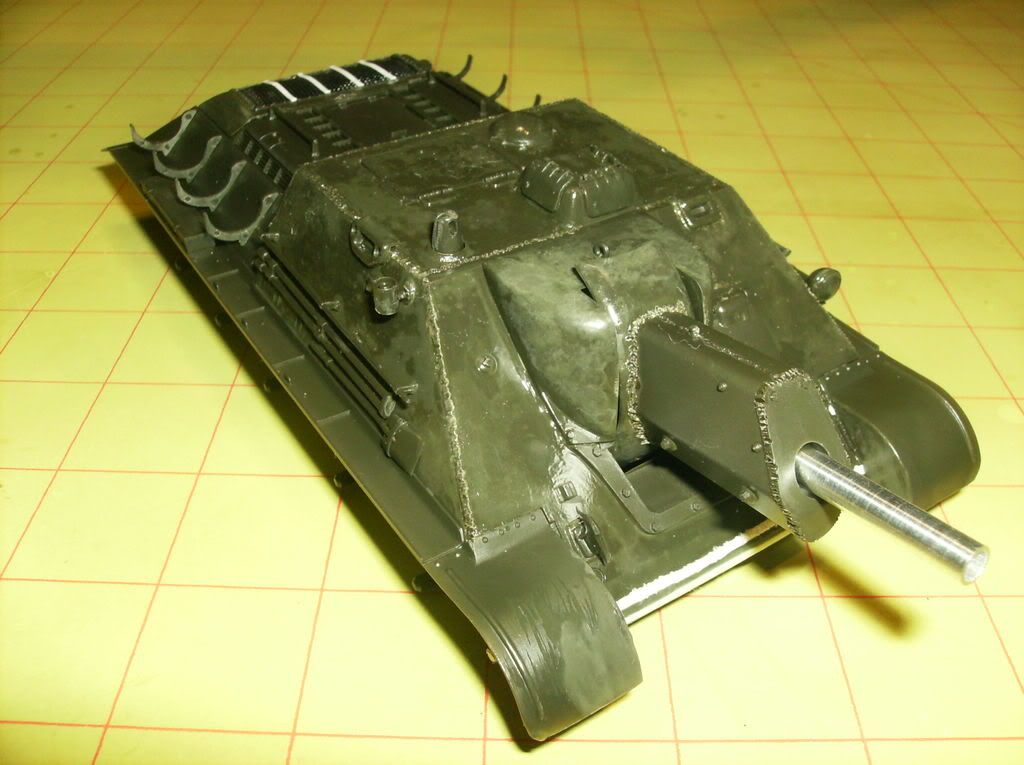
Also note how shiny the model is.  What I did was take the liquid plastic glue straight from the bottle and cover all the armor, small sections at a time.  The glue "burns" some texture on each panel.  I used 4-5 layers of glue on the parts that would be sandcast.  This technique is a substitute to Mr. Surfacer and sanding.

O.K....time to paint!!!

Question?: Does anybody know if the SU122 ever had the "box" type versus the "drum" type, reserve fuel tanks added to it?  I think the back of this beast would look good with this addition. (I'm leaving the drums off either way)  I may add the "boxes" anyway...it's a hobby for fun...afterall.

  • Member since
    December 2002
  • From: Reno, NV
Posted by espins1 on Thursday, January 10, 2008 9:43 PM
 arki30 wrote:

And like a total doofus I completely forgot I own Osprey's Bf109 Aces of the Russian Front.  There is good reference material in there for whitewash schemes. 

Excuse while I go read for awhile Big Smile [:D]

Laugh [(-D]Laugh [(-D]Laugh [(-D]

I was just about to start scanning some goodies out of that one for you!

Laugh [(-D]Laugh [(-D]Laugh [(-D]

Scott Espin - IPMS Reno High Rollers  Geeked My Reviews 

  • Member since
    February 2004
  • From: Second City
Posted by arki30 on Thursday, January 10, 2008 9:09 PM

And like a total doofus I completely forgot I own Osprey's Bf109 Aces of the Russian Front.  There is good reference material in there for whitewash schemes. 

Excuse while I go read for awhile Big Smile [:D]

Building Now:

1/48 Academy Bf-109G6 - 100%

1/48 Tamiya F4U-1A - 5%

Upcoming:

1/48 Revell F-14D

  • Member since
    February 2004
  • From: Second City
Posted by arki30 on Thursday, January 10, 2008 7:21 PM
 espins1 wrote:

Thanks!  Smile [:)]

I made a thinned mix of Tamiya Flat White XF-2 and basically ran the airbrush all over the plane in random, spaghetti noodle patterns holding the airbrush fairly close to the surface.  These are some of the references photos/profiles that I used for inspiration:

The decals went on after the whitewash.  Normally, on most schemes that you see, there should be areas where no whitewash was applied, especially around and on the numbers, balkenkreuz etc.  The references I had for Erich Hartmann's aircraft appeared to have had the markings applied after the whitewash.  He used this aircraft only temporarily while commanding JG54 (if I remember correctly).  The references show his aircraft was very well maintained and very clean. 

Woohoo!  Thanks for the pics, Scott.  I'm rethinking the whole decal sequencing now.  Because 1) it may be more accurate to place after the whitewash, and 2) it'll be soooo much easier. Smile [:)]


Building Now:

1/48 Academy Bf-109G6 - 100%

1/48 Tamiya F4U-1A - 5%

Upcoming:

1/48 Revell F-14D

  • Member since
    December 2003
  • From: Los Angeles
Posted by dostacos on Thursday, January 10, 2008 5:14 PM
 dupes wrote:

Wow! I see what you mean about that big gap...surprising from a Tamiya kit.

Were the M8's equipped with hedgerow devices?

Good luck filling that hole if you can't find one. Shock [:O]

eek! the top is not attached yet the gap is smaller, where the hedgerow cutter sitsWhistling [:-^]Ashamed [*^_^*]

EDIT: yes the Self propelled guns {squadron book} back cover shows one, I don't like the look so I plan on filling the hole. Most of the pictures also show it without the side fenders so they are GONESmile,Wink, & Grin [swg]

Dan support your 2nd amendment rights to keep and arm bears!
  • Member since
    December 2002
  • From: Reno, NV
Posted by espins1 on Thursday, January 10, 2008 3:54 PM

Thanks!  Smile [:)]

I made a thinned mix of Tamiya Flat White XF-2 and basically ran the airbrush all over the plane in random, spaghetti noodle patterns holding the airbrush fairly close to the surface.  These are some of the references photos/profiles that I used for inspiration:

The decals went on after the whitewash.  Normally, on most schemes that you see, there should be areas where no whitewash was applied, especially around and on the numbers, balkenkreuz etc.  The references I had for Erich Hartmann's aircraft appeared to have had the markings applied after the whitewash.  He used this aircraft only temporarily while commanding JG54 (if I remember correctly).  The references show his aircraft was very well maintained and very clean. 

When I originally put the decals on, the balkenkreuz decalss on the fuselage sides and upper wings and the yellow fuselage tail band wrinkled up something fierce when I applied some decal setting solution solution..... I ended up having to sand the decals off, which you can see in these pictures:

And then re-apply the whitewash in those areas, being very careful to replicate the same look and feel from the original, non-sanded areas around them.  It was tricky, but the gods must have been smiling down upon me that day.....

Scott Espin - IPMS Reno High Rollers  Geeked My Reviews 

  • Member since
    November 2006
  • From: Coastal Maine
Posted by dupes on Thursday, January 10, 2008 3:11 PM

Wow Scott, that 109 looks great. You managed to achieve almost EXACTLY the opacity with the whitewash coat that they were showing in Arki's markings scan. Thumbs Up [tup]Thumbs Up [tup]

Was that one coat of white over the top of the "usual" camo, or did you have to go with multiple passes? 

  • Member since
    February 2004
  • From: Second City
Posted by arki30 on Thursday, January 10, 2008 1:12 PM

Yep, Scott, that's essentially the same path I'll attempt to take.  Did you apply the decals after the whitewash? 

Post any reference pic you have!  I can use whatever I can get my grubby mitts on! Big Smile [:D]

Building Now:

1/48 Academy Bf-109G6 - 100%

1/48 Tamiya F4U-1A - 5%

Upcoming:

1/48 Revell F-14D

  • Member since
    December 2002
  • From: Reno, NV
Posted by espins1 on Thursday, January 10, 2008 12:07 PM

I do believe the underside should be RLM 76.  I did a similar scheme last year on a Hasegawa 1/32 Bf 109G-14 flown by Erich Hartmann.

First I free handed the upper camo, mostly for free hand airbrushing practice, but also to add to the realism of a slightly worn winter camo scheme.  I then deliberately sprayed it kinda patchy, yet with decent coverage at the same time. 

I have a few decent photos of various white washed schemes that I'd be more than happy to scan and post when I get home from work this evening.


Scott Espin - IPMS Reno High Rollers  Geeked My Reviews 

  • Member since
    February 2004
  • From: Second City
Posted by arki30 on Thursday, January 10, 2008 8:54 AM

Dupes, agreed on the picture not representing the underside color callout correctly.  And yep, I will have to paint the "regular" scheme before applying the whitewash so it will slightly show through.  You'll notice I'll also have to apply some or all of the markings as well since it appears that there is some overcoverage from the whitewash.  But that will be a pain in the Censored [censored] to get right.  Not looking forward to it. 

I'll have to spend some time doing more research before I start the painting.  For now I've started assembling the engine.  Nice detail, too bad none of it will be visible.

Building Now:

1/48 Academy Bf-109G6 - 100%

1/48 Tamiya F4U-1A - 5%

Upcoming:

1/48 Revell F-14D

  • Member since
    November 2006
  • From: Coastal Maine
Posted by dupes on Thursday, January 10, 2008 8:04 AM
 arki30 wrote:

Interesting that they mention the lower surfaces being RLM 76, but it doesn't look like it in the picture? Maybe it's just me being colorblind, but it all looks whitewashed to me.

So it looks like you need to do the whole "regular" upper scheme and then coat with a thin layer of white to get the original stuff to just show through. Should be very interesting! Big Smile [:D]

  • Member since
    November 2006
  • From: Coastal Maine
Posted by dupes on Thursday, January 10, 2008 6:17 AM

Wow! I see what you mean about that big gap...surprising from a Tamiya kit.

Were the M8's equipped with hedgerow devices?

Good luck filling that hole if you can't find one. Shock [:O]

  • Member since
    December 2003
  • From: Los Angeles
Posted by dostacos on Wednesday, January 9, 2008 7:58 PM

WIP My M 8 howitzer primed I think I will need to steal a hedgerow cutter for th front {either that or fill in the HUGE hole in the hull where it goes Sigh [sigh]


Dan support your 2nd amendment rights to keep and arm bears!
  • Member since
    December 2006
  • From: t.r.f. mn.
Posted by detailfreak on Wednesday, January 9, 2008 7:41 PM
Thumbs Up [tup]Thumbs Up [tup] when i was younger airplanes,especially the axis in wwII were of interest.hows about a do. 335 in winter camo.you should try modeling the way it ussually happens around here.i do believe i utilize just about all of the usable space in this here aaluminummmm trailer.couldnt imagine it any other way.Cool [8D]Laugh [(-D]. which unit did this 109 belong too? looking forward to seeing more of this one.hey look it tells the unit up there.DOH

[View:http://s172.photobucket.com/albums/w1/g-earl828/]  http://i158.photobucket.com/albums/t104/cycledupes/1000Roadwheels4BuildBadge.jpg

  • Member since
    February 2004
  • From: Second City
Posted by arki30 on Wednesday, January 9, 2008 7:07 PM

Dupes, here's the winter scheme I'll be butchering.

The ICM kit is interesting.  I've built two Tamiya Bf-109E-7's and this isn't quite the same level of engineering.  ICM provides a full engine which is cool, but I'm planning on closing the cowls so it's just more work for little gain.  This engine also means the nose section and cowls are seperate pieces, so I'm sure I'm in for some ugly seam work. 

There's a good review of this kit here:

http://aeroscale.kitmaker.net/modules.php?op=modload&name=Reviews&file=index&req=showcontent&id=2597

I was hoping the quality control issue on the plastic would be limited to only the reviewers kit, but sadly that's not the case.  The orange peel is in full effect on the wings and there is a lot of flash to clean up.

Sigh [sigh]

I think I can, I think I can.....

Oh, this will be totally OOB.  That's two in a row for me!  Feeling lightheaded....

Building Now:

1/48 Academy Bf-109G6 - 100%

1/48 Tamiya F4U-1A - 5%

Upcoming:

1/48 Revell F-14D

  • Member since
    December 2006
  • From: t.r.f. mn.
Posted by detailfreak on Tuesday, January 8, 2008 7:03 PM
ok,so perhaps i have a thing for assault guns and spg's.was webing the other evening and came across some info.the 3rd panzer grenadier div. had the 103rd panzer abteillung to which this panzer III belonged..also there were three knights cross recipients in this unit,stabsfeldwebel wilhelm wolf[zug commander] 3rd pz gr. 103rd pz abt. 2 kompanie,next washauptman ewald von stunzner[kompanie commander] 3rd pz.gr. 103rd pz abt. 3 kompanie these first two awarded in the summer and fall respectively.and the third in jan.hauptman rudolf haen 3rd pz. gr 103rd pz. abt. 1 kompanie.anyone else with more info. is greatly appreciated.Laugh [(-D]

[View:http://s172.photobucket.com/albums/w1/g-earl828/]  http://i158.photobucket.com/albums/t104/cycledupes/1000Roadwheels4BuildBadge.jpg

  • Member since
    February 2004
  • From: Second City
Posted by arki30 on Tuesday, January 8, 2008 2:01 PM
 dupes wrote:

Arki - can't wait to see that 109. You don't happen to have a scan of your markings sheet, do you...? Whistling [:-^]

Yeah, I should be able to come up with something for you.  It'll be tomorrow at best though.

Building Now:

1/48 Academy Bf-109G6 - 100%

1/48 Tamiya F4U-1A - 5%

Upcoming:

1/48 Revell F-14D

  • Member since
    November 2006
  • From: Coastal Maine
Posted by dupes on Tuesday, January 8, 2008 7:16 AM

Glad to see that lots of people are starting to make some progress! Sadly, I was ripping out my old power supply from my PC so the Panther sat idle on the bench all night. Angry [:(!]

Feldmarschall Model - dark yellow is definitely what you want as your base (in addition to  red/brown and dark green)...although for this build, the exact shade won't be CRITICALLY important, as most of it will be covered up in whitewash by the time you're done. Wink [;)]

Detailfreak - you must have StuG fever! Like the looks of those...

Arki - can't wait to see that 109. You don't happen to have a scan of your markings sheet, do you...? Whistling [:-^]

  • Member since
    July 2006
  • From: San Francisco Bay Area
Posted by bufflehead on Tuesday, January 8, 2008 1:05 AM

I think there is some confusion with the photos I posted today.  The first photo set is the DML Panzer IV...the one in gray styrene on the black cutting mat.  The 2nd photo of a more complete Panzer IV w/zim is an OLD Tamiya kit...tan styrene on the green cutting mat. I was just comparing the two for dupes.  Sorry if I misled anyone. Ashamed [*^_^*] The Pz IV I'm doing for this GB won't have any zim since the timeframe is a few months before zim was introduced.

BTW, the zim on that old Pz IV is hand applied using R&J Zimm-it-Rite AND Aves Apoxie Sculpt (experimenting with both!), but the model still isn't painted yet.  Its a definite shelf queen, sitting there for over a yearDisapprove [V]

Ernest

Last Armor Build - 1/35 Dragon M-26A1, 1/35 Emhar Mk.IV Female


Last Aircraft Builds - Hobby Boss 1/72 F4F Wildcat & FW-190A8


  • Member since
    February 2004
  • From: Second City
Posted by arki30 on Monday, January 7, 2008 11:39 PM
Alright, Dupes, I've finally started my 109.  Of course, I've only washed the parts but it's something! Big Smile [:D]

Building Now:

1/48 Academy Bf-109G6 - 100%

1/48 Tamiya F4U-1A - 5%

Upcoming:

1/48 Revell F-14D

  • Member since
    February 2006
  • From: Cincinnati Ohio
Posted by DantheMan85 on Monday, January 7, 2008 10:29 PM

Think I'll go with dark yellow, made some progress today.  This is what I've done, the turret is almost done.


On my Work Bench: Tamiya Ford GT 1/24

Up Coming: ?


  • Member since
    December 2006
  • From: t.r.f. mn.
Posted by detailfreak on Monday, January 7, 2008 9:52 PM
okay progress report.lower hull was prepared by removing the small locater pins for the suspension arms.with that done the torsion bars are test fitto insure freedom of movement at the arm end.the torsion bars then are installed as shown .suspension arms are then installed on the tosion bars,along with the shocks,bump stops and idler wheel adjuster.moving suspension,yes.also carefully drilled the escape hatch hinges to make those movable.notice the engine firewall and floor section are from the stug III early kit.they fit perfectly,making for a good scratchbuilt interior start.no one will ever know with the stug all buttoned up.pics

while waiting for the goo to dry i did a little turret work.the glass vision blocks are fussy.other than that this has been a pleasure so far.


heres a comparison between the pzrIII turret and the pzrIV.OH and a pair of winter stugs that will be set in adio. of an armored assault on a russian trenchline on the steppes outside stalingrad or moscow.
.thanks any input appreciated.My 2 cents [2c]Thumbs Up [tup]

[View:http://s172.photobucket.com/albums/w1/g-earl828/]  http://i158.photobucket.com/albums/t104/cycledupes/1000Roadwheels4BuildBadge.jpg

  • Member since
    February 2006
  • From: Smithers, BC, Canada
Posted by ruddratt on Monday, January 7, 2008 9:47 PM

 DHM wrote:
Mike, the actual color of German WW 2 tanks is not known for certain.  While the color was called dark yellow, the exact shade is unknown.  As long as it looks yellow, no one can prove that it is the right or wrong color, so I'm gonna say yes, almost any dark yellow will do. 

DHM, I know that you're correct in that. What I was stating was more of a personal preference. I once tried (in my earlier armor modeling days) middlestone as my dark yellow, but was unhappy with the results, as middlestone closely resembles yellow mustard in color. Just seemed a bit 'off' to me.

Mike

 "We have our own ammunition. It's filled with paint. When we fire it, it makes pretty pictures....scares the hell outta people."


DHM
  • Member since
    September 2007
Posted by DHM on Monday, January 7, 2008 9:29 PM
Ernest, that looks great so far.  From looking at my kit and the level of detail on yours I am amazed at how far Dragon has come. 
DHM
  • Member since
    September 2007
Posted by DHM on Monday, January 7, 2008 9:26 PM

Mike, the actual color of German WW 2 tanks is not known for certain.  While the color was called dark yellow, the exact shade is unknown.  As long as it looks yellow, no one can prove that it is the right or wrong color, so I'm gonna say yes, almost any dark yellow will do. 

dupes, sorry I haven't gotten back to you.  I'll be building DML's skdfz 164 Nashorn.  I mistook the older old version for the new one when I bought it, and the old one (based on my research) was DML's first armor kit.  Sign - Oops [#oops]

It won't be the most detailed model ever, but I think I'm up to the challenge.  I'll fix what I can on the kit, and this will be the first kit that I attempt to correct and/or modify.  The only AM I plan to use at this point is a new sproket set, as the kit parts are poorly detailed and don't fit the tracks. 

  • Member since
    February 2006
  • From: Smithers, BC, Canada
Posted by ruddratt on Monday, January 7, 2008 9:13 PM
 FeldMarSchall Model wrote:
 ruddratt wrote:

Dupes, bufflehead, thanks for the warm welcome fellas! Got a few projects that I'm in the process of buttoning up, and after those I'll be commencing on a few others, this one included.

FeldMarSchall Model , middlestone is one of the colors used by the RAF in their tropical camo schemes. Gunze and MM both make it. Might be a bit too yellow for your Tiger.


Didn't think I saw that at my LHS, but would dark yellow do? 

That's what I would go with, either Tamiya's or Model Master's.

Mike

 "We have our own ammunition. It's filled with paint. When we fire it, it makes pretty pictures....scares the hell outta people."


JOIN OUR COMMUNITY!

Our community is FREE to join. To participate you must either login or register for an account.

SEARCH FORUMS
FREE NEWSLETTER
By signing up you may also receive reader surveys and occasional special offers. We do not sell, rent or trade our email lists. View our Privacy Policy.