SEARCH FINESCALE.COM

Enter keywords or a search phrase below:

Battle of Britain GB 2008 - 21 June to 31 Oct 08

82881 views
1491 replies
1 rating 2 rating 3 rating 4 rating 5 rating
  • Member since
    December 2005
  • From: back seat of your car with duct tape streched out
Posted by soulcrusher on Monday, September 22, 2008 5:33 PM

Been real lazy when it comes to modeling lately. The Airfix Hurricane doesn't need much to be finished just can't seem to get of my butt and finish it. I think I was fritzoogeled once too! mabye it is going around like a flu?

                                                                           Soulcrusher


  • Member since
    February 2007
  • From: Bournemouth UK
Posted by Luftwoller on Monday, September 22, 2008 3:41 PM

Thunderbolt, I pity you, man. Your on that darn slippery slope. Today its cocpit masks....Tommorow its scratchbuilding doo-diddlydads in the whatchamakallum thingy whatits. I speak the truth man.. Be strong.

 sfcmac wrote:

 Guy!  I'm fritzoogled!

I was too, but thank the Lord for antibiotics. Dead [xx(]

...Guy

..'Your an embarrassment to the human genus, makes me ashamed to call myself Homo'.
  • Member since
    October 2004
  • From: League City, Texas
Posted by sfcmac on Monday, September 22, 2008 9:25 AM

Luftwoller !!!!! been trying to reach you all weekend! Forgot you don't check your PM's!!!!  Maybe some of the fellows here will let you know I'm looking for you!

Thunderbolt 369? 227? 578? Numbers numbers....... Those Mask look great and your right they are addictive! I think we should all be wary of such useful products as they slowly zap our skills!  An example would be how difficult is was for me to build models without electricity. I didn't touch one for a whole week but back in the days of Abraham Lincoln he used to build his Me-109's by candle light with glue made from old horses. Ran the airbrush with an old tire pump!

All I'm saying is be careful man!

 Guy!  I'm fritzoogled!

  • Member since
    April 2005
Posted by Thunderbolt379 on Monday, September 22, 2008 2:51 AM

Hi guys,

OOOOHHH!!! Me like Exress Masks!

Photobucket" border="0" />

Cheers,

Mike

http://worldinminiature.blogspot.com/

  • Member since
    February 2007
  • From: Bournemouth UK
Posted by Luftwoller on Monday, September 22, 2008 2:17 AM
 sfcmac wrote:

 Awesome work fellows! Missed a lot during the Hurricane ( not made by Hawker) Everything looks fantastic. Lots of 109's and a U-boat! Fantastic stuff!

oh there you are, Beginning to worry as youve not been around recently. Thought the Hurricane had taken you on vacation somewhere Big Smile [:D]

...Guy

..'Your an embarrassment to the human genus, makes me ashamed to call myself Homo'.
  • Member since
    April 2005
Posted by Thunderbolt379 on Sunday, September 21, 2008 10:09 PM

Hi Mike -- Great, Testor produce that one, I can probably pick it up locally. Thanks!

I'm putting the Express masks on the Emil -- they're an excellent product. If the ones for the Dornier are even a close-fit for the Squadron canopy for the Matchbox kit they'll really simplify those transparencies.

It's a grey, rainy day today, so no enamel spraying (outdoors). Might fade the acrylic camo on my Tiger, though...

Cheers,

Mike

http://worldinminiature.blogspot.com/

  • Member since
    December 2004
  • From: Yokosuka, Japan
Posted by luftwaffle on Sunday, September 21, 2008 9:33 PM
Mike, RLM 24 would be the correct blue for the spinners.

aka Mike, The Mikester My Website

"He has all the virtues I dislike and none of the vices I admire."   -Winston Churchill

  • Member since
    April 2005
Posted by Thunderbolt379 on Sunday, September 21, 2008 9:04 PM

Hi Dave, Bob and Karl,

Thanks for the kind words! I tried PVA for canopies years ago but the glue in this country is so very unreactive that it was barely any use for even temporary tack-in-place jobs. Breathe on it and it would fall off. Superglue spoiled me, I always expect rock-hard joints and I don't expect to hang around them them! Smile [:)]

I'll have another look for Pledge and see if it'll work as a Future substitute, and there's the Estapol clear I found last week.

Now, I need to tangle with the masks -- new experience coming up!

On the Dornier, I did the props the other day, now I need to do the hubs. The spinners are simply termed 'blue' on the Techmod instructions and I looked around for an RLM shade, RLM 24 Dark Blue is the only early-series blue I've come across. I know color photos are rare as hen's teeth from the era, but has anyone any thoughts on what blue they're talking about? I'm assuming it'll be a standard shade, same as RLM 04 for all the yellow signal trims of the period.

Bob -- I meant to say, great use of Lego for your painting stand!

Cheers,

Mike

http://worldinminiature.blogspot.com/

  • Member since
    November 2003
  • From: Nashville, TN area
Posted by bobbaily on Sunday, September 21, 2008 4:30 PM

Thanks Karl.  I'll be glad to finish this one.  For some reason, it has been a bit more challenging than it should have been.  Painting it the wrong colors for the period didn't help matters any....

Looking forward to seeing the 111 & Hurricane.  I remember that I built a 1/48 He-111 for the first BoB.  The cowling was quite a challenge.  I can't imagine doing a 1/72nd version Bow [bow].

 Keep us posted on the U-boat.  Looks like a fun build.

Bob


  • Member since
    July 2003
  • From: Bicester, England
Posted by KJ200 on Sunday, September 21, 2008 3:38 PM

Bob, stunning job on the sponge work paint finish.

Looking forward to seeing that one complete.

Mike, nice progress with the Tamiya Emil.

I use MicroKrystal clear or PVA for clear parts, no mess, and both are pretty tough too.

Dave, I was hoping to get some pics of both the 111 and the Hurricane done this weekend, but I've spent most of the weekend working on some fencing in the garden. 

Both are complete and sitting on the shelf, just can't seem to get around to taking some pics.

Karl


Currently on the bench: AZ Models 1/72 Mig 17PF

  • Member since
    November 2003
  • From: Nashville, TN area
Posted by bobbaily on Sunday, September 21, 2008 2:09 PM

Dave & Mike-thanks

Mike/TB379-your Emil is looking great.  Looking forward to seeing some paint on it.  I have found that if the canopy has been Futured, then CA glue won't cause fogging.  However, I'm sure that then next time I try that, it will fog.

For the paint application, I took a small piece of a sea sponge, applied paint and blotted it until almost dry and then applied to the plane. 

Bob


  • Member since
    September 2004
  • From: Vernon, BC, Canada
Posted by razordws on Sunday, September 21, 2008 1:42 PM

Karl, that's great news about the re-release of the type XXIII.  I'll have to deep an eye out for that.  Love the pic of your uboat but when do we get to see the He 111? Eh? Wink [;)] 

Bob, I think the sponge job came out pretty good. Thumbs Up [tup]  I still get a kick out of seeing your mega block pant stand.

Mike, the emil is looking good.  I always use pva (kids white school glue) for my canopies now - except for those complicated multi-part ones.

Aaron, glad to have you back.  Saw your pictures in the NAW thread and glad you had minimal damage.

Dave

  • Member since
    October 2004
  • From: League City, Texas
Posted by sfcmac on Sunday, September 21, 2008 1:31 PM

 Awesome work fellows! Missed a lot during the Hurricane ( not made by Hawker) Everything looks fantastic. Lots of 109's and a U-boat! Fantastic stuff!

  • Member since
    December 2004
  • From: Yokosuka, Japan
Posted by luftwaffle on Sunday, September 21, 2008 9:09 AM
Bob- Nice work on the camo!

aka Mike, The Mikester My Website

"He has all the virtues I dislike and none of the vices I admire."   -Winston Churchill

  • Member since
    April 2005
Posted by Thunderbolt379 on Sunday, September 21, 2008 9:01 AM

Hi all,

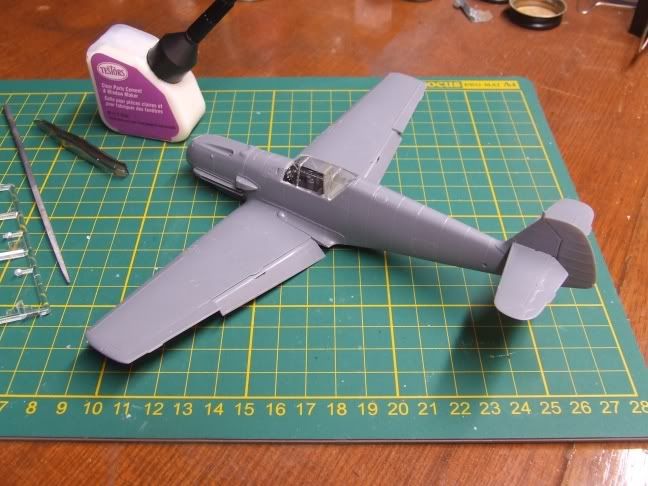
A little more progress on the Emil today. I've fixed the clear parts, including the gunsight, now in place and solid, and the second and third canopy elements. The special glue seems to be doing the trick but you have to let it cure well. Also, I doubt it would be too forgiving on ill-fitting parts. These, no bother. It remains to be seen if the glue will hold during the amount of handling required to do the masks.

Photobucket" border="0" />

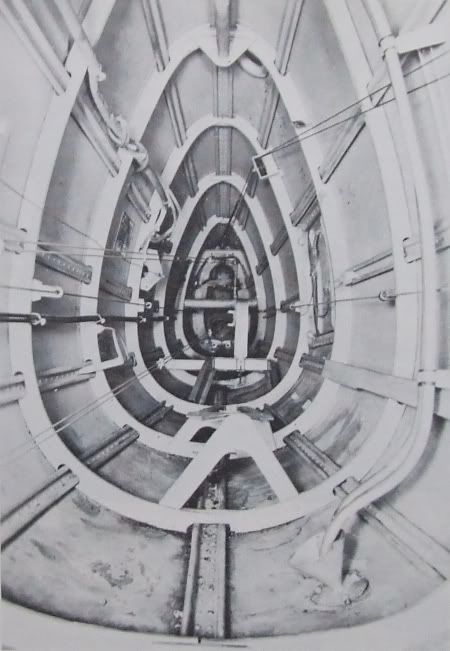
On the current discussion of structural seams in the Emil rear fuselage, here's a photo I found in Aerodata International: Fighters of WWII (Squad. Sig., 1981):

Photobucket" border="0" />

I see a major rivetted joint at the bottom, a seemingly less robust joint at the top, and panel attachments to the stringers all around. Hope this helps!

Bob -- the sponge camo came out amazing -- did you apply the paint with a fragment of Scotchbrite pad??? This is a finish I would love to try one day.

Great work on here, as ever!

Cheers,

Mike/TB379

http://worldinminiature.blogspot.com/

  • Member since
    November 2003
  • From: Nashville, TN area
Posted by bobbaily on Sunday, September 21, 2008 7:37 AM
Thanks Darren.  The lack of sponge camo on the hortizonal surfaces saves me one step.  However, I need to 'whitewall' the tail wheel now.....

Bob


  • Member since
    February 2003
  • From: Melbourne, Australia
Posted by darson on Sunday, September 21, 2008 5:52 AM

 Luftwoller wrote:

Oh yeah, great looking sub Karl. Shes a honey. Yet im pretty sure she didnt participate in the BOB. Im not fussed, i think she should get an honary entry.


...Guy


Guy that particular 109 is ok for the BoB (just) as Wick used it in those markings when he was given command of I./JG 2 on 7 Sept 1940.


Bob looking great on the sponge camo there and from my references the horizontal surfaces of all of Wick's aircraft were standard Luftwaffe splinter cam. Don't forget that the rudder was sponged and the whitewall tail wheel.

Cheers


  • Member since
    November 2003
  • From: Nashville, TN area
Posted by bobbaily on Sunday, September 21, 2008 5:50 AM
Thanks Steve. 

Bob


  • Member since
    July 2003
  • From: waynesboro va, via Ireland
Posted by sidure on Sunday, September 21, 2008 1:21 AM

Bob, very nice work on the camo job. I think your sponge work worked very well and looks the real deal. Dont know if you can improve on that. Good job.

Steve

  • Member since
    February 2007
  • From: Bournemouth UK
Posted by Luftwoller on Saturday, September 20, 2008 4:49 PM

Ill have to check my refs on the seams but im pretty sure that the 'E' had one on the top and nothing underneath yet the later types had a seam on the top and the bottom. Probably found out an easier and faster way to produce fuselages. I may be talking out of my A$$, as i say ill check my refs.

Oh yeah, great looking sub Karl. Shes a honey. Yet im pretty sure she didnt participate in the BOB. Im not fussed, i think she should get an honary entry.

...Guy

..'Your an embarrassment to the human genus, makes me ashamed to call myself Homo'.
  • Member since
    November 2003
  • From: Nashville, TN area
Posted by bobbaily on Saturday, September 20, 2008 4:31 PM

Dave-your Emil is looking great.  Very impressive.

Karl-nice job on the U-boat.  I need to diversify into other things than WW II planes & the occasion WW II armor & race car.

Mike-Thanks for the info.  I am going to leave both seams.  If necessary, I can make corrections on the next BoB build.  This one is wearing me out.

Anyway, this is the look that I'm going for on Wick's Emil:

I'm not really happy with my sponge job...might do some more work later...maybe not.

One question for the group-did Wick's plane have the hortizonal surfaces, i.e., wings, sponge camo'd also?

Thanks


Bob


  • Member since
    July 2003
  • From: Bicester, England
Posted by KJ200 on Saturday, September 20, 2008 4:20 PM

Dave, I keep looking at Revell's 1/72 Type VIIC, especially as one my LHS' has one at 20% off, but I don't know where the hell I'd put it.

Revell has just re-released the VIIC in 1/144, along with the XXI I'm working on now. Think that might be more my size.

Having siad that Airfix have just issued the ex-Special Navy Type XXIII in 1/72 which is very tempting.

The XXI just needs paint now, lots of it! Slightly off topic, but here's a pic.

The Emil looks great BTW.

Guy, I was always under the impression that the rear fusleage of the 109 was built up from clam shell sections, with a seam top and bottom. I've definitely got pics of 109Gs with both seams.

Karl


Currently on the bench: AZ Models 1/72 Mig 17PF

  • Member since
    December 2004
  • From: Yokosuka, Japan
Posted by luftwaffle on Saturday, September 20, 2008 1:28 PM
Dave- Really looking good!

aka Mike, The Mikester My Website

"He has all the virtues I dislike and none of the vices I admire."   -Winston Churchill

  • Member since
    December 2005
  • From: back seat of your car with duct tape streched out
Posted by soulcrusher on Saturday, September 20, 2008 11:57 AM

Hey T-botl I know what you mean about the Testors clear parts cement. I also have found it basicly usesless. It has no bonding qualities at all and is way to thin to even stay put. I have had great results with Microscale's Kristal Kleer. Not only does it bond clear plastic with decent strentgh but because it is pretty thick it also will fill in any small gaps between the canopy and the fuselage making for a great fit with no seams. The other great part is you can remove the canopy wihtout damaging it or the model if there anything needs touching up or breaks loose in the cockpit. It also is great for filling seams next to detail that you do not want to sand of. Just dab it on and wipe of the excess with a damp paper towel.

                                                                                     Soulcrusher


  • Member since
    December 2004
  • From: Yokosuka, Japan
Posted by luftwaffle on Saturday, September 20, 2008 11:29 AM
 Luftwoller wrote:
 luftwaffle wrote:
 bobbaily wrote:

Hey all-I'm making progress on the 109 & have decided to do Wick's plane, sponge camo and all.  However, I do have a basic 109E question-does the seam from the cockpit back show?  The only reference that I can dig out is a cut away drawing and it shows the seam.  If not, looks like I'll be filling & sanding tonight followed by a quick 'touch-up' job.......Whistling [:-^]

thanks all.

edit-Never mind.  I had a few minutes at lunch to research on the web and found photos of existing 109's that show no seam on the upper surface. I misread the Tamiya paint guide and thought the radio wire was a seam.  Banged Head [banghead]. Therefore, it's time to breakout the Squadron putty, nail polish remove and some masking tape and fix the problem.  Hopefully I will be able to fill, sand and repaint by the end of the weekend.  The plane had been Future'd, so I should be able to progress with decaling and maybe applying the first coat of sponge camo.  Or not.  Oh bother......Sigh [sigh]

Cheers

Bob, there was a seam along the top, it probably didn't show up well in the photos you dug up.  The 109 fuselage from aft of the cockpit was constructed of concentric halves so you had a seam on the bottom as well as the top, like so:

Great pic Luftwaffle, but im still pretty certain that there was just a seam on the top. That section you show was a large flat piece of steel that was bent around a former and then welded at the top. What you see at the bottom (The nick)  was cut into the strenghthening to prevent it kinking. when folded around.

Im on the search now for better pics. Big Smile [:D]

...Guy

Guy, I'm certainly no expert on metallurgy, maybe someone who is can chime in, but I don't think they could weld aluminum back then, these old crates were held together with rivets.  Although this is an "F" the construction would be identical to the Emil, you can see the seam along the bottom of the fuselage:

Moving inside, if you look at the spars in the 12 and 6 o'clock positions notice they have a double row of rivets, this is where each half of the fuselage "ring" section would be affixed.

Although these are drawings and subject to human error, they came from a pretty trusted source and also illustrate the double row of rivets along the top and bottom seam:

aka Mike, The Mikester My Website

"He has all the virtues I dislike and none of the vices I admire."   -Winston Churchill

  • Member since
    February 2003
  • From: A Spartan in the Wolverine State
Posted by rjkplasticmod on Saturday, September 20, 2008 9:13 AM

Dave,  Mighty fine 109 Thumbs Up [tup].

Regards,  Rick

RICK At My Age, I've Seen It All, Done It All, But I Don't Remember It All...
  • Member since
    February 2007
  • From: Bournemouth UK
Posted by Luftwoller on Saturday, September 20, 2008 3:52 AM

Wow, shes looking sweet Dave, The finish so far looks flawless.

Mike, heres a link that might help you with your cocpit search. As far as im know, the parts you refer too are for the cockpit head armor. This was an angled steel shield with a clear section to allow the pilot to look over his shoulder. I also think if it was an early 'E' then you could get away without head armor at all.

http://www.ipmsstockholm.org/magazine/1997/07/stuff_eng_detail_bf109e.htm

...Guy

..'Your an embarrassment to the human genus, makes me ashamed to call myself Homo'.
  • Member since
    February 2007
  • From: Bournemouth UK
Posted by Luftwoller on Saturday, September 20, 2008 3:42 AM
 luftwaffle wrote:
 bobbaily wrote:

Hey all-I'm making progress on the 109 & have decided to do Wick's plane, sponge camo and all.  However, I do have a basic 109E question-does the seam from the cockpit back show?  The only reference that I can dig out is a cut away drawing and it shows the seam.  If not, looks like I'll be filling & sanding tonight followed by a quick 'touch-up' job.......Whistling [:-^]

thanks all.

edit-Never mind.  I had a few minutes at lunch to research on the web and found photos of existing 109's that show no seam on the upper surface. I misread the Tamiya paint guide and thought the radio wire was a seam.  Banged Head [banghead]. Therefore, it's time to breakout the Squadron putty, nail polish remove and some masking tape and fix the problem.  Hopefully I will be able to fill, sand and repaint by the end of the weekend.  The plane had been Future'd, so I should be able to progress with decaling and maybe applying the first coat of sponge camo.  Or not.  Oh bother......Sigh [sigh]

Cheers

Bob, there was a seam along the top, it probably didn't show up well in the photos you dug up.  The 109 fuselage from aft of the cockpit was constructed of concentric halves so you had a seam on the bottom as well as the top, like so:

Great pic Luftwaffle, but im still pretty certain that there was just a seam on the top. That section you show was a large flat piece of steel that was bent around a former and then welded at the top. What you see at the bottom (The nick)  was cut into the strenghthening to prevent it kinking. when folded around.

Im on the search now for better pics. Big Smile [:D]

...Guy

..'Your an embarrassment to the human genus, makes me ashamed to call myself Homo'.
  • Member since
    April 2005
Posted by Thunderbolt379 on Saturday, September 20, 2008 2:58 AM

Hi Dave -- the Emil is looking fantastic!!!

Thanks for the info. Bunnings was the chain I went to last week, and I've checked my local Woolworths from time to time but never spotted 'One Go' -- yet. I'll keep looking! I'll read the article later on.

I did some experimental spraying this afternoon. Besides some more 02 details and getting five props into satin black, including the props for the Dornier, I had a go at fineline work again. I just got Chris Mrosko's first book for VLS and he mentioned cranking the pressure up two or three times higher than I've ever worked before, and it seems to have done the trick! I think I can fairly confidently do mottle now, though doing the overspray for my Tiger (Big Cats) used a LOT of air, a third of my gas bottle. With practice I should be able to work more econmomically, and the spots down the flank of a fighter should only take a few moments to apply.

Cheers,

Mike

http://worldinminiature.blogspot.com/

  • Member since
    September 2004
  • From: Vernon, BC, Canada
Posted by razordws on Saturday, September 20, 2008 1:41 AM

Karl, I asked about the uboat project because I recently picked up the Rev-Ger 1/72 Uboat VIIC/41 to go along with my Snowberry!  Don't know what I was thinking but the size looks impressive even in the box. Big Smile [:D]  Hope to see some pics of your build when its done!

Mike, according to Swanny's article on future a similar item called 'Pledge One Go' is availble in Australia in the following stores, Coles Supermarkets, Woolworth's, Supa Valu, Newmart, Bunnings

If you want to check out Swanny's article it is here http://www.swannysmodels.com/TheCompleteFuture.html


I spent the night getting the decals on my 109 while the wife was out partying with the girls. Disapprove [V] 

Dave

JOIN OUR COMMUNITY!

Our community is FREE to join. To participate you must either login or register for an account.

SEARCH FORUMS
FREE NEWSLETTER
By signing up you may also receive reader surveys and occasional special offers. We do not sell, rent or trade our email lists. View our Privacy Policy.