SEARCH FINESCALE.COM

Enter keywords or a search phrase below:

Battle of Britain GB 2008 - 21 June to 31 Oct 08

82881 views
1491 replies
1 rating 2 rating 3 rating 4 rating 5 rating
  • Member since
    April 2005
Posted by Thunderbolt379 on Saturday, September 27, 2008 9:44 AM

Guy -- got some 18mm for another job and used some of that -- it helps!

Steve -- she's looking good!

Made some progress today. It was hot and windy, I didn't think I was going to get any spraying done but in the late afternoon I got a calm window of opportunity, so I quickly applied the RLM 71. Here she is, sprayed through the masks:

Photobucket" border="0" />

And with the phase 1 masking removed:

Photobucket" border="0" />

Next, phase 2 masking, and apply the RLM 65.

Cheers,

Mike

http://worldinminiature.blogspot.com/

  • Member since
    February 2007
  • From: Bournemouth UK
Posted by Luftwoller on Saturday, September 27, 2008 4:38 AM

Oh yes, Steve. Shes looking ace mate. That is soo on my to build list.

...Guy

..'Your an embarrassment to the human genus, makes me ashamed to call myself Homo'.
  • Member since
    July 2003
  • From: waynesboro va, via Ireland
Posted by sidure on Friday, September 26, 2008 9:17 PM

OK, here I am with the 200. Still too damp to paint downstares. The underside is totally taped up and the top is ready to go.

Hopefull paint will follow soon.

Steve

  • Member since
    February 2007
  • From: Bournemouth UK
Posted by Luftwoller on Friday, September 26, 2008 3:05 PM

Fantastic progress Mike, I know your pain with the tamiya tape though. Why not get some of the wider stuff? Its 12mm or 15mm. It would save you a fortune LOL.

...Guy

..'Your an embarrassment to the human genus, makes me ashamed to call myself Homo'.
  • Member since
    July 2003
  • From: waynesboro va, via Ireland
Posted by sidure on Friday, September 26, 2008 1:20 PM

Mike, nice progress on both of your builds. Know what ya mean about masking tape. After masking the condor I am very low on tamiya tape and have to re-supply. I will post a photo of it later. Still too damp in the basement to spray the rlm 70. Might give it a shot tonight though, the wait is killing me. I did gloss coat the 109 to seal everything up so its on to dullcoat and weathering soon.

Steve

  • Member since
    April 2005
Posted by Thunderbolt379 on Friday, September 26, 2008 11:39 AM

Hi Steve and Scott -- masking, masking, masking! I gotta reorder 6mm Tamiya tape soon. Here's the Emil as she stands tonight:

Photobucket" border="0" />

I decided to follow the box top art as far as the wingroot demarkation is concerned. Everything is on for the RLM 71 tomorrow. I've decided to not try to mask the wheelwells as they are, but let them collect 65 when I spray the bottom, then remask around them and blow them back into 02. Masking on the lower surface of the wing will be far easier than masking the edges of the wells themselves.

Also, I used wet tissue to mask the exhaust receivers and the intakes of the underwing rads, tamping it into place with a probe. It'll mostly dry out overnight and after painting I'll easily hook it out with my scribing tool.

Then I went on to the Dornier for a while. I mounted the cockpit and closed the fuselage -- what a carry-on! Inadequate locational devices throughout -- one side of the fuselage has a peg, the other a tab-slot! the cockpit platform was not wide enough to sit on both the molded ledges so I added a strip of styrene to the one to starboard. The control column interfered with the fit of the cockpit into the port half, so I trimmed it shorter, which also put the yoke in the pilot's lap instead of drifting before his face. The fit of none of the parts is good. Note the huge ejector pin mark.

Photobucket" border="0" />

Then I closed the fuselage with superglue. The lack of alignment devices meant it was never going to be a great fit, and I spent the rest of the evening working with cya and a knife to fill and adze away the joint lines, finally wet-polishing them with 1200 wet'n'dry. The structure is not too bad, and I can now look at finishing the panel lines, scribing those that cross the midline, like the bomb bay doors. The wing is a very tight fit but the mating surfaces are malformed, presenting a lip that interferes with the general contours, and will need to be filed and adzed back before joining. Here she is with the wings and tail press-fitted, and before the fuselage joints were properly dressed:

Photobucket" border="0" />

At last, she's starting to look like a Do 17! Long way to go yet, though.

I can't wait to get back to armor myself, Scott! The PE for my Merkava is due early next week at the latest, so I can finlly finish my IDF entry.

Cheers,

Mike

http://worldinminiature.blogspot.com/

  • Member since
    December 2002
  • From: Reno, NV
Posted by espins1 on Friday, September 26, 2008 9:37 AM

Thunderbolt379 - I wouldn't sweat it.  In all honesty it's so difficult to even notice the top and bottom seam in photos that it really isn't worth worrying about, know what I mean?  :)

I've been spending most of my time over at the "dark side" building lots of tanks.  My Das Reich Tiger took 2nd at our local model contest this month.  Plus I've been doing a lot of writing for Armorama.com.

Anyway, at least my Bf 109E-3 has been started and further progress will be made soon.  Maybe that will bring me back!  LOL 

Scott Espin - IPMS Reno High Rollers  Geeked My Reviews 

  • Member since
    July 2003
  • From: waynesboro va, via Ireland
Posted by sidure on Thursday, September 25, 2008 10:58 PM

I too have been masking like crazy. I finished the splinter camo masks last night and what a job it was. I planed to paint tonight but its raining all day and way to damp for the airbrushing. I will do it tomorrow hopefully.

Steve

  • Member since
    April 2005
Posted by Thunderbolt379 on Thursday, September 25, 2008 9:23 PM

Hi Sc -- thanks! I just masked the left wing with Tamiya tape and it looks like it'll go down fine. I'll keep on with the masking today, probably do the wheelwells in this round, and lay on the 71 tomorrow. It's quite an experience doing a kit this good, no fights, just the challenge of the techniques themselves. I've masked splinter camo mentally many times, my hands now just seem to be following the routemap!

Cheers,

Mike

http://worldinminiature.blogspot.com/

  • Member since
    December 2005
  • From: back seat of your car with duct tape streched out
Posted by soulcrusher on Thursday, September 25, 2008 8:44 PM

Your welcome Mike. Looks like you have a handle on things even though you have alot on your plate. Seems to me you are making great progress.

Scott I was wondering what GB swallowed you up! I have'nt seen a post from you in a while. I heard rumors you hade gone over to the dark side? Say it ain't so Joe!

                                                                                     Soulcrusher


  • Member since
    April 2005
Posted by Thunderbolt379 on Thursday, September 25, 2008 7:41 PM

Hi Scott -- good to see you round the BoB! Darn, I needn't have gone to the trouble of dressing the joint... Oh well, I'll know in future!

Sc -- terrific, I thought so, now all I need do is mask the exposed portion of the flaps.

I'm hoping to get to the Emil's masking today -- wheelwells and start the splinter camo -- and do some structural stuf on the Do.

Cheers,

Mike

http://worldinminiature.blogspot.com/

  • Member since
    December 2005
  • From: back seat of your car with duct tape streched out
Posted by soulcrusher on Thursday, September 25, 2008 7:03 PM

T-Bolt the exposed area under the leading edge slats or flaps when in the down position should be RLM 02 on the Emil's I am not sure about the F or G series as I have build one yet.

                                                                                 Soulcrusher


  • Member since
    December 2002
  • From: Reno, NV
Posted by espins1 on Thursday, September 25, 2008 2:33 PM
 Luftwoller wrote:

Ill have to check my refs on the seams but im pretty sure that the 'E' had one on the top and nothing underneath yet the later types had a seam on the top and the bottom. Probably found out an easier and faster way to produce fuselages. I may be talking out of my A$$, as i say ill check my refs.

Oh yeah, great looking sub Karl. Shes a honey. Yet im pretty sure she didnt participate in the BOB. Im not fussed, i think she should get an honary entry.

...Guy

Sorry for being so late to the party on this issue.  All Bf-109s had the seam on the top and the bottom.  It had to do with the way they were constructed.  The two halves of the fuselage were built separately then bolted together.  The sheets of metal attached at the top and bottom, so the seams existed on ALL variants of the Bf-109.

There is some fantastic work going on here gentlemen!  I've actually started my Bf-109 E-3, but had to push it off to the side for a bit to meet a few quickly looming deadlines, which I'm sure most of you can relate to.  Smile,Wink, & Grin [swg]

Scott Espin - IPMS Reno High Rollers  Geeked My Reviews 

  • Member since
    April 2005
Posted by Thunderbolt379 on Thursday, September 25, 2008 11:06 AM

Hi Mike,

GRR! No standardization strikes again! Well, in that case I'm inclined to trust Tamiya's research and follow the boxtop. The top and the profile drawings don't necessarily match, of course... Airfix released their 1:24 Emil in these markings (Galland, Kommandeur II/JG26, red griffon) back in the 70s, it was the alternate choice backing up Helmut Wick's yellow nose/green mottle scheme. I wonder if their research was necessarily any better...

Do you have any photos of this bird? I've searched my printed matter but nothing yet showing the wingroots. Hmm, wasn't research supposed to be one of the really fun parts of this hobby?

Another point:the kit indicates that if building the slats deployed, the internal wing skin revealed should be RLM 65. It mentions nothing about the revealed area when the flaps are built down. Any idea what those areas should be? 02?

Cheers,

Mike

PS: I checked my local Woolworths and Pledge products are on the shelf, they had a wood polish and a wood cleaner, both bright gold in the bottle -- no 'One-Go' clear acrylic yet.

http://worldinminiature.blogspot.com/

  • Member since
    December 2004
  • From: Yokosuka, Japan
Posted by luftwaffle on Thursday, September 25, 2008 10:42 AM

Does it follow the baseline of the wing root, or the top line of the concave fairing panel, and if so, what's the trailing edge conformation?

To answer your question, yes... Wink [;)]

Mike, I've seen it both ways and I don't know if there was a standard for this.  I usually try to work off a photo of the real aircraft but that doesn't always work either.

aka Mike, The Mikester My Website

"He has all the virtues I dislike and none of the vices I admire."   -Winston Churchill

  • Member since
    April 2005
Posted by Thunderbolt379 on Thursday, September 25, 2008 8:19 AM

Aaron and Guy -- ah, fellers, when it comes to aftermarket thingums, tools and gadgets, and the gentle art of scratchbuilding, I'm already a lost cause. Today I seriously considered buying a lathe and learning to use it, so I can turn the fuselages for spectacular classic rocketships... To be vacformed or slush-cast. What did I say, hopeless?! Last yasr I finished a 1:72 SF jetplane scratchbuild, it took me three years, there were 17 patterned and cast parts... Good news is it was published and looked great in print!

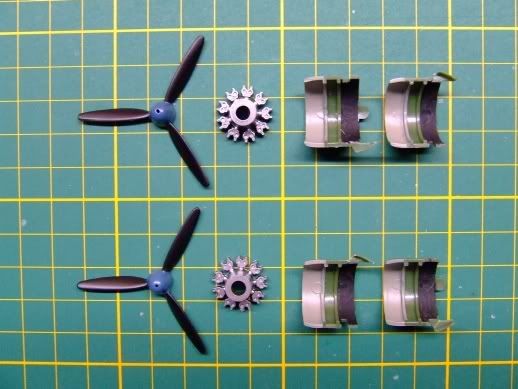
I got some work done today on both BoB projects, and faded the camo on my Tiger. Below are some Dornier parts, all sprayed up. Prop blades are Humbrol 85, spinners are RLM 24, engines are mixed metallic, and the cowlings are RLM 02 forward and flat black at the rear to beat the see-through nature of the engine cylinders.

Photobucket" border="0" />

I did some work on the cockpit tonight, it's pretty crappy but provides something to be seen through the greenhouse. I have the pilot figure done and in, next the control column is added. I've mounted the instrument panel (panzer gray with white dials) to the left fuselage half, and will add the cockpit platform tomorrow. The other three crew figures will mount through the canopy aperture, so I can go ahead and close the fuselage before painting them.

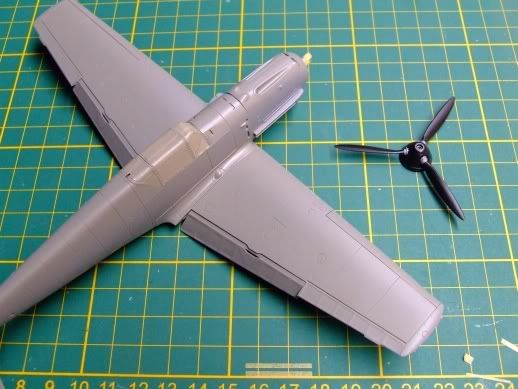
I also did some work on the Emil. I finished the prop, just a couple of touchups, and the big job today was spraying the RLM 02. I mounted the flaps pormanently and masked (Maskol) the locators for the canon barrels and radio mast. Then I sprayed the 02 for the wings and tails plus fuselage top, including the inside color for the canopy struts. It shows best on the fuselage sides here (gray on gray is never going to be very clear). Here she is:

Photobucket" border="0" />

Okay, 109 E Experten! What's the story on the wing-to-fusleage camo demarkation line? It's never very clear from profiles as the wing dihedral hides it. Does it follow the baseline of the wing root, or the top line of the concave fairing panel, and if so, what's the trailing edge conformation? I watched The Movie last night but there were only a couple of shots where you could see this part of a 109 clearly and they were gone in a flash... I don't seem to have photos that show this element and I hesitate to take the box art as gospel.

Looking forward to any pointers,

Cheers,

Mike/TB379

http://worldinminiature.blogspot.com/

  • Member since
    December 2005
  • From: back seat of your car with duct tape streched out
Posted by soulcrusher on Wednesday, September 24, 2008 8:58 PM

Andrew I read a review of the Pegasus kit and the kit got pretty good reviews. It was in FSM a coupleof months back. Simple construction and it looked pretty good in the pics. my local hobby store has a couple in stock and I looked at them breifly. They look to have better detail than the old Airfix kit!

                                                                                  Soulcrusher


  • Member since
    September 2006
  • From: From Vernal UT OH YEA!!
Posted by raptordriver on Wednesday, September 24, 2008 8:00 PM

Thanks Rick,Steve,Mike,bob,Guy and Dave

Soulcrusher, Thanks also, I should get a early hurricane, I saw a Pegusus Hobby review. Again thanks always makes me want to post more.

And for the canopy masking, I use liquid masking for it. I apply it with a toothpick and if I use to much I can just scrape it off. Then paint over it and dig it off with a toothpick. I can post pictures if you want.Smile [:)]

Andrew


  • Member since
    September 2004
  • From: Vernon, BC, Canada
Posted by razordws on Wednesday, September 24, 2008 7:49 PM
Ditto all the above Andrew.  Let's see, two spits against a Me 109 and a 110...  gotta like the odds for the RAF! Big Smile [:D]

Dave

  • Member since
    November 2003
  • From: Nashville, TN area
Posted by bobbaily on Wednesday, September 24, 2008 7:11 PM
Great work Andrew.  Very impressive.

Bob


  • Member since
    December 2004
  • From: Yokosuka, Japan
Posted by luftwaffle on Wednesday, September 24, 2008 3:26 PM
Nice work, Andrew!

aka Mike, The Mikester My Website

"He has all the virtues I dislike and none of the vices I admire."   -Winston Churchill

  • Member since
    February 2007
  • From: Bournemouth UK
Posted by Luftwoller on Wednesday, September 24, 2008 2:40 PM

Nice job Andrew. You did a great job on the canopy. What an ace BOB collection you have as well.

Notch another up for the Invasion fleet...JA!!!

...Guy

..'Your an embarrassment to the human genus, makes me ashamed to call myself Homo'.
  • Member since
    December 2005
  • From: back seat of your car with duct tape streched out
Posted by soulcrusher on Wednesday, September 24, 2008 11:33 AM

Looks good Andrew. Where are the Hurricane's though?

                                                                            Soulcrusher


  • Member since
    July 2003
  • From: waynesboro va, via Ireland
Posted by sidure on Tuesday, September 23, 2008 10:22 PM

Very nice build Andrew. It turned out well and god job on the finish

Steve

  • Member since
    February 2003
  • From: A Spartan in the Wolverine State
Posted by rjkplasticmod on Tuesday, September 23, 2008 9:41 PM

Nice build Andrew.  Well done.

Regards,  Rick

RICK At My Age, I've Seen It All, Done It All, But I Don't Remember It All...
  • Member since
    September 2006
  • From: From Vernal UT OH YEA!!
Posted by raptordriver on Tuesday, September 23, 2008 9:35 PM

Ok here is my finished Bf-110. I have been finished for a few days and it took me exactly a week to finish it. I used prisma pencils for the interior, and used tamiya and tenex glues instead of Testors(I will not use testors againWink [;)] I tried to fill the wing seams, because I haven't done that before. Here it is.

506253162210_0_BG.jpg picture by Raptor94

106253162210_0_BG-1.jpg picture by Raptor94

306253162210_0_BG.jpg picture by Raptor94

316253162210_0_BG.jpg picture by Raptor94

516253162210_0_BG.jpg picture by Raptor94

Hey a Chicken!

Hope this won't make any of you mad, but here is the whole BOB collection I have. My dad and I built the Spits along time ago.

126253162210_0_BG.jpg picture by Raptor94

326253162210_0_BG.jpg picture by Raptor94

826253162210_0_BG.jpg picture by Raptor94

Thanks for Looking!Smile [:)] All comments very welcome.

Andrew


  • Member since
    November 2003
  • From: Nashville, TN area
Posted by bobbaily on Tuesday, September 23, 2008 7:27 PM
 sfcmac wrote:

 bobbaily wrote:
Thanks Frank.  I think that I will expirement a bit with the sponge & paint on a test mule and see if I can get a light enough coat & then add some to 109.

Let me know how the sponge thing works out! Looks great so far! I am having trouble finding a suitable sponge to try it myself. Mine keeps squirming!

I just realized this could be Mr. Baily's new call sign!

Aaron-Thanks. I found a small sea sponge at my LHS and I cut off a small section (about the size a 1/48 scale 'natural' sponge would be), dab it into some paint, then blot it until almost dry.  I hold the sponge with a pair of long tweezers & dab onto the fuselage.

As far as the new call sign.....I'll get back with you.....Wink [;)]

Bob


  • Member since
    October 2004
  • From: League City, Texas
Posted by sfcmac on Tuesday, September 23, 2008 2:24 PM

 bobbaily wrote:
Thanks Frank.  I think that I will expirement a bit with the sponge & paint on a test mule and see if I can get a light enough coat & then add some to 109.

Let me know how the sponge thing works out! Looks great so far! I am having trouble finding a suitable sponge to try it myself. Mine keeps squirming!

I just realized this could be Mr. Baily's new call sign!

  • Member since
    November 2003
  • From: Nashville, TN area
Posted by bobbaily on Tuesday, September 23, 2008 11:13 AM
Thanks Frank.  I think that I will expirement a bit with the sponge & paint on a test mule and see if I can get a light enough coat & then add some to 109.

Bob


  • Member since
    January 2007
Posted by thuds1 on Tuesday, September 23, 2008 9:58 AM

 Bob,

 The sponge finish looks real good so far ,maybe  just put on a little more.

 Just looking in on this build makes me want to do one next year , there is alot of GREAT

 jobs being done here by all.Bow [bow]

  Frank

JOIN OUR COMMUNITY!

Our community is FREE to join. To participate you must either login or register for an account.

SEARCH FORUMS
FREE NEWSLETTER
By signing up you may also receive reader surveys and occasional special offers. We do not sell, rent or trade our email lists. View our Privacy Policy.