SEARCH FINESCALE.COM

Enter keywords or a search phrase below:

Battle of Britain GB 2008 - 21 June to 31 Oct 08

82880 views
1491 replies
1 rating 2 rating 3 rating 4 rating 5 rating
  • Member since
    April 2005
Posted by Thunderbolt379 on Thursday, October 9, 2008 11:30 PM

Hmmmm... I'm spraying at low pressure and wide apperture and it's still drying too quick. It's a warm day here, that could be affecting it too. I'll need to do some more experiments, but unless I can get a dependably smooth coat, I might de-prioritize the gloss.

Okay, I now have a panel wash drying on the test strip, on both glossed and unglossed areas.

Thanks for the tips!

Cheers,

Mike

http://worldinminiature.blogspot.com/

  • Member since
    September 2004
  • From: Vernon, BC, Canada
Posted by razordws on Thursday, October 9, 2008 11:24 PM
Mike, the bumpiness is usually caused by the paint drying too quickly before it has a chance to level out.  You want to get a nice moist layer on the plastic but not enough for it to run.  You can try holding your airbrush closer to the model so that the paint has less time to dry before it hits the model.  You can also try opening up the tip more to get more paint on it so that it pools and has a chance to level out.  Hope this helps.

Dave

  • Member since
    April 2005
Posted by Thunderbolt379 on Thursday, October 9, 2008 11:05 PM

Hi Dave,

I'm just doing some experiments as we speak. Earlier, I scribed some quick panel lines into a piece of plasticard, then blew it into RLM 71 (enamel). I've just had a go with X-22: my first experiment was to use 50% thinner, the same thinning ratio as for pigmented paint (clear will be a related carrier, I'm assuming), and the result was decidedly 'orange-peel.' My second coat was thinned 1:1, the hope being that the coat would 'fine its level.' It's bright, but decidely un-smooth! Nowhere near as fine as the raw paint.

Next would be to apply the panel wash, then finish with Gunze flat and see what we get.

Any idea what I'm doing wrong at the gloss stage???

At this point, unless I can work it out, I'm inclined to forget the clear coats and finish the beast as-is, it turns out I have a mountain of work ahead of me, dozens of models to build in the next 18 months, and need to crack on.

Cheers,

Mike

http://worldinminiature.blogspot.com/

  • Member since
    September 2004
  • From: Vernon, BC, Canada
Posted by razordws on Thursday, October 9, 2008 10:49 PM

Mark the Stuka is looking great.  Can't wait to see more.

Mike, Thinning raitos depends on what you are doing and what paints you are using.  Acrylic paints like Gunze don't really need thinning but I usually add a drop or two of thinner to prevent tip dry.  I usually use the name brand thinners rather than water as they contain retardants that keep the paint from drying too fast and getting all bumpy (and from drying on the air brush tip).  Looking forward to seeing the finnished Emil.

Dave

  • Member since
    April 2005
Posted by Thunderbolt379 on Thursday, October 9, 2008 7:19 AM

Mark -- The Stuka camo looks sweet! I'm thinking of tackling one of these for next year's BoB GB!

Guy -- The B&W undersides were exactly that, meant to be seen from the ground. They were an identification for AA gunners, exactly the same as the red & white undersides of Jv44. It was phased out in early 1944 (Edit: I mean 1940, of course, pardon the typo!) IIRC, but months after it was ended there were still solo Bf 109s making high-speed, low-level 'tip-and-run' raids deep into England with their undersides painted up in this scheme to slip by the Obserer Corps!

Cheers,

Mike

PS: I picked up fresh X-22 a couple of days ago and will have a chance to do some spraying tomorrow. I'll do a test-strip on styrene and run from color to gloss to flat, maybe accenting some scribed lines as well, and if the procedures work as expected I should be finishing the Emil in the next few days (I'll need a gas bottle change as well...) If they don't I'll be picking y'all's brains to see what I'm doing wrong!

Quick question -- what's your prefered thinning ratio for Gunze Aqueous, and is water the thinning medium???

http://worldinminiature.blogspot.com/

  • Member since
    February 2007
  • From: Bournemouth UK
Posted by Luftwoller on Thursday, October 9, 2008 5:51 AM

Np Aaron, The problem with info on the kit is that it comes from a company called 'Sweet' who are Japanese, which makes understanding th huge blurb theyve written fairly difficult. he bits i can read say that the plane was h mount of P.O H.J.R. ''Guppy'' Dunn out of Deben in th UK. It also says 'This Hurricane later force landed in Belgium (Kutrijk) on November 10 1939' So really the kit isnt applicable to the BoB. Ooops, didnt realise till now.

As for the 2 bladed prop. The early Hurricanes had fixed pitch propellors and fabric wings, making them fairly nimble fighters for there day. That is untill the 109 came along. I searched in a few refs ive got as to the markings and paint on the undersides but got nothing substantial. If anyone else knows as to why hey painted them like this. Id be interested to know. To me, it looks like its to be noticed from the ground, not comoflaged.

...Guy

..'Your an embarrassment to the human genus, makes me ashamed to call myself Homo'.
  • Member since
    October 2004
  • From: League City, Texas
Posted by sfcmac on Wednesday, October 8, 2008 4:26 PM
 Luftwoller wrote:
 sfcmac wrote:

 I have a question for Guy as soon as I can remember it? Confused [%-)]

Geez, you cant leave that hanging in the air, Big Boy.

...Guy

 Sorry Guy was getting cross eyed between our builds. Had to ascertain that it was for here as opposed to the 251 GB thread. Or your val, or your lofty conversion, or your Famo.... extc.

 It is here indeed that my inquiry lies, so I ask ou if there was any particular history on your Hurricane? I know it was a quick build for a lark but wondered if those older 2 bladed originals were common in the BOB? The markings keyed my intrest with all the codes on the underside and all.  


  • Member since
    February 2007
  • From: Bournemouth UK
Posted by Luftwoller on Wednesday, October 8, 2008 4:08 PM
 sfcmac wrote:

 I have a question for Guy as soon as I can remember it? Confused [%-)]

Geez, you cant leave that hanging in the air, Big Boy.

...Guy

..'Your an embarrassment to the human genus, makes me ashamed to call myself Homo'.
  • Member since
    March 2008
  • From: Wilmington, NC
Posted by mark983 on Wednesday, October 8, 2008 4:01 PM

Good idea..if I screwed it up now, I would probably cry like a little girl

Mark

  • Member since
    October 2004
  • From: League City, Texas
Posted by sfcmac on Wednesday, October 8, 2008 3:50 PM
 I was looking for the post. I am trying to recall what color they used. May have even been RLM 02 the light green gray pit color. It looks great anyways so Id try anything fancy out on a box lid or scrap plastic to make certain it gives you an effect you want.  Seen a few guys on here make it to the home streych and ka blooeh!  Just ask Soul Crusher! He recovered well though thankfully. The RAF depends on him!
  • Member since
    March 2008
  • From: Wilmington, NC
Posted by mark983 on Wednesday, October 8, 2008 2:18 PM

Maybe what I'll do is tone it down just a hair with a thinned lighter paint..and then apply a wash. 

Mark


  • Member since
    October 2004
  • From: League City, Texas
Posted by sfcmac on Wednesday, October 8, 2008 2:04 PM

 I thought it was suggested to use a thinned lighter color of the lighter color to fade blend the demarkcation lines in a suitable way. Thats what I did on the Dornier and it worked great! Tones em down and makes em look scale real to me.

 I have a question for Guy as soon as I can remember it? Confused [%-)]

 This is how the Dornier looked in the sun. The Exhaust weathering is not applicable on a Stuka but you can see the Splinter scheme how it is toned down but not hidden.

Perhaps the fellows who originally suggested this method way back can give a refresher point. I think it was a couple of our Luftwaffa experts.

  • Member since
    February 2007
  • From: Bournemouth UK
Posted by Luftwoller on Wednesday, October 8, 2008 1:52 PM

That camo looks the biz, Mark. I think the wash is a definate. You could try pastels to fade the paint a touch.

...Guy

..'Your an embarrassment to the human genus, makes me ashamed to call myself Homo'.
  • Member since
    February 2003
  • From: A Spartan in the Wolverine State
Posted by rjkplasticmod on Wednesday, October 8, 2008 8:18 AM

Nice work on the Stuka Mark.  Since this was early in the war, I'd go with the wash rather than fading.

Regards,  Rick

RICK At My Age, I've Seen It All, Done It All, But I Don't Remember It All...
  • Member since
    March 2008
  • From: Wilmington, NC
Posted by mark983 on Tuesday, October 7, 2008 11:24 PM

OK Guys!!  Here you go...wanted to post pix after tonights paint job before bed...still need to paint the yellow nose and yellow wing tips underneath...also need to do a bit of clean up on some of the edges..and then its off to the other parts, canopy, prop, wheels and final weathering...comments are always welcome.  By the way...would it be best for a faded look or black washed look?

Mark 

  • Member since
    March 2008
  • From: Wilmington, NC
Posted by mark983 on Tuesday, October 7, 2008 4:30 PM
 Luftwoller wrote:

Well i thought it was funny, Geez yous lot are a hard crowd.

Oh yeah, Mark. You had a stuka on the go a while back didnt you? Whatever happened to the sucker Whistling [:-^]

...Guy

Life got in the way for a sec..also working two jobs from 6am till 6pm kinda limits your energy.  Found myself getting home all ready to work on the Stuka..then after dinner, putting daughter to bed, watching a tv show..then falling asleep on the sofa..kinda ruled out time to build...but now with the deadline...I'm knocking it out and very happy on how the paint job is coming out..my first time using the pre-shading method and I love it!!!  The wife is even interested on how its coming out..! 

Mark

  • Member since
    February 2007
  • From: Bournemouth UK
Posted by Luftwoller on Tuesday, October 7, 2008 4:12 PM

Well i thought it was funny, Geez yous lot are a hard crowd.

Oh yeah, Mark. You had a stuka on the go a while back didnt you? Whatever happened to the sucker Whistling [:-^]

...Guy

..'Your an embarrassment to the human genus, makes me ashamed to call myself Homo'.
  • Member since
    October 2004
  • From: League City, Texas
Posted by sfcmac on Tuesday, October 7, 2008 2:18 PM
 mark983 wrote:

Only 25 more days left in this GB...I will finish my Stuka..I will finish my Stuka!!!  In the middle of her paint job..pix coming soon.

Mark

Ok Mark finish your Stuka. No pressure !

Guy!!?? A little Hurricane? A little Hurricane? Oh my gosh you shoulda been on the Benny Hill show! Laugh [(-D] Looks very quaint. I like the botton colors!

Again with All the 109's very impressive!  Thunderbolt you have been chugging along pretty steady! Almost there!

  • Member since
    March 2008
  • From: Wilmington, NC
Posted by mark983 on Tuesday, October 7, 2008 2:05 PM

Only 25 more days left in this GB...I will finish my Stuka..I will finish my Stuka!!!  In the middle of her paint job..pix coming soon.

Mark

  • Member since
    September 2004
  • From: Vernon, BC, Canada
Posted by razordws on Monday, October 6, 2008 10:22 PM

Mike the Emil is looking awesome.  I can't wait either to see you finish her up.

Guy, ...lame my friend, very lame, but I still LMAO!!!  Nice job on the little hurricane.  

Dave

  • Member since
    July 2003
  • From: waynesboro va, via Ireland
Posted by sidure on Monday, October 6, 2008 9:16 PM

Mike, the 109 is looking great and cant wait to see all the fiddly bits on it and finished.

Thanks for all the comments guy's, yea, the kit is old and I think the decals are shoing their age a bit. The decals ook good but the carrier film was just awful. I trimmed most of them close but had no idea they would silver that much.

Love the little Hurricane. Just more targets for us to shoot down.

Steve

  • Member since
    April 2005
Posted by Thunderbolt379 on Monday, October 6, 2008 8:29 AM

Yup, got PM 'Dark Dirt' (not black, it would be too stark) sent down from Hong Kong (LuckyModel.com).

You used a human hair as antenna wire? Now that's ambitious! Cool [8D] I won't ask how you attached it...

M

http://worldinminiature.blogspot.com/

  • Member since
    February 2007
  • From: Bournemouth UK
Posted by Luftwoller on Monday, October 6, 2008 8:17 AM

NP Mike, good luck. Oh and use promodeller washes for your panel lines. Its the future i tells ya. LOL

Oh yeah, did you all guess what i had to help the RAF, that Aaron knows all about???? Well??

Oh ill tell ya then.  What does Aaron know all about?........A little Hurricane!!! Muwahahahahah.

Im soo funny me...No? Aah what do you lot know. LOL

The kit was from Sweet and is 1/144th. It has recessed panel lines and went together reasonably well without any filler. I had a nightmare with the decals. They most definatelty wernt playing ball. But hey, its an RAF plane and they need the numbers. I liked the colour scheme with the Black and white undersides and the unpainted alluminium panels.

...Guy

P.s The aerial wire was a hair from my missus's, son's girlfriend, Louise. Ta love.

..'Your an embarrassment to the human genus, makes me ashamed to call myself Homo'.
  • Member since
    April 2005
Posted by Thunderbolt379 on Monday, October 6, 2008 7:58 AM

Hi Guy -- thanks for the kind words! This Emil is actually my first plane kit to be completed in five years (armor and scratchbuilds since then), though not the first to be started! Big Smile [:D] It's good to see my skills seem to be advancing.

X-22! Well, if Spain's answer to Francios Verlinden endorses it, it must be worth a go. It's standard shelf stock here, in fact I have some already. But the bottle is 15 years old (remember the old, big bottles?), and the remaining contents looks a bit yellowish, so I think I'll sortie to the LHS for some fresh tomorrow. I bought it in my first round of Tamiya paints, for mixing shades for finishing vinyl dinosaurs in the 90s, the clear was to bring up the hide lustre by mixing with the colours and for adding eye and mouth moisture. I have Horizon's 1:30 T. rex finished in Tamiya paints, it was my first published article, in an Aussie model mag around '92, '93. Those paints are all still fine, I'm still using them.

I've never airbrushed it straight, though. I tried once, an attempt to bring up the gloss on some Navy midnight blue, but the X-22 was going to go on rougher and flatter than the gloss enamel, so I didn't bother, and never did another experiment. I think this calls for some test spraying. All being well, I should be accenting the panel lines of the Emil later in the week.

Cheers,

Mike

http://worldinminiature.blogspot.com/

  • Member since
    February 2007
  • From: Bournemouth UK
Posted by Luftwoller on Monday, October 6, 2008 7:22 AM

Steve, the Condor is looking resplendant in all its colourfull glory. Im so looking forward to seeing the girl finished.

Mike, the 109 is looking great mate, far better than my effort LOL. As for the clearcoat issue. In the UK we can get Klear, the English 'Future', and to be honest, its ok but I have hit and miss results with the stuff. It would be interesting to find out what pressures and how many coats other ppl use with the stuff to get a good finish. You mentioned X-22, This is what i use when i remember. (Future is easy, no mixing)  Ive recently watched Mig Jimmenez's DVD and he raves about X-22. It goes off rock hard and allways gives a good clear coat. Id try that before struggling to get Future.

...Guy

..'Your an embarrassment to the human genus, makes me ashamed to call myself Homo'.
  • Member since
    April 2005
Posted by Thunderbolt379 on Monday, October 6, 2008 3:09 AM

Steve -- what a size! What a paintjob! You've really done the business on this classic! It's great to see old kits get the modern treatment, I must take a shot at one myself!

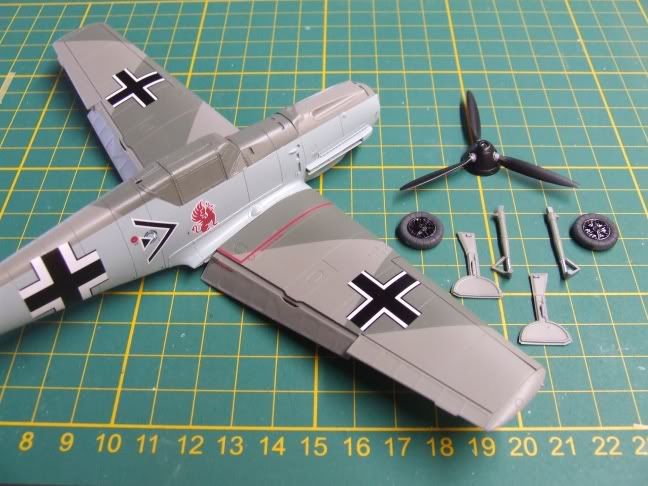
Okay, guys, here's the Emil, with 54 decals in place.

Photobucket" border="0" /> 

I decided to leave the over-size crosses as-is. Microscale's instructions for removing a decal involved things like high-tac tape to pull it off, followed by Microsol and an eraser to clean up the remains. That sounded too fraught for this stage of the game, so I declared it a 'from-the-box-ism!'

The underside crosses are an interesting case. The plans show them slightly offset, the one under the port wing is located fractionally further back than the starboard. I checked my references and found a single unclear photograph of an E which seemed to support the offset placement. Then I checked pics of the work of other modellers who had clearly done their research, and found no evidence of an offset. I declared the matter one for simplification and placed them in equal locations.

Two decals remain, the ones to wrap around the gear legs, then I can assemble the legs to the doors. A few touch-ups on the tires and the wheels can be added. I have the piot tube and tail gear to paint, and have painted the canons and exhausts. I need to punch through the port underwing cross to locate the pitot tube.

Next challenge: clearcoat. I've read some online articles and Pledge One-Go, available in Australia, no matterhow much it might suffice as floor polish, is not a universal subtitute for Future. There are stories of it yellowing, refusing to dry, stripping decals... I won't bother with it. Klear, from the UK, is said to be virtually identical, i read a post by a modeller who had been using it the same way as Future for some twenty years, and it turns out the UK post will carry the stuff, so I'll see about getting a bottle sent over.

But for the moment... What do you all think of Tamiya Clear Gloss X-22, and Gunze Aqueous Clear Flat? These are my immediate options for the Emil. Glosscoat to protect the enamels from oil wash for some underside streaking and to allow use of the Promodeller panel wash, then Gunze acrylic flat to seal it all.

I'm getting to the finishing stage, I can see this Emil in the display case by next weekend!

Cheers,

Mike

http://worldinminiature.blogspot.com/

  • Member since
    October 2004
  • From: League City, Texas
Posted by sfcmac on Monday, October 6, 2008 12:55 AM
 bondoman wrote:


Gennelmen, Italy wuz wunnerfull!!

Bondo!!!!!!!!!! So your back home? I too look forward to a full report when ye be more rested!

Glad to see ya!

  • Member since
    September 2004
  • From: Vernon, BC, Canada
Posted by razordws on Monday, October 6, 2008 12:27 AM

Welcome back Bondo.  I expect a full report at some point.

Steve, wow that thing is huge and I can't wait to see her done.  Looking forward to the 109 pics too.  I have had problems in the past too with some of revell's older decals.  They can be very flat textured with excessive carrier film.  I'm with Aaron on the best approach being to remove as much of the excess carrier film as possible before applying them to the model.  Doesn't help you now I know but you'll know for next time.

Dave

  • Member since
    March 2007
  • From: Carmel, CA
Posted by bondoman on Monday, October 6, 2008 12:00 AM


Gennelmen, Italy wuz wunnerfull!!

  • Member since
    October 2004
  • From: League City, Texas
Posted by sfcmac on Sunday, October 5, 2008 11:29 PM

 Wow that thing is really large. Even in 1/72. What a great splinter paint job! You even pulled off yellow which is really tough to get even. I can see the silvering you spoke of on the decals. If you got it all sealed over I would just leave it as there isn't much you can do short of damaging the paint/finish and the decals. Most you could try to do is with a sharp Hobby knife make some small cuts ( Very small ) into the silvered areas and try a drop of solveset or something setting. I'd leave it be though cuz you run the risk of it not working as well unless it really bothers you.

 I am guessing it would be because the decals are older. Maybe the glue on their backing yellowed enough to make the film a little more visable.  In those cases it is a help to cut out only the printed part cutting the excess film away. Takes a little longer but that would have made the edges not be seen. Seems like the Silvering is on the clear edges of the carrier film.

 Simple tips on a small detail in my book as I think it looks fine. Probably wouldn't have noticed had you not mentioned it.

 I am still shocked by it's size and all that painting you had to pull off.  I like it!

JOIN OUR COMMUNITY!

Our community is FREE to join. To participate you must either login or register for an account.

SEARCH FORUMS
FREE NEWSLETTER
By signing up you may also receive reader surveys and occasional special offers. We do not sell, rent or trade our email lists. View our Privacy Policy.