SEARCH FINESCALE.COM

Enter keywords or a search phrase below:

Battle of Britain GB 2008 - 21 June to 31 Oct 08

82881 views
1491 replies
1 rating 2 rating 3 rating 4 rating 5 rating
  • Member since
    April 2005
Posted by Thunderbolt379 on Tuesday, September 30, 2008 12:38 AM

Hi Steve -- Do Airfix provide those markings??? I searched Squadron last night and of 43 sheets for Bf 109s not one had Galland! What's the kit like??? It would be great to line them up next to eachother!

Nope, no mottling at all, it's all hard-edge masked camo (one reason I chose this subject, given my AB resolution difficulties lately).

Yes, I thought the camo looked different. I have a couple of photos showing the hood area, and the surroundings give the impression of a different layout to the August bird.

Mike

http://worldinminiature.blogspot.com/

  • Member since
    July 2003
  • From: waynesboro va, via Ireland
Posted by sidure on Tuesday, September 30, 2008 12:25 AM

Mike, the other Galland bird is the one I am building, with the mickey mouse embem. The camo does come further down the spine and if Airfix got their research right the wing camo pattern is also different. I am used to the standard look but this kit is totally different. Does your bird have motteling on the sides?.

Steve

  • Member since
    April 2005
Posted by Thunderbolt379 on Monday, September 29, 2008 11:42 PM

Many thanks, guys! I blush with achievement!

Steve -- I'm planning on some weathering, but not much. The markings are Adolph Galland's as of August 1940 (the red griffin) but the previous month he was in almost certainly a different plane. Photos dated July show the 02/71 wrapped lower on the fuselage and he had the Mickey Mouse cartoon crest. I'm not sure but I'm guessing that plane was lost or damaged and the red griffin plane was a replacement.

So, minimal weathering, she was probably not six weeks off the assembly line, but at the height of the battle she was probably in action almost every day. Dust on the landing gear, soot streaks from the canons and shell ports, oil streaks from the engine and some exhaust staining, plus chipped paint in the wear areas... I reckon I can get round that lot. I'll do the weathering probably last up before adding the teensy parts and the antenna wire.

Prolly won't get to the wheel wells today, real life calleth... (but I will order the EZ-Line, a grab handle maker and some soft wire...) Oh, and another few kits...

Cheers,

Mike

http://worldinminiature.blogspot.com/

  • Member since
    July 2003
  • From: waynesboro va, via Ireland
Posted by sidure on Monday, September 29, 2008 11:08 PM

Very nice work on the 109 Mike. It's very clean and sharp looking. Are you going to dirty it up or leave it clean?.

On my front I finally got to the paint shop and the RLM 70 is finally on and drying as I write. Cant wait to see it with the masks off.

Steve

  • Member since
    July 2003
  • From: waynesboro va, via Ireland
Posted by sidure on Monday, September 29, 2008 3:36 PM
WOW Karl, I just read what I wrote and yep, that could be taken very much the wrong way. How about, that is two great builds you have there. Thank for not taking it the wrong way. Im all red in the face now.Taped Shut [XX]
  • Member since
    October 2004
  • From: League City, Texas
Posted by sfcmac on Monday, September 29, 2008 3:13 PM

Hey GUY!!!!! PM inbound it is a matter of nation security!!!!!! Great work fellows you all make me feel unworthy to belong to such a talented group!

  • Member since
    February 2007
  • From: Bournemouth UK
Posted by Luftwoller on Monday, September 29, 2008 2:55 PM

Wow Mike, shes looking pucker mate. Id be happy with the masking as is. Im sure they masked a straight edge in the field and if its alright with the Krauts then its alright by me.

Have you used the promodeller stuff before? Its awesome stuff. The future of weathering in my opinion. Just make sure you have a good gloss coat down before starting.

...Guy

..'Your an embarrassment to the human genus, makes me ashamed to call myself Homo'.
  • Member since
    July 2003
  • From: Bicester, England
Posted by KJ200 on Monday, September 29, 2008 2:49 PM
 sidure wrote:

Karl, what a great set you have there. Very well done and finished.

Steve

Steve, for second there I wasn't sure about that comment! Wink [;)]

Hope your basement dries out soon.

Mike, great progress on the Emil, looking really good.

All, thanks for all the comments on the builds.

I've just realised I've forgotten to add the MG in the upper B position on the 111!Shock [:O]

Karl

Currently on the bench: AZ Models 1/72 Mig 17PF

  • Member since
    February 2003
  • From: A Spartan in the Wolverine State
Posted by rjkplasticmod on Monday, September 29, 2008 2:04 PM

Mike,  Nicely done.  The splinter looks great.

Regards,  Rick

RICK At My Age, I've Seen It All, Done It All, But I Don't Remember It All...
  • Member since
    March 2008
  • From: Wilmington, NC
Posted by mark983 on Monday, September 29, 2008 1:58 PM

Hey guys...have not been around in awhile what with family, job and the occasional hurricane...My stuka is back on the workbench..laid down the primer last night...going to work on some imperfections and then start laying down some color.  Going to stick to that deadline!!

 pics to com

Mike...nice clean build...beauty!


Mark

  • Member since
    December 2004
  • From: Yokosuka, Japan
Posted by luftwaffle on Monday, September 29, 2008 11:10 AM
Looking good, Mike!

aka Mike, The Mikester My Website

"He has all the virtues I dislike and none of the vices I admire."   -Winston Churchill

  • Member since
    April 2005
Posted by Thunderbolt379 on Monday, September 29, 2008 1:09 AM

Hi all

Guy and Dave -- thanks for the antenna tips. I think it's gonna be fiddly no matter how I tackle it, so I just gotta bite the bullet and get it done.

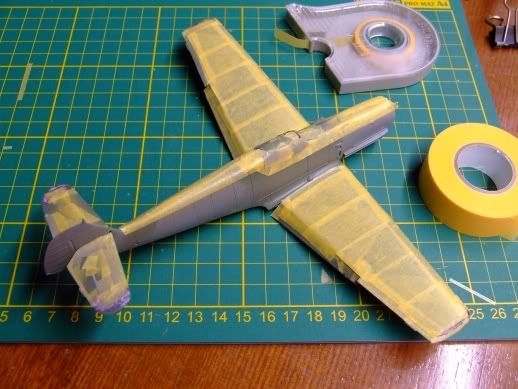
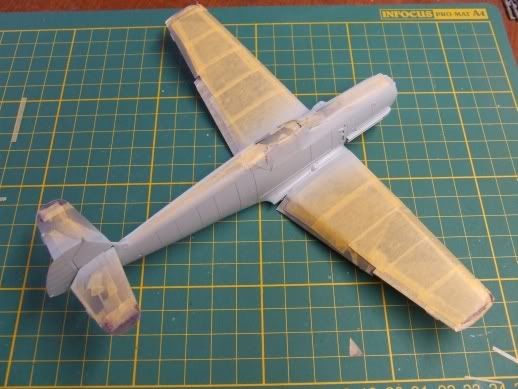
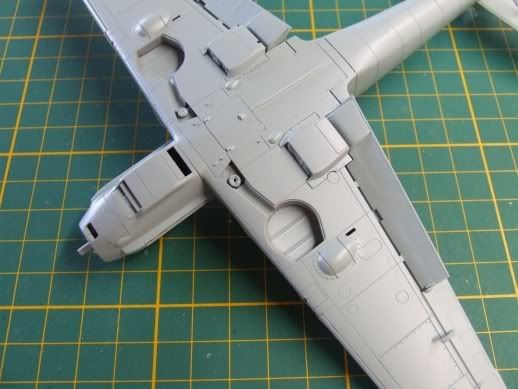
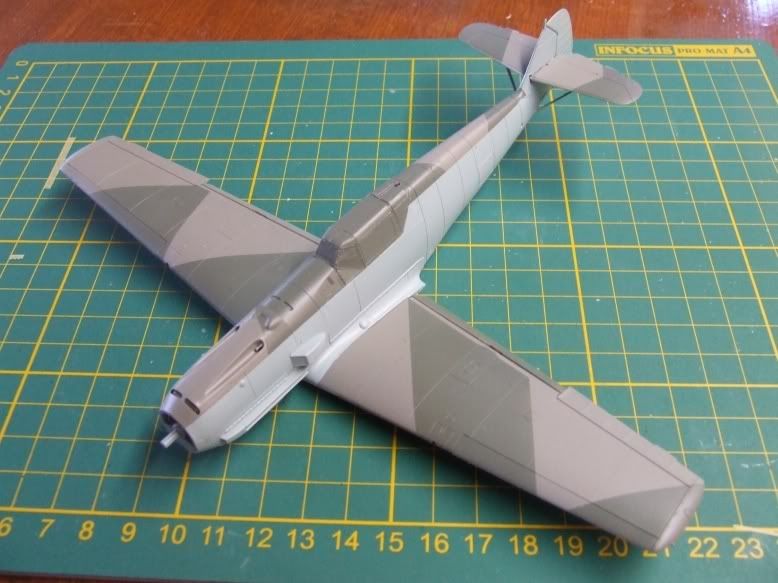
Made some progress on the 109 -- I completed the Phase II masking last night  but my camera batteries died before I could post the pic, so here's the full sequence today:

Masking done:

Photobucket" border="0" />

I sprayed the RLM 65 today, MM enamel going on smooth and easy at 1:0.5 thinning ratio and about .7 bars pressure. Two light coats were followed by spot touchups, the paint drying fast outdoors (in the shade. On the patio table by the pool, under the sun umbrella, if you must know...)

Photobucket" border="0" />

And the underside:

Photobucket" border="0" />

And finally with main masking away:

Photobucket" border="0" />

The lustre of the fresh paint is a distinct satin which makes me think the Tamiya decals will snuggle down absolutely fine without need of a glosscoat at this time. Then it'll be time to bite another bullet and lay a coat of gloss over them for protection before applying the Promodeller clay-based panel wash, to be followed by Gunze Flat. I'll leave the canopy masks on until then.

A few small parts to add, the odd touch-up... The tail end of the topside camo, at the base of the fin -- should that line be straight or curved? I masked it straight but it's easy enough to curve it with a small brush.

The only color spraying to do now is the gear bays (I remembered to spray the doors in this session!). When the RLM 65 is thoroughly hard, I'll mask around the bays and blow them into 02. Then the tissue masking can come out of the rads.

Cheers, more later,

Mike

http://worldinminiature.blogspot.com/

  • Member since
    July 2003
  • From: waynesboro va, via Ireland
Posted by sidure on Sunday, September 28, 2008 10:55 PM

Dave, that is one sweet looking 109. Hope mine turnes out half as good.

Karl, what a great set you have there. Very well done and finished.

Both of you guys have done some awsome work.

On my front, my basement was flooded so no work on my builds this weekend. All cleaned up now so hoping to paint tomorrow.

Steve

  • Member since
    November 2003
  • From: Nashville, TN area
Posted by bobbaily on Sunday, September 28, 2008 7:36 PM

Mike & Steve-great progress.  Looking forward to seeing the finished product.

Karl & Dave-very impressive builds.  Very nice.

Bob


  • Member since
    September 2004
  • From: Vernon, BC, Canada
Posted by razordws on Sunday, September 28, 2008 3:46 PM

Karl, Great looking builds there on both counts.  Thanks for posting the pics... Finally! Wink [;)]  I need to try one of those bombers with the black undersides as it looks like a challenge.  One that you pulled off quite nicely Thumbs Up [tup]Thumbs Up [tup]

Mike, ditto what Guy said on the antenae only in 1/72 the masts are too small to drill holes in them so I just dip the thread in CA and hold it until it sets.  A third hand with accelerator would be handy.  I use invisible thread and heat it afterwards with a small soldering iron to shrink it until it is tight.

Dave

  • Member since
    December 2005
  • From: back seat of your car with duct tape streched out
Posted by soulcrusher on Sunday, September 28, 2008 1:08 PM

Wow Karl you really know how to finish a GB! With a one two punch! Well done and both sides represented well.Bow [bow].

                                                                            Soulcrusher


  • Member since
    December 2004
  • From: Yokosuka, Japan
Posted by luftwaffle on Sunday, September 28, 2008 11:02 AM
Karl- Wow!  Just gorgeous, perfect weathering, just stunning work all the way around!

aka Mike, The Mikester My Website

"He has all the virtues I dislike and none of the vices I admire."   -Winston Churchill

  • Member since
    February 2007
  • From: Bournemouth UK
Posted by Luftwoller on Sunday, September 28, 2008 10:19 AM

Wow, I wondered what happened to your 111. Shes a beaut Mate. I love everything about it. Colours, markings, canopy the lot. Youve excelled and a worthy addition to our Armada.

The Hurri looks great too. Love the subtle weathering on the underside. Top marx and great additions to our GB and your collection.

...Guy

..'Your an embarrassment to the human genus, makes me ashamed to call myself Homo'.
  • Member since
    February 2003
  • From: A Spartan in the Wolverine State
Posted by rjkplasticmod on Sunday, September 28, 2008 8:53 AM

Sweeet looking builds Karl.  Well done Thumbs Up [tup].

Regards,  Rick

RICK At My Age, I've Seen It All, Done It All, But I Don't Remember It All...
  • Member since
    July 2003
  • From: Bicester, England
Posted by KJ200 on Sunday, September 28, 2008 8:49 AM

Finally got around to taking some pics of the He111 and the Hurricane.

This is Hase's 1/72 offering with AIMS decals for a KG54 He111 P-2.

Paints are a mix of Gunze & Tamiya acrylics, with a Vallejo flat coat.

This is Airfix's ancient 1/48 offering with a whole raft of spare parts taken from a Hase kit that have been languishing in the spares box.

Decals are from Aeromaster, and represent the aircraft of Pilot Officer Johnny Cock in July 1940 when he downed an He111 over the Bristol Channel.

Karl


Currently on the bench: AZ Models 1/72 Mig 17PF

  • Member since
    February 2007
  • From: Bournemouth UK
Posted by Luftwoller on Sunday, September 28, 2008 3:37 AM

TB, the way i do aerial rigging is to 1st drill a very small hole in the fin (Unless the wire ends at a stub Like early 190's) Rub the end of the wire in a pool of CA then insert in predrilled hole. Apply a spot of accellerator. Then put a small spot of CA using a coctail stick or similar onto the aerial. Gently pull the aerial towards the front, positioning it over the blob. Then using an extra hand if you have one, another drop of accelerator on the blob. Trim with a sharp blade and your done.

If you do have a stub to attach it to on the fin, then use the same method as described to attach the wire to the aerial.

Hope this helps.

...Guy

..'Your an embarrassment to the human genus, makes me ashamed to call myself Homo'.
  • Member since
    February 2007
  • From: Bournemouth UK
Posted by Luftwoller on Sunday, September 28, 2008 3:30 AM

Dave that build is perfect. The camo looks spot on as does the canopy masking. Flawless. Puts loads of my 1/48th builds to shame. 10 out of 10, big boy. Notch another up for the Glorious Luftwaffe!!!

...Guy

..'Your an embarrassment to the human genus, makes me ashamed to call myself Homo'.
  • Member since
    July 2003
  • From: Bicester, England
Posted by KJ200 on Sunday, September 28, 2008 2:31 AM

Dave, stunning job on the Emil.

Looks like everything you tried came out well.

What I love about Tamiya kits is that you can focus the finish, rather than having to spend time fixing design flaws!

Karl


Currently on the bench: AZ Models 1/72 Mig 17PF

  • Member since
    April 2005
Posted by Thunderbolt379 on Saturday, September 27, 2008 10:58 PM

Hi Razor - thanks for the #, I must see if I can get it! That's a REAL pretty Spit too!

One quesion... HOW do you attach the rigging line? I'm gonna get some of the EZ-Line stretchy thread but even in 1:48 I'm puzzling about how to attach it...

Mike

http://worldinminiature.blogspot.com/

  • Member since
    September 2004
  • From: Vernon, BC, Canada
Posted by razordws on Saturday, September 27, 2008 10:36 PM

Mike and Mike, thanks guys for your comments.  Mike (#1) The Aeromaster sheet was 72-003 Battle of Britain with Markings for two spits, two Hurricanes and three Emils.  It was quite a good deal I think. Thumbs Up [tup]  Already used one of the spits to do this model for the spitfire GB.

Now I just have to build a Hurricane (but after the BR20 Wink [;)])

Dave

  • Member since
    December 2004
  • From: Yokosuka, Japan
Posted by luftwaffle on Saturday, September 27, 2008 9:58 PM
Dave- Absolutely gorgeous, just a great build all the way around.  I just love that 1/72 Tamiya Emil, I think I could build several a year!

aka Mike, The Mikester My Website

"He has all the virtues I dislike and none of the vices I admire."   -Winston Churchill

  • Member since
    April 2005
Posted by Thunderbolt379 on Saturday, September 27, 2008 9:05 PM

Hi KG and Razor -- thanks for the kind words! It's been a lot of fun working on the Emil, and the Dornier has been a challenge from day one. I'm glad to say I'm winning the battle, which is rewarding, but the better kit is more fun!

Razor, in answer to your question, masking in this order is more symmetrical, and although it goes against the principle of lightest colors first, it simplifies things. My brain can get hold of it... Masking the wingroot in an arc across the concave panel was a concept that persistently escaped me! The MM enamels are laying on so smooth and covering so well I'm confident there won't be any show-through problems. Two light coats of 65 should be plenty.

I love your Emil! You can be justly proud of this piece of work. the paintjob is superb, the decals look great, weathering is delicate and in-scale. If I was marking this as an essay, you'd be an easy 'High Distinction!' I can't wait to do a yellow-nose! What was the number of the Aeromaster sheet? I must add this one to my collection.

Cheers,

Mike

http://worldinminiature.blogspot.com/

  • Member since
    September 2004
  • From: Vernon, BC, Canada
Posted by razordws on Saturday, September 27, 2008 8:45 PM

Gee, awfully quiet in here today!?!?  Is there a bikini parade somewhere that I don't know about?

Anyway, finished my Emil today.  Tried a few new things and some worked some didn't work as well as I would have liked.  Overall, I'm pretty happy with it, I believe this is actually my first Tamiya aircraft build and I must say I liked it, though it did take me a long time to finish considering some of you folks told me this kit builds itself.  Questions and comments welcome as always. 

Kit is Tamiya 1/72 E4 with Aeromaster decals.

I sure do like that big yellow nose!!! Propeller [8-]

Dave

  • Member since
    September 2004
  • From: Vernon, BC, Canada
Posted by razordws on Saturday, September 27, 2008 12:26 PM

Karl, really looking forward to your pics.  They're always a treat!!!Propeller [8-]

Mike, glad you got you paint session in.  Your builds are looking really really good Thumbs Up [tup] but can I ask why you paint the rlm 65 last?  I always do the lighter colours first.

Steve,  OHHHH Yaaaaaa!!!Tongue [:P]  That is looking so nice. Thumbs Up [tup]

I hope to have some time this afternoon to finish up my emil, all she needs is a dust coat, flat coat and an antenae and she is done.  After that I hope to get going again on the Fiat BR20.

Dave

  • Member since
    July 2003
  • From: Bicester, England
Posted by KJ200 on Saturday, September 27, 2008 11:34 AM

Mike, that Emil is looking real nice.

And it looks like you're doing a stella job on that Dornier, which is no mean feat considering the kit.

Steve, looking forward to seeing that Kondor built, as it's looking awesome.

I'll post some pic of the Hurri & He111 tomorrow, once the batteries on the camera have charged up.

Had to re-attach the port undercarriage leg on the Hurri this morning after my wife toppled a fan onto it by accident.

All fixed now, ready for tomorrrow's photo shoot.

Karl


Currently on the bench: AZ Models 1/72 Mig 17PF

JOIN OUR COMMUNITY!

Our community is FREE to join. To participate you must either login or register for an account.

SEARCH FORUMS
FREE NEWSLETTER
By signing up you may also receive reader surveys and occasional special offers. We do not sell, rent or trade our email lists. View our Privacy Policy.