SEARCH FINESCALE.COM

Enter keywords or a search phrase below:

AFV Club M42A1 Duster WIP - Done with pictures!!

83268 views
249 replies
1 rating 2 rating 3 rating 4 rating 5 rating
  • Member since
    July 2004
  • From: Texas
Posted by wbill76 on Tuesday, July 9, 2013 8:35 PM

Really love all the little details you've added to this one Pawel, those rags are a case in point for sure. Yes

  • Member since
    May 2009
  • From: Poland
Posted by Pawel on Tuesday, July 9, 2013 9:02 AM

Hello Steve, thanks a lot for your comment and your kind words.

Believe me, I'm looking forward to my next project, too. Thing is I travel a lot and have set up two or three workbenches. Switching between them helps me. But I sure would like to concentrate and just build faster - no such luck yet. Hopefully, one quiet day at my Duster workbench and it will be done!

Thanks again, have a nice day

Paweł

All comments and critique welcomed. Thanks for your honest opinions!

www.vietnam.net.pl

  • Member since
    July 2003
  • From: On my kitchen counter top somewhere in North Carolina.
Posted by disastermaster on Monday, July 8, 2013 1:53 PM


 I've been watching you come along on this project and I have to tell you that the last picture is as close to the real thing as you can get.

Every detail on this is right, right and right!

 http://1.bp.blogspot.com/-zDm-YD0AT90/TV2PjEmM8wI/AAAAAAAAAcY/57-1bmFu2qc/s1600/smiley+star.jpg  This showpiece is WAY up there in workmanship, quality and improvisation.

ENORMOUS talent.

 How in the world do you keep from getting burnt out? I'm already looking forward to your next project.


  • Member since
    May 2009
  • From: Poland
Posted by Pawel on Monday, July 8, 2013 9:09 AM

OK, I finished that tarp - here's what it looks like:

I also put some stuff (gas can, ammo boxes) around the spre barrels. Please note how the barrel muzzles are stuffed with rags to protect them:

I hope to proceed with the final assembly soon!

Thanks for reading, have a nice day

Paweł

All comments and critique welcomed. Thanks for your honest opinions!

www.vietnam.net.pl

  • Member since
    May 2009
  • From: Poland
Posted by Pawel on Monday, July 1, 2013 8:31 AM

Bill, Mike - thanks a lot for your comments and for your kind words, they mean a lot to me. Thanks again and have a nice day

Paweł

All comments and critique welcomed. Thanks for your honest opinions!

www.vietnam.net.pl

  • Member since
    July 2006
  • From: New Jersey
Posted by redleg12 on Monday, July 1, 2013 6:00 AM

Pawel - The details just keep on coming. Outstanding.

Rounds Complete!!

"The Moral High Ground....A Great Place to Emplace Artillery."

  • Member since
    July 2004
  • From: Texas
Posted by wbill76 on Saturday, June 29, 2013 6:12 PM

The added details are a nice touch to this one Pawel, very nice indeed! Beer

  • Member since
    May 2009
  • From: Poland
Posted by Pawel on Saturday, June 29, 2013 5:11 AM

Karl - thanks a lot! I got a tip from a Vietnam vet that they carried a stretcher on ther track - I thought it made a lot of sense and you don't see that too often on a model so I had to use the opportunity Big Smile

As for the tarps - please try it yourself and write me how it works for you!

Thanks for your comment and have a nice day

Paweł

All comments and critique welcomed. Thanks for your honest opinions!

www.vietnam.net.pl

  • Member since
    January 2007
Posted by the doog on Friday, June 28, 2013 6:03 AM

Amazing work, Pawel! That stretcher, in particular, made me think you had some relic of the war! Wow, does that lok real!

That method for making tarps looks fantastic too!

  • Member since
    May 2009
  • From: Poland
Posted by Pawel on Thursday, June 27, 2013 6:54 PM

Hello!

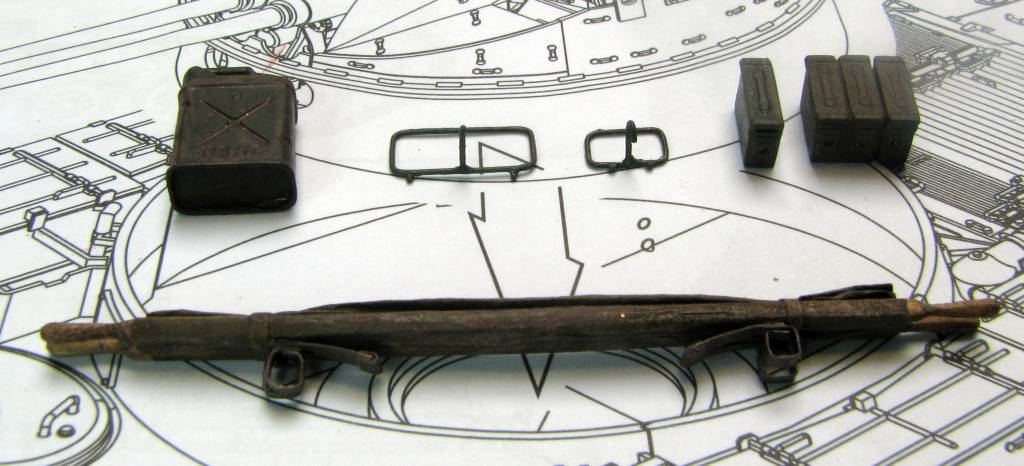
It's been a long time. I finally got to take some pictures of the bits that will wrap up my model. So on the first photo we've got a few 7,62 ammo boxes made from AFV Club's amo box kit, a USMC gas can and those funny things in the middle of the top row are so called autoloader lifters - tools specific to the 40mm Bofors cannon. I soldered themout of copper wire about 0.5mm in diameter. In the bottom of the photo there's the folding stretcher that I scratchbuilt - I started out with two thin wooden poles - cut the handles on them, then made some fabric out of a gutted teabag and finished it off with the hinges and feet made out of copper sheet metal:

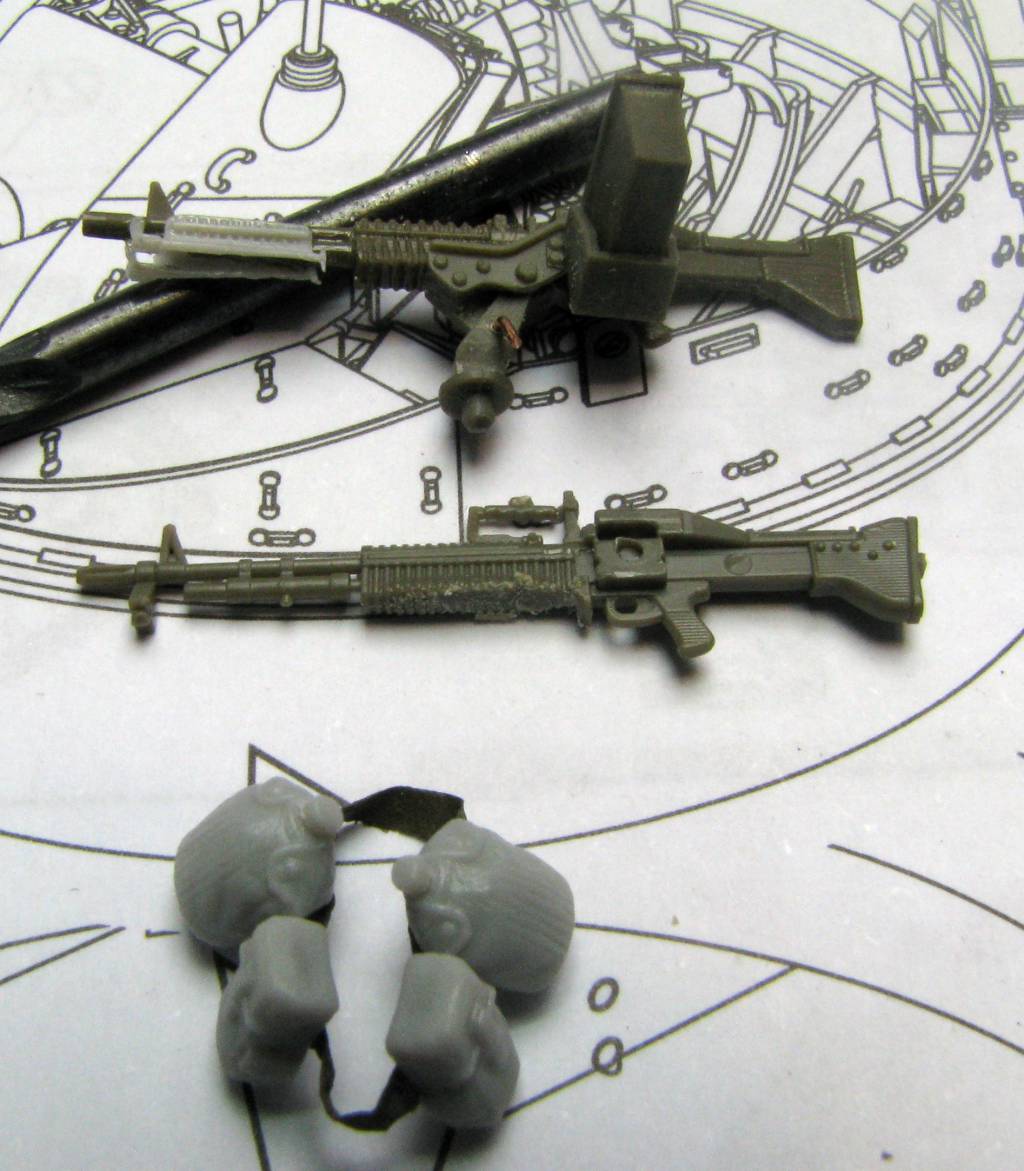
Next, I also needed a belt with some equipment on it, and a M60 machine gun. The belt was made out of the same teabag that I mentioned earlier. The canteen and the ammo pouches came from a Dragon figure kit. As for the MG, I wanted to have it under a tarp, so I didn't want to "waste" the excellent AFV Club part. I just cut off the mount, and took an old Tamiya M60, shortened a bit to be dimensionally correct. I also had a spare Dragon bipod for it. The result is shown over the AFV Club M60:

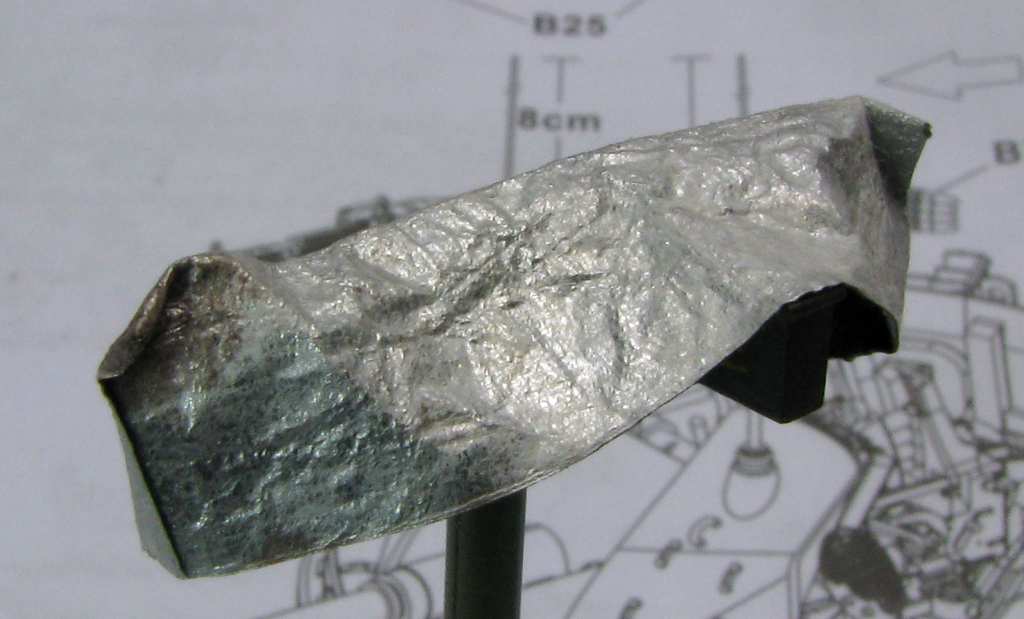
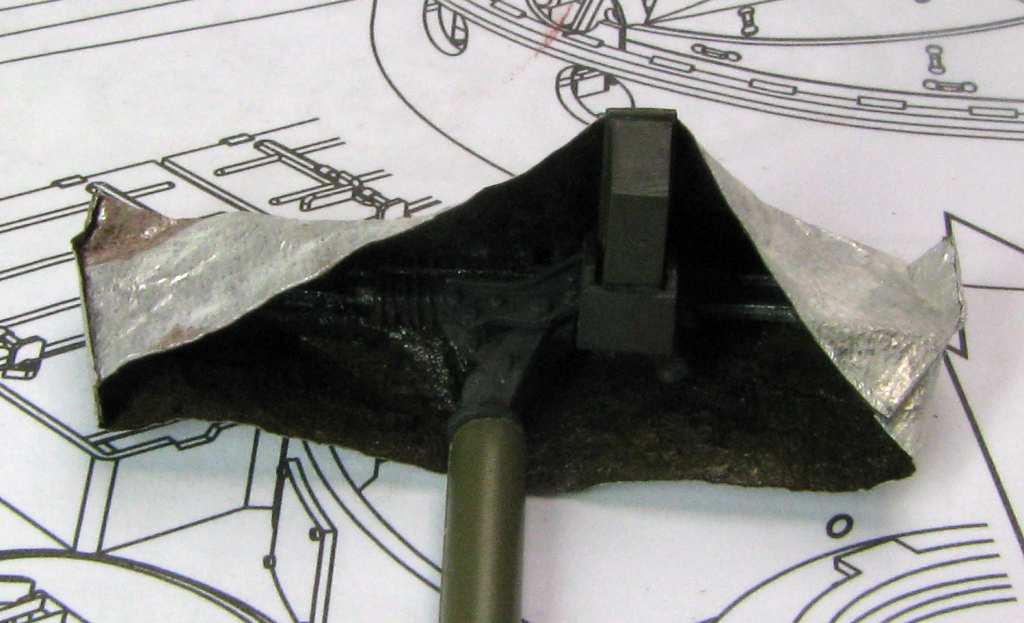
I painted the belt, the MG and the time came to do the tarp. I made it out of Pawelite - it's a material that I developed especially for making tarps. It consists of aluminium foil sandwiched between two layers of tisue. Holds the shape and creases very well, takes paint nicely and has this "fabric" texture. The tarp is painted on the insides for now:

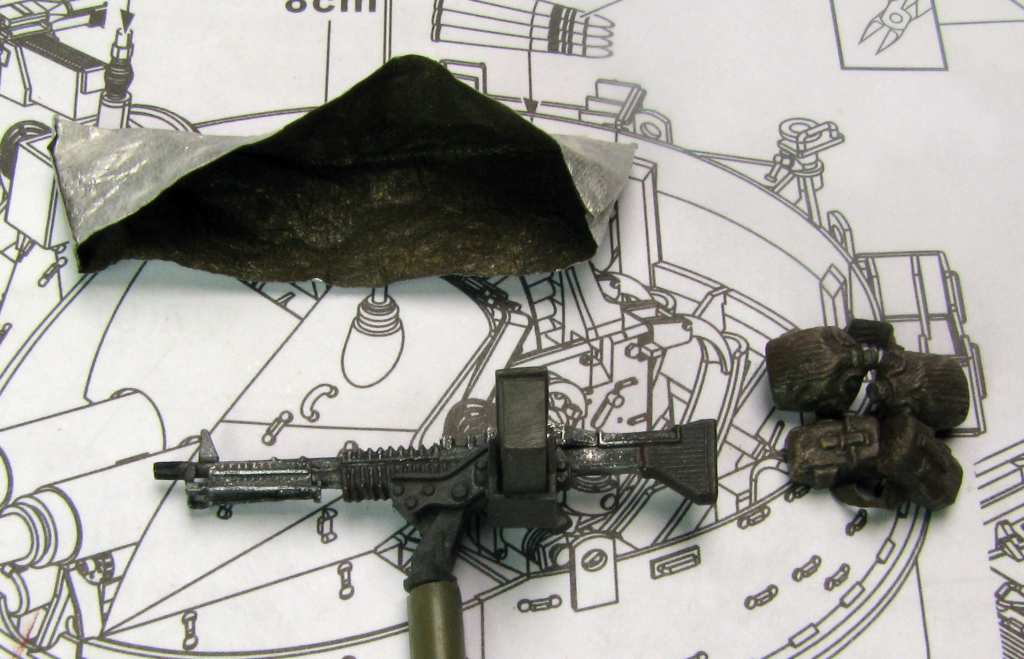
Then I put the tarp on the MG, still have to paint it on the outsides. The MG is on a temporary holder:

And that's what I have so far - hope you like it, thanks for reading and have a nice day!

Paweł

All comments and critique welcomed. Thanks for your honest opinions!

www.vietnam.net.pl

  • Member since
    May 2009
  • From: Poland
Posted by Pawel on Wednesday, May 22, 2013 12:59 PM

Terry, Bill - thanks a lot for your comments and for your kind words! You motivate me to work on the last bits even harder. Thanks again and have a nice day

Paweł

All comments and critique welcomed. Thanks for your honest opinions!

www.vietnam.net.pl

  • Member since
    July 2004
  • From: Texas
Posted by wbill76 on Tuesday, May 21, 2013 5:40 PM

Devil's always in the details Pawel and they can 'steal' away your time before you know it! Wink Still your attention to those details is paying off very much, those rounds look 'live'!

MrT
  • Member since
    December 2010
Posted by MrT on Tuesday, May 21, 2013 3:25 PM

Looking great from here!

Terry

  • Member since
    May 2009
  • From: Poland
Posted by Pawel on Tuesday, May 21, 2013 1:10 PM

Hello again!

I'm still taking my time - working mostly on the stowage. I finished working on the 40mm ammo, here's what it looks like:

I also added the microphone booms for the crewmen wearing CVCs. I used a kit from Royal Models RM018:

Also did the gas mask carrier hanging on the antenna base. I made the shoulder strap out of tea bag tissue - it's a good material for this, durable and doesn't get weak when wet:

I installed the water can in it's holder on the front of the right fender:

This stowage sure takes a lot of time! Still some more to do. Hope you like 'em, thanks for reqading and have a nice day

Paweł

All comments and critique welcomed. Thanks for your honest opinions!

www.vietnam.net.pl

  • Member since
    May 2009
  • From: Poland
Posted by Pawel on Monday, May 13, 2013 11:57 AM

Steve - thanks a lot for your kind words, I really like to take my time modelling. Have a nice day!

Paweł

All comments and critique welcomed. Thanks for your honest opinions!

www.vietnam.net.pl

  • Member since
    August 2007
  • From: back country of SO-CAL, at the birth place of Naval Aviation
Posted by DUSTER on Saturday, May 11, 2013 9:54 AM

Pawel as I tell my Hausfrau, " it is not the amount of time, it is the quality of the time and the results that matter"

Of course, I rush through my builds, get lously results and then rush to  read your posts to make me feel all better 

Seriously Great job so far, well worth the time spent 

Steve

Building the perfect model---just not quite yet  Confused

  • Member since
    May 2009
  • From: Poland
Posted by Pawel on Tuesday, May 7, 2013 4:15 PM

Lee - thanks a lot!

Bill - yes, time flies when you're havin' fun! Thanks a lot for your comments!

Gino - thanks a lot, it's especially nice to hear from a man who knows a lot about rounds!

Terry - thanks, when do we see pictures? Big Smile Please be sure to get me a link to them.

Thanks again for your comments, have a nice day

Paweł

All comments and critique welcomed. Thanks for your honest opinions!

www.vietnam.net.pl

MrT
  • Member since
    December 2010
Posted by MrT on Tuesday, May 7, 2013 3:57 PM

Really great work Pawel!!  You have inspired me to start mine.

Terry

  • Member since
    December 2002
  • From: Valrico, FL
Posted by HeavyArty on Monday, May 6, 2013 8:42 PM

The rounds look awesome.  Very nice.

Gino P. Quintiliani - Field Artillery - The KING of BATTLE!!!

Check out my Gallery: https://app.photobucket.com/u/HeavyArty

"People sleep peaceably in their beds at night only because rough men stand ready to do violence on their behalf." -- George Orwell

  • Member since
    July 2004
  • From: Texas
Posted by wbill76 on Monday, May 6, 2013 7:12 PM

Hard to believe you've been working on this for the past year Pawel but all your attention to the details have paid off for sure. Got to love the look of those ammo clips. Yes

  • Member since
    March 2004
  • From: Spartanburg, SC
Posted by subfixer on Monday, May 6, 2013 1:39 PM

Great stuff there, Pawel.

Lee

I'm from the government and I'm here to help.

  • Member since
    May 2009
  • From: Poland
Posted by Pawel on Monday, May 6, 2013 11:55 AM

Hello again!

This time I put the knive and the antennae on the mount, this is how it looks like now:

I'm also working on the ammo for the forties. I'm using a kit from a company called Orange Hobby - it gives you turned brass shells and cases, and PE shell bases and four round clips. Those are quite fiddly bits, but the extra work gives you good looking results. First I did the painting by gripping every shell with a motor tool and painting the individual bands with a fine-tipped brush. Now I'm assemblying the individual clips:

I put the first three clips in the ready racks on the mount, I'll try to hang the rest of them on the mount wall, let's see how many I can stow this way.

I hope you like it so far, thanks for reading and have a nice day

Paweł

All comments and critique welcomed. Thanks for your honest opinions!

www.vietnam.net.pl

  • Member since
    May 2009
  • From: Poland
Posted by Pawel on Wednesday, May 1, 2013 11:31 AM

Hello!

Almost exactly a year ago I started this WIP post, so this is kinda an anniversary update Big Smile.

First, for kicks and maybe to attract Hans to this thread again, here's a side by side comparisom of the speed rings from Tamiya and AFV Club:

Noticeable difference, isn't it?

Next, there's the bolo knife with sheath I scratchbuilt from 1mm styrene sheet:

Finally - I installed the computing sights in the mount. Now the guns look like this:

The good news is I managed to keep the guns moveable, so you can watch all the gear working while elevating the guns.

Thanks for reading, hope you like it and have a nice day

Paweł

All comments and critique welcomed. Thanks for your honest opinions!

www.vietnam.net.pl

  • Member since
    December 2012
Posted by RX7850 on Wednesday, April 24, 2013 3:44 PM

Guess I missed that,Bang Head will have to try that technique sometime.

  • Member since
    May 2009
  • From: Poland
Posted by Pawel on Wednesday, April 24, 2013 11:55 AM

Bill -thanks a lot! I'm out on a business trip again, but just for kicks, I'll post a photo of the Tamiya cast plastic speed rings for some laughs and contrast... Glad you like'em!

RX7850 - thanks a lot. As I already wrote, rather than using a brush, I used a small bit of a sponge for that effect. And it seemed to pay off Big Smile You might want to look a few pages back for a detailed descrition of how it was done.

Thanks again for your comments, have a nice day

Paweł

All comments and critique welcomed. Thanks for your honest opinions!

www.vietnam.net.pl

  • Member since
    December 2012
Posted by RX7850 on Tuesday, April 23, 2013 4:30 PM

Nice job so far. The worn look of the  star came out really good. Did you use a cut down brush for that ?

  • Member since
    July 2004
  • From: Texas
Posted by wbill76 on Tuesday, April 23, 2013 10:29 AM

Nice to see this one moving along again Pawel. Got to love the look of this sight rings. Wink

  • Member since
    May 2009
  • From: Poland
Posted by Pawel on Monday, April 22, 2013 3:34 PM

Eric, Steve - thanks for your comments, and your kind words - I'm glad you like my model!

Sorry for replying so late, I was a little busy recently - but at last I've got a small update for you on this one. I finally managed to build the correct antennae for my model:

Those are made using a guitar string as the main material. The antenna on the left is an AT-912/VRC with a MX-2799 matching unit, as opposed to AT-1729/VRC which comes out of the box. Almost all pictures from Vietnam show the AT-912/VRC/MX-2799 combination, so I wanted to have it on my model.

By the way a question: What colour should the antenna "whips" be? Thanks in advance for the help.

I also put together the computing sight with the speed rings. Of course I couldn't resist showing the reflex sight removed and adding some lighting devices with cables. The speed rings come from the Eduard PE set. One speed ring shows light damage - as can be seen in my references:

Now I'm going to paint and install those details. Thanks for reading and have a nice day

Paweł

All comments and critique welcomed. Thanks for your honest opinions!

www.vietnam.net.pl

  • Member since
    August 2007
  • From: back country of SO-CAL, at the birth place of Naval Aviation
Posted by DUSTER on Tuesday, March 26, 2013 4:02 PM

Pawel!

Spectacular job  looks very fine.Yes

Steve

Building the perfect model---just not quite yet  Confused

  • Member since
    December 2006
  • From: N. Georgia
Posted by Jester75 on Tuesday, March 26, 2013 9:51 AM

Just gets better and better Pawel!

Eric


JOIN OUR COMMUNITY!

Our community is FREE to join. To participate you must either login or register for an account.

SEARCH FORUMS
FREE NEWSLETTER
By signing up you may also receive reader surveys and occasional special offers. We do not sell, rent or trade our email lists. View our Privacy Policy.