SEARCH FINESCALE.COM

Enter keywords or a search phrase below:

AFV Club M42A1 Duster WIP - Done with pictures!!

83268 views
249 replies
1 rating 2 rating 3 rating 4 rating 5 rating
  • Member since
    July 2004
  • From: Texas
Posted by wbill76 on Sunday, November 4, 2012 9:32 AM

The little details are where the real fun is at Pawel, the flashlights are a neat touch including the red lenses!

  • Member since
    May 2009
  • From: Poland
Posted by Pawel on Saturday, November 3, 2012 5:33 PM

Hello!

Not much of an update, but I have the MG ammo trays with the ammo itself and flashlight holders ready (the flashlights are scratchbuilt):

In the picture you can also see the fire extinguisher on the left, and the asimuth indicator cover with chain (bottom left) Now I'm putting them in the mount, let's see how it will look like. Thanks for reading, have a nice day

Paweł

All comments and critique welcomed. Thanks for your honest opinions!

www.vietnam.net.pl

  • Member since
    May 2009
  • From: Poland
Posted by Pawel on Friday, November 2, 2012 3:12 AM

fificat - thanks a lot for your comment! What I have in mind is a setup showing the duster on a move, but a local one - like changing firing positions after dark to confuse the eventual attackers as to the exact location of the guns, something like that. I already have one of the loaders standing up in the gun mount, now I would like to find a cool place for the other one.

I'd also have another question for you - can you tell me what personal weapons did you have back then and where were the racks for them in the gun mount?

Thanks again, have a nice day

Paweł

All comments and critique welcomed. Thanks for your honest opinions!

www.vietnam.net.pl

  • Member since
    January 2011
Posted by fificat on Thursday, November 1, 2012 3:28 PM

Pawel--In the old days, I was a loader on one of these in the Cal NG in the late 1950's.  If you want to show this as battle ready, you need the loaders at their stations with clips of ammo in their hands.  If you are in a stand-by situation, you might want to have guys out of their seats.  Maybe they can be helping stacking clips of ammo at the sides of the tub to get ready for later.

Witha max of 240 rounds per minute, and a 1/4 pound of tnt in each round, these Dusters could really tear up patches of ground fast.

  • Member since
    May 2009
  • From: Poland
Posted by Pawel on Wednesday, October 31, 2012 3:17 PM

Thanks for the comments, friends!

Bill - I heard it's a lot of ammo to shuffle, plus in Vietnam you had to look around all the time and fire small arms ocassionally, so extra people sure came handy.

Steve - thanks for the links, very interesting footage, pity there's not more of it!

Thanks again, have a nice day

Paweł

All comments and critique welcomed. Thanks for your honest opinions!

www.vietnam.net.pl

  • Member since
    August 2007
  • From: back country of SO-CAL, at the birth place of Naval Aviation
Posted by DUSTER on Tuesday, October 30, 2012 1:50 AM

Pawel

 have you seen these vidios?

http://www.youtube.com/watch?v=keFzBeJkFCI&feature=related

http://www.youtube.com/watch?v=7fhy5akosok&feature=related

while not of good quailty  you do get an idea of the operation of the duster in the late 50's or early 60's

Steve

Building the perfect model---just not quite yet  Confused

  • Member since
    July 2004
  • From: Texas
Posted by wbill76 on Tuesday, October 16, 2012 7:05 PM

Having a pair of loaders makes sense given the rate of fire on the twin 40mm guns...a crew of 4 was common with the ship mounts of these same guns.

  • Member since
    May 2009
  • From: Poland
Posted by Pawel on Monday, October 15, 2012 1:38 PM

John - I mean Clint Big Smile - thanks a lot for your kind words!

Bill - thanks a lot! I don't know about such restrictions - but fitting the figs sure is a challenge. Theoretically there should be two more guys (the loaders) there - but I think about showing them outside of the mount. We shall see...

Thanks again for your comments, have a nice day

Paweł

All comments and critique welcomed. Thanks for your honest opinions!

www.vietnam.net.pl

  • Member since
    July 2004
  • From: Texas
Posted by wbill76 on Monday, October 15, 2012 11:18 AM

Outstanding work on the details continues! I bet there were certain size/height restrictions on the crews for these vehicles...looks awfully tight! Wink

  • Member since
    August 2012
  • From: Parker City, IN.
Posted by Rambo on Sunday, October 14, 2012 5:33 PM

looking good so far really cramped in there

Clint

  • Member since
    May 2009
  • From: Poland
Posted by Pawel on Sunday, October 14, 2012 10:55 AM

Hello again!

Still fighting with the crew, here's how they fit the turret right now:

The right arm of the man sitting right to the guns (extreme left in the picture) is giving me most trouble right now.

Here's another picture for you - I'm happy how I made the inscription on the grenade boxes:

I also finished scratchbuilding the MG ammo trays - finally did the holders and the flashlights today:

How do you like it? Thanks a lot for reading, have a nice day

Paweł

All comments and critique welcomed. Thanks for your honest opinions!

www.vietnam.net.pl

  • Member since
    May 2009
  • From: Poland
Posted by Pawel on Friday, October 12, 2012 3:18 PM

Van - welcome to my thread, nice to have you onboard!

Carl - thanks for your kind words! I agree - just after trying to fit the crew in, I realized, how cramped the gun mount really was.

Thanks for your comments, have a nice day

Paweł

All comments and critique welcomed. Thanks for your honest opinions!

www.vietnam.net.pl

  • Member since
    March 2006
  • From: Right Side of a Left State
Posted by Shellback on Wednesday, October 10, 2012 8:40 PM

Figures sure add a lot to a model when done right . Looks good Pawel .Yes

Van
  • Member since
    February 2010
  • From: London, UK
Posted by Van on Wednesday, October 10, 2012 2:46 PM

Damn nice Paweł...watching you from now :)

"So many models so little time"

  • Member since
    May 2009
  • From: Poland
Posted by Pawel on Sunday, October 7, 2012 11:39 AM

And a little update - I'm working on the crew now - have to have them done to close up the gun mount.

I have the guy sitting on the left of the guns almost shaped up - I just have to glue on his right arm and the head:

The soldier sitting on the left of the guns is not that complete:

The torsos and arms come from the Legend 0107 set, and the heads are from Hornet. I had to rework most of the arms, to get an appropriate pose, and in the photo above you can see I took a right arm from the Dragon Mule set (number 3315, the driver figure). Frankensteining, like Hans used to say! Hope you like it, thanks for reading and have a nice day

Paweł

All comments and critique welcomed. Thanks for your honest opinions!

www.vietnam.net.pl

  • Member since
    May 2009
  • From: Poland
Posted by Pawel on Tuesday, October 2, 2012 8:53 AM

Bill, Colin, Rob, Carl - thanks a lot for your kind words, glad you like it. your comments really motivate me! Have a nice day

Paweł

All comments and critique welcomed. Thanks for your honest opinions!

www.vietnam.net.pl

  • Member since
    March 2006
  • From: Right Side of a Left State
Posted by Shellback on Monday, October 1, 2012 9:01 PM

Oh ya Pawel , really looking realistic !!!

  • Member since
    October 2009
Posted by PANZERWAFFE on Monday, October 1, 2012 8:44 PM

That's some VERY NICE detailing Yes  Excellent work, keep at her.

Rob

  • Member since
    August 2012
Posted by Colin P on Monday, October 1, 2012 7:52 PM

Wow, the details are really standing out now. Keep up the great work!

  • Member since
    July 2004
  • From: Texas
Posted by wbill76 on Sunday, September 30, 2012 8:02 PM

Nice update Pawel, the detail work really shows up at this stage, impressive!

  • Member since
    May 2009
  • From: Poland
Posted by Pawel on Sunday, September 30, 2012 10:43 AM

Hello everybody!

Apart of fitting the figures, which is a very fiddly job, I also did some weathering and put a few parts together. I glued on one of the seats, installed the spent brass chutes and the grenade boxes (in the rear of the mount). I dry-fitted the guns and the upper armor and then the mount looked like this:

I didn't weather the guns yet, so they stand out a little bit - I will work on that later. Thanks for reading, have a nice day

Paweł

All comments and critique welcomed. Thanks for your honest opinions!

www.vietnam.net.pl

  • Member since
    May 2009
  • From: Poland
Posted by Pawel on Thursday, September 13, 2012 8:56 AM

Thanks a lot for your comment, Carl! Have a nice day

Paweł

All comments and critique welcomed. Thanks for your honest opinions!

www.vietnam.net.pl

  • Member since
    March 2006
  • From: Right Side of a Left State
Posted by Shellback on Tuesday, September 11, 2012 1:24 PM

Good to see you were able to get more done on this one Pawel , i was just thinking last night i hadnt seen an update recently . Everything looks great ! Yes

  • Member since
    May 2009
  • From: Poland
Posted by Pawel on Tuesday, September 11, 2012 8:16 AM

Hello!

It's been a long time, finally, on sunday I managed to do something and so I have a small update for you.

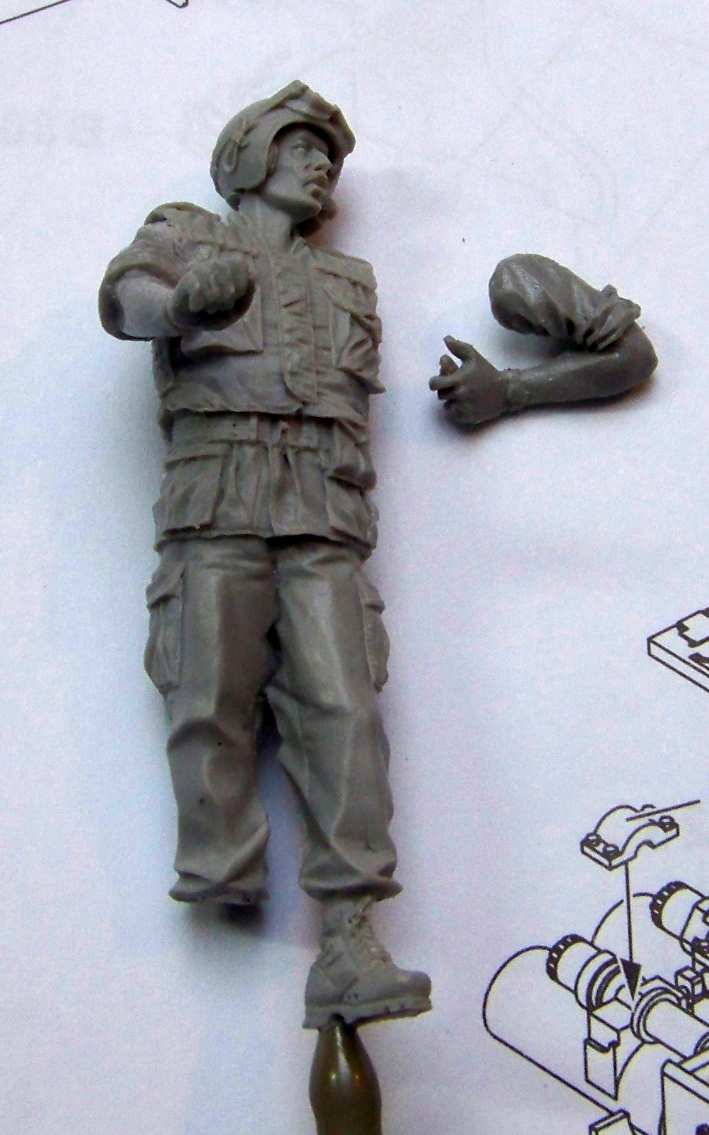
First, I started working on the crew. There's this guy from Bravo 6 - he's going to ride shotgun on my Duster:

Then I started working on the figures of the gunner and the assistant gunner. the beginnings are humble:

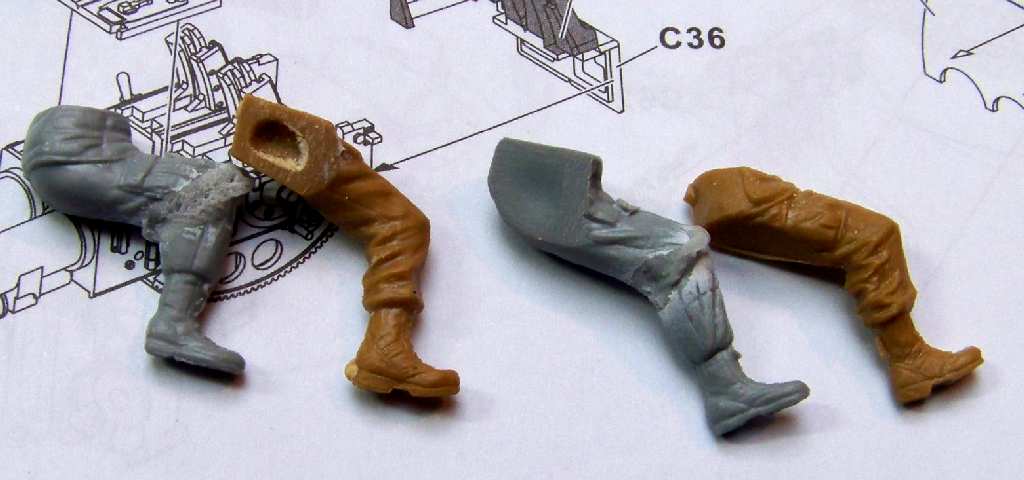
The "outer" legs (orange plastic) come from Master Box kit "Charlie on the left", from the driver figure. The "inner" legs (grey plastic) come from the Dragon's Modern tank crew set, also from the driver. They hed to be cut, shortened and repositioned. I filled the gaps with thick CA glue.

I also worked on the gun mount:

I installed the firing pedal (absent in the kit) and the asimuth indicator cover - the kit provides this part, but I already had a metal part made, so I decided to with it.

I had more work with the antenna bases:

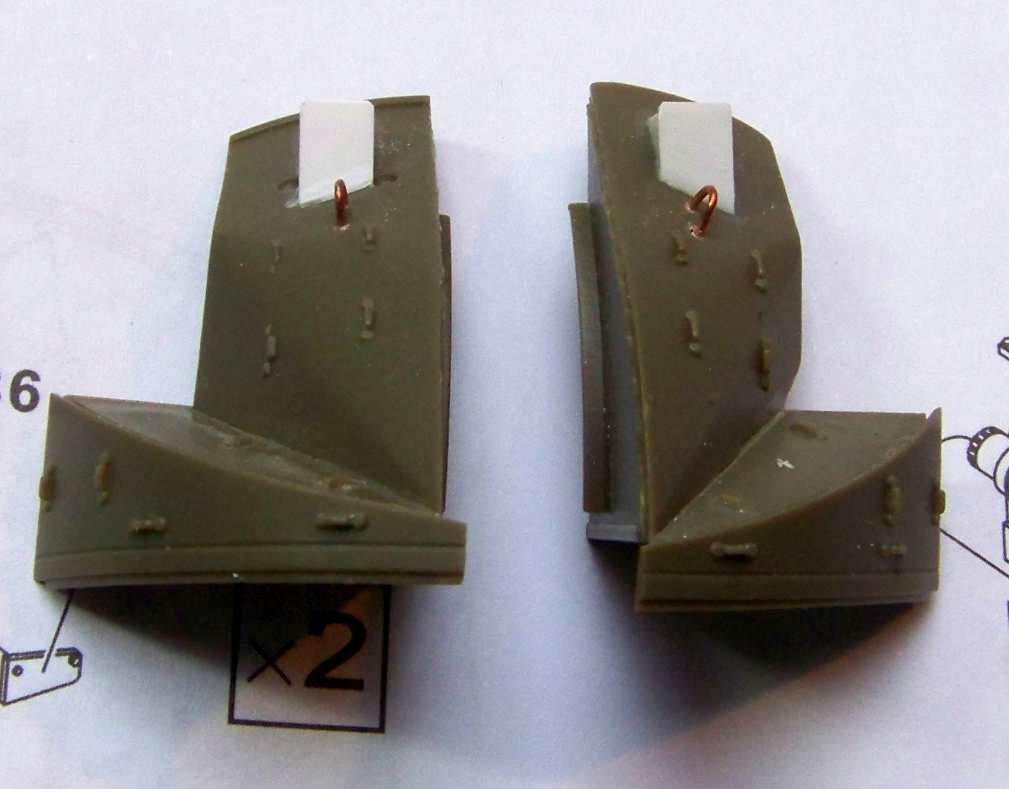
There were two types of that fitting - round and sqare. The kit gives you a pair of round bases, but most of the Vietnam-era photos show vehicles with square ones, so I went to scratchbuild the square antenna bases. Gettitng the right angles was the most challenging part of it.

And that would be all for now - thanks for reading, have a nice day

Paweł

All comments and critique welcomed. Thanks for your honest opinions!

www.vietnam.net.pl

  • Member since
    May 2009
  • From: Poland
Posted by Pawel on Tuesday, August 21, 2012 10:04 AM

Colin - you're welcome and thanks for your kind words. Those tracks look nice. Maybe the idea was, if the fit was a little bit more loose, the track wouldn't be curving? Good luck with the assemblying, it's a lot of work.

Carl - thanks a lot, that's what I told myself, too.

Bill - thanks fot stopping by!

Have a nice day, everybody!

Paweł

All comments and critique welcomed. Thanks for your honest opinions!

www.vietnam.net.pl

  • Member since
    July 2004
  • From: Texas
Posted by wbill76 on Monday, August 20, 2012 5:53 PM

Nice update Pawel!

  • Member since
    March 2006
  • From: Right Side of a Left State
Posted by Shellback on Monday, August 20, 2012 4:03 PM

Colin thats good info . Maybe i'll invest in a set . I've read where its difficult to get the tracks to look tarnished .

  • Member since
    August 2012
Posted by Colin P on Monday, August 20, 2012 10:06 AM

Hello Carl, pretty easy assembly, just time consuming. The supplied wire is thin imo and seemed to leave too much slack in the joints so I used a 1/32" bit and paper clips instead. I'd estimate the assembly time at around 48 Hrs. The most tediuos part is trimming the flash and drilling out the holes.

  • Member since
    March 2006
  • From: Right Side of a Left State
Posted by Shellback on Monday, August 20, 2012 9:35 AM

Hey Pawel those seats you made look a lot better than the kits parts , for sure Yes

Colin , i've never used Fruils . Are they easy or difficult to assemble ?

  • Member since
    August 2012
Posted by Colin P on Sunday, August 19, 2012 2:05 PM

These are the track sets I am currently working on that I messaged you about. Thanks for sending me the pics of the tools nice to finally know what they look like. Beautiful job on the seats, I'm a little intimidated but I'm gonna try to replicate them!

 The set contains 160 links 80/side (I counted 176 total 4 of them were bad castings) 180 nuts (210 counted) wire for pinning and instructions.

 The Nuts to cover the pinning holes come on sprues and are well detailed. With an extra 30 I plan on using them on other areas of the model if scale allows.

The links themselves are well detailed and needed minimum trimming. Each link must be drilled out with a 0.5mm bit to clean the flash from the casted holes. However, I used a 1/32" bit a replaced the wire with paper clips for the pins. I fitted two links together before drilling to keep the holes aligned then switched top and bottom to complete  them.

Inner Tracks

Outer Tracks

THe pinning side with some of the nuts glued in place.

 As you can see the track is slowly curving. I applied some pressure on the center links at the same time forcing the outerlinks in the opposite direction and it straightened right out.


JOIN OUR COMMUNITY!

Our community is FREE to join. To participate you must either login or register for an account.

SEARCH FORUMS
FREE NEWSLETTER
By signing up you may also receive reader surveys and occasional special offers. We do not sell, rent or trade our email lists. View our Privacy Policy.