SEARCH FINESCALE.COM

Enter keywords or a search phrase below:

AFV Club M42A1 Duster WIP - Done with pictures!!

83270 views
249 replies
1 rating 2 rating 3 rating 4 rating 5 rating
  • Member since
    May 2009
  • From: Poland
Posted by Pawel on Monday, May 28, 2012 9:14 AM

Thanks a lot!

Bill - the cool thing is I learned this trick here on the forums!

Scott - of course the man stays! Evil -don't know about that, but "Get some" - all of the Duster crew just had to be that way!

Best greetings and have a nice day

Paweł

All comments and critique welcomed. Thanks for your honest opinions!

www.vietnam.net.pl

  • Member since
    August 2006
  • From: Amherst, MA
Posted by M1 A1 A2 Tanker on Sunday, May 27, 2012 11:45 AM

Pawel


http://www.vietnam.net.pl/M42A1/crew01.jpg


Ok, got to say it the look on this guy's face is pure EVIL!

All I can think of when I look at it is the guy is saying "Get Some!!"

So I would leave him just that way.


Scott


“Computers are like Old Testament gods; lots of rules and no mercy.”  ~ Joseph Campbell


  • Member since
    July 2004
  • From: Texas
Posted by wbill76 on Sunday, May 27, 2012 11:16 AM

Coming along nicely Pawel, neat little trick for the chains! Yes

  • Member since
    May 2009
  • From: Poland
Posted by Pawel on Sunday, May 27, 2012 9:39 AM

Thanks for the comments, friends!

Andy, Carl - thanks for your kind words! There's always this dillema for the model kit manufacturer - what's with details that cannot be acurately molded - leave tham out or put SOMETHING there? Option 2 usually wins, and then there's a lot of shaving to do - that's where a sharp blade and good electronics side cutters come very handy.

Scott - thanks a lot. Yeah, that twin gun mount is tricky. Man Up pills? I tried to scratchbuild this mount before, and almost had it done by the time the AFV Club kit went out (see here), so now I'm not afraid. I even know a few details AFV Club left out!

Now I'm movin' on with the hull - I added the various chains to the engine deck:

Of course you could buy them photoetched, but I chose do do them myself. It's easy, too - just take two pieces of soft wire, twist them tightly together and then lay on a hard surface and tap with a small hammer, or like in this case - with a screwdriver handle. Done!

I also added two details on the rear armor plate:

Those two wwhite chunks above the final drive housings are track deflectors, meant to prevent thrown track from snagging the hull edges. By the way, on this photo the towing shackle mounts are corrected - I noticed the error in the instructions late (still glad I managed this BEFORE painting Big Smile)

Then I went on with the right fender:

Here I also replaced the latches, I also drilled out the holes on the padlock tabs (between the latches) - I also did that on the left side. I shaved the tow rope hooks and cleaning rod mounts and replaced them with PE taken from my old model. You have to watch those tow rope hooks - Eduard designed them to be "square" where infact they should be U-shaped, you can correct that easily.

The lower compartment doors all have different width, and the instructions have an error here too - as you can see the Part O33 is called out two times. You actually are supposed to put the part O31 on the rearmost compartment and part O33 on the front compartment.

To close the hull finally, I have to take care of the interior, and this means putting the driver there - later the acces will be to poor. So I built the "handlebar" and the driver currently looks like this:

I still have to build some kind of seat to put him on, but, as said - I try hard to keep it simple.

And that would be it for now - thanks for reading, best greetings to all and have a nice day

Paweł

All comments and critique welcomed. Thanks for your honest opinions!

www.vietnam.net.pl

  • Member since
    August 2006
  • From: Amherst, MA
Posted by M1 A1 A2 Tanker on Saturday, May 26, 2012 6:08 PM

Love the pics!! Awesome looking.

I'll be honest though after reviewing the instructions at Hobby Search website, that fighting compartment scares me with how crammed full of stuff it is.

Now if I could find my Man Up pills I might buy it.


Scott


“Computers are like Old Testament gods; lots of rules and no mercy.”  ~ Joseph Campbell


  • Member since
    March 2006
  • From: Right Side of a Left State
Posted by Shellback on Thursday, May 24, 2012 7:09 PM

Yah ! What Andy saided !!!

  • Member since
    April 2009
  • From: Carmel, IN
Posted by deafpanzer on Thursday, May 24, 2012 1:23 PM

Molded on latches despite the fact this kit is a recent release!?!?!?  When will the manufacturers get it that we don't like molded on latches, tools, cables, etc?  Stick out tongue

Your work replacing those molded on looks GREAT!!!  

Andy

  • Member since
    April 2009
  • From: Carmel, IN
Posted by deafpanzer on Thursday, May 24, 2012 1:20 PM

Molded on latches despite the fact this kit is a recent release.  When will the manufacturers get it that we don't like molded on latches, tools, cables, etc?  Stick out tongue

Your work replacing those molded on looks GREAT!!!  

Andy

  • Member since
    May 2009
  • From: Poland
Posted by Pawel on Thursday, May 24, 2012 8:44 AM

Mike - thanks for your comment! The rusty mix is easy - just take some gun metal/steel and mix it with nice red/brown, that mix being applied over fresh black paint.

And now I'm movin' on with the build. For one, I also did the muffler on the other side of the Duster:

The tool tray also comes from the Eduard PE set and was "transplanted" from my old model.

Then I started looking at the ammo box tops. OOB they looked like this:

I knew I could make much better latches/bolts than those molded on by AFV Club, so I went on and fabricated those:

Much nicer, huh? I also substituted a PE part for the kit part in front of the ammo boxes, this looks a lot better, too, but there's a slight difference in size between the kit and the PE part, you also need to sand some molded-on detail from the front ammo box support in order to pull this one off.

So that'd be it for now, I hope for another update soon - thanks for reading and have a nice day

Paweł

All comments and critique welcomed. Thanks for your honest opinions!

www.vietnam.net.pl

  • Member since
    July 2006
  • From: New Jersey
Posted by redleg12 on Tuesday, May 15, 2012 5:09 AM

Moving along nicely....love the rusty mix...I will have to put that on the shelf!!

Rounds Complete!!

"The Moral High Ground....A Great Place to Emplace Artillery."

  • Member since
    May 2009
  • From: Poland
Posted by Pawel on Sunday, May 13, 2012 10:48 AM

Thanks a lot Bill! Unfortunately my job slowed me down recently, but I managed to do this little update:

I went on with the work on the fenders. I worked on the mufflerarea brackets, and they need a lot of work to make them look like stampings, and not like castings, that they in fact are. Here are two photos - "after" on the left, "before" or OOB parts on the right:

Once the parts were thinned down, I painted the parts that will become unreachable with my custom rusty mix of black, brown and gun metal, then I glued the muffler in place. On top of the muffler and the muffler shroud there is a tool tray. I took this tray from my old model, it's a modified Eduard PE part. This part is a little wider than the kit part, so it's very important to test fit the complete fender to the hull to watch for fit problems - I discovered mine soon enough, the tool tray hd to be moved outside a bit, to avoid it from conflicting with the engine cover hinges. Here's how the first muffler looks like now:

And that would be about it for now - thanks for reading, have a nice day

Paweł

All comments and critique welcomed. Thanks for your honest opinions!

www.vietnam.net.pl

  • Member since
    July 2004
  • From: Texas
Posted by wbill76 on Monday, May 7, 2012 11:47 AM

You're moving right along with this one Pawel! Nice work on the details. Yes

  • Member since
    May 2009
  • From: Poland
Posted by Pawel on Monday, May 7, 2012 9:43 AM

PANZERWAFFE - Thanks man! Please do that, maybe you can find something interesting, too! Big Smile

Gino - Thanks a lot! I'm fighting with myself not to do that - I have enough reference to do a complete interior, and I'm afraid of how much time that would take, considering almost nothing of it will be visible once I put the crew figures in the hatches. So I put SOMETHING in, for the interior not to look completely empty, mabe also basic seats, headrests and the "handlebar" for the driver, but that would be about it. I want to finish this model!

Thank you again for your comments, have a nice day

Paweł

All comments and critique welcomed. Thanks for your honest opinions!

www.vietnam.net.pl

  • Member since
    December 2002
  • From: Valrico, FL
Posted by HeavyArty on Sunday, May 6, 2012 1:34 PM

Looking really nice.  Do you plan on adding a basic interior to the driver's area?  It wouldn't be hard using the pic I posted earlier.  Keep up the good work.

Gino P. Quintiliani - Field Artillery - The KING of BATTLE!!!

Check out my Gallery: https://app.photobucket.com/u/HeavyArty

"People sleep peaceably in their beds at night only because rough men stand ready to do violence on their behalf." -- George Orwell

  • Member since
    October 2009
Posted by PANZERWAFFE on Sunday, May 6, 2012 11:37 AM

Beautiful scratch work and detail, looking great Yes  Will have to go back and read everything through now but love what I am seeing.....keep it coming.

Rob

  • Member since
    May 2009
  • From: Poland
Posted by Pawel on Sunday, May 6, 2012 11:25 AM

Gennulman - thanks a lot for your kind words! Encouraged by them I go on with my build.

I added another rod loops to the rear of the gun mount ring:

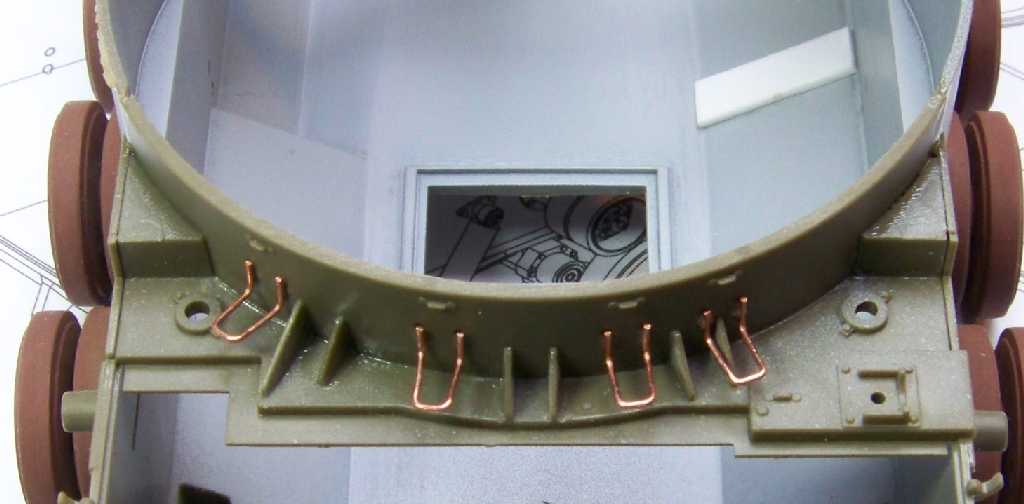
Again, making them from wire was faster than cleaning up the kit parts. Those parts normally hold a large tarp, that could be used to cover the gun mount.

Then I went on with the front door - I finally put them on the front armor plate. From inside it would look something like that:

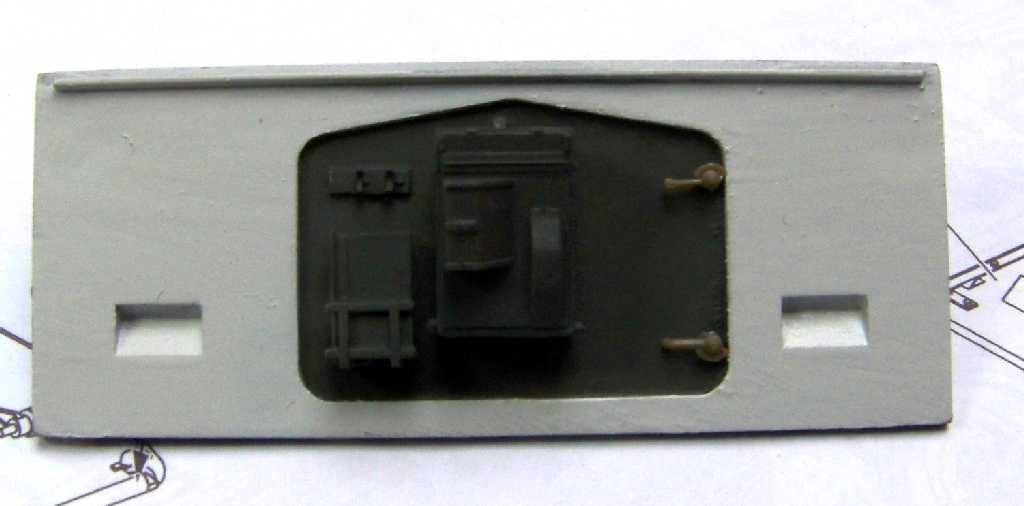
From left we see an ammo box, above it is a flashlight holder, the large chest is a periscope storage and on the right there are latches in closed position (yet to be painted). I just quickly added those parts, the interior is going to be pretty basic.

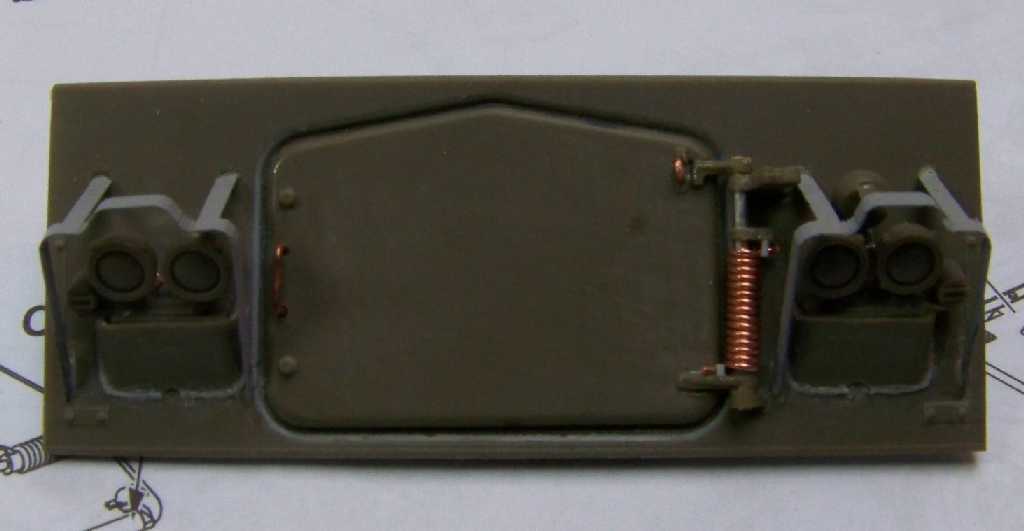
On the outside the front armort looks like this:

And from other direction:

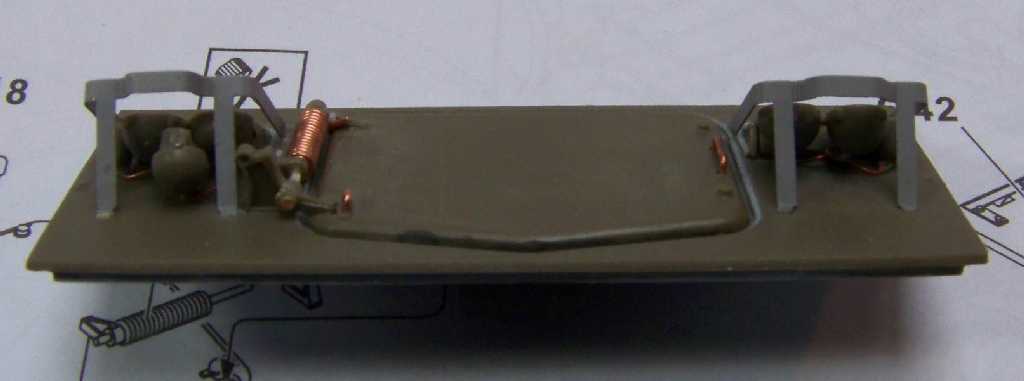
On the hatch I made the handle and the latch catch from copper wire. I replaced the spring and hinge axle with wire too, I think it looks better this way. I left off the front door latch for later, I think it could break off too easily. I made some wiring on the lights and added weld seams and drain holes for the light bases. The light guards are transplants from my old duster model, they originally came from an Eduard PE set and due to the differences between Tamiya and AFV Club kits the horizontal braces need to be shortened some 2,5mm to fit right.

I painted the hull interior and I also put in something like a bulkhead, as I said I try to keep it simple (it's not easy!):

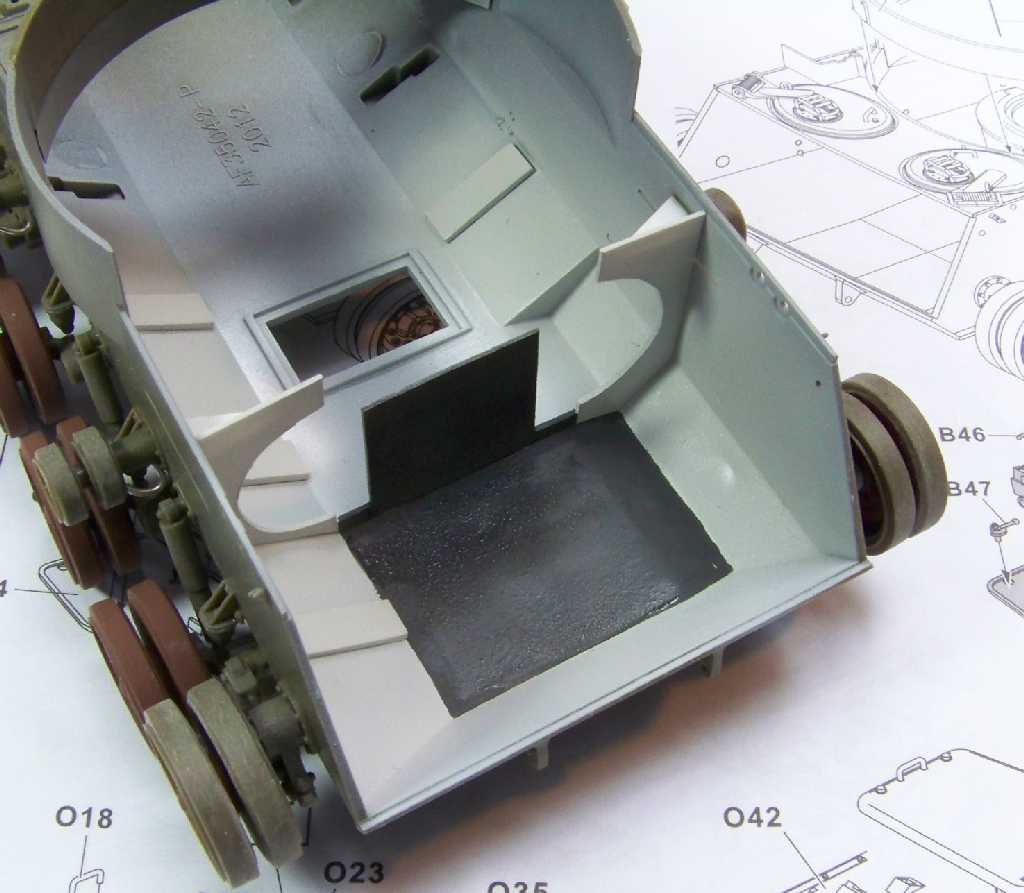
Some Dusters had their interior OD up to the bulkhead, so please check your references.

I also went on with some rear armor:

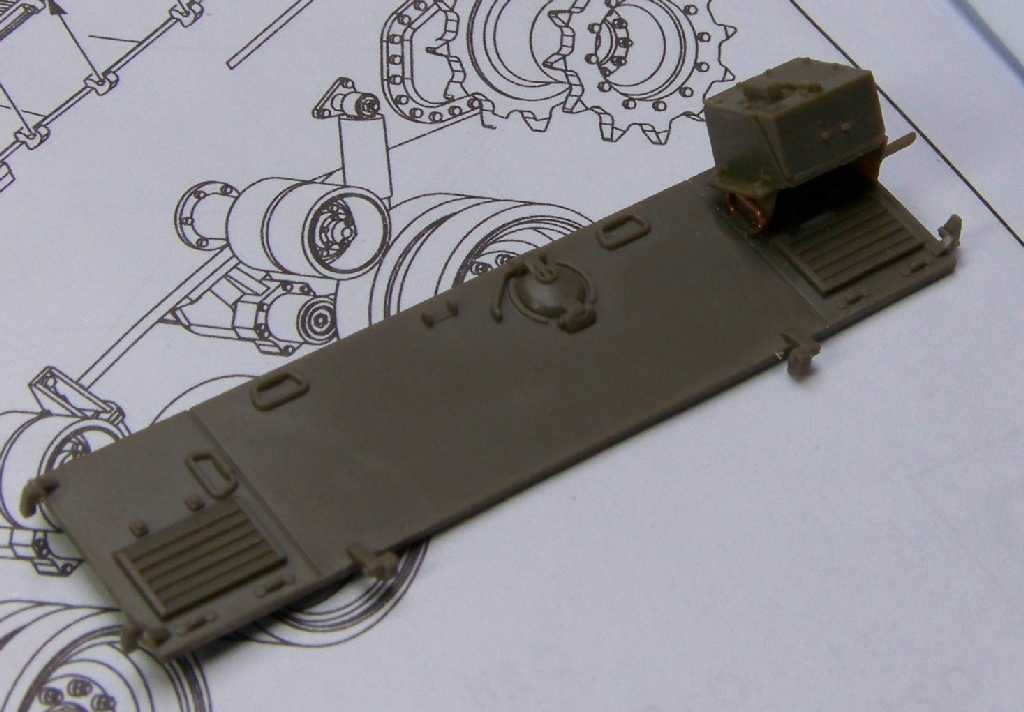
Now again, the instructions don't tell you that, but you have the option to add a telephone box, as I did. In case of a tank, a telephone box is for the infantry outside to communicate with the tank crew. In case of the duster, though, this box was handy for pluging in the landline and communicating with the FDC when dug in.

To build the box you need the parts L7, L8 and L25. The fit is a bit tricky. You even have the option to pose it open, then you add the part L10 inside and you'd have to add a handset and some wire. To put the box on the armor plate, you have to shave one of the handles off. The handle would normally lean against the telephone box base - to show that I fabricated an extra handle, as can be seen in the picture.

Now my week off is over - I could put some serious bench time in, so I'm glad. Now the updates will not be as frequent, ain't that sad? Thanks for reading and have a nice day

Paweł

All comments and critique welcomed. Thanks for your honest opinions!

www.vietnam.net.pl

  • Member since
    July 2006
  • From: New Jersey
Posted by redleg12 on Saturday, May 5, 2012 6:48 PM

Looking very nice    love the work on the road wheels

Rounds Complete!!

"The Moral High Ground....A Great Place to Emplace Artillery."

  • Member since
    March 2006
  • From: Right Side of a Left State
Posted by Shellback on Saturday, May 5, 2012 4:47 PM

Nice progress .Yes

  • Member since
    May 2009
  • From: Poland
Posted by Pawel on Saturday, May 5, 2012 4:12 PM

It's me again - as I wrote I worked on the track return rollers. I noticed their mounts dont have those funny rod loops you see in many photos, by the way - anybody know what are they good for? Anyhow, I added them:

After that I put on the rollers themselves, and when they were in place, I couldn't resist test fitting the track:

Nice, huh? What you see is 75 links of AFV Club M41 Workable track. The track is pretty tight, I heard the duster drivers in Vietnam liked it that way. By the way, the AFV Club track kit doesn't give you enough links to do both sides, to use this kit you need two of them. I found this out the hard way some two years ago - nowadays with those nice kit supplied vinyl tracks it's really a decision to make.

I also started working on the fender-mounted ammo box:

It's a little tricky - the central part, O2, is like 1mm too long for the side, O46. But after you sand a little off each end, everything fits just fine. I even test-fitted the box to the fender and it fits good. Also the supports, O9, O12 and B16 are too thick OOB (they are NOT armoured!), so I thinned them down. You have to be careful doing this, so as not to damage the parts, but it's doable. At first I planned to replace those parts with sheet metal, but they have to many nice datails molded on them.

So that'd be it for today - thanks again for reading, and have a nice day

Paweł

All comments and critique welcomed. Thanks for your honest opinions!

www.vietnam.net.pl

  • Member since
    May 2009
  • From: Poland
Posted by Pawel on Friday, May 4, 2012 5:32 PM

Gino - thanks a lot for your kind words and for the interior photo. And good luck with your duster!

I put most of the wheels on mine - here's what it looks like now:

It took some tweaking - I had to enlarge the holes in each wheel, and fit a little length of plastic tube on each axle to keep the correct track width, but it's done now with exception of the track return rollers, which will follow soon! Thanks for reading, have a nice day

Paweł

All comments and critique welcomed. Thanks for your honest opinions!

www.vietnam.net.pl

  • Member since
    December 2002
  • From: Valrico, FL
Posted by HeavyArty on Thursday, May 3, 2012 7:49 PM

It's coming along nicely.  Good job on the idler wheels.  They look great.

The interior was semi-gloss white.

Gino P. Quintiliani - Field Artillery - The KING of BATTLE!!!

Check out my Gallery: https://app.photobucket.com/u/HeavyArty

"People sleep peaceably in their beds at night only because rough men stand ready to do violence on their behalf." -- George Orwell

  • Member since
    July 2006
  • From: New Jersey
Posted by redleg12 on Thursday, May 3, 2012 7:28 PM

My Forty Duce arrived today. You work so far is inspiring!!

Rounds Complete!!

"The Moral High Ground....A Great Place to Emplace Artillery."

  • Member since
    May 2009
  • From: Poland
Posted by Pawel on Thursday, May 3, 2012 4:34 PM

Well alright, here is some progress:

I took care of the idlers - thanks again for the tip, Gino! I turned centers out of kit's tires and installed M41 suspension hubs inside. Came out quite nice:

Now I have 12 nearly identical whels. Check.

I also assembled most of the bits from the lower rear armour plate:

There are still two parts missing - the tanker bar and the towing pintle. The little round object over the pintle mount is a bracket to hold the towing pintle when it's not installed. But I heard in Vietnam the pintle was installed all the time, so in my model it will be installed too, just like the instructions say. It's good though, to drill a hole through the holder, so it looks like a small piece of tube - a little work and a good realistic result.

I also started painting the insides of the hull:

The hull won't have any interior to speak of, but the hatches will be open with crew figures in them, so at least let them have some background. I believe the interior was white, but I'll verify that.

I also started working on the top armor plate:

I cut off the placeholder for the fire extinguisher handle - I'll install a proper T-handle and I cut off the 7,62 ammo holds - they were too thick, I'll make them out of copper sheet. And that would be it for now - thanks for reading, have a nice day

Paweł

All comments and critique welcomed. Thanks for your honest opinions!

www.vietnam.net.pl

  • Member since
    May 2009
  • From: Poland
Posted by Pawel on Wednesday, May 2, 2012 4:26 PM

Hello!

Sorry, no new photos today - the sun went down too fast, I'll try to get new material tomorrow. But thanks for the comments!

Bill - glad you like it, and I'm just begenning!

Rob - welcome aboard and thanks for your kind words. I could use your advice here! As for the Tamiya kit - of course it can be upgraded, but as you wrote, the amount of work is basically scratchbuilding.

OK, back to the workbench, have a nice day

Paweł

All comments and critique welcomed. Thanks for your honest opinions!

www.vietnam.net.pl

  • Member since
    July 2004
  • From: Texas
Posted by wbill76 on Wednesday, May 2, 2012 12:44 PM

Nice work on the hatches Pawel! Yes

  • Member since
    December 2002
  • From: Fort Knox
Posted by Rob Gronovius on Tuesday, May 1, 2012 7:22 PM

Very nicely done. I hope to get around to buying one of these. I first saw a Duster in the summer of 1984 during annual training at Fort Drum, NY. At the time, I didn't know they were still in the inventory, but the old 50th Armor Division still had them as divisional air defense and had them as late as 1985. Probably had them longer.

I'd echo Pawel's statements about upgrading the old Tamiya kit. I attempted to do so and just hacking off the running gear from the lower hull is a chore. Even with the Eduard etch and Barrel Depot guns, the detail of the suspension doesn't look right on the clunky upper hull.

I'd chuck the Tamiya kit up on eBay and let buyers who don't know a better kit is on the market buy it from you.

  • Member since
    May 2009
  • From: Poland
Posted by Pawel on Tuesday, May 1, 2012 5:25 PM

Mike - thanks for the link, nice reference. Be sure to update the kit list though, the new one is worth it. Your web page is one of my favourites!

Gino - thanks a lot for the heads up, you really woke me up here! I don't know how this idler issue could confuse me that way! Well AFV Club gives you four drive sprockets and a whole lot of extra parts on the double sprues - I guess they might as well go with the M41 suspension set and give you two extra road wheels. Oh well - your message made me scratch my head and what I did was to use my lathe and turn the insides out of four kit's road wheel halves. I'm gonna marry the rubber tires I got with the hubs of the idlers and this way I plan to get two extra wheels with the correct undercut, as you called it. To be clear here, the parts painted this nice brown color come from this AFV Club M41 Suspension kit.

That review at Perth is also a nice thing - I've sen it before, but didn't read it throughly, now I see there are some really helpful and insightful remarks there.

Apart of messing with the wheels, I also wrapped up the hatches. The inner side of the TC hatch:

The latch is made as previously described, I also carved out the insides of the resin periscope to represent missing periscope - this can be seen all the time on Vietnam vehicles (they broke easily, from what I heard).

The outer side of the hatches looks like this:

And that'd be it for now, have a nice day

Paweł

All comments and critique welcomed. Thanks for your honest opinions!

www.vietnam.net.pl

  • Member since
    July 2006
  • From: New Jersey
Posted by redleg12 on Monday, April 30, 2012 7:45 PM

Here are a few pics of a restored Duster for you to peek at

http://www.redleg2scale.com/walkaround%20gallery/M42%20Duster.html

Rounds Complete!!

"The Moral High Ground....A Great Place to Emplace Artillery."

  • Member since
    December 2002
  • From: Valrico, FL
Posted by HeavyArty on Monday, April 30, 2012 6:42 PM

It looks like you are off to a good start.  The kit looks really nice as well.  Too bad they didn't go with the AFV Club M41 Suspension set though.  However, they would have had to give you some extras in the set, like another 2 complete roadwheels.  I'll explain below.

... M41 Suspension Kit, also from AFV Club, and the wheels from this kit are a lot better. Here they are compared side by side:

http://www.vietnam.net.pl/M42A1/wheels01.jpg

Road wheels: My old wheels have the "lip" inside, the kit wheels lack this feature.

The AFV Club M41 Suspension Set roadwheels are a little nicer and they do have the correct undercut on them.

http://www.vietnam.net.pl/M42A1/wheels02.jpg

Drive sprockets: My old ones have the mud evacuation holes in them, the kit ones don't.

As you found out later, the instructions are wrong on which sprockets to use.  AFV Club does include a set of really nice ones with mud release holes in the kit.

http://www.vietnam.net.pl/M42A1/wheels03.jpg

Track tensioning wheel - my old one sports this cool "holey design", kit wheel is similar to the road wheels

The kit is correct in this respect.  The slotted idler wheel was not used on the M42 Duster.  It was used on the M41A3, which is what the AFV Club Suspension Set comes from.  As I alluded to above, you would need two additional, complete roadwheels to replace the slotted idlers with.

Like I said, a great kit and you're off to a good start.  In the end though, it is better to use the kit suspension as it is really nice and not really noticeable or worth the cost (2 sets) to replace them with the AFV Club M41 Suspension Set.

For more info on the kit , check out the review at Perth

Gino P. Quintiliani - Field Artillery - The KING of BATTLE!!!

Check out my Gallery: https://app.photobucket.com/u/HeavyArty

"People sleep peaceably in their beds at night only because rough men stand ready to do violence on their behalf." -- George Orwell

  • Member since
    March 2006
  • From: Right Side of a Left State
Posted by Shellback on Monday, April 30, 2012 5:05 PM

more nice details Pawel . I like how you replaced the door spring .Yes

JOIN OUR COMMUNITY!

Our community is FREE to join. To participate you must either login or register for an account.

SEARCH FORUMS
FREE NEWSLETTER
By signing up you may also receive reader surveys and occasional special offers. We do not sell, rent or trade our email lists. View our Privacy Policy.