SEARCH FINESCALE.COM

Enter keywords or a search phrase below:

AFV Club M42A1 Duster WIP - Done with pictures!!

83268 views
249 replies
1 rating 2 rating 3 rating 4 rating 5 rating
  • Member since
    May 2009
  • From: Poland
Posted by Pawel on Sunday, August 19, 2012 11:35 AM

Colin - that with the weathering - sounds like a good idea. I see you're getting a lot of goodies, too.

I worked some on the update. I came to the point, where the gun mount is in subassemblies that will be connected in the end, but for now I'm working on them individually:

For example the upper mount sheet metal (hard to call it armor) - I decided to join the three pieces together, to fill and sand the seams now:

I'm going to install it as one piece, but not before I detail the tub completely.

The dry fit looks interesting:

As you can see I scratchbuilt the firing pedal for the gunner, and also put together the spent brass chutes - they needed thinning with a motor tool to allow for free movement of the guns.

Colin asked me to post more pictures of the seats I scratchbuilt for my old model. In my opinion they are good enough to install them in my new model, here thay are:

The spots are evidence of my younger brother carelessly using my airbrush while I wasn't there - that happened some time ago, and I still want to hurt him...

Kit seat parts for comparison:

Other than that, my weekends are busy recently - hope to do more next time. Thanks for reading, have a nice day

Paweł

All comments and critique welcomed. Thanks for your honest opinions!

www.vietnam.net.pl

  • Member since
    August 2012
Posted by Colin P on Thursday, August 16, 2012 12:03 PM

Thanks for the warm welcome Pawel! Wanted to also thank you for pointing me to the website, gonna take me awhile to catch up on all this great info. (Currently going through the tools section LOL)

I thought about that when I woke up this morning it would be useful to practice some weathering on after I strip the PE parts!

Going to order the AFV kit next week, until it arrives I have a lot of work ahead as the Friulmodel Track Link set and the Verlinden Bofors and Ammo boxes came yesterday.

Have a good one!!!

Colin

  • Member since
    May 2009
  • From: Poland
Posted by Pawel on Thursday, August 16, 2012 10:26 AM

Mike - thanks a lot!

Colin - welcome to the forums, and thanks for your kind words. Well, I say don't smash nothing, but starting over should save you lots of time and give you opportunities to practice not only the scratchbuilding, but also other skills, like painting, weathering and so on. Good luck with your project and have a nice day

Paweł

All comments and critique welcomed. Thanks for your honest opinions!

www.vietnam.net.pl

  • Member since
    August 2012
Posted by Colin P on Tuesday, August 14, 2012 10:24 AM

Well just spent the morning reading this build and just gotta say this just blows me away!!!! Phenominal job with the details!

Now I need to order the AFV kit, strip down the PE parts off the Revell kit and smash it against the wall LOL!!! I have to side with you on your point about a detailed kit, I started my Revell last June and still chipping away at the engine deck Ick!

If you think the Tamiya kit is bad the Revell kit is identical to the Matchbox build from the 70's. I've had to do a lot of modding just to get the Track Fenders to scale  I cant complain though it's taught me a lot about scratch building.I tore the curb side ammo storage locker apart 6 times and they can say what they want to about CA glue I've never had a problem seperating two parts metal/metal or metal/plastic. I'll have to make up a video and show you the Revall kit so far. I should just throw it against the wall LOL

Keep up the great work looking forward to seeing the finished build.

  • Member since
    July 2006
  • From: New Jersey
Posted by redleg12 on Wednesday, August 8, 2012 5:39 AM

Mind bending details.....very nice

Rounds Complete!!

"The Moral High Ground....A Great Place to Emplace Artillery."

  • Member since
    May 2009
  • From: Poland
Posted by Pawel on Tuesday, August 7, 2012 10:08 AM

Ben, Karl, Bill - thanks a lot for your comments and your kind words. They give me the additional motivation and make this build even more fun! Thanks again and have a nice day

Paweł

All comments and critique welcomed. Thanks for your honest opinions!

www.vietnam.net.pl

  • Member since
    July 2004
  • From: Texas
Posted by wbill76 on Sunday, August 5, 2012 12:44 PM

Always neat to see what other little details you'll upgrade on this project Pawel, keep it coming! Beer

  • Member since
    March 2006
  • From: Right Side of a Left State
Posted by Shellback on Sunday, August 5, 2012 11:54 AM

Pawel you got the details nailed !

  • Member since
    September 2010
  • From: Qubec, Canada
Posted by Ben323 on Sunday, August 5, 2012 10:04 AM

Amazing.... wow

Great job! Amazing workYes

Ben K.

  • Member since
    May 2009
  • From: Poland
Posted by Pawel on Sunday, August 5, 2012 9:55 AM

T-rex - thanks a lot. Yeah, I gues I really try to go to town on this one Big Smile

Guney - thanks a lot!

Mike - yeah, I missed you! Like I wrote, first I tried to turn the Tamiya model into something accurate, but it took me like four years, and then when the AFV Club came out, I had most things already figured out, and now you can see the results of my previous research.

By the way, let me show you what I did recently.

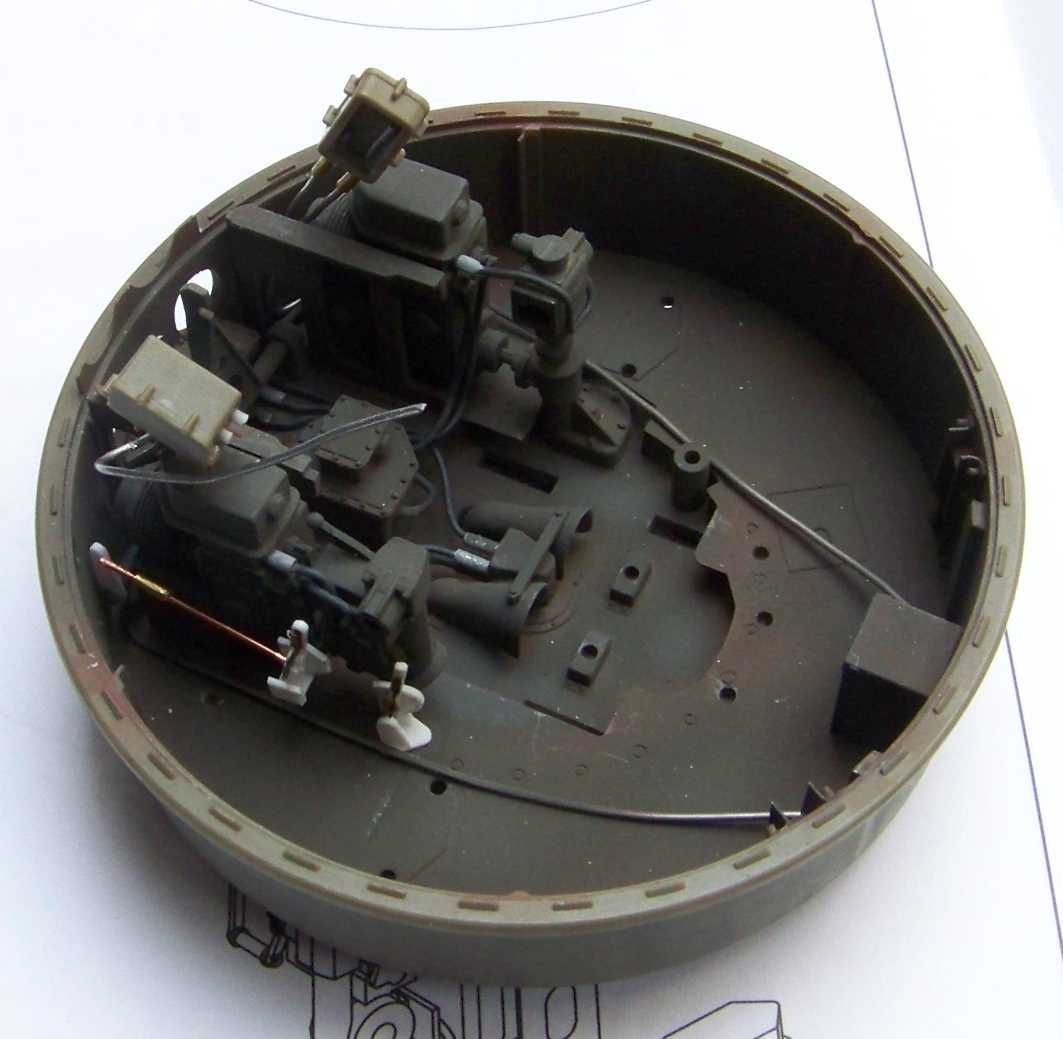
I worked on the wiring some more and I put in the junction boxes - decided to wire them now and let them dangle on the wires, 'till I can fix them to the armor plates they belong to. I also installed the travel lock and it's levers done previously:

And the front armour is in the works too:

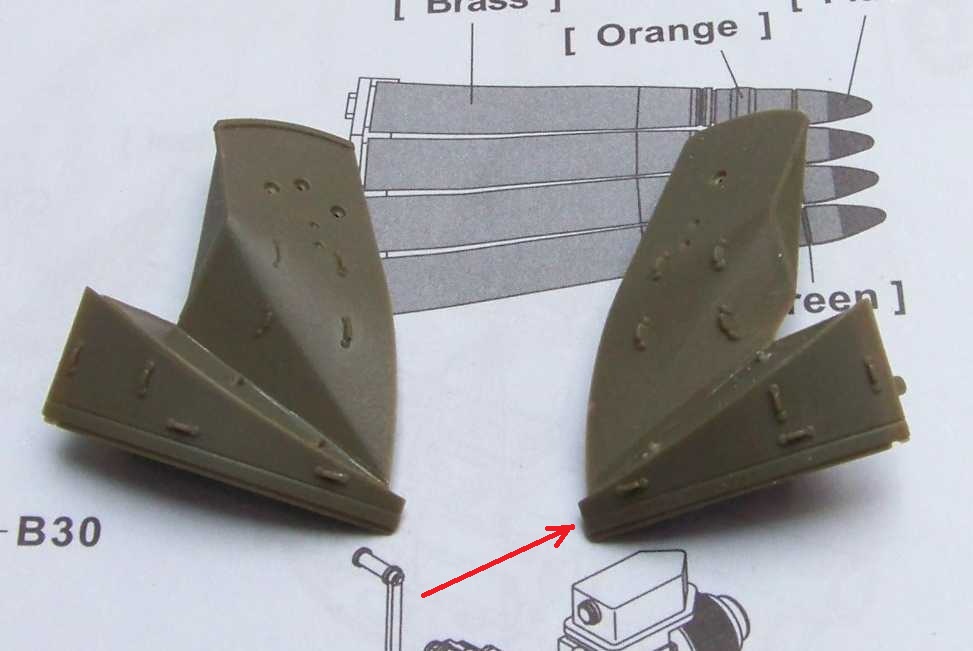
You need to trim about 1mm at the point the arrow indicates, or else the top portion of the mount isn't going to fit. Thought somebody might be interested in that.

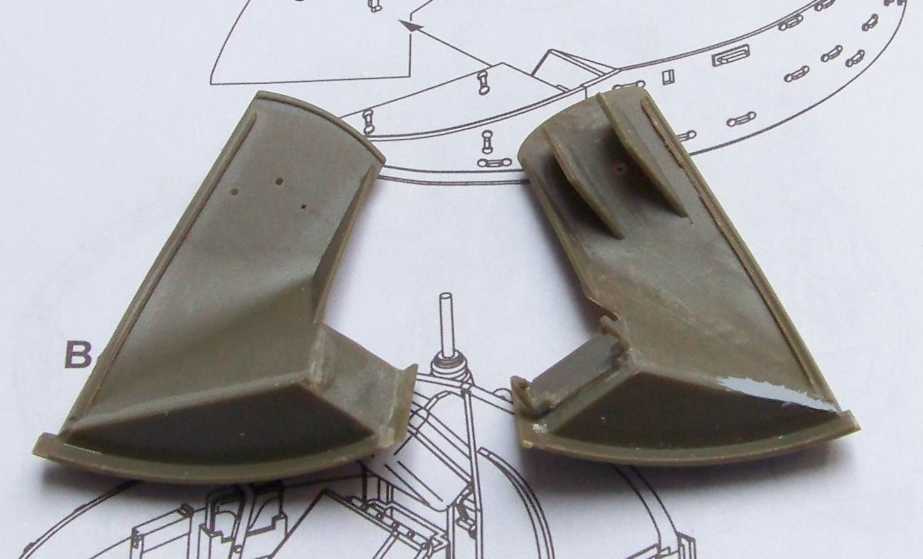
From the other side it shows, that some filling and sanding is necessary:

I removed the binoculars holder and will replace it with a PE part.

I also scratchbuilt the MG ammo holders that will be installed in the back of the mount. Here's what the old and the new parts look like:
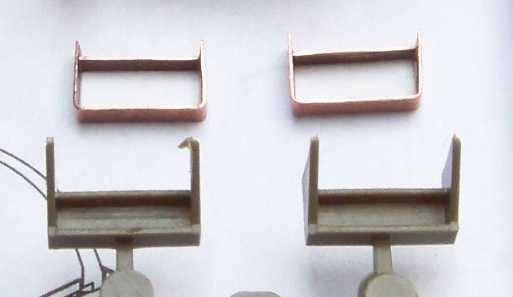
I like mine better Big Smile And they still miss the flashlight holders, but I'll take care of that.

And that would be it for now - thanks for reading, have a nice day

Paweł

All comments and critique welcomed. Thanks for your honest opinions!

www.vietnam.net.pl

  • Member since
    July 2006
  • From: New Jersey
Posted by redleg12 on Thursday, August 2, 2012 7:24 PM

Pawel - I have been a bad boy and not posted to this thread for a bit but....OMG.....your going way deep on the details. It is obvious you have been researching and waiting for this one for a while. LOOOOOOKING Great

Rounds Complete!!

"The Moral High Ground....A Great Place to Emplace Artillery."

  • Member since
    June 2009
Posted by Guney on Thursday, August 2, 2012 4:35 PM

Impressive works Pawel....:)

  • Member since
    February 2007
  • From: Calgary, Alberta, Canada
Posted by T-rex on Thursday, August 2, 2012 1:07 PM

Wow, you put alot more time and effort than my Duster, but then again, I kind of meant to be easy.

Keep up the posting update.

Working on: Trumpeter SU-152 (1/35) Trumpeter E-10 (1/35) Heller Somua (1/35)

"The world is your enemy, prince of a thousand enemy. And when they'll find you, they will kill you... but they will have to catch you first ''

  • Member since
    May 2009
  • From: Poland
Posted by Pawel on Wednesday, August 1, 2012 9:11 AM

Steve, thanks a lot!

USS Oklahoma City - interesting history, looks like it was an important ship for the Vietnam War!

Thanks again, have a nice day

Paweł

All comments and critique welcomed. Thanks for your honest opinions!

www.vietnam.net.pl

  • Member since
    March 2006
  • From: Right Side of a Left State
Posted by Shellback on Tuesday, July 31, 2012 5:59 PM

Pawel , that was the USS Oklahoma City , CLG-5 . She's long gone now . Here's her history ..........

www.okieboat.com/Ship&

I sure like your scrstch detailing .Yes

  • Member since
    May 2009
  • From: Poland
Posted by Pawel on Tuesday, July 31, 2012 10:10 AM

Bill, Tread - thanks a lot for your kind words! It's good to have you onboard! Dang, I just couldn't leave those levers out Big Smile Have a nice day

Paweł

All comments and critique welcomed. Thanks for your honest opinions!

www.vietnam.net.pl

  • Member since
    September 2005
  • From: beacon falls , Ct.
Posted by treadwell on Sunday, July 29, 2012 4:55 PM

Hi Pawel... Still following along ... you are doing a great job with the wiring and all and the parts you are scratching would make anyone shudder.

great looking WIP !Yes

treadCool


  • Member since
    July 2004
  • From: Texas
Posted by wbill76 on Sunday, July 29, 2012 4:26 PM

Tiny is right Pawel! Pretty soon you'll be able to answer the age-old question about angels on the heads of pins at the rate you're going. Big Smile Nice job on the details.

  • Member since
    May 2009
  • From: Poland
Posted by Pawel on Sunday, July 29, 2012 8:33 AM

Hello!

I'm movin' on with the wiring:

I also scratchbuilt two levers, operating the elevation and traverse travel locks. Those details start getting annoyingly tiny:

Thanks for reading, have a nice day

Paweł

All comments and critique welcomed. Thanks for your honest opinions!

www.vietnam.net.pl

  • Member since
    May 2009
  • From: Poland
Posted by Pawel on Monday, July 23, 2012 9:37 AM

Bill - thanks for your comment!

Carl - Thanks a lot! Yeah, that musta been really something! By the way, what was the name of this ship? I was only once onboard of a US Navy Ship - that was USS Valley Forge visiting port in Freemantle, Australia. No big guns, but also interesting to see.

Thanks again for the comments, have a nice day

Paweł

All comments and critique welcomed. Thanks for your honest opinions!

www.vietnam.net.pl

  • Member since
    March 2006
  • From: Right Side of a Left State
Posted by Shellback on Sunday, July 22, 2012 2:54 PM

I like the plumbing Pawel , its really going to look great when your done . Talking of mechanical/analog computers the cruiser i was on had  those for our main battery tripple 6 inch(152mm) turret . That thing stood about 4 feet tall , 5 ft long and 4 ft wide ............as i remeber . 1940's technology , it was huge , There were all kinds of gears , cams , synchro's , gyro's etc in it . It controlled the elevation and bearing that theguns were aimed . so when the ship went up and down with the ocean swells or the ship changed heading those guns stayed on target . Cool to tsee hose long barrels (23 feet) go up and down automatically as the ship pitched and rolled .

  • Member since
    July 2004
  • From: Texas
Posted by wbill76 on Sunday, July 22, 2012 1:05 PM

Definitely going the extra mile on this one Pawel! Yes

  • Member since
    May 2009
  • From: Poland
Posted by Pawel on Sunday, July 22, 2012 11:54 AM

Updated!

All comments and critique welcomed. Thanks for your honest opinions!

www.vietnam.net.pl

  • Member since
    May 2009
  • From: Poland
Posted by Pawel on Thursday, July 12, 2012 9:58 AM

OK, another update!

I put some more detail in the oil gear. Now it looks like that:

I also modified the kit-supplied grenade boxes - I filled the large hole molded in each of them and also cut off the corresponding large plastic chunks from the mount. Same goes for the loaders' seats:

I decided to build the frames of the loaders' seats out of copper sheet to give them scale thickness. Now the mount looks like on the photos below:

To put more stuff in I had to start painting. I started weathering at this point - I preshaded with red-brown (Humbrol 113) and then finished with OD (Humbrol 66). that's the effect:

Next thing to do is to install the oil gear and put in as much of the wiring and stuff as possible before installing the guns. Thanks for reading and have a nice day!

Paweł

All comments and critique welcomed. Thanks for your honest opinions!

www.vietnam.net.pl

  • Member since
    May 2009
  • From: Poland
Posted by Pawel on Thursday, July 12, 2012 9:58 AM

Bill - thanks a lot! As I wrote before, that Duster must have been an engineering marvel in the fifties. I really admire the people who designed it - building a mechanical computer is so much harder than a modern electronics machine. Anyhow, it's important for me to understand how the real thing operated - I feel after that I can build a much better model. Thanks again, have a nice day

Paweł

All comments and critique welcomed. Thanks for your honest opinions!

www.vietnam.net.pl

  • Member since
    July 2004
  • From: Texas
Posted by wbill76 on Wednesday, July 11, 2012 12:46 PM

We often take for granted the "digital" form of computing vs. analog computing that was "state of the art" in the 50's and 60's...my how technology has advanced in such a relatively short space of time! Nice work as usual on the details Pawel. Yes

  • Member since
    May 2009
  • From: Poland
Posted by Pawel on Wednesday, July 11, 2012 9:31 AM

Bill, p38jl - thanks a lot for your comments! I'd write sooner, but a storm took away lots of the network hardware at the place where I spend weekends and I was busy...

Apart of fixing the computers I also put some work into the model. I slowly started installing stuff in the gun mount. Of course it wouldn't be like me not to add some wiring:

The foremost box is the electrical junction box, and the rearmos wired box is the slip ring I already wrote about. The middle box is an inverter, making 115V current out ov 24V current, for the traverse and elevation motors. Lots more of wires to come!

I also built the computer:

That was something - a mechanical computer (working with gears, not electronics!) calculating the lead for the guns, after dialing in target's course and attitude and speed. You were supposed to align "the rod" with the attitude of the aircraft you were trying to shoot down. In Vietnam this whole stuff sat unused all the time anyhow..

I replaced the knob for rotating the whole thing with a scratch-built one - I liked mine betterthan the kit-supplied one.

I also begun to fit the upper mount parts. There is a lot of them:

The fit isn't bad, but not without problems, and complicated. It will take time to do it without too much putty and cursing. I also have to cut some additional holes to make it more accurate.

That would be it for now - thanks for reading and have a nice day

Paweł

All comments and critique welcomed. Thanks for your honest opinions!

www.vietnam.net.pl

  • Member since
    January 2003
  • From: Hancock, Me USA
Posted by p38jl on Thursday, July 5, 2012 3:18 PM

keep up the good stuff.. !

[Photobucket]

  • Member since
    July 2004
  • From: Texas
Posted by wbill76 on Wednesday, July 4, 2012 2:54 PM

Devil's always in the details and looks like you're finding them all and dealing with them Pawel, nice work so far. Beer

  • Member since
    May 2009
  • From: Poland
Posted by Pawel on Wednesday, July 4, 2012 8:28 AM

Thanks for your kind words Mike - I like details! Have a nice day

Paweł

All comments and critique welcomed. Thanks for your honest opinions!

www.vietnam.net.pl

JOIN OUR COMMUNITY!

Our community is FREE to join. To participate you must either login or register for an account.

SEARCH FORUMS
FREE NEWSLETTER
By signing up you may also receive reader surveys and occasional special offers. We do not sell, rent or trade our email lists. View our Privacy Policy.