SEARCH FINESCALE.COM

Enter keywords or a search phrase below:

AFV Club M42A1 Duster WIP - Done with pictures!!

83424 views
249 replies
1 rating 2 rating 3 rating 4 rating 5 rating
  • Member since
    January 2007
Posted by the doog on Monday, January 28, 2013 10:20 AM

Pawel,

WOW! Somehow I must have missed this whole thread, but I spent a good 30 minutes reading through this inspiring build here, and have to complement you on the thoroughness and skill with which you've detailed this build! It's REALLY impressive! Now "THAT'S modeling"!

The comparison of the two kits has also been genuinely eye-opening!

Bow Down

  • Member since
    May 2009
  • From: Poland
Posted by Pawel on Monday, January 28, 2013 9:17 AM

Hello!

A little update on painting today: I needed to do a "chipped" national star on my duster - I guess the boys didn't repaint it because it makes too good a target for the enemy to aim at? At first I thought to do it by applying the kit supplied decal, and scraping it away later, but I didn't, because I was afraid I won't get the desired effect anyway and I would be running a risk of damaging the underlying paint. So I took the dimensions of the decal and cut an according template out of masking tape. Then, through this template I applied a little gloss white from Gunze using a piece of sponge, then touched it up with a brush. After that was dry, I went on painting the not-so-neat bridging plate, where OD is looking from under the uneven coat of yellow. I cut another template and applied Humbrol 69 (gloss yellow). On top of that went black digits taken out of the spares book (where I keep unused decals). I also applied the remainder of the kit supplied decals - it's worth noting, that the decal solution that works best with them is Mr. Mark Softer from Gunze. Anyhow, now my model looks like this:

Hope you like it - thanks for reading and have a nice day

Paweł

All comments and critique welcomed. Thanks for your honest opinions!

www.vietnam.net.pl

  • Member since
    May 2009
  • From: Poland
Posted by Pawel on Monday, January 7, 2013 9:12 AM

Thanks a lot gentlemen! I'm glad to have some comments on this one at last!

Joe - thank you for your kind words!

Ben - thanks a lot! The "guts" make it interesting, don't they? I'd say some softskins would be a good practice for that (like a jeep with open hood or something like that).

Bill - you've got that exactly right! It was a great feeling to realise it's downhill now! It's like five years since I started messing with that old Tamiya and I started the AFV kit in May!

Ernest - thanks a lot! I'm just taking my time with this one. My work only lets me tackle this one on weekends and holidays, that's why it's taking so long. Then again - lots of time to think about what to do next!

Thanks again, have a nice day

Paweł

All comments and critique welcomed. Thanks for your honest opinions!

www.vietnam.net.pl

  • Member since
    July 2006
  • From: San Francisco Bay Area
Posted by bufflehead on Sunday, January 6, 2013 8:37 PM

Hinksy

Talk about impressive - this is excellent!

I liked the look of this kit but I think it will be a tad too 'excessive' for me yet. Give me another 12 months to gain some more experience! I need to start doing more 'open-topped builds.

This is looking sweeeeeeeet! Great figures! too Beer

Ben Toast

I'm with you on that one Ben!  Open topped vehicles seem to take so much more work!  The two I've done have taken way longer than the usual closed up tanks and such!  Gotta give props to Pawel and wbill76 who seem to make it so easy! 

Great looking Duster Pawel!  You've really done an outstanding job with all the detailing. 

Ernest

Last Armor Build - 1/35 Dragon M-26A1, 1/35 Emhar Mk.IV Female


Last Aircraft Builds - Hobby Boss 1/72 F4F Wildcat & FW-190A8


  • Member since
    July 2004
  • From: Texas
Posted by wbill76 on Sunday, January 6, 2013 7:28 PM

You've been doing an excellent job with the details on this one Pawel! I'm sure it's a relief to finally be on to painting the exterior, getting close to the finish line with this one! Beer

  • Member since
    September 2009
  • From: Rugby, England
Posted by Hinksy on Sunday, January 6, 2013 3:21 PM

Talk about impressive - this is excellent!

I liked the look of this kit but I think it will be a tad too 'excessive' for me yet. Give me another 12 months to gain some more experience! I need to start doing more 'open-topped builds.

This is looking sweeeeeeeet! Great figures! too Beer

Ben Toast

On the Bench - Dragon Pz. IV Ausf. G (L.A.H.) Yes

Your image is loading...


  • Member since
    July 2011
  • From: Pittsfield, IL USA
Posted by novembergray on Sunday, January 6, 2013 2:45 PM

This is a kick ass build

Joe

It's not about how fast you get there or even where you're going. It's whether you enjoy the ride.

  • Member since
    May 2009
  • From: Poland
Posted by Pawel on Saturday, January 5, 2013 6:17 PM

And here we go - the painting begins!

First - to mask off the parts not to be painted:

Then I sprayed the whole model with Humbrol 113 (red-brown) and picked up the panel centers with Humbrol 66 (OD). Now the model looks like this:

So now I've got a base for further operations. Thanks for reading, have a nice day

Paweł

All comments and critique welcomed. Thanks for your honest opinions!

www.vietnam.net.pl

  • Member since
    May 2009
  • From: Poland
Posted by Pawel on Friday, January 4, 2013 4:19 PM

And a last update before painting - a bino bin (huh?):

And a stowed drive controller:

It's shown stowed, because in Vietnam the power mode wasn't used, for fear of malfunction - it was always in hand mode, where you had to turn the cranks to traverse and elevate the guns. So now the next step - painting! Thanks for reading, have a nice day

Paweł

All comments and critique welcomed. Thanks for your honest opinions!

www.vietnam.net.pl

  • Member since
    May 2009
  • From: Poland
Posted by Pawel on Thursday, December 27, 2012 9:43 AM

Hello again!

I try to move towards wrapping up the gun mount. I tackled the ammo carriers' jump seats. On the photo below, you can see (top to bottom) the Tamiya part, my seat supports I scratchbuilt, then my seat cushions, made using some wood veneer that was just laying around, to simulate the seats' plywood bottoms, and finally the AFV Club kit part:

After painting, the seats looked like this:

And after installation in the mount:

I also put the ammo ready racks and other details on the back of the mount. I detailed the ready racks a little bit with some copper wire:

I'm also still working on the right "wing" of the mount - I put a bino holder on it, that came drom the Eduard PE detail set. The binoculars themselves were scratchbuilt:

And that would be it for now - thanks for reading, and have a nice day

Paweł

All comments and critique welcomed. Thanks for your honest opinions!

www.vietnam.net.pl

  • Member since
    May 2009
  • From: Poland
Posted by Pawel on Tuesday, December 25, 2012 6:07 AM

Hello everybody!

I hope you're having a very merry Christmas, or if you're celebrating some other holiday, lots of joy with that. I personally found some time to work on my model, and here's another update for you:

I moved on with the crew. I'd say those three dudes are done for now:

I also managed to finish some minor work on the mount and was able to glue the upper mount armour, plus the left armoured "wing" of the mount. The right "wing" was test-fitted for the photo:

While fitting the upper armour, I noticed that the traverse crank would conflict with the first aid kit and it's bracket - so I checked my references and I noticed, that the kit has an error here - the first aid kit box is too wide and mounted too low. I corrected it somewhat and now it looks like this:

I used Archer Dry Transfers product for the inscription on the box.

I hope you like it so far, thanks a lot for reading and have a nice holiday!

Paweł

All comments and critique welcomed. Thanks for your honest opinions!

www.vietnam.net.pl

  • Member since
    May 2009
  • From: Poland
Posted by Pawel on Tuesday, December 18, 2012 1:55 PM

Hello again!

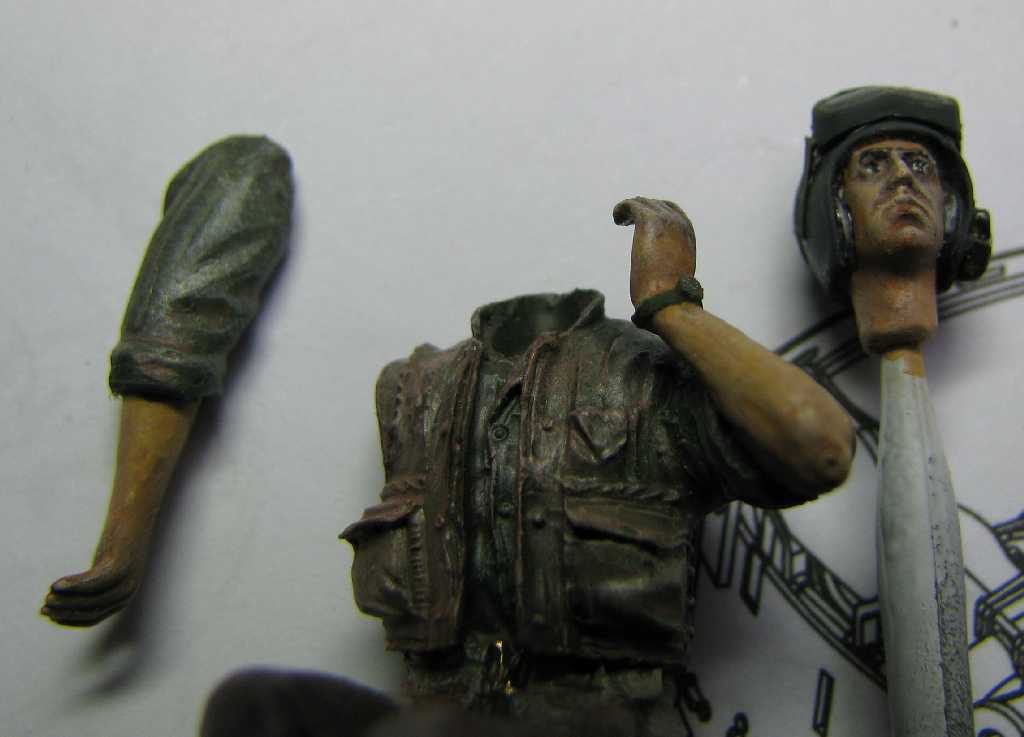
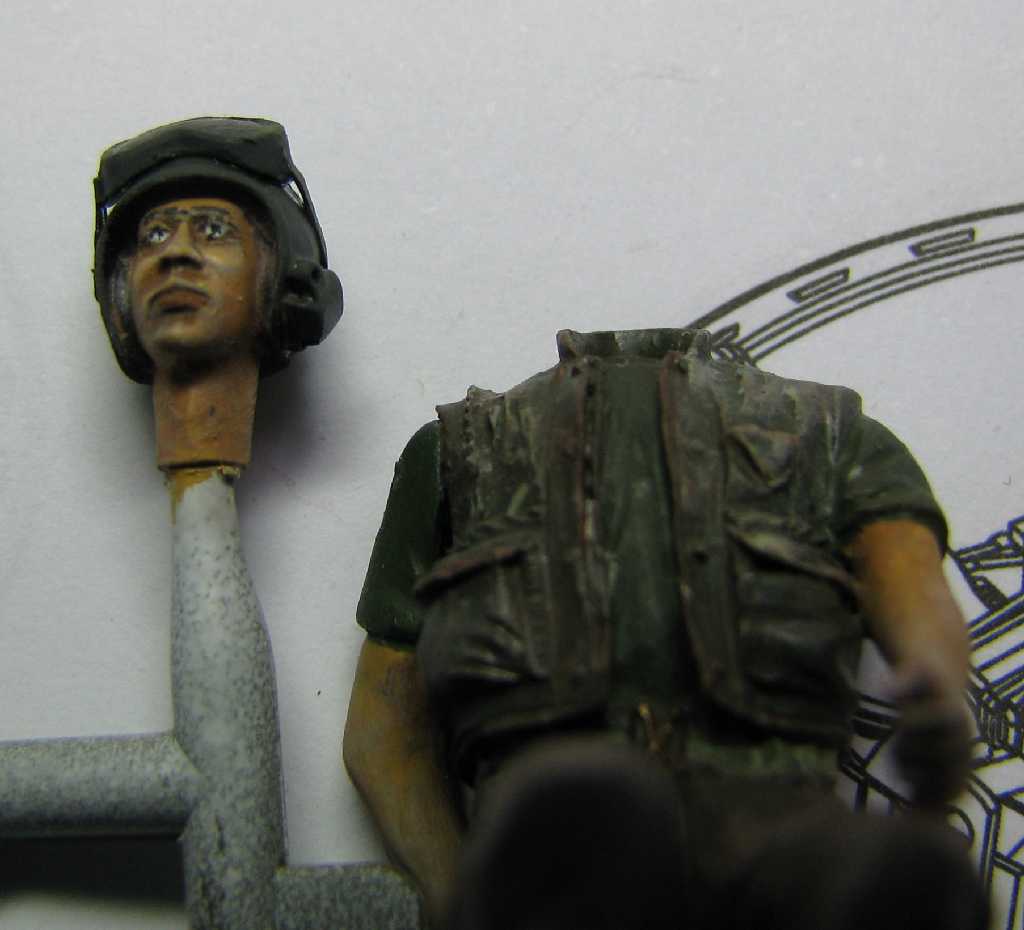
I'm still working on the crew - I added goggles and painted the helmets. I took the goggles from the Dragon Madern Tank Crew set, and from the Academy Mutt kit for the infantry helmets. The men with the CVC helmets look something like this:

I also wanted to add some matt cote to the figs, so I sprayed the Humbrol 49 on them, but it did a really nasty trick and turned completely white, that wasn't good! Really angry I let it dry overnight, in the morning I was able to save it brushing a highly diluted Humbrol 135 (Satin cote) over several times, so now they look decent again, but I still have to find some way to matt them, but first they have to dry really well.

In the meantime, I'm preparing to move on with the gun mount, so I prepared the gun tools storage on the mount's rear wall, it's scratchbuilt, there's no trace of it in the kit:

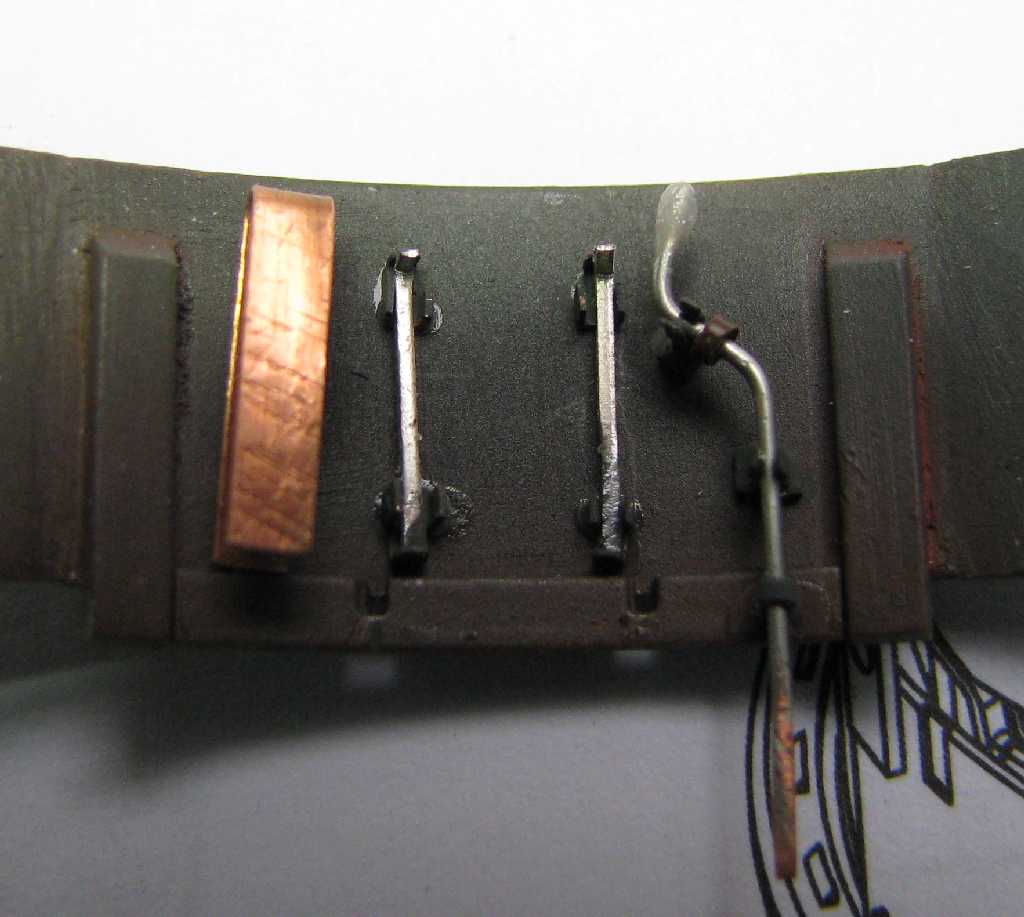
The tools have those nice, "correct" descriptions like "shell pusher", "cartridge extractor" and the like. I also wanted to show that the crew of the Duster always had to be on the lookout for the enemy, and so I decided to build the rifle rack - this is how it looks now:

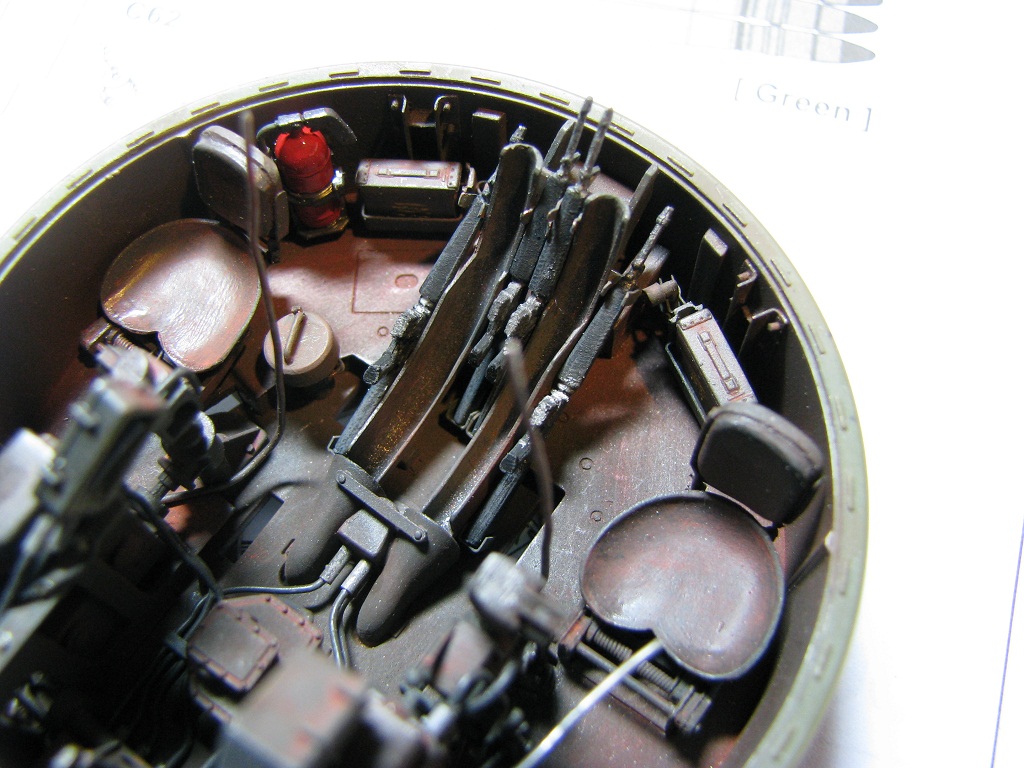
I'd especially like to hear what you think about it, as I don't have much reference on this one. Thanks in advance, and have a nice day

Paweł

All comments and critique welcomed. Thanks for your honest opinions!

www.vietnam.net.pl

  • Member since
    May 2009
  • From: Poland
Posted by Pawel on Sunday, December 2, 2012 8:52 AM

Yeah, Bill, that's what it is! Thanks a lot for your comment!

And I'm movin on with painting the uniforms. Here's what I have so far:

I'm still not satisfied with the color transitions, I would like to make them more smooth, but didn't fint the way to do it yet. I think about adding goggles for all people, and then I'll probably start installing the gunners and finishing the turret. I'd like to know what you are thinking about the figures so far. Thanks for reading and have a nice day

Paweł

All comments and critique welcomed. Thanks for your honest opinions!

www.vietnam.net.pl

  • Member since
    July 2004
  • From: Texas
Posted by wbill76 on Friday, November 30, 2012 1:41 PM

Figures are coming along nicely Pawel, sounds like the trip to the Caribbean did the trick!

  • Member since
    May 2009
  • From: Poland
Posted by Pawel on Friday, November 30, 2012 8:47 AM

Hey, Bob! Thanks a lot for your comment and for your kind words. I'm so glad to hear I could help you some with your modelling, that means a lot to me. Good thing is, once you learn something new in one modelling genre, it usually improves your models in other genres too!

And I have the faces painted now, let me show you the "ID photos" of the crew now:

The driver, done years ago:

The officer riding along by chance:

The squad leader (have problems with macro!):

The gunner:

The ammo bearers:

Hope you like 'em, now I'm movin' on to the uniforms. Thanks for reading, have a nice day

Paweł

All comments and critique welcomed. Thanks for your honest opinions!

www.vietnam.net.pl

  • Member since
    October 2010
  • From: Chambersburg, Pa.
Posted by Bob H. on Thursday, November 29, 2012 9:57 PM

Hey Pawel, I'm not an Armor guy but I was browsing around and stumbled upon this Topic. All that I can say is WOW !!! I'm really impressed with your work, particularly the scratch building and the weathering. I am getting involved in Aircraft ( mostly WWII and earlier ) since that's where most of my knowledge base and interest resides, but I know that I'll have to get up to speed on te Armor stuff because I do have some 1/48 kits to compliment future Aircraft projects. Thanks for taking the time to post this project because it is a good learning tool for me. KEEP UP THE GREAT WORK !!!!                  Bob Henry

  • Member since
    May 2009
  • From: Poland
Posted by Pawel on Thursday, November 29, 2012 5:32 PM

Bill, Rob - thanks for your kind words! I've been away in the Carribean, to load up my battery, but now I'm back and I'm working on the crew again. I started painting - first I primed 'em in black and painted the faces and hands Humbrol 63, or darker depending on the man:

After the base colours were really well dried (at least 24 hours in case of the Humbrols), I proceeded with painting the flesh. I used dark brown wash on those areas, and then dry-brushed them with custom mixed pink. Here's what I got:

Now I'll try to paint the eyes on - that's always sporty! Thanks for reading, have a nice day

Paweł

All comments and critique welcomed. Thanks for your honest opinions!

www.vietnam.net.pl

  • Member since
    October 2009
Posted by PANZERWAFFE on Sunday, November 18, 2012 9:33 AM

FINE work on positioning and shaping the figures and very nice adding the details.  Looking real good Yes

Rob

  • Member since
    July 2004
  • From: Texas
Posted by wbill76 on Saturday, November 17, 2012 11:33 AM

Congrats on making the newsletter Pawel, well deserved! Beer

  • Member since
    May 2009
  • From: Poland
Posted by Pawel on Friday, November 16, 2012 5:12 PM

Chris - nice to know! You've sure got a good excuse for not modelling Big Smile Please, watch your back out there!

Bill - thanks a lot, you know I'm doing my best!

And for the first time since I joined the forums, my thread appears in the newsletter, I feel good! Thanks for reading everybody, don't forget to leave your comments! Have a nice day

Pawel

All comments and critique welcomed. Thanks for your honest opinions!

www.vietnam.net.pl

  • Member since
    July 2004
  • From: Texas
Posted by wbill76 on Thursday, November 15, 2012 11:26 AM

Nice job on the bandolier detail, but then we've come to expect that from you by this stage! Big Smile

  • Member since
    December 2003
  • From: Colorado
Posted by psstoff995 on Wednesday, November 14, 2012 12:31 PM

Nice to see you're still building away with your favorite Vietnam subjects. My studies went well, I have a bachelors degree in Criminal Justice. Currently I'm in the Army Infantry out in Afghanistan, thats whats kept me away from modeling and the forums for over a year. Should be home for the holidays, I'm looking forward to it! Also looking forward to seeing these figures too! Love the way you've customized them to fit your needs, the bandoleers look great.

-Chris

US Army Infantryman

  • Member since
    May 2009
  • From: Poland
Posted by Pawel on Wednesday, November 14, 2012 9:56 AM

Bill, Carl - thanks a lot for your comments! Well I'm going for it. First I've got the pose for the second loader ready. Look how I tackled the bandoleers:

So now with all figs posed, I'm starting to paint them. I need to have at least one of the gunners completely painted and sitting down, before I can put the upper mount armor in place. So I'm going to paint them all to keep it uniform. Here's the lineup:

From the left we've got driver's head (the rest is already in place, then there's the officer riding along as passenger (from Bravo 6), and the squad leader with left leg and right arm from Dragon, the other leg from MasterBox, torso and left arm from Legend, and head from Alpine.

Further from the left there's the gunner with right leg from Dragon, left leg from MasterBox, torso and both arms from Legend and head from Alpine. In the middle there's the first loader with Dragon parts from different sets and helmet from Tank Models. The second loader also has parts from at least two Dragon sets (3305 and 3309) and arms from MasterBox and helmet also from Tank Models.

Now I'm going to prime them some dark colour, inspect for any flaws and then paint the flesh. Let's see how long this will take. Thanks for reading and have a nice day!

Paweł

All comments and critique welcomed. Thanks for your honest opinions!

www.vietnam.net.pl

  • Member since
    March 2006
  • From: Right Side of a Left State
Posted by Shellback on Monday, November 12, 2012 11:53 PM

Comming along nicely !

  • Member since
    July 2004
  • From: Texas
Posted by wbill76 on Monday, November 12, 2012 5:15 PM

If the crew fits, go for it! Wink Beer

  • Member since
    May 2009
  • From: Poland
Posted by Pawel on Monday, November 12, 2012 12:21 PM

Hey Chris, it's been a long time! Good to see you again! How are your studies? And thanks for your kind words. I also started admiring those guys after I've seen where this is heading, probably needed a lot of training to operate everything smoothly in such a squeeze. Thanks again for your comment, please stay tuned and have a nice day

Paweł

All comments and critique welcomed. Thanks for your honest opinions!

www.vietnam.net.pl

  • Member since
    December 2003
  • From: Colorado
Posted by psstoff995 on Monday, November 12, 2012 10:54 AM

Hey, sorry to come in late Pawel, but just had to say this one's looking great so far! Love all the details. The figure placement looks perfect to me, really shows how tight the quarters were. I never would have guessed.

-Chris

US Army Infantryman

  • Member since
    May 2009
  • From: Poland
Posted by Pawel on Sunday, November 11, 2012 6:37 PM

Hello again!

I'm still working on the crew - I just made a (poor) photo of the crew mock up and it looks like this:

OK, so there are some parts missing - the driver's head, the passenger's and gunner's arm, and the loader standing on the rear deck is just half-there Big Smile. I put him there to give you an idea, where he's going to be, he'll be leaning on the gun mount's rear armor. I would like to get your opinions on this one - thanks in advance, have a nice day

Paweł

All comments and critique welcomed. Thanks for your honest opinions!

www.vietnam.net.pl

  • Member since
    May 2009
  • From: Poland
Posted by Pawel on Monday, November 5, 2012 3:21 PM

Thanks for the comments, friends!

Bill - so nice of you to notice! It's really fun, I don't think any company does those flashlights in 1:35.

Arthur - No problem, I'm going to keep on digging! I believe it's possible the stateside Dusters didn't even have any rifle racks - the TM doesn't mention them. But in Vietnam the soldiers needed those personal weapons badly, so I'm still curious how they were stored and I want to show that in my model.

Thanks again, have a nice day!

Paweł

All comments and critique welcomed. Thanks for your honest opinions!

www.vietnam.net.pl

  • Member since
    January 2011
Posted by fificat on Monday, November 5, 2012 10:55 AM

Pawel--We did our two week  summer camps at Hunter Liggett.  We carried M1 carbines, and the Sgts. had grease guns.  We left our personal weapons in our barracks and went by truck to the firing lines.  We had driven our M42's and M16's out there during the first part of the two weeks we were there.  Sorry for the lack of info on how they were stored in the tub.

Arthur

JOIN OUR COMMUNITY!

Our community is FREE to join. To participate you must either login or register for an account.

SEARCH FORUMS
FREE NEWSLETTER
By signing up you may also receive reader surveys and occasional special offers. We do not sell, rent or trade our email lists. View our Privacy Policy.