SEARCH FINESCALE.COM

Enter keywords or a search phrase below:

Mustang Build

80079 views
1582 replies
1 rating 2 rating 3 rating 4 rating 5 rating
  • Member since
    June 2013
Posted by bvallot on Tuesday, June 14, 2016 2:18 PM

Mark, that's moving along fast. I better pick up the pace here. =] Your cockpit turned out pretty nice. I've actually never seen an Academy mustang built up before, or at least not that I can recall. Looking forward.

Larry, I know I already mentioned on the other GB, but I don't think made mention of the pulling off those checkered colors. Nice go of it! I've seen Joe's tutorial and I've been anixous to try it. Just haven't gotten around to it yet. I think what's tricky about them is that they aren't actual squares at all for the most part as they have to go around a curved body. Your use of the decal to make a copy is clever. I'll have to remember that when I try it. Sounds to be more user friendly. =] How's it going so far? I should think it wouldn't be too difficult to fix...just bothersome.

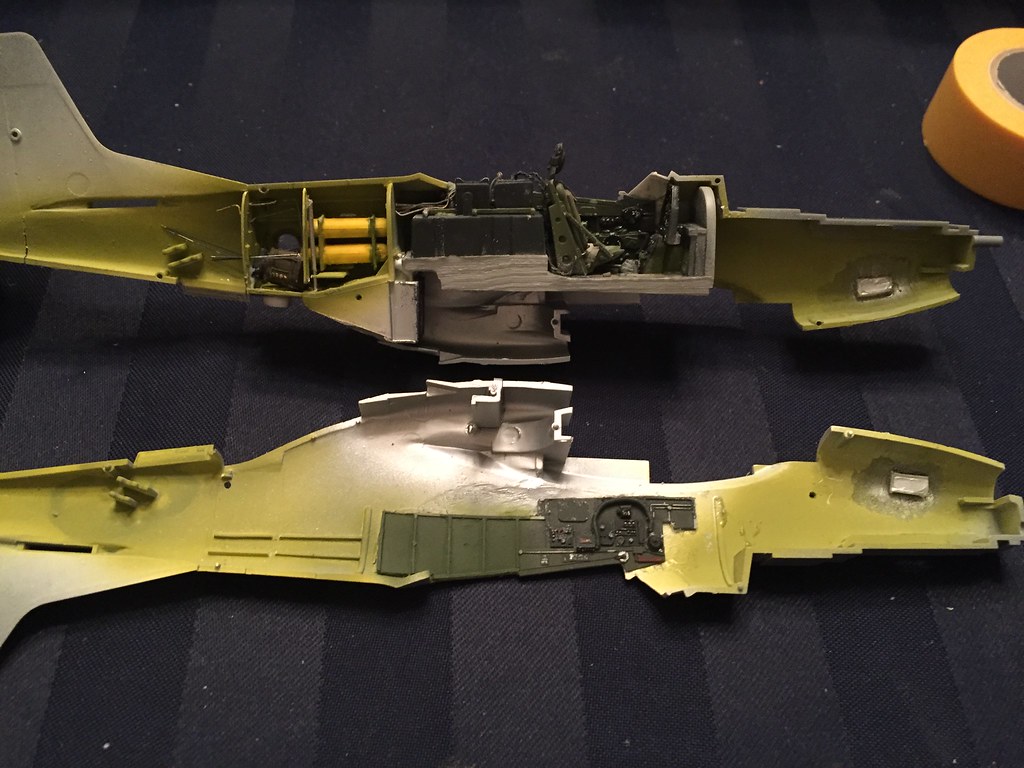
I have a quick update on the F-6D. I'm trying to get through this part so I can close her up and then focus on getting her prepped for primer. Afterwards, I'll try to bounce back and forth between this and the P-51A I've neglected. 

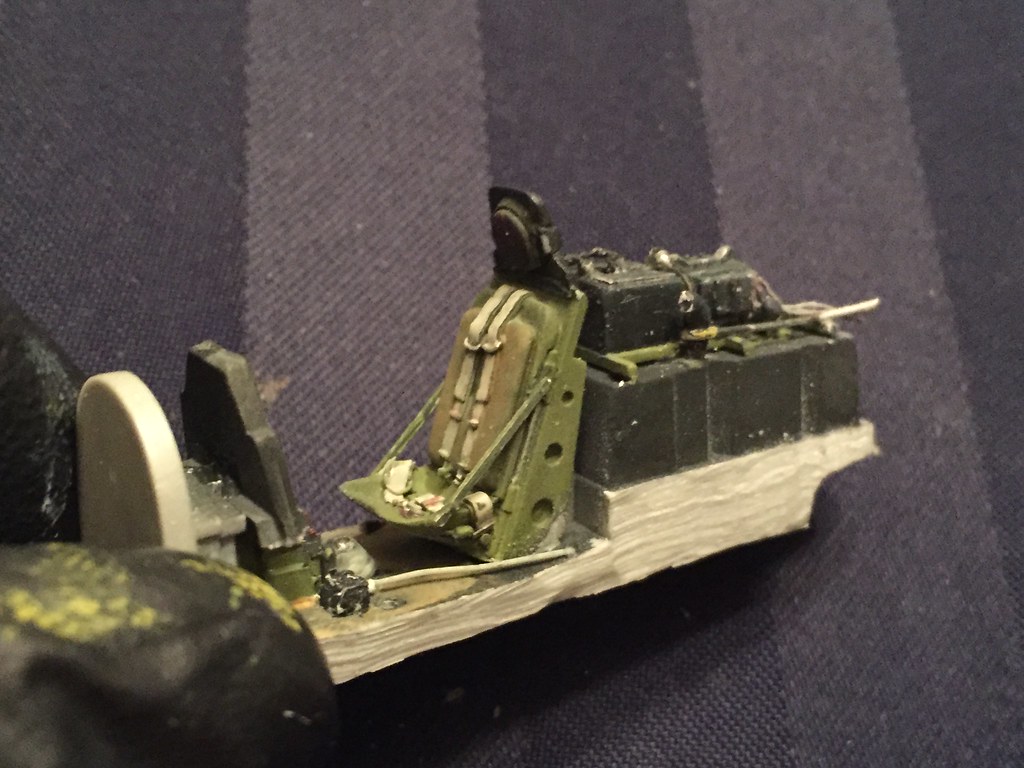
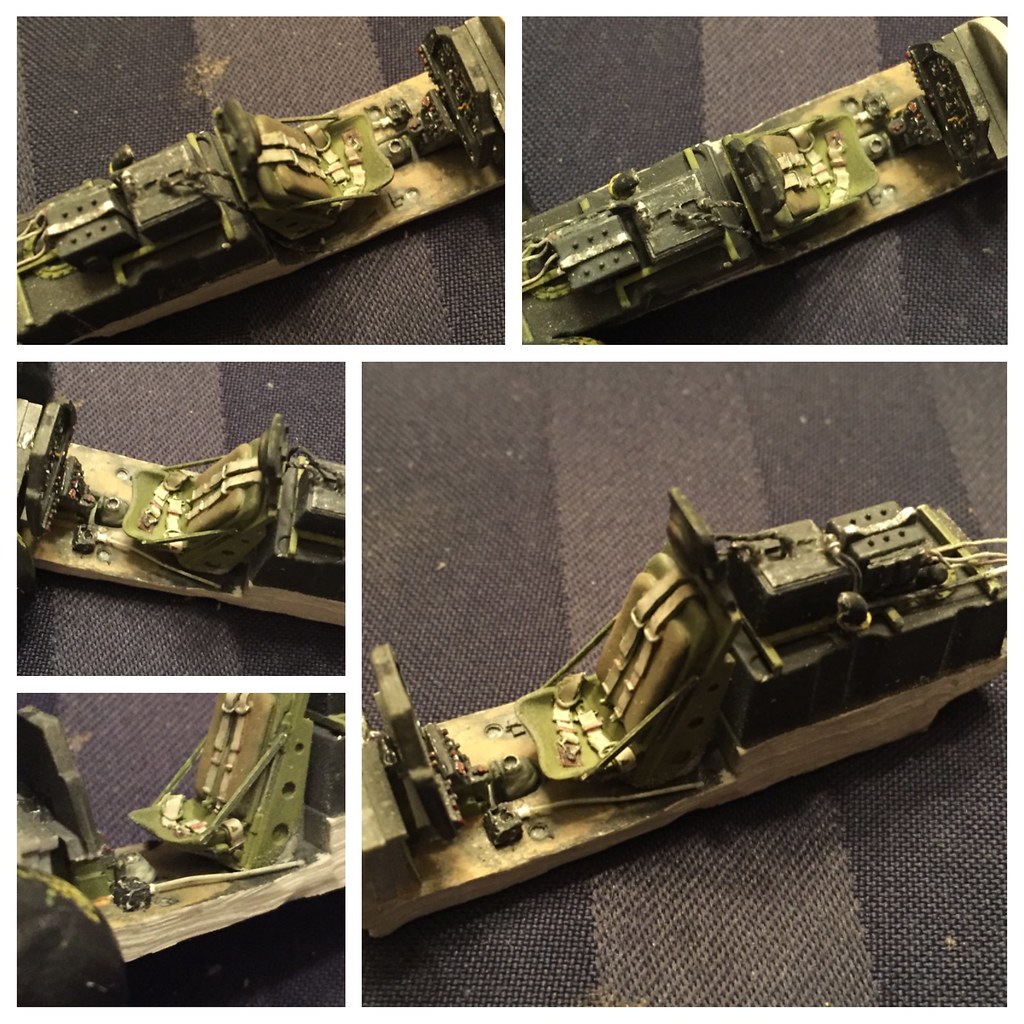
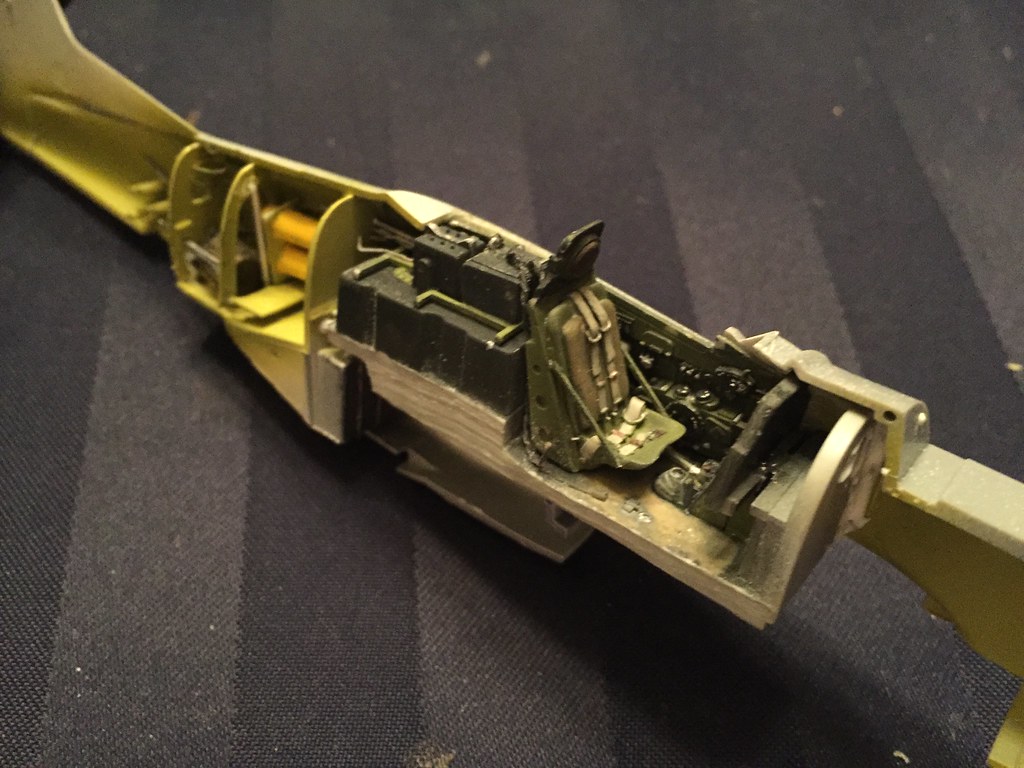
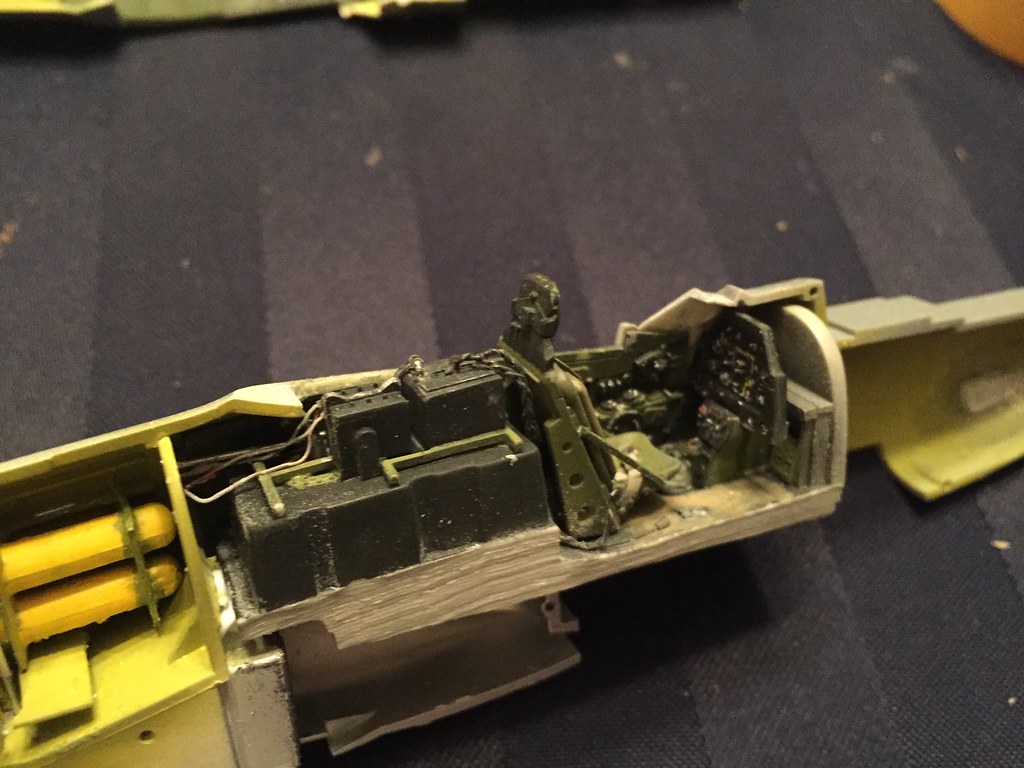
So to start, I've completed the cockpit. I've added the thin support arms to the seat, which were absent on the TD pit, and I've scratched out the intervalometer-a device used to for timing and filming for the reconnainsance equipment on board. It sat just to the left of the stick on the floor by the pilot's feet. I guess there's no good place to put it, and that made the most sense. It's basically two parts...a small square piece I sanded down to the appropriate size (comparing photographs) and a thin face to go on top. The thin plastic face was drilled with a pinvise to make the dial that's seen and glued on top with Tamiya ETC. That's all =] Then, some tinier bits of thin plastic rod and stretched sprue make up knobs and buttons that are seen. Albion tube makes up the receiver end for the cable you see...the cable is stretched sprue. Also, there's the fuselage fuel tank dial I scratched to place on the tank to the left. Warmed up a plastic rod and bent it into shape. Easy.

 Untitled by Britt Vallot, on Flickr

 Untitled by Britt Vallot, on Flickr

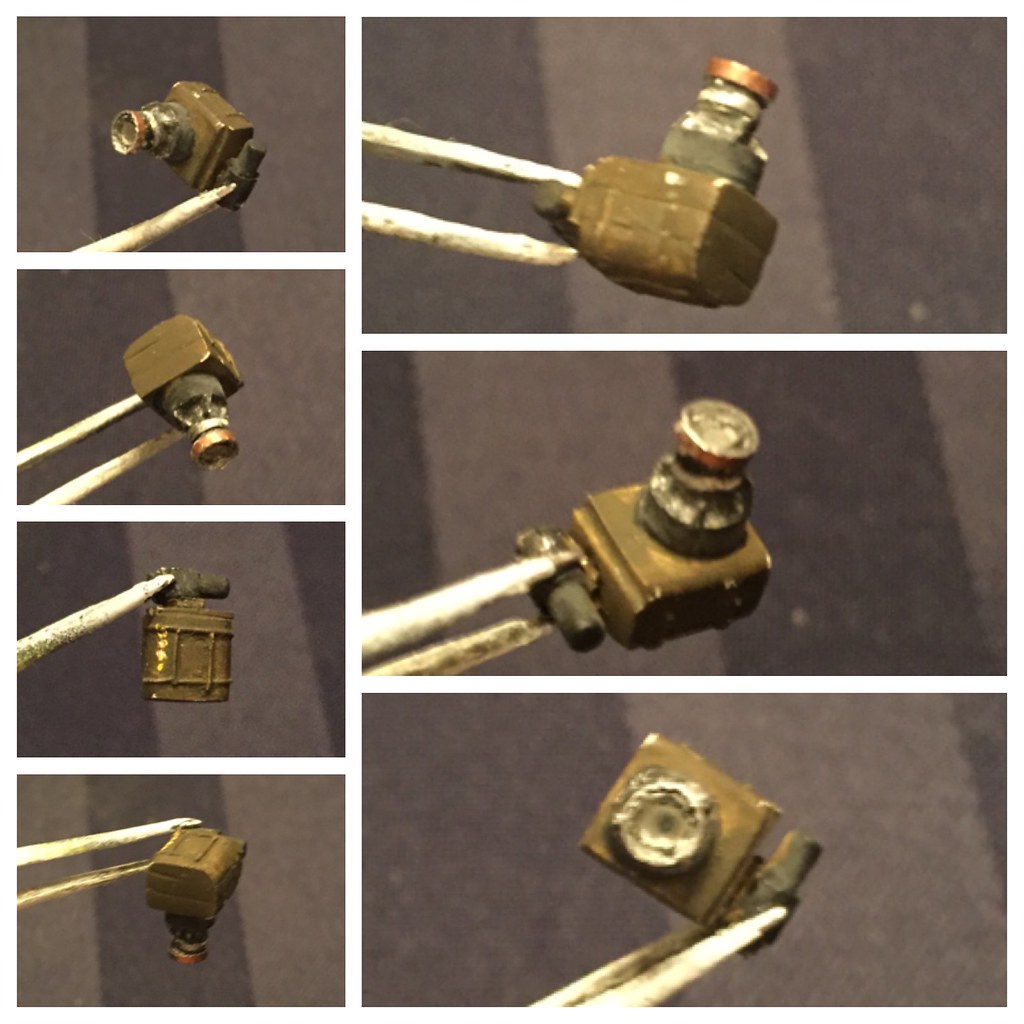
Next, is the K-24 camera. Painted it up and dropped her into place. 

 Untitled by Britt Vallot, on Flickr

 Untitled by Britt Vallot, on Flickr

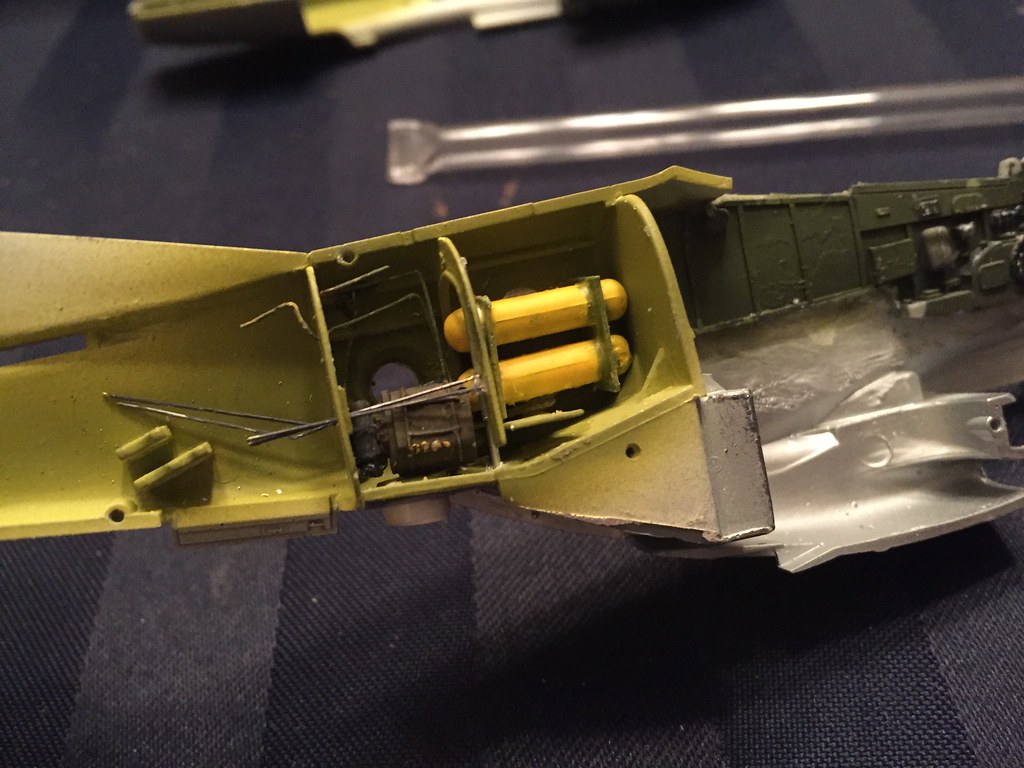
And that's about where I am for now. I stopped to assess how I was coming with all the internal detail for the camera bay to see how visible any of it was...and naturally, I couldn't see Jack Sh!t. Virtually...it's not terribly impossible to see what's going on in there, but for the time and effort you always hope it comes out a little better. So, I'm going to hit the breaks on further detail. It gets hard to cram everything in there after awhile even when there's space to put it (eventually your tools are too big to put them in there). It's sufficiently busy in there and I can live with it I suppose. =] 

The cockpit has been glued in place, camera set in place, and here's that:

 Untitled by Britt Vallot, on Flickr

 Untitled by Britt Vallot, on Flickr

 Untitled by Britt Vallot, on Flickr

Tonight I plan to close up these halves after the glue is set. =]

On the bench:  

Tamiya F4U-1  Kenneth Walsh


  • Member since
    July 2014
Posted by modelcrazy on Tuesday, June 14, 2016 2:53 PM

Britt,

That is unbeliveable detail Bow Down I couldn't toucht hat level of detail on my 1/32 bird. Kudos sir!!

Steve

Building a kit from your stash is like cutting a head off a Hydra, two more take it's place.


http://www.spamodeler.com/forum/

  • Member since
    June 2013
Posted by bvallot on Tuesday, June 14, 2016 3:09 PM

As I do appreciate it, it's not something most people can't do. The True Details AM cockpit is really a nice upgrade if you don't want to splurge on the Aires. That's helping this mustang out quite a bit. The extra detailing isn't so bad either if you fool with it enough. Hardest part is probably just being creative enough to imagine how you'll pull something off with what you've got. I always encourage everyone to just try. I think the painting is what does the most to trick your eye that you're looking at something else. Lucky for me it helps hide the fact that my construction could always be a bit better.

=]

On the bench:  

Tamiya F4U-1  Kenneth Walsh


  • Member since
    July 2013
Posted by lzdaily@comcast.net on Tuesday, June 14, 2016 5:27 PM

Lostagain, great job with the gloss finish. Those are really hard to pull off.

Britt, I have to agree with everyone else - your F-6D is amazing.

In terms of the paint on my D - I ended up stripping it. I was never going to be able address all the issues that came up. Chalk it up to learning - I have a better idea of what order to do things in and a few ideas for improving the process. For one, I think I'll photocopy the kit checkerboard decal onto plain decal stock and apply that to the making tape instead of rubbercementing  a paper copy. It will be less thick and might just conform to the surface of the model a bit better.

Larry


  • Member since
    June 2013
Posted by bvallot on Wednesday, June 15, 2016 1:27 PM

That's unfortunate. What exactly is the method for going about stripping your painted surface. I've often heard of others talking about the same thing, but the thought of it sounds terrifying to do. Is it something you rub on and off? Also, I think I better understand what you were talking about with the rubber cement now. That's probably how it went down. Lesson learned sounds like. I can think of a few times where I might have gotten in the same trouble with similar masking features but apparently lucked out. I do tend to paint in very thin coats which may have been what saved me. 

Something to think about though. Thanks for sharing that. =]

On the bench:  

Tamiya F4U-1  Kenneth Walsh


  • Member since
    July 2014
Posted by modelcrazy on Wednesday, June 15, 2016 1:40 PM

bvallot
I've often heard of others talking about the same thing, but the thought of it sounds terrifying to do.

Ditto

Steve

Building a kit from your stash is like cutting a head off a Hydra, two more take it's place.


http://www.spamodeler.com/forum/

  • Member since
    July 2013
Posted by lzdaily@comcast.net on Wednesday, June 15, 2016 2:13 PM

Britt, Steve,

Stripping paint from a nearly completed aircraft model is a very scarey business. This is the first time I've had to do it. I used a chemical stripper called Scalecoat Wash Away (Scalecoat makes a line of model railroad paints). The instructions call for soaking the model in the stuff, but that would have ruined all the work I put into the cockpit. Instead, I brushed a heavy coat onto the model, taking care to keep it away from the cockpit interior. Then I let it sit for 10 minutes. It took several applications, but I finally got all the paint off - without ruining the cockpit (I'm counting that a win). I did have to reapply some putty; Wash Away seems to dissolve Squadron Green putty. I did notice, however, that it didn't seem to have any effect on Mr. Surfacer.

Best,Larry

  • Member since
    June 2013
Posted by bvallot on Saturday, June 18, 2016 7:10 PM

You're right. That does sound scary. 

On the bench:  

Tamiya F4U-1  Kenneth Walsh


  • Member since
    June 2013
Posted by bvallot on Saturday, June 18, 2016 7:27 PM

Okay...made some progress. It feels like it'll be mostly downhill from here. =]

I finally got the fuselage closed up. I also removed the elevators from the horizontal stabs and went ahead and put the rivets in all of this now before applying them to the fuselage where it would be more difficult later. I aim to keep all the riveting a subtle feature in the metal. I looking to see it appear only here and there. So that's done...I did have a little to repair around the mass balance from there removal. I haven't done that in the past and I regreted it later. Sanding it pretty is just not enough. There's just too big a gap that doesn't belong. So a little plastic strip cut to fit and sanded smooth does just the trick and goes a long way to making a nice modification into a great modification. =] 

So here it all is.

 Untitled by Britt Vallot, on Flickr

Took my time making sure the fit of the fuselage went perfectly.

 Untitled by Britt Vallot, on Flickr

 Untitled by Britt Vallot, on Flickr

Made my first round of sanding seams. I'll be making another pass after the riveting is done for the rest of the plane.

 Untitled by Britt Vallot, on Flickr

 Untitled by Britt Vallot, on Flickr

This Tamiya kit really does a nice job engineering this mustang to build up. Everything fits together perfectly and intelligently. The horizontal stabs/elevators even come in one piece! Of course the only hassle is cleaning up the seams on the bottom for the radiator, but hey...nobody's perfect. =P

I also put the "glass" in the windows for the cameras. The big one went in from the inside and the small one from outside. 

 Untitled by Britt Vallot, on Flickr

That's that for now. =]

On the bench:  

Tamiya F4U-1  Kenneth Walsh


  • Member since
    July 2014
Posted by modelcrazy on Saturday, June 18, 2016 7:59 PM

It is really taking shape now britt. This is going to be such a cool looking build Yes, I'm really looking forward to it's completion. 

Steve

Building a kit from your stash is like cutting a head off a Hydra, two more take it's place.


http://www.spamodeler.com/forum/

  • Member since
    June 2013
Posted by bvallot on Tuesday, June 21, 2016 11:42 AM

Thanks Steve. I'm really cruising now. I've gotten everything riveted, buttoned up, and sanded smooth. Took my time lining up the dihedral for the wings on this mustang...something I didn't do in the past as much, so I either got lucky or later noticed something was off about those beautiful lines these planes make. I still have some sanding to do in places, but for the most part this one is close to paint.

 Untitled by Britt Vallot, on Flickr

 Untitled by Britt Vallot, on Flickr

 Untitled by Britt Vallot, on Flickr

 Untitled by Britt Vallot, on Flickr

That's that for now. I'll be throwing some putty in the seams for the wings to show that smooth laminar flow wing that was sought after. I'll let it wear a little towards the front. Then there's the landing gear bay to wire up after painting, but all of that will wait until after I get the P-51A caught up to this same point. That way when I start throwing down the Alclad, I can do them both at the same time. =] 

Questions and comments are always welcomed.

On the bench:  

Tamiya F4U-1  Kenneth Walsh


  • Member since
    April 2014
  • From: Australia
Posted by lostagain on Thursday, June 23, 2016 7:20 AM

Britt that is looking great. The camera bays look just right and the work on the rivetting is amazing. Looking forward to seeing what both birds look like painted up.

I have totally avoided rivets on my build, but it has led to a lot of work filling, sanding and polishing. It is not easy (for me at least) to get a really good gloss finish. But after touching up a few spots where I ripped the paint up, I am calling 'Thunderbird' done .

So thanks to everyone for sharing their builds and skills and their kind comments. I will continue to watch their progress.

Thanks most of all to Steve for hosting the build. Now, back to 1946...

Regards

Piers

  • Member since
    July 2014
Posted by modelcrazy on Thursday, June 23, 2016 7:29 AM

WOW nice job Piers YesYesYes Those old racing birds look so cool. Thank you for joining and hope to see you in my next GB.

Steve

Steve

Building a kit from your stash is like cutting a head off a Hydra, two more take it's place.


http://www.spamodeler.com/forum/

  • Member since
    June 2013
Posted by bvallot on Thursday, June 23, 2016 9:55 AM

Piers, that's a gorgeous finish there. Your hardwork paid off. I'd tell ya to get that thing in some natural light but it might just be too bright afterwards to see it! =D Very nicely done.

On the bench:  

Tamiya F4U-1  Kenneth Walsh


  • Member since
    July 2013
Posted by lzdaily@comcast.net on Saturday, June 25, 2016 8:40 AM

Britt, as I said in the other group, your F-6 looks amazing. Great detail. You have some mad scratchbuilding skills. Piers, Thunderbird looks really great. I have a lot of respect for someone who can pull off a gloss paint job successfully.

Well, I’ve solved a couple of problems with my D. The first one concerned the splash of color behind the nude in the nose art. The Kit’s World decals that I had purchased included (as did most of the decal sets I found) a red background, but some included blue or black. I wasn’t sure which was correct. I finally found a color photo of Weaver’s aircraft (color photo of Weaver’s Mustang). The photo is absolutely clear: the background splash was black. So, after a little more online searching, I ordered EagleCals set EC-103, which includes the black splash.

That decal set also solved some of my painting issues. While I think the checkerboard method I was working on has potential, I want to get this build done. I didn’t like the paint buildup along the masking, which I think was exacerbated by the paper I rubber cemeted to the masking tape. After stripping off my first attempt at a NMF, I didn’t want to end up with exactly the same problems. The EagleCals set includes the checkerboard markings as two decals: a solid yellow background and the red checks. The red in the decals seemed like a pretty good match to Model Masters Insignia Red, so I decided to paint the yellow and use the decals for the red checks. Here's where I am now. I need to do a bit of touchup to the paint, but next up is applying the decals.

Larry

  • Member since
    July 2014
Posted by modelcrazy on Saturday, June 25, 2016 10:22 AM

Nice recovery Larry. The repaint looks great. Yes Whoever thought you could find the picture you were looking for on Airliners.net?

I think the method you decided to go with will work fine. This will be build to be proud of.

Steve

Building a kit from your stash is like cutting a head off a Hydra, two more take it's place.


http://www.spamodeler.com/forum/

  • Member since
    June 2013
Posted by bvallot on Saturday, June 25, 2016 10:36 PM

Beautiful save Larry!! =] I think it's an improvement over the first time. I'm gonna go back and peek to compare, but I'd say it's a win. And as for the checkerin'....hey, however you gotta' get it done =D I know the feeling though. The less and less I decal, the more accomplished a builder I feel. There are still a few things I'm a bit cautious to try.

And thanks. I do appreciate the nod. I think I'm just starting to tighten up all the loose areas of my building. I'm anxious to complete these two mustangs to see how they turn out. I also have to go back and fix up a couple of spots on the Dauntless I just completed...those flaps were beasts!

On the bench:  

Tamiya F4U-1  Kenneth Walsh


  • Member since
    July 2013
Posted by lzdaily@comcast.net on Sunday, June 26, 2016 5:52 PM

Britt, Steve,

Thanks for the kind words. I gotta wonder, though, if it's really a save if you go back to square one and start over...

I’m am finally making progress, though. I’ve also learned a few important lessons. First, the EagleCals chcekerboards went on like a dream. They just needed a bit of touchup at the edges. That’s where the lesson comes in. Since the spinner was going to be the same colors as the checkerboard, I epoxied it on before painting. Then I painted with Model Masters Insignia Yellow and Insignia Red. Bad move. The red on the decals is actually better matched by plain old Testors Gloss Red — the stuff that comes in the little square bottles. Repainting the red on the spinner has been a little bit of a nightmare, but I think I’m about ready to apply the rest of the decals.

Best to all,Larry

  • Member since
    July 2014
Posted by modelcrazy on Sunday, June 26, 2016 6:25 PM

The checkerboard came out great. Looks beautiful. 

Steve

Building a kit from your stash is like cutting a head off a Hydra, two more take it's place.


http://www.spamodeler.com/forum/

  • Member since
    June 2008
Posted by lewbud on Monday, June 27, 2016 7:48 PM

BV, nice work on the F-6. 

This originally was to be a flash build for D-Day, however we're at D+21 and she's still not done.  The kit is Academy's really nice P-51B/C in 1/72.  The decals are unfortunately Academy's as well.  I had some pics of the early build, but my camera decided to eat them.  So, we get to start at the painting stage.

The tape is on, so the underside Medium Gray has already been shot.

I wanted a different look from my normal factory fresh, so I used Model Master's Faded OD instead of my usual Tamiya OD rattle can.

Shot some gloss, let the decalling begin!

Now wait a minute there, li'l mister! Don't you think you should have started with bottoms, since they're keyed to the landing gear bays? Hangs his head, strips off the top stripes, and starts again.

Ok, they're on and relatively straight.  Although they are crappy, thick, unyielding decals, they are pretty resilient and went over the molded on drop racks without difficulty.  Now for the tops.

 It took a LOT of Microsol/set to get the decals to conform, however they eventually were beaten into submission.  This is where she sits right now.  I don't know if I'll get to the Airfix kit that is on the front page.  However, the Israeli Mustang is a Tamiya kit in Hasegawa markings, so if someone could fix the caption under my build, it would be most appreciated.


Buddy- Those who say there are no stupid questions have never worked in customer service.

  • Member since
    June 2013
Posted by bvallot on Monday, June 27, 2016 11:39 PM

Lewbud, I'm sorry. I began writing this post earlier this evening but had to keep stopping. I only just now finished but never refreshed the page obviously. Very nice stripes!! Way to work. Never surrender. =D

I made some important progress in securing the canopy. I've been a little leary in just plopping this piece on here and hoping it'll work out and never creep or shift or even gap in spots. I haven't always had the best luck when it comes to windscreens and canopies, so I wanted to absolutely make sure I did everything possible to ensure this badboy went on perfect and stayed perfect. Especially since I can't just peel off the "glass" and start again...the back end will be a part of the fuselage. So in order to keep a seamless finish with the kit plastic, it needs to be perfect...thus the patience!! =]

I've placed two tabs aroung the top half of the cowl piece. The first is underneath the cowl poking out to reinforce the top piece which will accept the canopy. It worked out pretty well and I was able to make it leave just enough space to account for the width of the plastic canopy so it will be flush to the cowling. Next, I wanted to reinforce this forward part with a bulkhead to keep it strong. So, I cut and sanded to shaped (using the canopy as a guide) the bulkhead that the motor mounts attach to...only I moved it back a little from where it would actually be. I chose the location for functionality.

 Untitled by Britt Vallot, on Flickr

I added a couple of tabs that will be hidden to help secure the sides to the fuselage. There's a total of 4 along the bottom of the canopy and 2 attaching to the back of the spine of the fuselage. There is just enough gap to allow a smooth transition (I'm hoping!) I also took this moment to cut out the extra window that's present on JJ England's mustang. I made the shape from the Montex mask that I picked up so it would match up properly. I sanded the plastic scratched out piece as thin as I could but found that I still needed to touch it up after I had fixed it to the canopy. I personally felt it was easier too. I masked off the plastic canopy and carefully brought the extra window closer to scale on it's thickness.

 Untitled by Britt Vallot, on Flickr

 Untitled by Britt Vallot, on Flickr

And I suppose the masochist in me decided I couldn't get this far without making it more difficult...so since there is a big gaping hole for a carb intake, I just couldn't leave that without putting something there. I very simply scratched out the housing for the intake and the C-channel shaped anchors that attached it to the cowling. There's a bit more going on with the actual intake, but for here I just wanted something that would fit the bill, occupy the space, and prevent any light from sneaking through from the cockpit. So that's what I did. Primed and painted parts:

 Untitled by Britt Vallot, on Flickr

 Untitled by Britt Vallot, on Flickr

That's where I had to stop for now. Last things left with this part includes a few details  for the window to the canopy door, controls for the throttle/oil mixture, and prime and paint.

=]

On the bench:  

Tamiya F4U-1  Kenneth Walsh


  • Member since
    July 2014
Posted by modelcrazy on Wednesday, June 29, 2016 11:14 PM

Brett,

Man you really go all out! I give me inspiration to keep reaching for a better build.

Steve

Building a kit from your stash is like cutting a head off a Hydra, two more take it's place.


http://www.spamodeler.com/forum/

  • Member since
    June 2013
Posted by bvallot on Thursday, June 30, 2016 12:23 PM

Thanks Steve. Glad to hear. =] This is all very achievable. It just takes a little more time is all. I first didn't consider posting about that part since nobody is generally too worried about fit and engineering a kit together. We usually want to see the pretty stuff, but I never see anyone put together a -A with the Squadron canopy because we all probably look at with the same eyebrow of skepticism. So I figured going through the motions with it might encourage others to try it, and if they do...they've got one way of going about it. And maybe it gives way to a better way.

I am currently on DEFCON 4 with regards to the actual attaching of this part. I'm uncertain how sanding this part smooth is going to work. It may require some Milliput. Fingers crossed I get it right the first time. 

On the bench:  

Tamiya F4U-1  Kenneth Walsh


  • Member since
    August 2014
  • From: Willamette Valley, Oregon
Posted by goldhammer on Saturday, July 2, 2016 2:48 PM

Since it is 4th of July w/e, thought I had better get back to Miss America.  Got a couple of coats of clear gloss on her, will give a couple of days to dry and hopefully will get decals on her Monday.  After that another couple of evenings will wrap her up.  Then pics and on her way to MC.

  • Member since
    June 2013
Posted by bvallot on Saturday, July 2, 2016 11:47 PM

Can't wait to see it. =]

I also had a question for any Mustang experts out there. I've seen photos lately where I've paid more attention and noticed that the inboard gear doors for the landing gear were able to lock in place in an "up" position while landed. I've seen pictures of both where the doors were up and where the doors were down. Is there a reason why they'd be up? What's the deal here?

On the bench:  

Tamiya F4U-1  Kenneth Walsh


  • Member since
    July 2014
Posted by modelcrazy on Sunday, July 3, 2016 12:01 AM
The doors would bleed down after the engine is shut down and the hydraulic pump is no longer supplying pressure to the system. Depending on the condition of the hydraulic system and seals the bleed time would very. When the engine stated the doors close. The pictures you saw were probably taken shortly after an engine shutdown. This happens to current Stangs as well.
The flaps were a different story. The pilot would lower the flaps to facilitate easer mounting and dismounting onto the wing. The pilot would raise the flaps as soon as there was hydraulic pressure to reduce FOD from the prop wash. The pilot did not always lower the flaps so pictures will show the flaps in either position.


Steve

Steve

Building a kit from your stash is like cutting a head off a Hydra, two more take it's place.


http://www.spamodeler.com/forum/

  • Member since
    June 2013
Posted by bvallot on Sunday, July 3, 2016 12:06 PM

Thanks Steve! Makes perfect sense. =] I didn't think there was necessarily a right or wrong way to do it, but I did want to understand why incase there's a certain time for it to be a certain way. It doesn't sound like it makes much difference though. 

One more thing...what's FOD? =]

On the bench:  

Tamiya F4U-1  Kenneth Walsh


  • Member since
    July 2014
Posted by modelcrazy on Sunday, July 3, 2016 2:16 PM

Sorry, Foreign Object Damage, rocks and such.

Steve

Building a kit from your stash is like cutting a head off a Hydra, two more take it's place.


http://www.spamodeler.com/forum/

  • Member since
    June 2008
Posted by lewbud on Sunday, July 3, 2016 3:16 PM

Bvallot, what Steve  said is true for the D and later models.  On the B's and C's, there was a mechanical interlock that kept the inner gear doors in the up position.  It could be manually released for service, but for the most part  the inner gear doors should be up on B's and C's. 

Buddy- Those who say there are no stupid questions have never worked in customer service.

  • Member since
    August 2014
  • From: Willamette Valley, Oregon
Posted by goldhammer on Sunday, July 3, 2016 5:59 PM

Well, here we are after today.  Got the gear painted and decals on.....5 hours after starting and some more gray hair. Will get the gear on tomorrow and final clear on Tues. or Wed.  All the main red, white and blue is paint, all logos and stars are kit decals.

JOIN OUR COMMUNITY!

Our community is FREE to join. To participate you must either login or register for an account.

SEARCH FORUMS
FREE NEWSLETTER
By signing up you may also receive reader surveys and occasional special offers. We do not sell, rent or trade our email lists. View our Privacy Policy.