SEARCH FINESCALE.COM

Enter keywords or a search phrase below:

Mustang Build

80078 views
1582 replies
1 rating 2 rating 3 rating 4 rating 5 rating
  • Member since
    November 2003
  • From: Naples, FL
Posted by tempestjohnny on Sunday, April 3, 2016 9:14 AM

Final pics. Airfix P-51D. Really liked this kit. Eagle Strike 357th FG decals. Hasegawa P-51B Blue Nose Birds of Bodney decals 


  • Member since
    July 2014
Posted by modelcrazy on Sunday, April 3, 2016 10:44 AM
Great finish on both, I never saw a blue nose with OD. That is and interesting contrast. Thank you for joining us in the Mustang Build.
Are you still planning on the Academy D?
Cody has been very busy lately so It may take a little while to get you on the wall.

Steve

Building a kit from your stash is like cutting a head off a Hydra, two more take it's place.


http://www.spamodeler.com/forum/

  • Member since
    June 2008
Posted by lewbud on Sunday, April 3, 2016 11:17 AM
Some nice work going on here. TJ, nice work on the Blue Nose and Nooky Booky III. Plan on getting back to the table today after errands and will be working on a Mustang. Don't know which country yet, but it will be a Tamiya D in 1/72. If I could find a kit to convert a K into a Cavalier, El Salvador had one in a cool blue gray, and green scheme. Modelcrazy, the pic of my finished Mustang is in Israeli markings, not Dominican Republic. That settles the country question, Tamiya D model, with Airfix's DR markings. Trying to avoid NM at all costs at the moment.

Buddy- Those who say there are no stupid questions have never worked in customer service.

  • Member since
    July 2014
Posted by modelcrazy on Sunday, April 3, 2016 1:44 PM

Thanks lewbud, I fixed the roster. I love Israeli gear.

Steve

Building a kit from your stash is like cutting a head off a Hydra, two more take it's place.


http://www.spamodeler.com/forum/

  • Member since
    November 2003
  • From: Naples, FL
Posted by tempestjohnny on Sunday, April 3, 2016 4:11 PM
Steve I'm going to try and get the other D done


  • Member since
    January 2003
  • From: Chantilly, Virginia
Posted by CNicoll on Sunday, April 3, 2016 4:35 PM

You gentlemen have been very busy!  I'm working on the weathering on mine and just need to frame the canopy.  

I saw Britt is using lead foil for the framing and it looks nice.  That gave me the idea to try using painted Scotch Tape.  I am doing a 1/72 B-17G and used Scotch Tape (the frosted kind) to do the masking, but in taking some of the masking off it looked good on the frame so I left it.  Planning on trying it on the Mustang too.

TempestJonny - love the bluenose OD Mustang.  Very unique and definitely a beauty - nicely done.  It is so hard to find a unique Mustang anymore - but yours really stands out.  I may have to see about something like that sometime.

Steve - the stand is perfect.  Looks good and a perfect complement to your fine engine. 

Larry - that is a terrific interior - I had quite forgotten about the TD interiors - but your work with that set really makes it a shame to close up the fuselage around it.  Too bad the Mustangs didn't have car doors like the P-39's!

I'm off on a business trip for the next three weeks, but hoping to finish my Mustang III before the end of the month.

Keep it up the great work gents - it is really inspiring.

Chris

On the bench:  Academy 1/72 B-17G 'Blue Hen Chick';  1/48 Tamiya Mustang III; Kitty Hawk 1/32 P-39. 

Completed:  1/48 Tamiya P-51D Mustang - 'Show Bird', 1/32 Dragon P-51D  Flying Tigers 'What if'; 1/32 Tamiya P-51D Big Beautiful Doll

Group build:1/48 Tamiya Mustang III; 1/48 Tamiya P-51D Show Bird

  • Member since
    April 2014
  • From: Australia
Posted by lostagain on Monday, April 4, 2016 7:33 AM

Hi Steve, the Packard looks just great. Can't wait to see the scratch built body to go with it...

TJ your birds have come up a treat - like others I had to do a double take on the OD with a blue nose, and I like it. The checks on the -D are effective too.

Britt, fantastic detail in the cockpit there, it is looking excellent. A great build to follow and get tips from.

And thanks for the encouragement. The Gloss finish is taking a bit of work. It has been sanded back a couple of times. Now after the third coat I am happy with it. I am using the Tamiya acrylic blue, and it seems pretty transparent to me. But here we are ready to get the decals on now.

  • Member since
    June 2013
Posted by bvallot on Wednesday, April 6, 2016 12:45 PM

TJ, very nicely done...and at 1:72! I wouldn't have guessed until I saw it on your signature.  That's a great looking blue for your blue nose.  Well done. =]

Lostagain, it looks as though your efforts have paid off. The lighting doesn't quite allow one to see all of it, but I can see that shine.  Looking forward to how you dress it up.  If you're ever having issues with transparency and it's not a mixing issue, then consider building up the surface with a color before your top coat.  Depending on which direction you're looking to go with the color (i.e. bright, muted, etc.) choose that base coat to support your desired outcome and it can often lend itself to more depth within the paint.  A transparent color is often a blessing in disguise. ;)

On the bench:  

Tamiya F4U-1  Kenneth Walsh


  • Member since
    June 2013
Posted by bvallot on Wednesday, April 6, 2016 2:16 PM

So this will likely be one of the last posts I can make to update my build as I'm about to move into my new home.  It's just about time to start boxing things up. =[

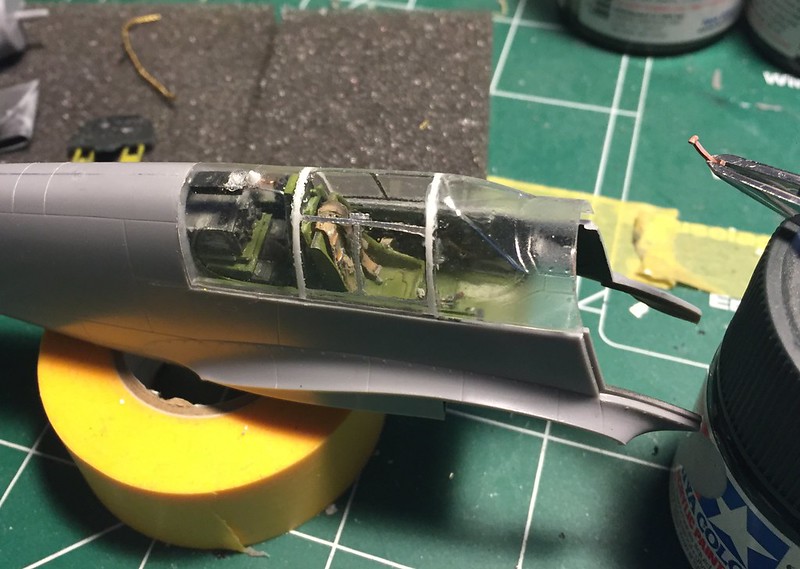
A small addition to the radio equipment of the -A...it's really not so noticeable yet, but after paint and what not this will become more clear. I gave a little bit more life to the antenna mast and it's hook-ups to the receiver.  There is a part molded into the Squadron AM canopy that I believe is supposed to be where the radio aerial ties in...but it is incorrect in shape for England's mustang. So I drilled it out and replaced it with a plastic rod that I sanded into shape and glued into place. Also, there's a light that is molded into the Squadron canopy that I dressed up as well. With a small square of lead foil (this stuff is so handy) I white glued a tiny piece of clear sprue that I sanded into shape and polished to make up the bulb.  Once all of this is painted, only a tiny bit of the aluminum will show.  I'm hoping this will make the "bulb" pop a little better.  I have never attempted this before but my tests seemed to work fine.  I did also make a new canopy release lever as the molded kit part didn't live up to the actual part.  That can be seen in the tweezers on the right. I didn't want to lose it, so I left it clamped there. =]

 Untitled by Britt Vallot, on Flickr

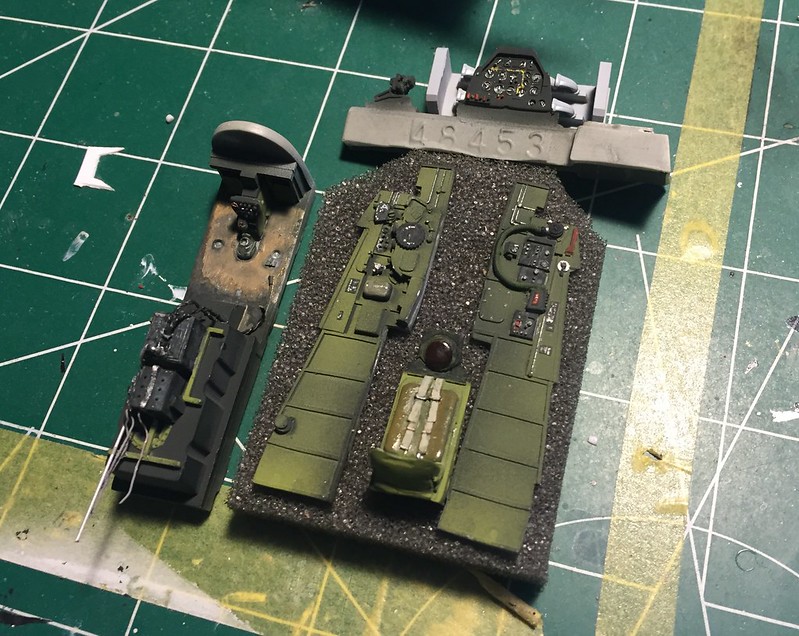
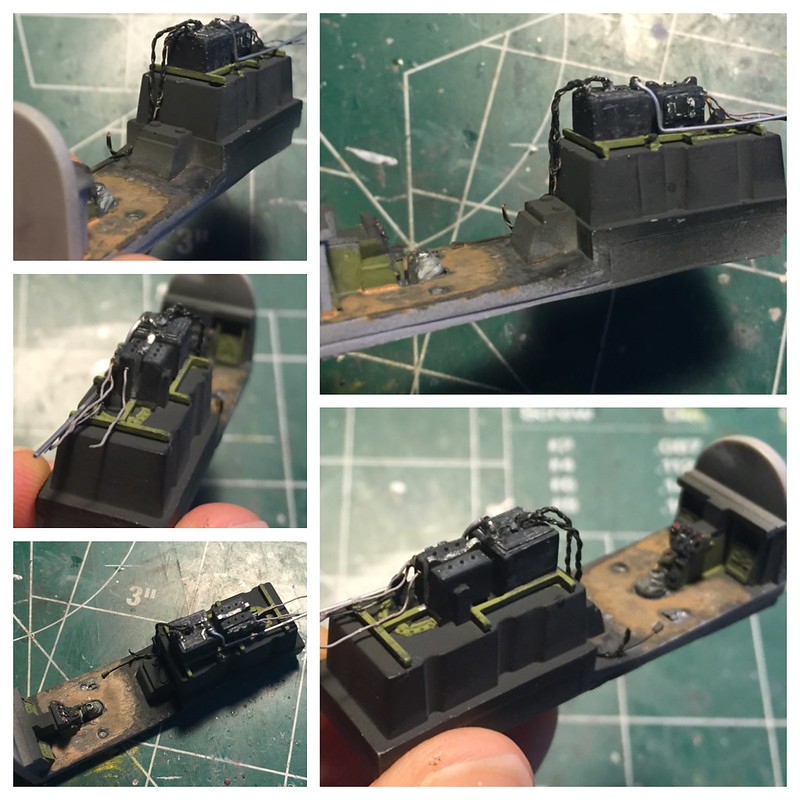
I have my F6-D recon mustang cockpit mostly painted up.  There is an extra piece of equipment that went on the floor to the pilot's left: an intervalometer.  This controlled the sequencing of pictures taken. I haven't scratched that part out yet, but it won't be too difficult. Here's what I have so far...I haven't gotten around to a clear/flat coat yet, but the weathering will be very light considering I've done most of it with the painting already.  This is pretty much how it will remain.

 Untitled by Britt Vallot, on Flickr

 Untitled by Britt Vallot, on Flickr

 Untitled by Britt Vallot, on Flickr

 Untitled by Britt Vallot, on Flickr

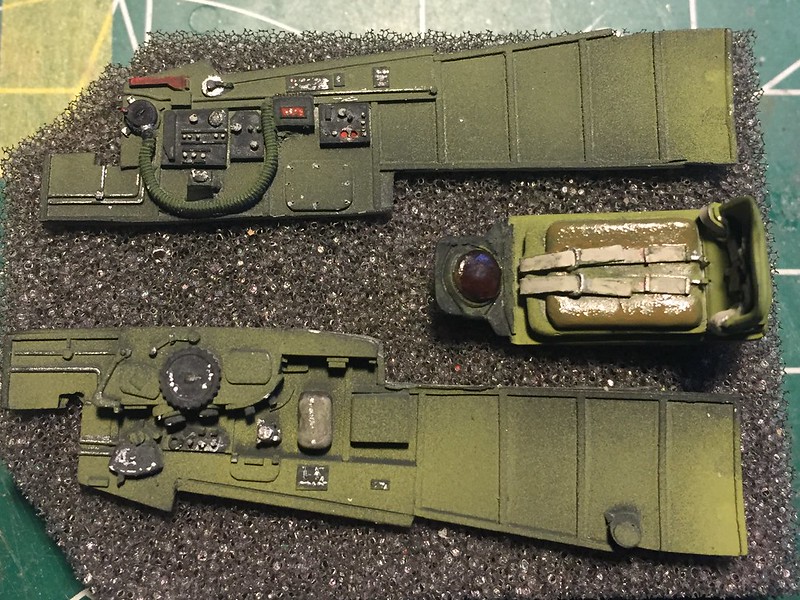
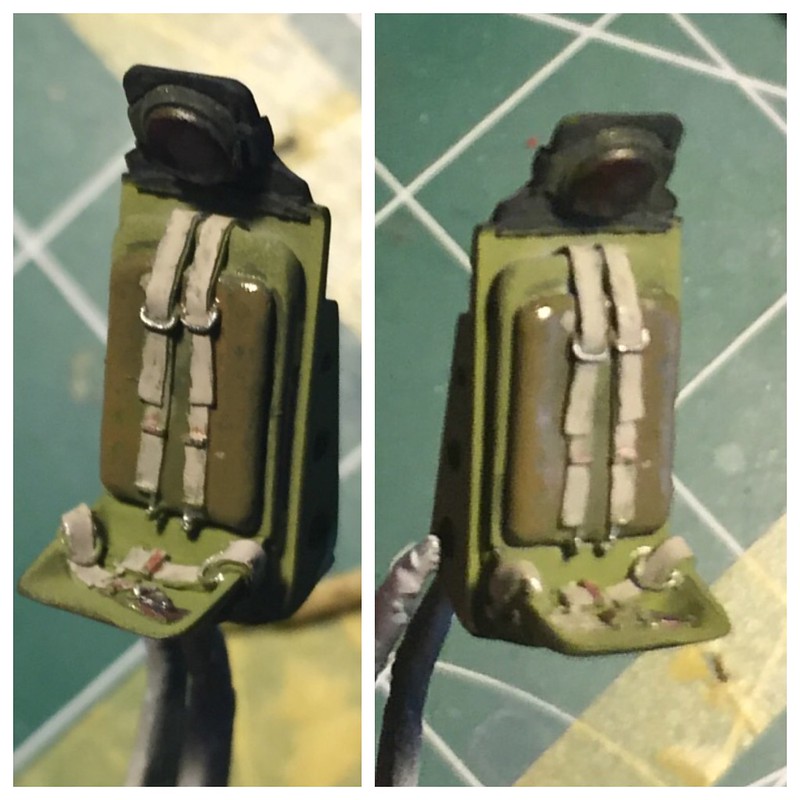
This True Details cockpit was actually a lot of fun to paint.  The transmitter/battery above the fuel tank is a little underdetailed next to the Aires version, but with a little help it comes out just as good if not better.  A bit of copper wire and albion aluminum slide tube makes up the wire and cables here.  For your money...don't count out the TD cockpit for the P-51D.

That's where I'll be for a while. I hope to get back up and running again soon. =]

On the bench:  

Tamiya F4U-1  Kenneth Walsh


  • Member since
    December 2013
Posted by CodyJ on Thursday, April 7, 2016 3:26 PM

Really sorry guys.  Just got got a new job and recently moved.  I appologize to all the people didnt get their pics in the gallery very quickly.   :(


Cody J

  • Member since
    July 2014
Posted by modelcrazy on Thursday, April 7, 2016 3:51 PM

Oh good, so you went with the job from your friend?

Steve

Building a kit from your stash is like cutting a head off a Hydra, two more take it's place.


http://www.spamodeler.com/forum/

  • Member since
    July 2013
Posted by lzdaily@comcast.net on Saturday, April 9, 2016 8:15 PM

Britt, the A is looking great. You're putting thoughts of redoing my A in my head.

tempestjohnny, your B and D look really good. Great job!

lostagain, can't wait to see it done.

Well, I've been away from my bench for too long. I have gotten a little done on my D, though. It took me a while to get to the point that I could button up the fuselage. I drilled out the formation lights under the starboard wing and used 1/16"clear styrene rod to make lenses (see my A-36 page for more information). I also replaced the molded in machine gun barrels with replacements made from several sizes of brass tubing. I need to clean up a few seams, then it will be off to the spray booth for some paint.

Happy building, all.

Larry

  • Member since
    August 2014
  • From: Willamette Valley, Oregon
Posted by goldhammer on Sunday, April 17, 2016 12:13 PM

  • Member since
    July 2013
Posted by lzdaily@comcast.net on Sunday, April 17, 2016 12:36 PM

goldhammer, looks good. Can't wait to see her in red, white, and blue.

I've got a question for the group. I'm getting close to painting my D, which will be my first NMF. I know that the Mustang fuselage was unpainted. I have several "colors" of Alclad: aluminum, airframe aluminum, and duraluminum. What do you all prefer? I also know that Mustang wings were puttied and painted silver. What color silver do people prefer to replicate the paint used?

Suggestions most appreciated.

Larry

  • Member since
    July 2014
Posted by modelcrazy on Sunday, April 17, 2016 2:41 PM
Larry,
Airframe Aluminum is more shinny than Duraluminum, so It’s really your call. I have noticed that the base coat makes a huge difference in the shine. A dull base will cause a dull finish and so on.
As far as the puttied wings, I’ve heard that Floquil Old Silver is a perfect match, but it’s not produced anymore so may be hard to find. I have used MM Aluminum but wasn’t supper happy with the results. It should be an almost dull greyish silver.
GH,
Wow, my daughter would flip over such a gesture. I haven’t even built her a Miss A.
Can’t wait to see you build in her evening dress. Such a pretty bird.

Steve

Building a kit from your stash is like cutting a head off a Hydra, two more take it's place.


http://www.spamodeler.com/forum/

  • Member since
    June 2013
Posted by bvallot on Monday, April 18, 2016 1:08 PM

Looking forward to seeing some paint Goldhammer. =]

On the bench:  

Tamiya F4U-1  Kenneth Walsh


  • Member since
    August 2014
  • From: Willamette Valley, Oregon
Posted by goldhammer on Monday, April 18, 2016 3:51 PM

Hit her with the white just now...and it brought back to me how much I hate white even on a 1:1 rig.  Hard to see how much you are laying on.  Got a couple of runs to sand out and spot in before I can do the layout for the second color.

Going to have to redo the wheel wells after all the other paint is done.  Didn't mask before the white but will before the red and blue.

  • Member since
    July 2014
Posted by modelcrazy on Monday, April 18, 2016 4:04 PM

I'm with you GH. I hate white.....and yellow.

Steve

Building a kit from your stash is like cutting a head off a Hydra, two more take it's place.


http://www.spamodeler.com/forum/

  • Member since
    August 2014
  • From: Willamette Valley, Oregon
Posted by goldhammer on Monday, April 18, 2016 4:20 PM

Won't even get into all my painting was done with 1 QT siphon gun 23 years ago, and new to AB's, along with air pressures and thinning ratios.  Like everything else....a learn by screwup deal....Crying

  • Member since
    September 2003
  • From: Northern hemisphere - most of the time-
Posted by blkhwkmatt on Tuesday, April 19, 2016 12:40 AM

Great looking stuff going on for all.  I have been following through the emails these last weeks.  Keep up the great work.


I am calling my P-51D completed and as promised here are the final pictures.


Thanks again for the great GB.

All comments and critiques are welcome.


<Matt

Quidquid latine dictum sit, altum videtur!!! - Anything said in Latin sounds profound!


  • Member since
    July 2014
Posted by modelcrazy on Tuesday, April 19, 2016 7:26 AM

Great looking build Matt Yes Yes Yes. The weathering and detail is exceptional. That is a build to be proud of for sure. That Tamiya kit is a nice one and takes some time to make it look right.

Thank you for joining us in the Mustang build. It was a pleasure watching you build.

Steve

Steve

Building a kit from your stash is like cutting a head off a Hydra, two more take it's place.


http://www.spamodeler.com/forum/

  • Member since
    June 2013
Posted by bvallot on Tuesday, April 19, 2016 11:34 AM

Masterfully done Matt.  You've got plenty going on here without overdoing anything.  That's the way it ought to be some times.  Hats off to you. =]

On the bench:  

Tamiya F4U-1  Kenneth Walsh


  • Member since
    August 2014
  • From: Willamette Valley, Oregon
Posted by goldhammer on Tuesday, April 19, 2016 2:53 PM

X 2 Matt, nicely done.


Well, got my screwup fixed this morning, now have the white done on the lady, will have to swing by the LHS on my way to Salem Thurs. night when I go up for a meeting to see about acrylic red and blue.  Have them in enamel but would rather stay all the same. Will get the red shot on her hopefully Friday and the blue next week.  And get to get a new nose cap for the NEO since it fell off the bench and tweaked it.  Rolled it back with a pair of needlenose, but has some rough edges that will affect the pattern.

  • Member since
    July 2013
Posted by lzdaily@comcast.net on Tuesday, April 19, 2016 5:08 PM

Matt, great job! I hope mine comes out half as nice as yours.

goldhammer, looking good.

Larry

  • Member since
    August 2014
  • From: Willamette Valley, Oregon
Posted by goldhammer on Tuesday, April 19, 2016 6:00 PM

Thanks, but still way early.....I still have plenty of time to mess it up more.  I'll be using the stars and all the lettering/logos/emblems decals from the sheet, but the major color scheme will be paint.  Below is what she is supposed to look like in her "go to prom" dress

  • Member since
    September 2003
  • From: Northern hemisphere - most of the time-
Posted by blkhwkmatt on Thursday, April 21, 2016 11:26 AM

Thanks all for the kind words, the,Tamiya kit is really a marvelous kit, worth the price.  I believe that I will not be building the trumpeter "B" as there isn't enough to time at this point, and my Do-335 has my attention right now.


Goldhammer- can't wait to see the finished product,  it's looking real good so far.  Those schemes look so difficult to me.

Thanks for the great group build,  as always it's been a pleasure to watch, learn and participate. 

<Matt

Quidquid latine dictum sit, altum videtur!!! - Anything said in Latin sounds profound!


  • Member since
    August 2014
  • From: Willamette Valley, Oregon
Posted by goldhammer on Thursday, April 21, 2016 11:42 AM

I'll use the kit decals as the pattern for the scallops on the tail and horizontal stabs.  The rest of it it is pretty straight forward and the lines fall on easily defined points on the fuselage and wing.  I also might try and see if I can get the decal placement diagram blown up to real size and have a few copies made to cut up for masking patterns.


I painted motorhomes for Safari for a couple of years back when and have been in the body/paint trade for 40 years, so layout and masking is nothing new, just have to learn to work on a smaller subject....Smile

  • Member since
    July 2014
Posted by modelcrazy on Thursday, April 21, 2016 11:52 AM

Your a better man than me GH, I dislike masking more than filling and sanding.

Steve

Building a kit from your stash is like cutting a head off a Hydra, two more take it's place.


http://www.spamodeler.com/forum/

  • Member since
    August 2014
  • From: Willamette Valley, Oregon
Posted by goldhammer on Friday, April 22, 2016 5:29 PM

WooooooHoooooo.....went down to UPS store with the decal/paint diagram (had to run back and get the length and wingspan of the model) and we made four copies of both side views and four copies of the top and bottom views....Actual size of the model, +/- a hair.  Cost was a grand total of $1.35.  Now I have templates to cut and use for the paint scheme lines.  I think it will be way easier than constantly checkin the sheet and the model to match points.  Actually on this one the points are easily defined, but the curves will be way easier now. 

Won't get anything done until at least Sunday afternoon, and that is if it is raining.  Got to go to Salem on Sat. to work on my new gold dredge to try and get it ready for the opening of the season in mid May, and Sun. is a metal detector hunt down in Springfield.

  • Member since
    July 2013
Posted by lzdaily@comcast.net on Sunday, April 24, 2016 9:23 AM

Helllo, all.

Because I’ve never done a natural metal finish before, I’m trying to take my time and explore all my options. None of the color photos that I have, though, clearly show the surface of the wings, especially in a shot that would allow a direct comparison with the natural metal fuselage. In the black and white photos, I don't see a big difference between the wings and the fuselage. To try and decide what colors to use, I took a spare pair of wings and shot them with Alclad Black Primer. The one on the left was then finished with Alclad’s Duraluminum. I applied Airframe Aluminum (the most popular choice for the fuselage) over the black primer on the gun bay cover and Airframe Aluminum over the Duraluminum on the ammo bay cover. On the right wing, I applied Semi Matte Aluminum over the black primer (now that it’s really dry it’s really obvious that I needed at least one more pass for complete coverage) with Airframe Aluminum over black on the gun bay covers and Airframe Aluminum over the Semi Matte Aluminum on the ammo bay cover. I have to admit, I’m still unsure how to paint the wings. I am sure, though, that I need to do much more surface prep on the model before I spray it with Airframe Aluminum. Any thoughts or suggestions greatly appreciated.

- Larry

JOIN OUR COMMUNITY!

Our community is FREE to join. To participate you must either login or register for an account.

SEARCH FORUMS
FREE NEWSLETTER
By signing up you may also receive reader surveys and occasional special offers. We do not sell, rent or trade our email lists. View our Privacy Policy.