SEARCH FINESCALE.COM

Enter keywords or a search phrase below:

Mustang Build

80080 views
1582 replies
1 rating 2 rating 3 rating 4 rating 5 rating
  • Member since
    April 2014
  • From: Australia
Posted by lostagain on Wednesday, February 24, 2016 8:18 AM

BV, just fantastic watching your detail work. Really is great getting masterclasses on scratchbuilding.

5, very neat and precise work on those fairings. The finishing is coming along really nicely too.

Larry, looking forward to seeing Ding Hao all bottled up.

TJ, your pair are looking good. As was said, nice drying rack there too.

My meagre offering has gone a bit off the rails - I was doing a Tamiya primer coat to see where there were any panel lines left to fill.

At this point, I dropped the model and the horizontal stab broke off, and the end of the fuselage broke off on the join line.

Here it is, after I stuck the back end on again. Incidentally there were loads of panel lines still to fill in, so now it is covered in lines upon lines of Mr Surfacer 99% of which I need to sand off...

So sand, fill, repeat...


  • Member since
    July 2014
Posted by modelcrazy on Wednesday, February 24, 2016 11:50 AM

5,

That looks better with the toned down weathering

Britt,

Amazing detail, you are really going full bore on that.

Lost,

I hate that, and while it's dropping you don't want to grab it just in case you cause more damage on the way down....you just hope for the best.

Steve

Building a kit from your stash is like cutting a head off a Hydra, two more take it's place.


http://www.spamodeler.com/forum/

  • Member since
    June 2010
Posted by 5-high on Wednesday, February 24, 2016 12:36 PM

Lost .don't worry about it ok. We all been there once or halve dozen times. Lol. Important thing is ..it can be fixed . Wet Sand her down with 600 or 800 grit ..then if you need fill sand again. From 800 to 1000 I thing that will do it .glue back the broken part  ...then give her a couple of light coats of tamiya AS -12  bare metal silver. That'll get you back and running. 

5

  • Member since
    July 2013
Posted by lzdaily@comcast.net on Wednesday, February 24, 2016 6:35 PM

lostagain, dropping a fairly complete model is the worst. If you think about it, though, you simply "rekitted" it and you obviously have kitbuilding skills. Stick with it.

Britt, that cockpit looks amazing. You planning to fly that thing when you finish it? It looks like you could.

5-high, it always amazes me when people pull off major surgery on a painted model. Well done.

My thanks to Britt and lostagain for the kind words on my Ding Hao build. Drop tanks are on and I washed the canopy parts tonight in preparation for a Future dip.

Best to all,
Larry


  • Member since
    June 2013
Posted by bvallot on Friday, February 26, 2016 1:37 PM

Thanks folks.  I'm getting her there. The construction phase is the part of all this I'm trying to improve most.  Painting and weathering for me seems to come pretty easy, so I've really tried not to rush any of this in the hope that the building part really shines later at the end.  It's been my bane these last couple of builds where I've improved as a modeler.  I see those pitfalls and just shake my head thinking, "If I were only more patient..."

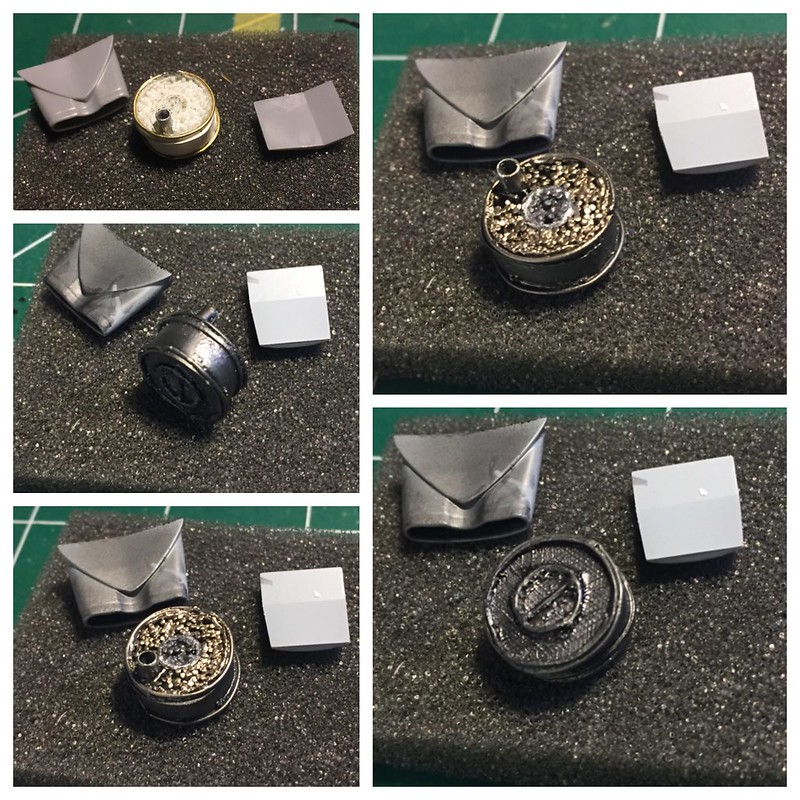
Anyhow. Here I am with another quick update.  The radiator is complete.  I just need a coat of flat on the screen in the front.  That'll go on tonight.  I need to build up the framework around it some to hold it in place, but I'll likely keep it simple.  None of that will be visible.

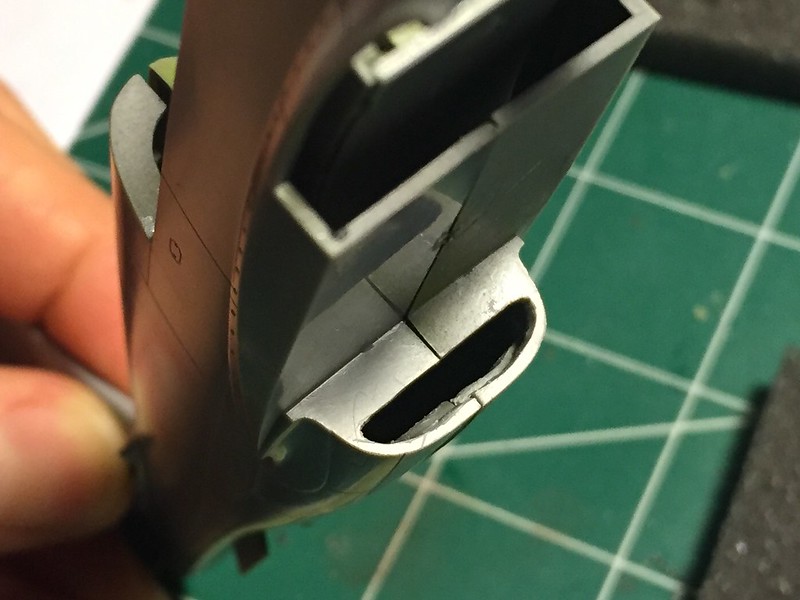
Here's one thing I started.  I opened up the intake for the radiator.  I mean...it's in the name...it should be open right. Simple enough.  I left the sides around it alone so that the kit part can fit on top of it as it needs.

 Untitled by Britt Vallot, on Flickr

Not too bad right.  Dropped the radiator in to check the fit and wouldn't you know it...perfect...you still can't see a damn thing! =]  I'm still happy with it.  It matters to me. =D

Here's the completed radiator.  The outer ring is for the engine and the inner circle goes to the 10gl oil tank.  I painted all of this in Alclad's Gloss Black to start, moved on to Stainless Steel, did the outer ring in thier Pale Burnt Metal color, and then followed up with a Tamiya Dark Grey/Flat Aluminum mix to keep a dark color with some shine behind it.  The interior of the intake scoop is also in Stainless Steel.

 Untitled by Britt Vallot, on Flickr

That's that for now.  Hopefully tonight I can get a lot done. I might even get to close this up. Fingers crossed. =]

On the bench:  

Tamiya F4U-1  Kenneth Walsh


  • Member since
    July 2014
Posted by modelcrazy on Friday, February 26, 2016 3:21 PM

That is some fine detail work Brit.

Steve

Building a kit from your stash is like cutting a head off a Hydra, two more take it's place.


http://www.spamodeler.com/forum/

  • Member since
    June 2013
Posted by bvallot on Friday, February 26, 2016 4:29 PM

lzdaily@comcast.net

Britt, that cockpit looks amazing. You planning to fly that thing when you finish it? It looks like you could.

Larry


Larry! It's like I hear them say...it'll fly at least once. =P


Thanks Steve! It's a bit cruder than I would rather have.  The very top part of the front has four pipes that shunt air to different parts of the aircraft, but since it isn't visible at all I didn't bother with it.  Most of this is going to require a flashlight and a magnifying glass to see anyhow. lol =]  But I'm looking to have it ready by April 9 for a show I'm going to try to take it to.  


On the bench:  

Tamiya F4U-1  Kenneth Walsh


  • Member since
    June 2010
Posted by 5-high on Sunday, February 28, 2016 12:09 AM

Had a hell of a time logging in bvallot ,,thought I'd never get on Hmm..

Anyhow yes think that your doing great work that rad ..I'd never thought of doing that or even trying it ..keep up the great work buddy Bow Down


Steve I know your bizzy with other products. .just curious if your still working on that merlin engine? ?

5-high 

  • Member since
    July 2014
Posted by modelcrazy on Sunday, February 28, 2016 2:49 AM

5-high
Steve I know your bizzy with other products. .just curious if your still working on that merlin engine? ?

Yes, I am going down to the Warhawk Museum in mid Mar to do a veteran interview for the national archives. They have a Packard Merlin engine there and I want to get some more pictures of fuel, oil, ignition lines that I just can't find on the internet.

Steve

Building a kit from your stash is like cutting a head off a Hydra, two more take it's place.


http://www.spamodeler.com/forum/

  • Member since
    September 2003
  • From: Northern hemisphere - most of the time-
Posted by blkhwkmatt on Sunday, February 28, 2016 3:28 AM

I must say that there are some great builds going on here. I have been watching via email and am impressed with what  I have seen. 

BV, looking great, patience at the begining pays off in the end!

Nice save on the mustang III shrouds, dont think I would have had the courage for that level of surgery.


Quidquid latine dictum sit, altum videtur!!! - Anything said in Latin sounds profound!


  • Member since
    September 2003
  • From: Northern hemisphere - most of the time-
Posted by blkhwkmatt on Sunday, February 28, 2016 3:34 AM

I finally got some time to sit down and get some more done on the P-51D.  Here are some pictures of where I finished at today.  Almost there.

I liked the PE detail in the gun bays I just couldnt cover them up. 

I need to finish the standing pilot figure, add on some more of the fiddly bits and finish the simple base.  I might need to add a couple more figures as well, not sure yet.

Will hopefully get this one across the finish line soon.

<Matt


Quidquid latine dictum sit, altum videtur!!! - Anything said in Latin sounds profound!


  • Member since
    July 2014
Posted by modelcrazy on Sunday, February 28, 2016 10:54 AM

Oh wow Matt, that is some beautiful work. The weathering looks spot on. The PE detail for the guns are great and really make it pop. I saw that plane at the Air and Space Museum in Seattle. It sets next to a 109 hanging from the ceiling. 

Steve

Building a kit from your stash is like cutting a head off a Hydra, two more take it's place.


http://www.spamodeler.com/forum/

  • Member since
    June 2010
Posted by 5-high on Sunday, February 28, 2016 3:15 PM

Matt outstanding work and detail. Love the weathering you've done. That canopy is crystal clear. Cool. Just amazing Matt Bow Down

5-high 

  • Member since
    July 2013
Posted by lzdaily@comcast.net on Sunday, February 28, 2016 3:23 PM

Matt,

Looks great! Excellent work.

Larry

GML
  • Member since
    February 2016
Posted by GML on Sunday, February 28, 2016 6:29 PM

So thanks 5 H.  I'll try and order it on line.  Very poor selectiones of rattle can paints at my local hobby store.  GML

  • Member since
    June 2013
Posted by bvallot on Monday, February 29, 2016 11:14 AM

There's a lot of fantastic things going on here Matt. =]  Looking forward to you completed pics.

On the bench:  

Tamiya F4U-1  Kenneth Walsh


  • Member since
    July 2013
Posted by lzdaily@comcast.net on Monday, February 29, 2016 8:15 PM

Well, folks, I think Ding Hao is finished. I may go back after a few days and add a little bit more weathering with some chalk, but maybe not. Mostly I'm calling this build done. Cody, I'm kind of partial to either the first or the third of these for the gallery.

Larry

  • Member since
    January 2003
  • From: Chantilly, Virginia
Posted by CNicoll on Monday, February 29, 2016 8:21 PM

Larry,

Looks amazing there!  Love the base as well and the pilot figure.  Great job!

Chris

On the bench:  Academy 1/72 B-17G 'Blue Hen Chick';  1/48 Tamiya Mustang III; Kitty Hawk 1/32 P-39. 

Completed:  1/48 Tamiya P-51D Mustang - 'Show Bird', 1/32 Dragon P-51D  Flying Tigers 'What if'; 1/32 Tamiya P-51D Big Beautiful Doll

Group build:1/48 Tamiya Mustang III; 1/48 Tamiya P-51D Show Bird

  • Member since
    June 2010
Posted by 5-high on Monday, February 29, 2016 8:49 PM

Wow she sure looks at home on that grassy base ..Larry !!!..you've done a fantastic job. .dam that's amazingly awesome. .love how you did pilot figure. 

I'm thinking of doing a base for my.n ..where can I get that grassy base. .or did you do it on your own? ?

I've see similar but on a sheet ..but not that thick (high)..great job Larry Bow Down

5-high 

  • Member since
    July 2014
Posted by modelcrazy on Monday, February 29, 2016 9:52 PM

Larry, fantastic finish sir. Ding Ho looks great and will be a nice addition to your pony collection. I love the bases you photograph on, it and the sky add a very real component and the pilot doesn’t hurt either. Cool addition.
I had you down for the four Mustangs, did you have any more that you wanted to add or are you Mustanged out for now?

Steve

Building a kit from your stash is like cutting a head off a Hydra, two more take it's place.


http://www.spamodeler.com/forum/

  • Member since
    July 2013
Posted by lzdaily@comcast.net on Tuesday, March 1, 2016 4:15 AM

Thanks for the kind words, everyone.

5-high, the base is simply a piece of scrap plywood with a grass mat stuck to it with double-sided tape. The mat comes from a company called Busch that makes scenery supplies for model railroads. The blue sky is actually the backdrop for my model railroad.

Steve, I'm not quite Mustanged out yet. Next up is a Tamiya P-51D. I have a set of decals that cover two of Charles Weaver's D's - one in camoflage and one NMF. I'm not sure which one I want to build, but I'm leaning toward the NMF.

Larry

  • Member since
    July 2014
Posted by modelcrazy on Tuesday, March 1, 2016 7:09 AM

Larry,

I take it it's the 1/48?

Steve

Building a kit from your stash is like cutting a head off a Hydra, two more take it's place.


http://www.spamodeler.com/forum/

  • Member since
    July 2013
Posted by lzdaily@comcast.net on Tuesday, March 1, 2016 11:36 AM

Steve,

Yes, it's 1/48.


Larry

  • Member since
    July 2014
Posted by modelcrazy on Tuesday, March 1, 2016 1:27 PM

LOL, Larry you sir are a Mustang Master. I updated the roster.

Steve

Building a kit from your stash is like cutting a head off a Hydra, two more take it's place.


http://www.spamodeler.com/forum/

  • Member since
    June 2013
Posted by bvallot on Tuesday, March 1, 2016 1:42 PM

Very nice indeed Larry.  ...do I see you dropping hints at a NMF crossover?!? =D  I think I do....

On the bench:  

Tamiya F4U-1  Kenneth Walsh


  • Member since
    July 2013
Posted by lzdaily@comcast.net on Tuesday, March 1, 2016 7:52 PM

Steve,

Don't know that I'd call myself a Mustang Master. There are folks on this group build who know far more than I do and who have done some amazing work (bvallot, I'm thinking of the detail you just did in that cockpit). I'm just a man on a mission: to build an example of each variant of the P-51 flown by the US in WWII.

bvallot, I'm a bit slow on the uptake, so I'm not quite getting the crossover comment, but I am pretty much planning to do Weaver's P-51D serial number 472199 in natural metal. It's going to be a bit of a stretch - I've never built a model of a D before, I've never done a natural metal finish, and I've never done a red and yellow checkboard on the nose. Should be fun.

Larry

  • Member since
    July 2014
Posted by modelcrazy on Tuesday, March 1, 2016 8:34 PM

Larry, Brit was hinting that you may want to jump in on Tueuns' NMF GB. Not a bad idea.

Steve

Steve

Building a kit from your stash is like cutting a head off a Hydra, two more take it's place.


http://www.spamodeler.com/forum/

  • Member since
    June 2010
Posted by 5-high on Tuesday, March 1, 2016 8:44 PM

I think you'll do a fabulous job on the next mustang D..I'll be watching .

5-high Toast


  • Member since
    June 2010
Posted by 5-high on Tuesday, March 1, 2016 8:57 PM

I think you'll do a fabulous job on the next mustang D..I'll be watching .

5-high Toast


  • Member since
    June 2010
Posted by 5-high on Tuesday, March 1, 2016 9:00 PM

OPPS 

SORRY FOR THE DOUBLE  POST ..

WASN'T PAYING ATTENTION. Embarrassed

5-high 

JOIN OUR COMMUNITY!

Our community is FREE to join. To participate you must either login or register for an account.

SEARCH FORUMS
FREE NEWSLETTER
By signing up you may also receive reader surveys and occasional special offers. We do not sell, rent or trade our email lists. View our Privacy Policy.