SEARCH FINESCALE.COM

Enter keywords or a search phrase below:

Mustang Build

80078 views
1582 replies
1 rating 2 rating 3 rating 4 rating 5 rating
  • Member since
    July 2014
Posted by modelcrazy on Thursday, March 17, 2016 10:33 PM
I did the veterans interview today at our local air museum and was able to take some very detailed pictures of the Merlin while I was there. Tomorrow I'm going to get back on it the kit and try to get it across the finish line.

Steve

Building a kit from your stash is like cutting a head off a Hydra, two more take it's place.


http://www.spamodeler.com/forum/

  • Member since
    July 2013
Posted by lzdaily@comcast.net on Sunday, March 20, 2016 3:48 PM

Steve, can't wait to see the finished Merlin.

CNicoll, your RAF bird is looking really good.

I haven't had much bench time lately, but I have snuck a little in here and there. I decided to use the True Details P-51D cockpit set on this build. The True Details cockpit set is gorgeous and dropped right into place once I removed the rudimentary detail cast into the kit's sidewalls. I sprayed a coat of Model Masters Interior Green and then picked out details with Insignia Red, Flat Black, Insignia White, and a few other colors. I added placards from the Eduard P-51 set and then weathered the sidewalls with a wash of Turpenoid and Burnt Umber oil paint. The True Details seat was beautiful (I used it rather than the UltraCast seat that I ordered and I love UltraCast parts). All I had to do was add the braces made from .010x.020 styrene strip. I also added some wiring to the radio and replaced the resin stub that represented the fuslage fuel tank guage with some HO scale piping that better represented the prototype. After some thought, I decided to use the Tamiya instrument panel. The True Details part was nice, but the dials lacked detail and the raised edges on the resin part meant that decals wouldn't fit properly. The Tamiya part was fairly nice and accepted Mike Grant instrument decals much better.

Best to all,

Larry

  • Member since
    July 2014
Posted by modelcrazy on Sunday, March 20, 2016 5:40 PM

That looks outstanding Larry. Are the belts True Details?

Steve

Steve

Building a kit from your stash is like cutting a head off a Hydra, two more take it's place.


http://www.spamodeler.com/forum/

  • Member since
    July 2013
Posted by lzdaily@comcast.net on Sunday, March 20, 2016 8:01 PM

Steve,

The belts are True Details. They're cast into the seat.

Larry

  • Member since
    July 2014
Posted by modelcrazy on Sunday, March 20, 2016 10:27 PM

Larry, I’m going to have to look into True Details then. All my belts always come out terrible. I’m lucky that the people who see my aircraft builds after I post them here are my family. I would like to up my game a notch.

I know it’s been a while, but I needed to get some more pics of our local Merlin. Every picture I found on the internet failed to show where some lines were going, like the right Magneto and the Oil Pressure Relief Valve lines for example.
Well I took some very specific pictures and was able to finish running the lines. I painted the engine and painted the bolts and lines silver. I still need to paint the ignition conduit, high temp spark plug wires, coolant tank and a few other things before attaching it in the mounts. After that I will run the coolant and oil lines as well as the air intake ducting.
I want your guy’s opinion. Should I add oil stains and weathering or leave it clean?
Steve


Steve

Building a kit from your stash is like cutting a head off a Hydra, two more take it's place.


http://www.spamodeler.com/forum/

  • Member since
    June 2013
Posted by bvallot on Monday, March 21, 2016 7:28 PM

Very, Very nice Merlin Steve!!  What scale is that again?

I also picked up the TD cockpit for the P-51D.  It's nearly half the price of the Aires version and still nicely detailed. I might still give the win to Aires, but for the price...it's not hard to dress up the TD pit and make it your own. 

I've been out of town for work all of last week, but hopefully I'll manage some things these next couple of days.  While I'm on this cockpit state of mind on the -A, I think I'll get the -D started too. 

On the bench:  

Tamiya F4U-1  Kenneth Walsh


  • Member since
    July 2014
Posted by modelcrazy on Monday, March 21, 2016 7:36 PM

Brit, its 1/18 scale which makes the engine itself somewhere in the neighborhood of 3 to 4". It's all resin and the instructions seriously lack detail but it's a fun build anyway.

Steve

Building a kit from your stash is like cutting a head off a Hydra, two more take it's place.


http://www.spamodeler.com/forum/

  • Member since
    July 2013
Posted by lzdaily@comcast.net on Monday, March 21, 2016 8:02 PM

Steve,

I think just a little subtle weathering would enhance the look just a bit. Just my .02.

Larry

  • Member since
    July 2014
Posted by modelcrazy on Monday, March 21, 2016 8:06 PM

Agreed, a light wash and dry brush to bring out the details. 

Steve

Building a kit from your stash is like cutting a head off a Hydra, two more take it's place.


http://www.spamodeler.com/forum/

  • Member since
    January 2003
  • From: Chantilly, Virginia
Posted by CNicoll on Monday, March 21, 2016 8:13 PM

modelcrazy

Brit, its 1/18 scale which makes the engine itself somewhere in the neighborhood of 3 to 4". It's all resin and the instructions seriously lack detail but it's a fun build anyway.


Steve - Looks AMAZING!  Glad you got the photos you were looking for as your attention to detail is phenominal.  Can you shrink that to 1/32 scale for me?  I'll just need one or two for my future works. :-)

Chris

On the bench:  Academy 1/72 B-17G 'Blue Hen Chick';  1/48 Tamiya Mustang III; Kitty Hawk 1/32 P-39. 

Completed:  1/48 Tamiya P-51D Mustang - 'Show Bird', 1/32 Dragon P-51D  Flying Tigers 'What if'; 1/32 Tamiya P-51D Big Beautiful Doll

Group build:1/48 Tamiya Mustang III; 1/48 Tamiya P-51D Show Bird

  • Member since
    July 2014
Posted by modelcrazy on Monday, March 21, 2016 8:25 PM

LOL Chris, just take a look at my 1/32 Stang several pages back. I did similar detail to that engine.

Check out pages 24 and 25.

Steve

Building a kit from your stash is like cutting a head off a Hydra, two more take it's place.


http://www.spamodeler.com/forum/

  • Member since
    January 2003
  • From: Chantilly, Virginia
Posted by CNicoll on Monday, March 21, 2016 8:37 PM

Been slowed down quite a bit by work, some travel and family stuff and am also building for a friends wife a 1/72 model of the B-17G he flew in WWII.  I did a 1/48 build a few years ago for her but she's going to more shows and traveling and that is a big bird to carry around.

I'm fast realizing that my workbench is optimized for building ONE model at a time, but I'm adjusting to doing dual builds.  I like being able to bounce back and forth.

Making progress - got the landing gear and landing gear doors on (after the photos were taken) and am working on the topside weathering.

Still have some seam-clean up to do but mostly this is a top-side build.  I did the wheel wells more as a learning experience for other builds.

Topside view showing the weathering work on the roundals.  I'm planning a dullcoat finish (of course) but also looking at a white wash to tone things down.

Have the canopy to mask and paint next then the gloss coat to seal everything in and then the dullcoat.


On the bench:  Academy 1/72 B-17G 'Blue Hen Chick';  1/48 Tamiya Mustang III; Kitty Hawk 1/32 P-39. 

Completed:  1/48 Tamiya P-51D Mustang - 'Show Bird', 1/32 Dragon P-51D  Flying Tigers 'What if'; 1/32 Tamiya P-51D Big Beautiful Doll

Group build:1/48 Tamiya Mustang III; 1/48 Tamiya P-51D Show Bird

  • Member since
    January 2003
  • From: Chantilly, Virginia
Posted by CNicoll on Monday, March 21, 2016 8:42 PM

modelcrazy

LOL Chris, just take a look at my 1/32 Stang several pages back. I did similar detail to that engine.

Check out pages 24 and 25.


Will do, thanks!

On the bench:  Academy 1/72 B-17G 'Blue Hen Chick';  1/48 Tamiya Mustang III; Kitty Hawk 1/32 P-39. 

Completed:  1/48 Tamiya P-51D Mustang - 'Show Bird', 1/32 Dragon P-51D  Flying Tigers 'What if'; 1/32 Tamiya P-51D Big Beautiful Doll

Group build:1/48 Tamiya Mustang III; 1/48 Tamiya P-51D Show Bird

  • Member since
    June 2013
Posted by bvallot on Tuesday, March 22, 2016 12:17 AM

Nearly there CN. =]

Steve, I agree that some weathering would be noteworthy here, but at 1:18 I doubt you'll need much.  I suppose it depends on what you're looking for with this build, but to showcase it I think you do just enough to show it was in some use.  Nothing is ever factory clean for long. ;)

I managed a little bit tonight.

For a while I've been thinking about the interior of a canopy and how best to recreate the depth that is present.  Some are simple, and some contain a little more in terms of operation.  The P-51A canopy actually has quite a bit going on with compared to others and even though I'm leaving it closed I wanted to try to represent what is there.  With some lead foil from a wine bottle, I tried to build up the frame around the coffin lid door and side canopy windows.  Since the Squadron AM part is embossed around a mold, it lacks an actual frame...i.e. there is a depression.  The thicker parts around the front and back are plastic strip sanded down thinner than the .15mm strip I started with and glued with Tamiya ETC. These strips will give a little bit of strength to this much thinner/weaker section of the plane now...I hope. =]  I'll be doing a bit more to strengthen some of this where I can.

 Untitled by Britt Vallot, on Flickr

The lead foil is glued with a strong white glue and it's actually still drying in the photos.  I'll add the handle for the sliding window and moving parts for it later. =]

On the bench:  

Tamiya F4U-1  Kenneth Walsh


  • Member since
    July 2014
Posted by modelcrazy on Tuesday, March 22, 2016 7:19 AM
That is some mighty fine detail work Britt. I will have to try some foil on a build. I've seen foil on other builds and liked it. We always worry about the exterior of the canopy but seldom the interior.

Steve

Building a kit from your stash is like cutting a head off a Hydra, two more take it's place.


http://www.spamodeler.com/forum/

  • Member since
    April 2014
  • From: Australia
Posted by lostagain on Tuesday, March 22, 2016 7:27 AM

Great work on the MkIII there CN, we always need more Malcolm hoods. The finish is looking good, and great work in the under carriage.

Larry, the cockpit looks great, never even knew those bars were on the seats... The IP has come up really well.

Steve, just the lightest of weathering as others have said.

Britt, your attention to detail is a lesson for me, really excellent to follow your work through.

GH, really looking forward to seeing Miss America in the flesh.

I had just resurfaced my B after a crash, sanded down nicely, when I realised that the tail fillet for my plane was not where it should be. So a scrap of 0.020" got me started and some putty did the rest.

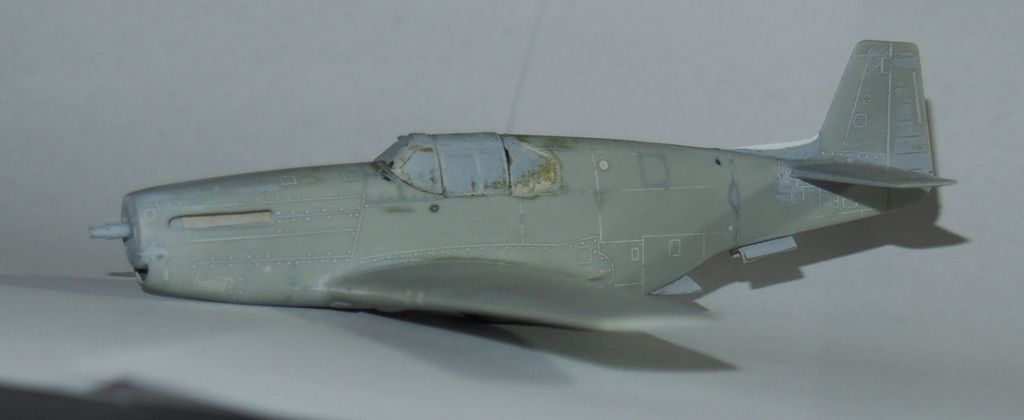
Then a coat of primer, sand it back again, then the colourcoat! Using Tamiya gloss blue, it came out streaky and plenty of orange peel:

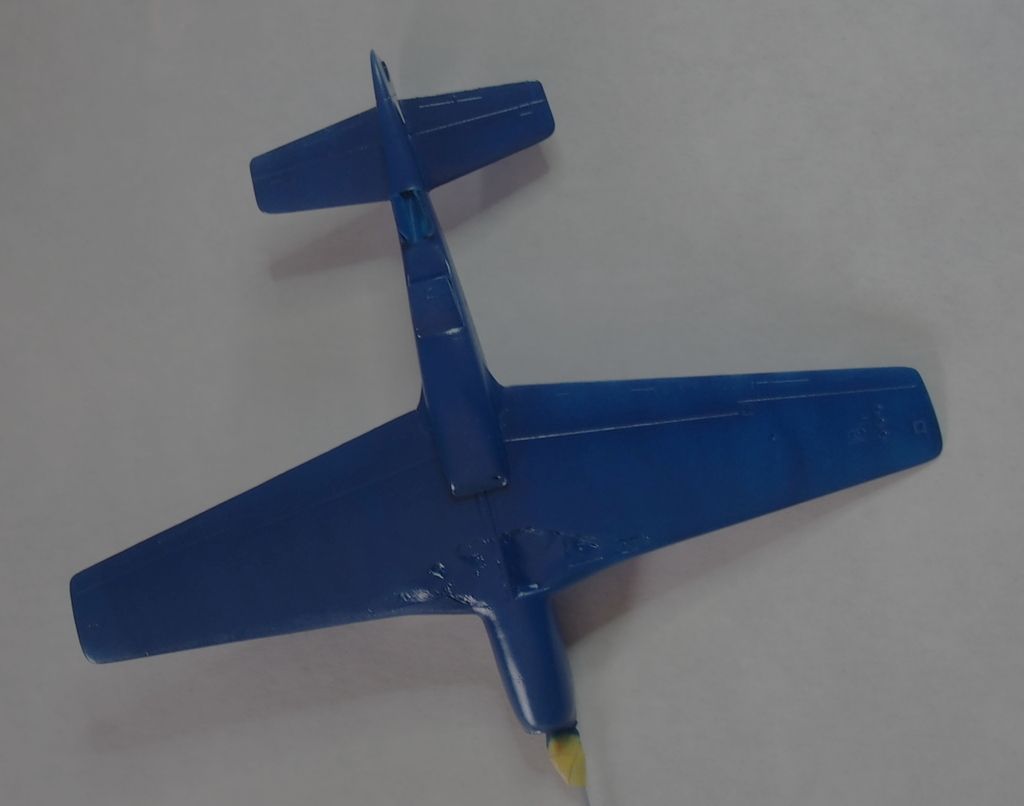
Now this was taken down to 2400 grit and a better gloss coat applied. I will leave it sit for a week or so before deciding on whether we are good enough.

Looking forward to seeing more from you all.


  • Member since
    January 2014
  • From: Nampa, Idaho
Posted by jelliott523 on Tuesday, March 22, 2016 8:21 AM

Steve,

I appologize, but I am going to have to take my "hat" out of the ring for this build. The 1/32 "B" Mustang I have is absolutely horrible. There was so much flash on it and the clear parts were so distorted, that I dont have the time or the experience to make it even a passable build.EmbarrassedNoBang Head

On the Bench:  Lots of unfinished projects!  Smile

  • Member since
    July 2014
Posted by modelcrazy on Tuesday, March 22, 2016 9:30 AM

Understood Jeremy, I had to do the same with the Monogram 1/48. I just don't have the time or willingness to fight a kit at this point.

Steve

Building a kit from your stash is like cutting a head off a Hydra, two more take it's place.


http://www.spamodeler.com/forum/

  • Member since
    January 2014
  • From: Nampa, Idaho
Posted by jelliott523 on Tuesday, March 22, 2016 12:00 PM

modelcrazy

Understood Jeremy, I had to do the same with the Monogram 1/48. I just don't have the time or willingness to fight a kit at this point.


Totally understand. I have finished up the Double Eagles for the Boeing build and will get pics uploaded soon.

On the Bench:  Lots of unfinished projects!  Smile

  • Member since
    July 2014
Posted by modelcrazy on Tuesday, March 22, 2016 10:10 PM

I finished the painting on the Merlin and applied a little bit of weathering. Next I will install the intake ducting, finish the mount and make up the propeller.


Steve

Building a kit from your stash is like cutting a head off a Hydra, two more take it's place.


http://www.spamodeler.com/forum/

  • Member since
    June 2013
Posted by bvallot on Friday, March 25, 2016 10:00 PM

Very, very nice so far Steve! =]  I've been wanting to do the same thing with some 1:32 engines...or have a 1:48 next to the subject on a cart...just never seem to get around to it.  How much is left??

Lostagain, keep at it.  How tricky is that gloss paint?  Is it easy for it to get too thick?  I've personally never painted with anything but flats with these WW2 planes.

I've also made a small update.  It's beginning to feel as though 70% of this build is going to be within the cockpit...the part nobody will ever see as I'm too chickensh!t to cut it open. LOL  So with the seatbelts scratched out and painted and married to the seat, I can now move on to matching the seat to the armor plate which was also scratched and match that to the roll struts.  I let them set up and moved on to a couple of electrical components that governed the radio antenna mast. This part was a little delicate.  The electrical plumbing that exists along the roll strut actually helps to support the box to the antenna.  I kept it very light weight but the fit is actually fairly strong.  Or at least strong enough to keep up with normal banging around.  Here's where I'm at:

 Untitled by Britt Vallot, on Flickr

I'll move on to the IP next and look to have the interior of the canopy painted as well.

I also started on the next Mustang since I'm in the cockpit mode. =]

 Untitled by Britt Vallot, on Flickr

I'm seriously considering converting this to an F-6D recon version and building Shomo's mount right after he jumped on those 7 Jap planes he took all at once.  I was looking to pick up some Ultracast exhausts for this build but found an excellent deal on eBay for the whole shebang...so I figured hell why not.  I don't normally dump all the AM stuff a kit can fit because I feel like I rob myself the opportunity to improve my building skills, but I'll try it once just see how a thing like that comes out I suppose.  Then I'll know the difference. So here's what's going in this one:

 Untitled by Britt Vallot, on Flickr

That's that.

=]

On the bench:  

Tamiya F4U-1  Kenneth Walsh


  • Member since
    July 2014
Posted by modelcrazy on Friday, March 25, 2016 10:11 PM
Awesome detail Britt! You put a lot into your work and it really shows. The AM haul you have for your Tamiya looks like fun. I’m excited to see you jump into that one as well.
Steve

Steve

Building a kit from your stash is like cutting a head off a Hydra, two more take it's place.


http://www.spamodeler.com/forum/

  • Member since
    June 2010
Posted by 5-high on Saturday, March 26, 2016 5:16 PM

britt nice kit and AM detals ..love to see it come togther ..will be watching this one Eats

  • Member since
    July 2014
Posted by modelcrazy on Monday, March 28, 2016 10:19 PM
I finished the Merlin with the exception of the stand. I didn’t have another $20 for the offered stand from HpH but I have an idea for it.
The only thing that’s missing is the carbonator and the linkages. I don’t have the skill to scratchbuild something like that so I went without it. The oil lines were made from solder and the water lines are wire. The hose connectors were made from shrink tube while the hose clamps are cut PE sprues.
I hope you enjoy it.
Cody, I will be taking finial pictures after I make a stand so if you put it on the wall, I will have updated pics later.


Steve
  

Steve

Building a kit from your stash is like cutting a head off a Hydra, two more take it's place.


http://www.spamodeler.com/forum/

  • Member since
    July 2013
Posted by lzdaily@comcast.net on Tuesday, March 29, 2016 5:25 AM

Steve,

The Merlin looks great! Amazing work!

Larry

  • Member since
    June 2013
Posted by bvallot on Tuesday, March 29, 2016 1:26 PM

That's gorgeous Steve.  It definitely needs to be propped up on something. =P Where did you get your shrink tube from?  What kinds of sizes does it come in?  I've been trying to make due with albion slide tubes to get the job done like that.

On the bench:  

Tamiya F4U-1  Kenneth Walsh


  • Member since
    July 2014
Posted by modelcrazy on Tuesday, March 29, 2016 1:52 PM

Brit,

Some of the tubing came in the kit, the other sizes came from some scrap from work (I am an electronics tech).

I am sending you a PM.

Steve

Building a kit from your stash is like cutting a head off a Hydra, two more take it's place.


http://www.spamodeler.com/forum/

  • Member since
    July 2014
Posted by modelcrazy on Tuesday, March 29, 2016 10:38 PM
I went to the local hardware store today and purchased some plastic and an aluminum piece and made a stand for the Merlin. So here it is in as much glory as I can muster.
Cody, would you please put picture #1 or #2 up on the wall? Your choice.
    

Steve

Building a kit from your stash is like cutting a head off a Hydra, two more take it's place.


http://www.spamodeler.com/forum/

  • Member since
    June 2013
Posted by bvallot on Tuesday, March 29, 2016 11:05 PM

Fantastic Steve.  I think that stand is perfect.  Less is usually more.  Very nicely done! =]

On the bench:  

Tamiya F4U-1  Kenneth Walsh


  • Member since
    July 2013
Posted by lzdaily@comcast.net on Wednesday, March 30, 2016 5:37 AM

Steve,

The stand is perfect. Very nice looking in itself, but puts the focus on the model where it should be.

Larry

JOIN OUR COMMUNITY!

Our community is FREE to join. To participate you must either login or register for an account.

SEARCH FORUMS
FREE NEWSLETTER
By signing up you may also receive reader surveys and occasional special offers. We do not sell, rent or trade our email lists. View our Privacy Policy.