SEARCH FINESCALE.COM

Enter keywords or a search phrase below:

Mustang Build

80080 views
1582 replies
1 rating 2 rating 3 rating 4 rating 5 rating
  • Member since
    June 2010
Posted by 5-high on Saturday, February 20, 2016 2:47 PM

Nicely done radail9. 

Bvallot great job on those radios .lookin goooooood Propeller

5-high 

  • Member since
    January 2016
  • From: A Galaxy Far, Far Away
Posted by Hunter on Saturday, February 20, 2016 2:50 PM

Gentlemen - 

I just got done going through all 41 pages of this thread and I have to say there is a boat load of great talent in this GB. All of you have produced outsatnding builds, with wonderful paint jobs and great details. I will definitely watch this to the end to see everyone's build. You have set a very high bar for some of us to strive for. Bow Down

Hunter 


  • Member since
    June 2013
Posted by bvallot on Saturday, February 20, 2016 2:53 PM

Thank you 5. All this scratch-building is still a learning process for me. Each time I do something new, I figure out a new trick for getting there. Keeps it interesting. How's the dot weathering coming along? I'm interested in seeing how it came out.

On the bench:  

Tamiya F4U-1  Kenneth Walsh


  • Member since
    June 2013
Posted by bvallot on Saturday, February 20, 2016 2:56 PM

Hunter, whenever you get done with that Zero you ought to pick you up a kit and join us. =]

On the bench:  

Tamiya F4U-1  Kenneth Walsh


  • Member since
    June 2010
Posted by 5-high on Saturday, February 20, 2016 4:04 PM

Thank you hunter. I think your doing a great job on your zero. .I've been watching your progress . Must say the zero is comeing along great. Bvallots right. After you finish the zero. You should pick up a mustang kit and join us am sure that there's more than enough time to make another one ..I think a pacific theater mustang would look cool next to that zero 

Bvallot. .just now I found time to tackle the dot filter method. .but I'm still wondering about how the aryclic clear will hold up with oils .I'm wondering if I should or could use water based aryclics ie ...tamiya paint in stead. Alcohol will strip the paint as I brush ...what do you recommend 

5

  • Member since
    December 2015
Posted by Kyuzo on Saturday, February 20, 2016 5:22 PM

Howdy all. Unfortunately I've been set back on my painting by the weather (has been too cold to properly ventilate) but I've been getting to push forward a small bit at a time. Thanx to Brandon's reference pics I was able to conclude that the best skill to go with for my decals would be the 1/72. So I bought set 3 of 6 from theses Blue Nosed Birds of Bodney decal set that I found on eBay.  Each set has decals for 3 different blue nosed variants. This is the set that I bought 

I'll probably end up going with the center set. Also, while looking for these I found a 1/72 Tuskegee Airmen P-51D/Me-262A-1a 2-in-1 kit I might buy. 

  • Member since
    July 2014
Posted by modelcrazy on Saturday, February 20, 2016 5:51 PM

The GB still has 5 more months, so there's plenty of time.

Steve

Building a kit from your stash is like cutting a head off a Hydra, two more take it's place.


http://www.spamodeler.com/forum/

  • Member since
    June 2013
Posted by bvallot on Saturday, February 20, 2016 7:36 PM

5-high

I'm still wondering about how the aryclic clear will hold up with oils .I'm wondering if I should or could use water based aryclics ie ...tamiya paint in stead. Alcohol will strip the paint as I brush ...what do you recommend 

5


That's a great question 5.  Normally, you really shouldn't have any problems from weathering with oil paints.  Most clear coats normally are acrylic in nature. Or at least from what I've seen.  I've been putting a flat laquer coat to seal everything for quite a while and have not had a single problem with it.  So, the short version here is be certain to have a low odor thinner for oil paints.  I've seen where liquin will work too, but this stuff will allow the oil paint some body to it.  Not really what you're looking for here, but for future projects...a little of both could be helpful.  So you stick to a low odor thinner and spread your oil paint washes over a clear coat and you should be fine.  

What I personally do...if I have any doubts about something new...seal everything in a flat coat (I use Alclad's clear flat) and go back over with a clear coat again.  The coats are thin, or should be, so you needn't really worry about how they impact your build.  This will put an extra "layer of defense" between your paint job and your weathering.  I doubt it will be necessary.  If you put the clear coat down well, then it should be sufficient. =]  Keep in mind that this weathering process with oil paints may take some time to dry.  It depends on how thick it is and the humidity where you live.  24 hours ought to be good normally for coats as thin as you'll be putting on.  Once your done with the weathering at that particular stage, put your flat coat down and viola! =]

I can PM you about a more detailed explanation if you'd like.  I try to be considerate of the chatter here on the forum.  =]

On the bench:  

Tamiya F4U-1  Kenneth Walsh


  • Member since
    November 2003
  • From: Naples, FL
Posted by tempestjohnny on Sunday, February 21, 2016 6:28 AM

bvallot

Here's just a short post on the radio equipment for the P-51A.  I managed to get this all sorted out last night, but it'll be a few days before I can get this closed up.  I decided I couldn't live without mocking up the radiator as well for these mustangs.  So, I need to get that whipped up as well as the tail wheel.  I caught a small error in scratching out the bottom shelf receivers.  I sawed off the bottom half and fixed them up...simple. The lower shelf is in place and I went ahead and scratched the Dynamotor coder from some sprue and created its place on the shelf.  All of this has a coat of primer on it and has been painted.  All I really need is to complete the wiring and IP for the most part and then put a flat coat to seal and the cockpit will pretty much wrapped up. =]  Very rewarding to tackle this section like this. 

 Untitled by Britt Vallot, on Flickr


Britt that looks great. Definitely an improvement over the kit


  • Member since
    July 2013
Posted by lzdaily@comcast.net on Sunday, February 21, 2016 7:52 PM

Britt, those scratched parts are looking great. Impressive.

After waiting for replacement decals (just to get the "AJ" code letters I messed up), I've made a little progress on my Ding Hao over the last few days. Here are a couple of shots. I still have to stick on a few little fiddly bits and brush paint a few details, but the only major things I have left to do are to add the canopy and the drop tanks.

Best to all,
Larry


GML
  • Member since
    February 2016
Posted by GML on Sunday, February 21, 2016 8:12 PM

MKelley

Modelcrazy and bvballot thanks for the comments, Groot she has a few warts when you see it close up. Considering how much superglue filler I have used I am not unhappy with the results. I used a rattle can of Krylon metalic silver. I paln on lightly buffing a few panels to give it some variation. 


i have been looking for someone who has used the Zkrylon.  Outstanding.  Im building a 1/32 Revell Mustang as my first model in perhaps 45 years.  I do not have an airbrush so am looking for a way(s) to get an NMF without airbrush.  Could you post final photos?  I love your aircraft!  Michael

  • Member since
    July 2014
Posted by modelcrazy on Sunday, February 21, 2016 9:12 PM

Almost finished with #4 Larry, impressive, most impressive. 

Steve

Building a kit from your stash is like cutting a head off a Hydra, two more take it's place.


http://www.spamodeler.com/forum/

  • Member since
    June 2010
Posted by 5-high on Sunday, February 21, 2016 9:24 PM

Izdaily it's looking very good. Yes I agree with modelcrazy on that .your wait for those decals is soon to pay off ..I say it's a three point landing. Wink

5-high 

  • Member since
    June 2010
Posted by 5-high on Monday, February 22, 2016 11:37 AM

GML...for that NMF try tamiya AS-12 bare metal silver .

  • Member since
    June 2010
Posted by 5-high on Monday, February 22, 2016 12:30 PM

Well guys I've decided I'm not happy with the exhaust fareings on this mustang lll. After all I've done it don't look right eugeniuszs mustang didn't have it and it wouldn't look right ..soooo ...doctor 5 please report to the bench for sergury Propeller.

5

  • Member since
    July 2014
Posted by modelcrazy on Monday, February 22, 2016 1:27 PM

That is funny 5. I know how you feel, something just drives you nuts and you gota fix it.

Steve

Building a kit from your stash is like cutting a head off a Hydra, two more take it's place.


http://www.spamodeler.com/forum/

  • Member since
    July 2013
  • From: Chicago area
Posted by modelmaker66 on Monday, February 22, 2016 3:32 PM

can we still participate?

  • Member since
    July 2014
Posted by modelcrazy on Monday, February 22, 2016 3:54 PM

modelmaker66
can we still participate?

Plenty of time, 5 months left. Whatcha got?

Steve

Building a kit from your stash is like cutting a head off a Hydra, two more take it's place.


http://www.spamodeler.com/forum/

  • Member since
    July 2013
  • From: Chicago area
Posted by modelmaker66 on Monday, February 22, 2016 4:04 PM

a 1/48 revell mustang that i got off ebay cheap. do i just post her or is there somewhere else. i've not done it before but the friendliness here makes me want to participate. What format for picks? how often to post?

  • Member since
    July 2014
Posted by modelcrazy on Monday, February 22, 2016 4:25 PM

No problem MM, you will post it here in the GB as often as you feel there is any progress to show.

For posting the pictures you will need a photo hosting site such as Photobucket, Imageshack, flicker Etc. After uploading your picture on the hosting site, just copy the URL and past it in the "Source" field after clicking on the "Insert/Edit Image" Icon in the tool bar when replying to a post.

I'll get you on the roster and just start when you’re ready.


Steve

Steve

Building a kit from your stash is like cutting a head off a Hydra, two more take it's place.


http://www.spamodeler.com/forum/

  • Member since
    January 2016
  • From: A Galaxy Far, Far Away
Posted by Hunter on Monday, February 22, 2016 5:33 PM

bvallot

Hunter, whenever you get done with that Zero you ought to pick you up a kit and join us. =]


bvallot & 5-High

Thank you for the invite. I have committed myself to another GB (Floats&Boats) with two entries and have my hands full. I am no were near the level to have multiple builds going at once like yourselfs. But I definitely want to be in on a build with you. Again, thank you for the invite.  

Hunter 


  • Member since
    January 2016
  • From: A Galaxy Far, Far Away
Posted by Hunter on Monday, February 22, 2016 5:36 PM

lzdaily@comcast.net

Britt, those scratched parts are looking great. Impressive.

After waiting for replacement decals (just to get the "AJ" code letters I messed up), I've made a little progress on my Ding Hao over the last few days. Here are a couple of shots. I still have to stick on a few little fiddly bits and brush paint a few details, but the only major things I have left to do are to add the canopy and the drop tanks.

Best to all,
Larry


Larry - Beautiful Job! YesYes

Hunter 


  • Member since
    July 2013
Posted by lzdaily@comcast.net on Monday, February 22, 2016 7:10 PM

Thanks, Hunter. It's going to take me another day or so (after work) to get the drop tanks on and plumbed.

Larry

  • Member since
    November 2003
  • From: Naples, FL
Posted by tempestjohnny on Tuesday, February 23, 2016 1:25 PM

Decals and gloss coat on.  The 357th FG decals were a bear.  Anything red or yellow wanted to crack. 


  • Member since
    July 2014
Posted by modelcrazy on Tuesday, February 23, 2016 1:27 PM

Good idea for a drying rack.

Steve

Building a kit from your stash is like cutting a head off a Hydra, two more take it's place.


http://www.spamodeler.com/forum/

  • Member since
    January 2016
  • From: A Galaxy Far, Far Away
Posted by Hunter on Tuesday, February 23, 2016 2:16 PM

TJ - 

Very Nice, Very Nice Sir. Great looking builds!

Hunter 


  • Member since
    June 2010
Posted by 5-high on Tuesday, February 23, 2016 9:49 PM

T.J ...thats a neat way of drying them mustangs out . thay sure are looking good. two thumes up YesYes. one for each mustangPropeller

  • Member since
    June 2010
Posted by 5-high on Tuesday, February 23, 2016 11:11 PM

well guys i thought i,d share some resent wip pic,s 

after i did some toneing down on the chipping . I put down a coat or two of gloss (x-22 clear) , I kept some of the wing root chipping and got rid of the rest , by useing the liquid mask, by dipping a sponge in the liquid mask and dabbing it where i want to keep chipping . where i did not dab gets covered by paint . after that its a matter of peeling of the masking to reveil the underlying sivler .I really like the way it worked .

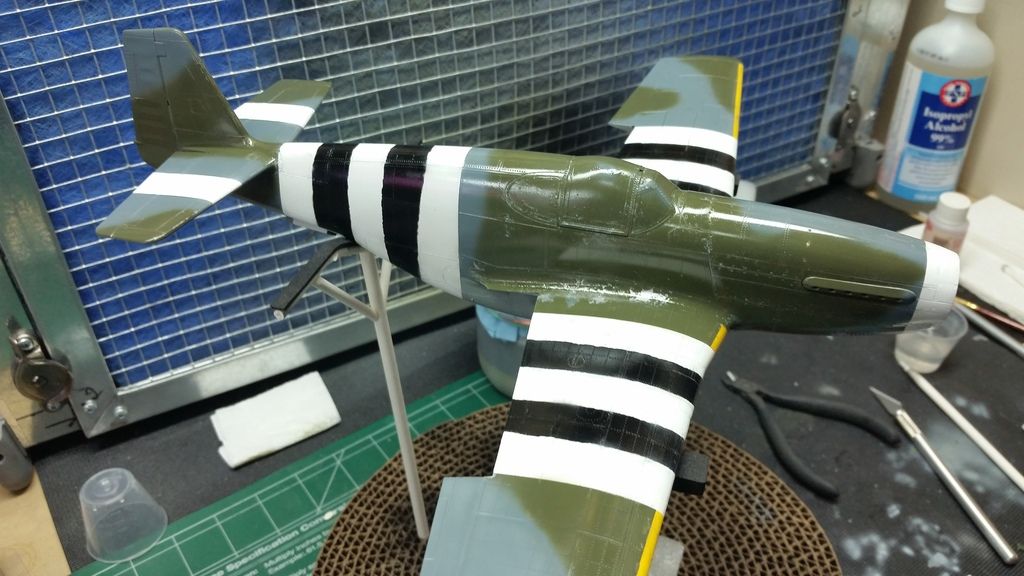
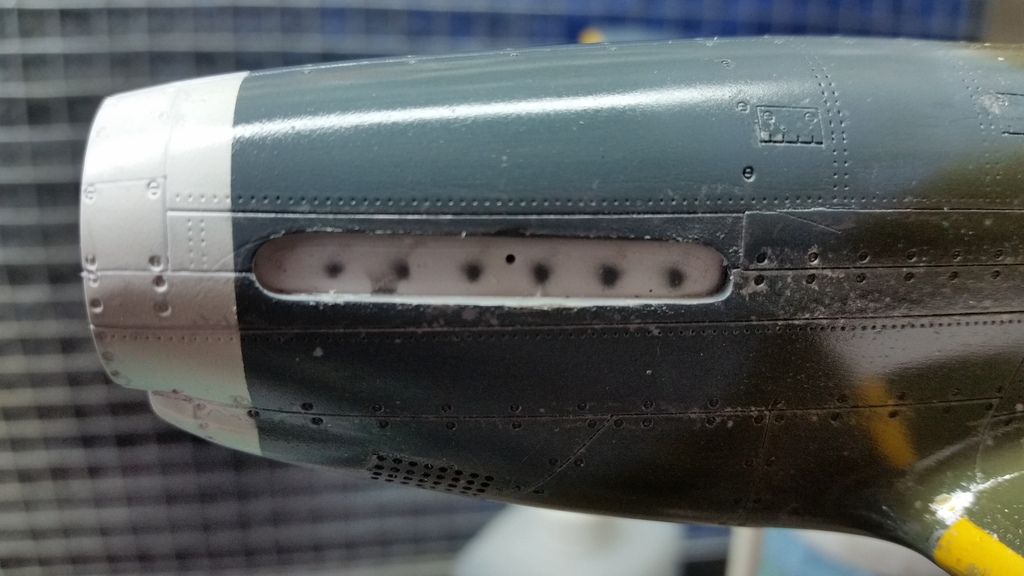
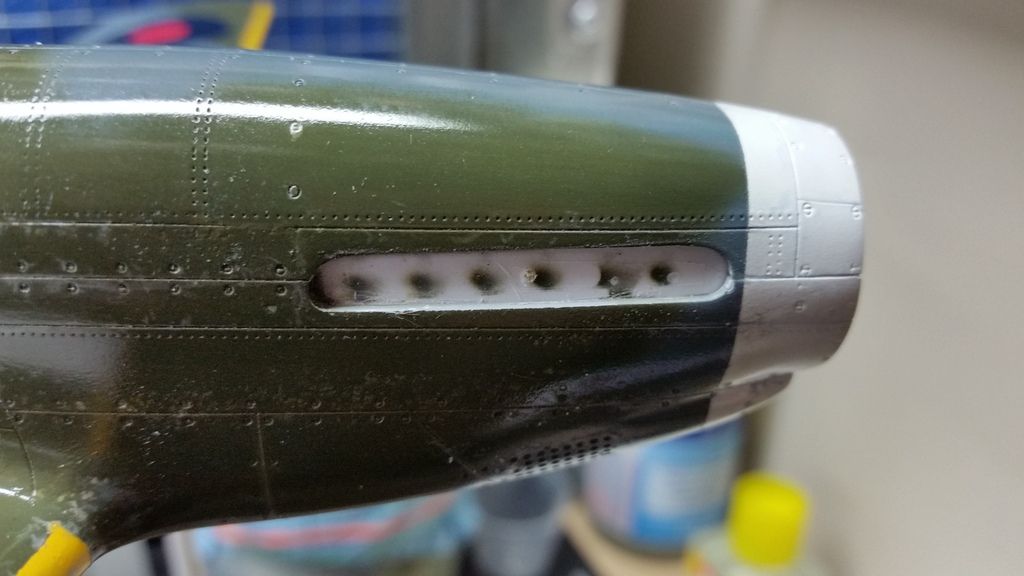
as you can see i airbrushed out most of the chipping

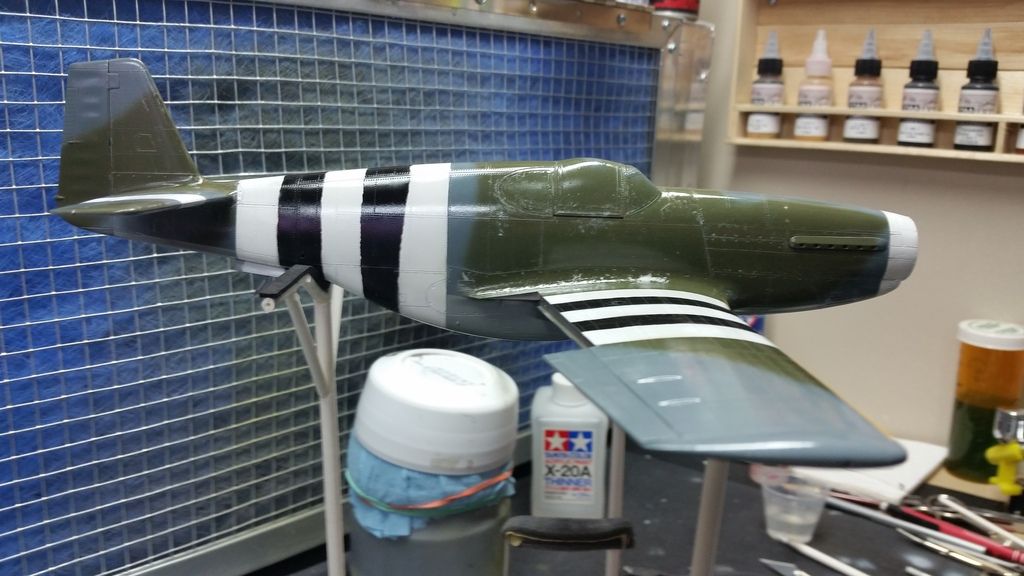
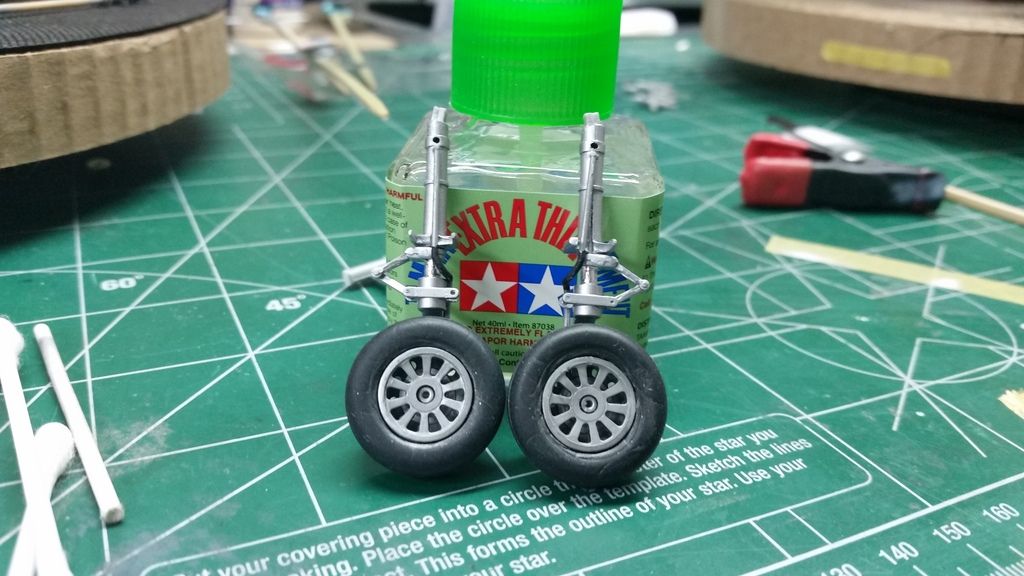
had a tuff time getting the rims pressed in those god offull tires . also one should trim ones finger nails as i left marks on them LOLEmbarrassed

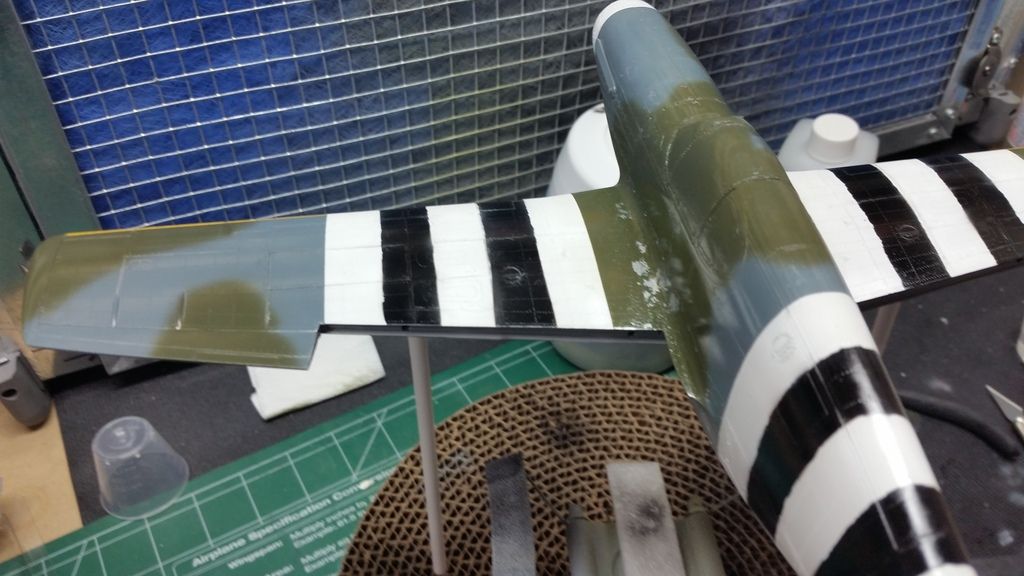
the wings came out great

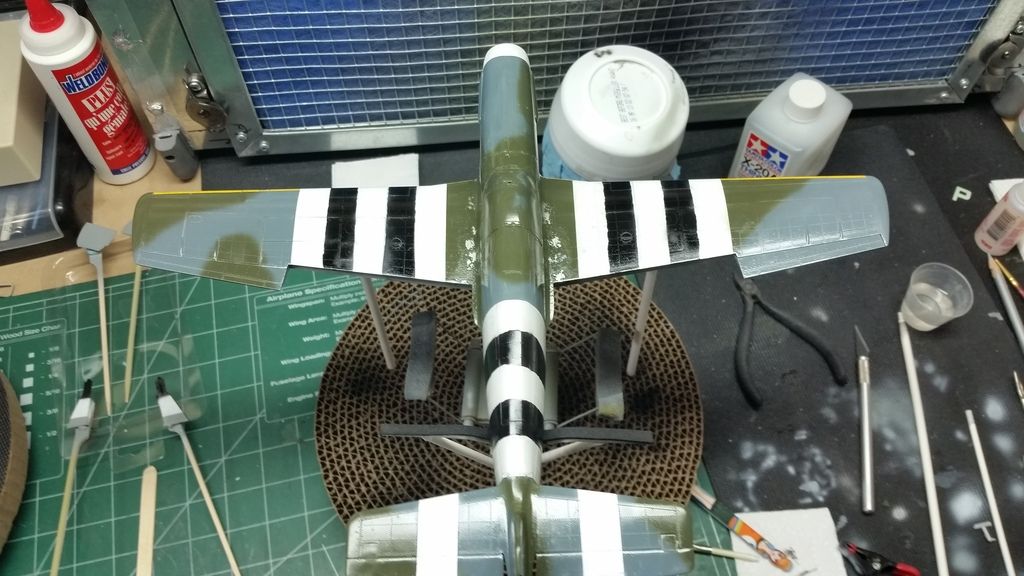
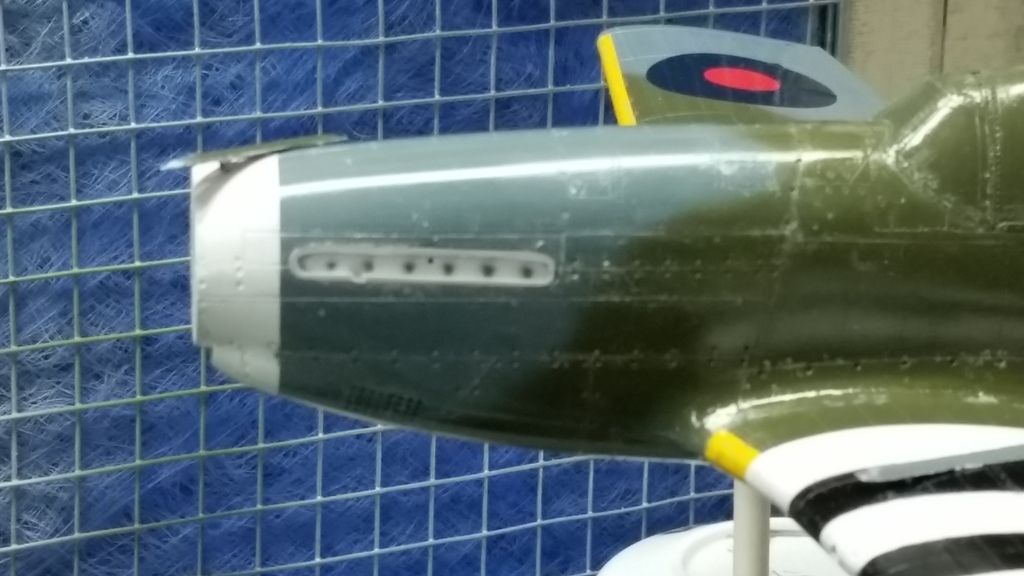
so after being satisfide with it , I then moved of to decaleing ,,,right in the middle of decaling ,,,,,those darn exhaust fairings stuck out and buged me to no point ,,soooo some surgery was in order . OFF WITH THERE FAIRINGS No

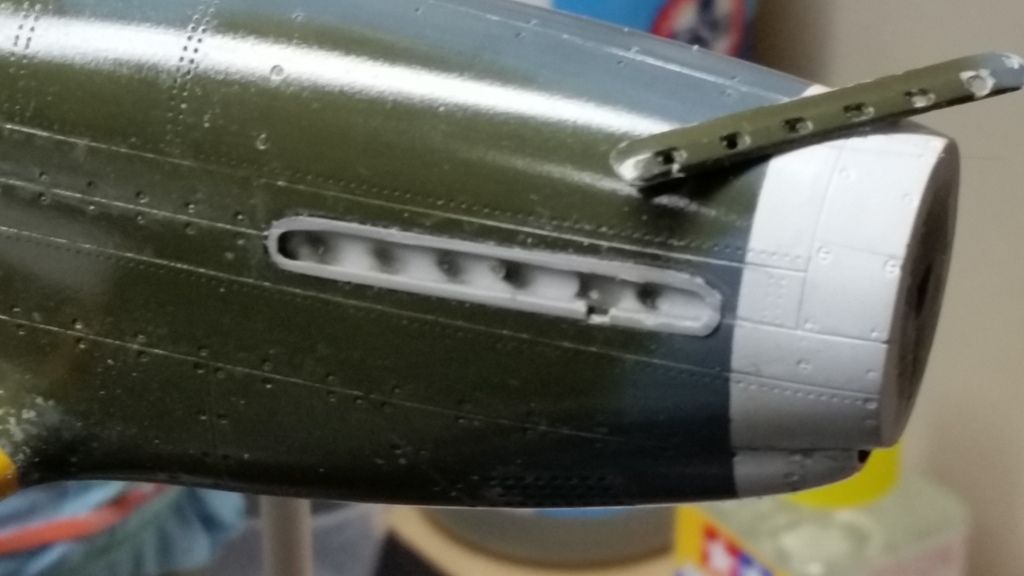
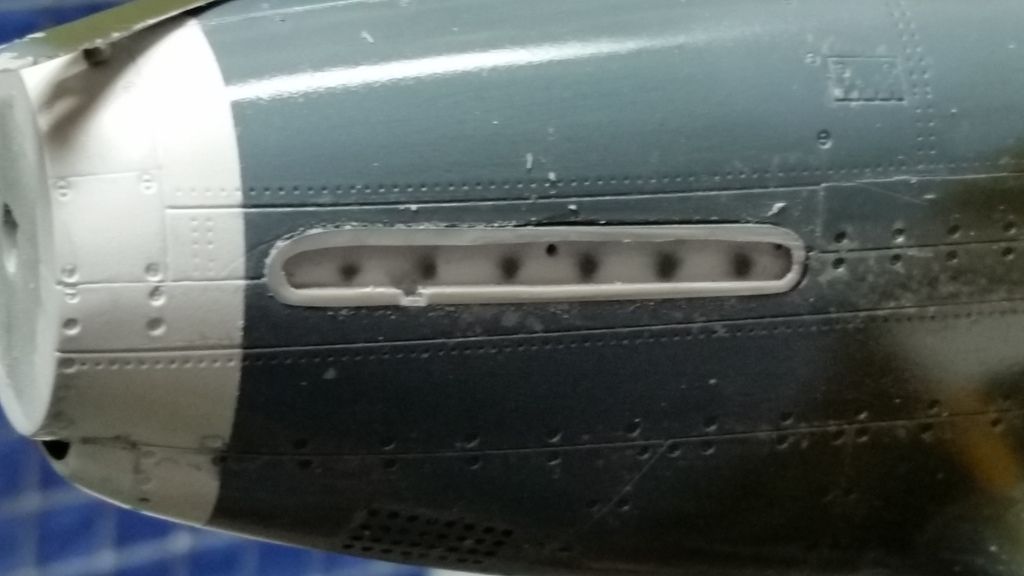
I used tamyia taped around the fairings to protect the coweling and my paint work . then broke out my CZECH MASTER,S razor saw and started cut ever so carefully

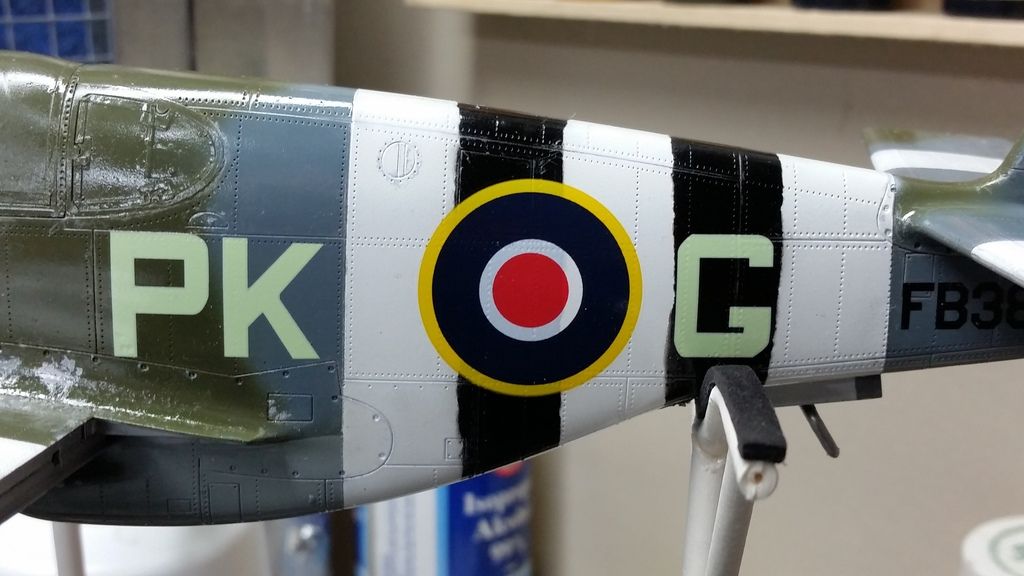
here you can see the invasion stripes showing though the decal a little bit ,but i think i can blend it togther with the dot filtering i plan 

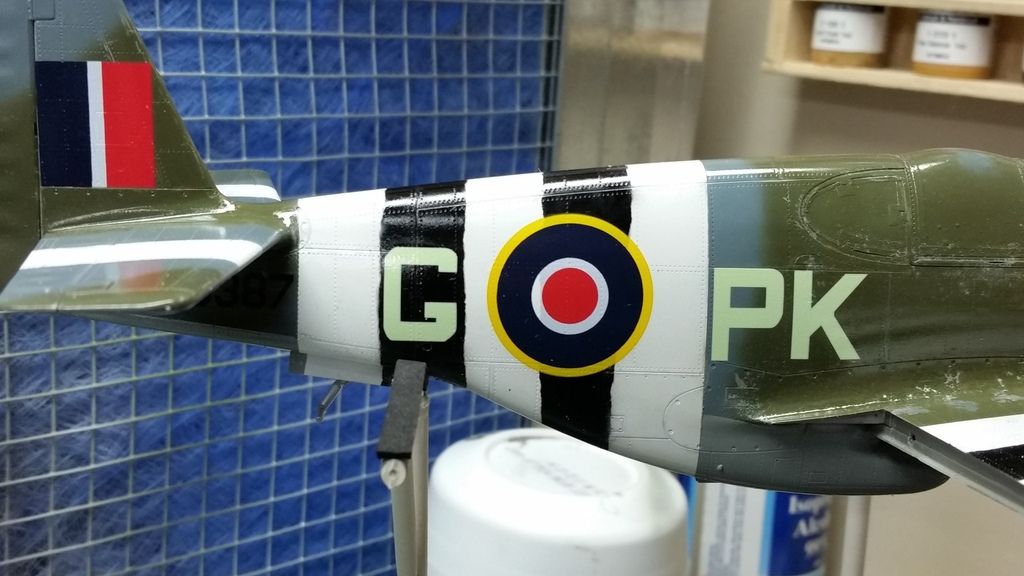
after 20 hours of carefull sergery ,,,,,NAA Wink i carefully removed what was left of the kits fairing i moved on to the right hand side 

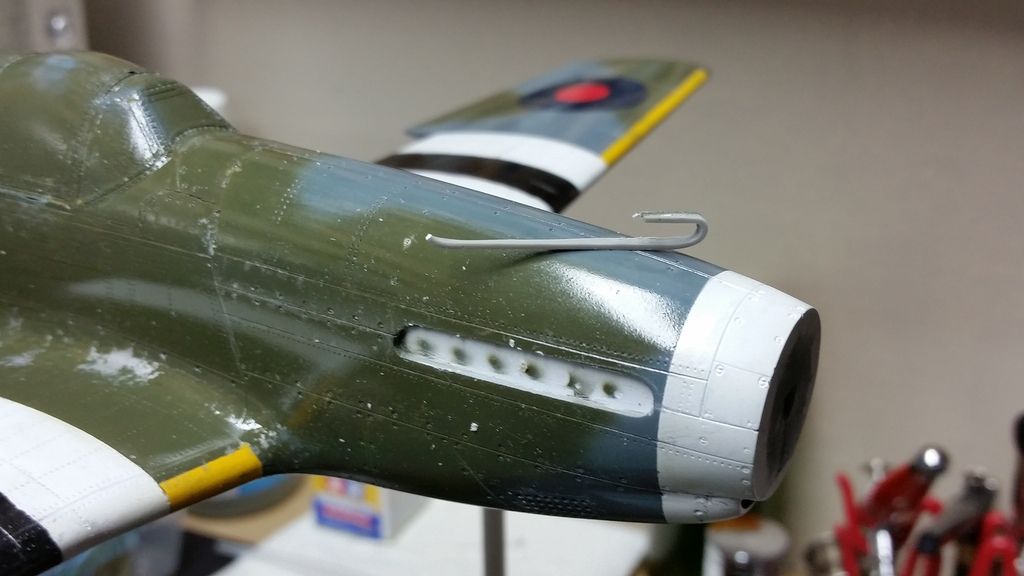
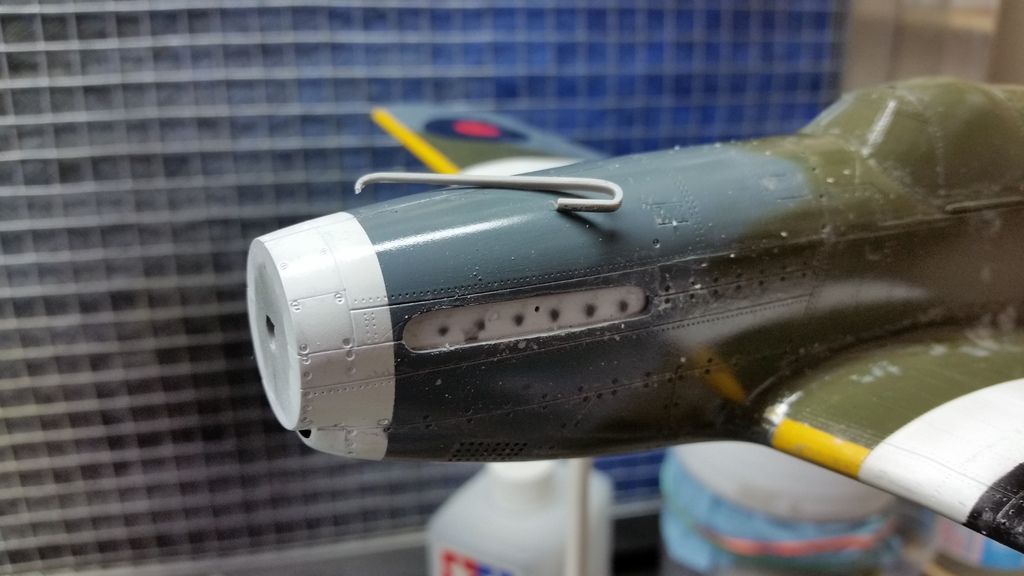
I HAPPY TO SAY THE PATIENT IS EXPECTED TO MAKE A FULL RECOVERY Balloons

5-HIGH 

  • Member since
    June 2013
Posted by bvallot on Wednesday, February 24, 2016 12:17 AM

TJ, looks like you're almost done. =D

Larry, very nice! Your colors are very close to the photographs.  Very nicely accomplished. =]

5, I'm glad to see you pulled it off.  It sounded to me that you were getting into deeper waters with the dot filter.  Airbrushing the colors back in is a much easier method and with less to think about.  You did an excellent job.  Just the right amount I think. =]  I ususally wait to put something like the exhaust fairings or any other fiddly bit until the end.  MUCH less fuss. I almost never go by the instructions anymore which will some times get me in trouble with some specific aspect of a build. Glad to see you back on top. 

On the bench:  

Tamiya F4U-1  Kenneth Walsh


  • Member since
    June 2013
Posted by bvallot on Wednesday, February 24, 2016 12:46 AM

Quick post for the night.  

I managed to get a few things done today in some spare time.  I began to scratch out the Prestone radiator the P-51A had. I started off by soldering some brass rod together to make the outer rims of the radiator.  This helps give some form to the plastic strip that needs to be teased into place.  I should say...I first started by measuring the width of the fuselage where the radiator is located and subtracted 2mm accounting for the width of the  plastic.  This way I know my new part will fit without too much trouble.  Then, I got moving with the mesh screen at the front of the radiator.  Here, I cut out a circle based on the dimensions from my brass rod circle, filed and sanded it smooth, and then cut lightly into it to make the impression of the mesh surface.  Handy little trick when you don't have any AM parts available.  Later on this with get a coat of the Detailer and all these tiny cuts will pop real pretty. =] For the posterior side, I began to make up some of the structure and width of the radiator.  Everything plastic was bonded together with Tamiya Extra Thin Cement...the brass to plastic is done with a very strong white glue.  Right now I'm filling the center with tiny strips of plastic rod to make up the tubing present here.  I still have the rest of the way to go.  It seems kind of tedious, but I'm not finding it too bad actually.  Here's my progress:

 Untitled by Britt Vallot, on Flickr

Some of this needs a bit of refinement and tweaking, but this is the gest of it. =]

Here are some cockpit details.

 Untitled by Britt Vallot, on Flickr

I'm piecing this together a little bit at a time to make sure it all fits properly.  Some of the wiring isn't quite yet attached to it's end points as I needed to wait for my glue to dry, but this is mostly how this will work. 

 Untitled by Britt Vallot, on Flickr

That's it for now.  As soon as I get the radiator knocked out, I'll look into the tail gear and get that out they way so I can get these fuselage halves put together. =]

On the bench:  

Tamiya F4U-1  Kenneth Walsh


JOIN OUR COMMUNITY!

Our community is FREE to join. To participate you must either login or register for an account.

SEARCH FORUMS
FREE NEWSLETTER
By signing up you may also receive reader surveys and occasional special offers. We do not sell, rent or trade our email lists. View our Privacy Policy.