SEARCH FINESCALE.COM

Enter keywords or a search phrase below:

Mustang Build

80078 views
1582 replies
1 rating 2 rating 3 rating 4 rating 5 rating
  • Member since
    June 2013
Posted by bvallot on Tuesday, March 1, 2016 11:19 PM

modelcrazy

Larry, Brit was hinting that you may want to jump in on Tueuns' NMF GB. Not a bad idea.

Steve


Exactly.  Me and Theuns are hosting the NMF GB going on right now.  If you've never built a NMF plane before then this is the perfect time to jump into a GB like this.  Plenty of subjects, plenty of advice/experience (both success and failures), and plenty of time to build. =]  If you want to get your feet wet, this is the way to do it. =]

On the bench:  

Tamiya F4U-1  Kenneth Walsh


  • Member since
    July 2013
Posted by lzdaily@comcast.net on Wednesday, March 2, 2016 5:13 AM
5-high, thanks for the vote of confidence. Steve, thanks for the clarification. I'll check out the NMF Group Build. I'm going to be away from my workbench and offline for several days; I'm going to be traveling for work. Best to all, Larry
  • Member since
    April 2014
  • From: Australia
Posted by lostagain on Wednesday, March 2, 2016 7:02 AM

Britt,

Your attention to detail is fantastic, enjoying following your build.

Matt, the build is looking super, I can see why you don't want the PE covered up. Looking forward to the finished product.

Talking of complete builds, Ding Hao looks a peach Larry. You have got a smooth finish on it and the setting is great.

Recovery continues on the dropped B. Here it is looking ugly with all the Mr Surfacer on:

And today with it all smoothed back including the missing tail feather:

Looking better with everything down to 1200 grit. The glazing fell out during the clean up, will be stuck back on once the coaming is painted black again.


  • Member since
    June 2010
Posted by 5-high on Wednesday, March 2, 2016 10:08 AM

Lostagain 

Looks much better now. .you did a great job on her ..now remember that there will be scratch marks all over so look closely for them ..and take care of it before you paint the silver on it cuzz the silver will show every flaw ..must say you did a  great save there ..Yes

5-high 

  • Member since
    July 2013
Posted by lzdaily@comcast.net on Wednesday, March 2, 2016 6:17 PM

lostagain,

I agree with 5-high. You did a great job recovering from a disaster. Can't wait to see it finished.

Larry

  • Member since
    June 2013
Posted by bvallot on Wednesday, March 2, 2016 11:29 PM

Hang with it Lostagain.  =]

I don't have too much to show. Progress is slow with work being so busy and having a pregnant wife to tend to. I felt I'd post what I did to the tail gear here as this isn't absolutely necessary but certainly easy and worth the effort.  

One, I wanted to have the wheel turned to the side showing the way these planes pivoted around a parking spot.  I cut the wheel off at the base of the shaft leading to the gear strut.  I drilled a hole so this new joint has something to bite into and give it some strength. I cleaned up the wheel and fashioned a small brass rod to take the place of the kit part. Bent and filed it down into place based on photos...and then glued into the kit strut with CA. Viola! =]  After test fitting this part, it looked awfully wobbly to me.  Since I don't like flimsy parts, I decided to beef it up a bit.  After learning my lesson with my P-40B I found that none of this area will be visible whatsoever.  Time is a bit of a factor at the moment in completeing this build so I opted not to make an accurate replica of this region that will go underappreciated.  I kept it simple...a couple of plastic rods that I could bond to the kit parts with Tamiya ETCement and reinforce how the actual part will respond to stress.

 Untitled by Britt Vallot, on Flickr

Here's the rest of the cockpit put together.  Just about completed and ready to be closed up.

 Untitled by Britt Vallot, on Flickr

 Untitled by Britt Vallot, on Flickr

This last one shows the changes I made to the tail gear.  Nothing major, but it stands up to more abuse now. =]


On the bench:  

Tamiya F4U-1  Kenneth Walsh


  • Member since
    July 2014
Posted by modelcrazy on Thursday, March 3, 2016 7:20 AM
Very nice work Brit. As far as the tailwheel, I have to weigh how much will be seen and the audience that will see it and know what they are looking at to gauge how much detail to add. I can go way overboard and be the only one that notices. Beefing it up is a wise idea, they do seem to a tad weak.

Steve

Building a kit from your stash is like cutting a head off a Hydra, two more take it's place.


http://www.spamodeler.com/forum/

  • Member since
    June 2013
Posted by bvallot on Thursday, March 3, 2016 11:30 AM

I totally agree. Ordinarily, I build it as it should be if for nothing more than the practice and my own satisfaction.  But I can't have this mustang take 6 months to build.  Since none of this area will be visible with one of those flashlights, I'm not gonna sweat it this time.  I'll still include the trimmings with the doors and such.  That'll come later. =]

On the bench:  

Tamiya F4U-1  Kenneth Walsh


  • Member since
    June 2010
Posted by 5-high on Thursday, March 3, 2016 12:05 PM

Looking good bvallot. It's comeing along nicely. I haven't been able to get any bench time lately. .too much going on ..on that tail wheel. I've seen them pivoted two in some pictures. Great idea. The interior detail  is fantastic too .keep them comeing buddy Propeller

5-high 

  • Member since
    June 2013
Posted by bvallot on Thursday, March 3, 2016 11:41 PM

Thanks 5. This part is gonna be slow.  Once I get this canopy figured out, it'll all pick up quick. =]

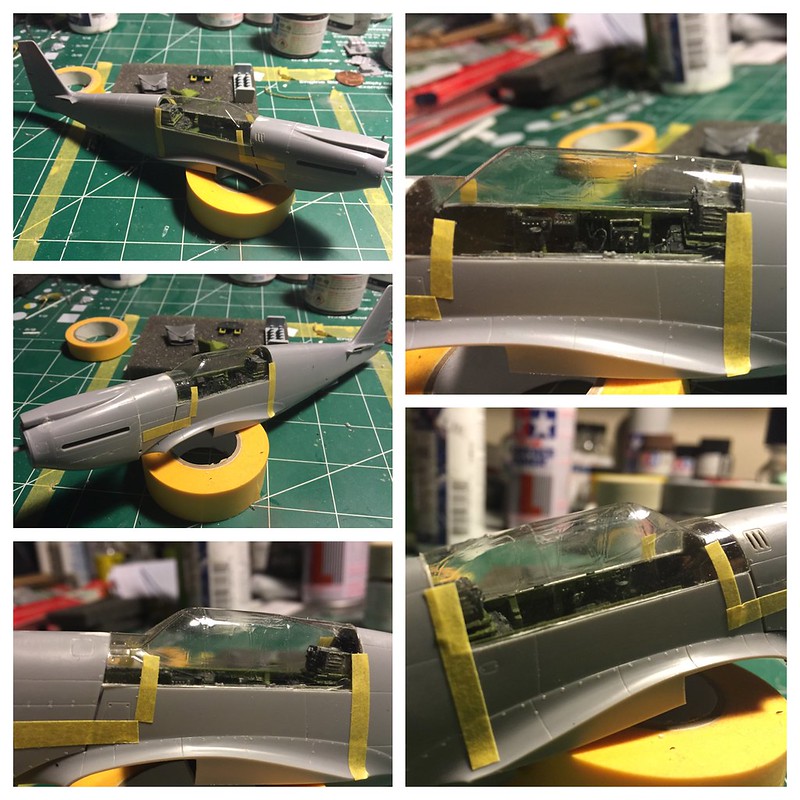
Made a bit more progress tonight.  Got everything fitted and closed up.  Seams are all sanded and polished smooth.  Now I'm just working on getting this Squadron canopy in place.  I think it's going to be a real treat if I can get her to settle in like she's supposed to.  I wanted to post this part for anyone out there who ventures into this AM piece.

 Untitled by Britt Vallot, on Flickr

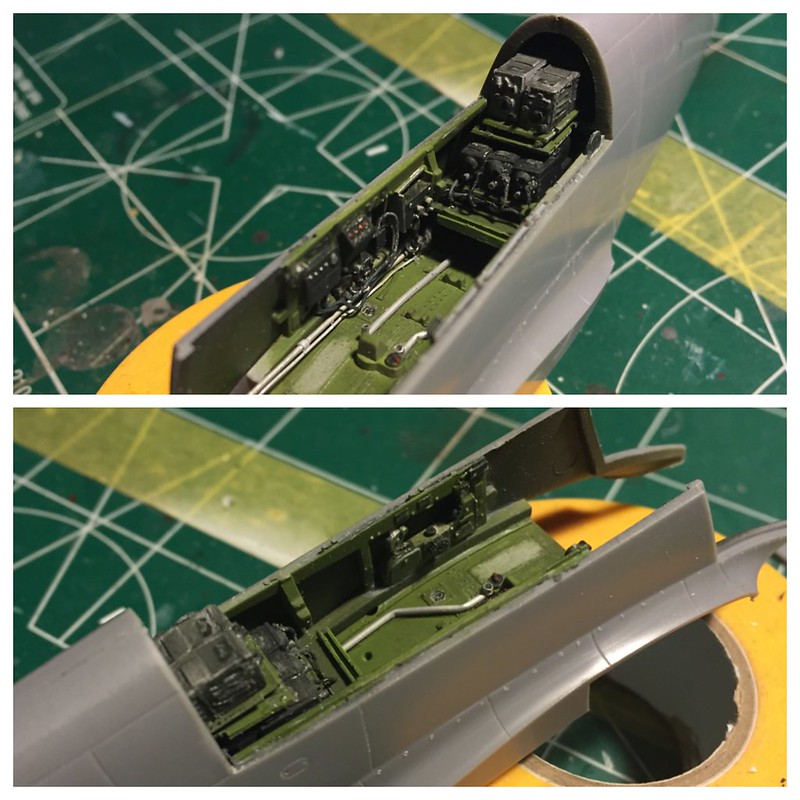
This is mostly already measured and cut to fit.  I suppose I should've gone ahead and completely fixed this part up so that I'm not making complicated masking tasks all around my cockpit after the fact to touch up the painting I'll have to tend to, but c'est la vie.  So with a little patient tweaking (my razor blade carefully sawing into what needed to be removed) I removed just enough kit plastic to allow the new canopy to settle into place.  Here's where I started.

 Untitled by Britt Vallot, on Flickr

I did purposefully leave a little to take off later, that way I'm not having to shim something after the fact and not be able to reach it from the other side.  In hindsight, it'll likely cause me some repainting. No matter.  It happens.  I'd rather it this way where I don't feel rushed, but it's something for the builder to consider.  Once I trimmed the back end around the radio compartments down just right, I test fitted the canopy once more and found this....

 Untitled by Britt Vallot, on Flickr

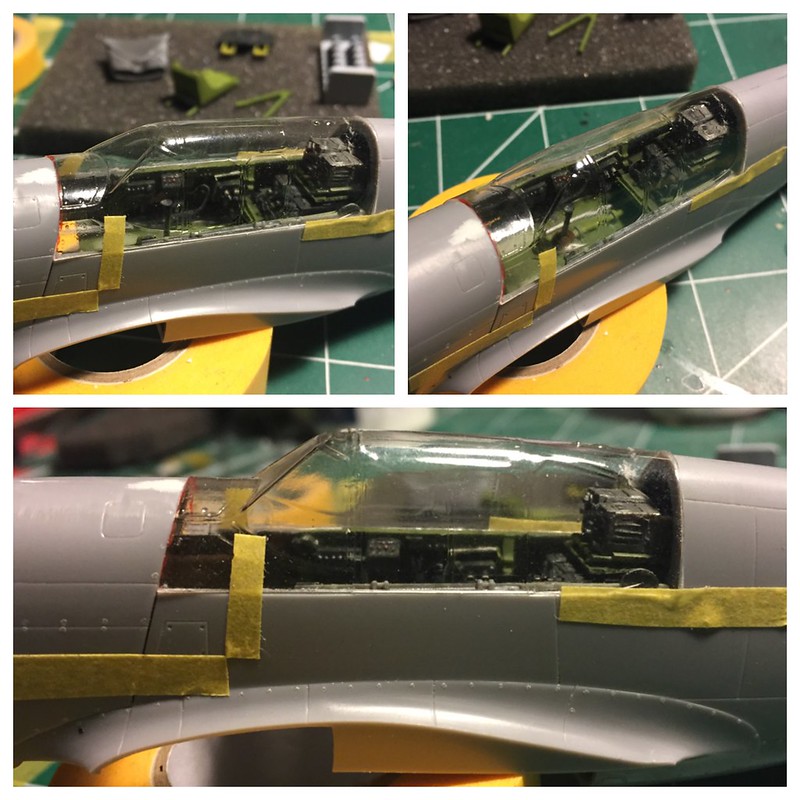
I've highlighted the most forward part in a red dry erase maker to see what I'll be trimming off. I may actually try to sand this part down to keep it even since it's such a small length.  These are all very tiny steps off the actual kit's lines, but to leave them unfixed would completely throw off what's going on here.  I haven't ever tackled a canopy like this before, but I feel pretty good so far.  Cross your fingers! =]

On the bench:  

Tamiya F4U-1  Kenneth Walsh


  • Member since
    June 2010
Posted by 5-high on Friday, March 4, 2016 6:52 AM

Bvallot.  Looks more like a greenhouse. .then an canopy  lol. But ...I see what you mean ..taken it slow is the best way to go .I know you'll pull it  off .Wink right now I'm fightin to get bench time here . I'm seriously thinking of scratch building the exhaust stacks on myn ..the kit parts look under scale  just don't look right ..a nother trump weak spot . Just have to think this out how to go about it . All those tiny decals  ( placard. ). Are going to be a pain in Tha @$÷! Big Smilelol . I'm thinking about doing halve of them cuss of the camouflage. It's a different story on a all metal Finnish bird were your able to see them more clearly ..I may also do the same as you have done on the tail wheel . 

5

  • Member since
    July 2014
Posted by modelcrazy on Friday, March 4, 2016 9:39 AM

That is really looking great Brit. You put a lot of work into it, and I' m sure you will get thre cannopy in just right. I can tell you really take pride in doing things right.

Steve

Steve

Building a kit from your stash is like cutting a head off a Hydra, two more take it's place.


http://www.spamodeler.com/forum/

  • Member since
    August 2014
  • From: Willamette Valley, Oregon
Posted by goldhammer on Saturday, March 5, 2016 11:27 AM

Couple of pics on the slow progress of "Miss America".  Pit before and after fuselage close, and the wing clip and metal replacement tips from the kit.

  • Member since
    June 2013
Posted by bvallot on Saturday, March 5, 2016 1:09 PM

Goldhammer, is the interior of this particular mustang grey?

On the bench:  

Tamiya F4U-1  Kenneth Walsh


  • Member since
    August 2014
  • From: Willamette Valley, Oregon
Posted by goldhammer on Saturday, March 5, 2016 3:03 PM

bvallot

Goldhammer, is the interior of this particular mustang grey?


According to MC, yes.  He has a friend on the crew, and said the interior is/was a light grey.  So that's what I went with, and OOB with some of my own colors for highlights.  We were hoping for some pit pics, but he never was able to send them.


Trying to decide between Guards Red or Insignia Red and then French Blue or Blue Angel Blue for her.  Or maybe something else if someone has better ideas.

  • Member since
    July 2014
Posted by modelcrazy on Saturday, March 5, 2016 11:25 PM
Deleted

Steve

Building a kit from your stash is like cutting a head off a Hydra, two more take it's place.


http://www.spamodeler.com/forum/

  • Member since
    June 2013
Posted by bvallot on Sunday, March 6, 2016 10:16 AM

I gotcha.  I peaked at the first page with the box art and figured it might've been something like that.  Pretty nifty.  Looks like you're about ready to close her up. =]

On the bench:  

Tamiya F4U-1  Kenneth Walsh


  • Member since
    August 2014
  • From: Willamette Valley, Oregon
Posted by goldhammer on Sunday, March 6, 2016 10:22 AM

As soon as I get all the holes in the wing filled and the tips faired in, will attach wingy thingy to fuselage and do the final fill and be ready to prime.  Don't get much time to work on it right now, just a couple of minutes in the evening and a little on the w/e's.  Life has a way of getting in the way of living.


Hopefully get her done by the deadline and be ready for the submarine GB.

  • Member since
    February 2010
  • From: New Jersey
Posted by 68GT on Sunday, March 6, 2016 12:27 PM
Thats some very nice work there Britt

On Ed's bench, ???


  • Member since
    February 2010
  • From: New Jersey
Posted by 68GT on Sunday, March 6, 2016 12:30 PM
I really need to get back to work on my 95 Mustang I was building. I just got very discouraged with trying to make and install spark plug wires that I stopped totally on it.

On Ed's bench, ???


  • Member since
    July 2014
Posted by modelcrazy on Sunday, March 6, 2016 2:15 PM

68,

Those little details really slow me down. It's easy to get discouraged when you see very little progerss.

Steve

Building a kit from your stash is like cutting a head off a Hydra, two more take it's place.


http://www.spamodeler.com/forum/

  • Member since
    August 2014
  • From: Willamette Valley, Oregon
Posted by goldhammer on Saturday, March 12, 2016 2:27 PM

Got the wing and stabs on her this morning.  Starting to look like an aircraft instead of a pile of styrene.....

Still filling holes and seams as you can see, especially the wing clip and replacement metal ends.

  • Member since
    June 2010
Posted by 5-high on Saturday, March 12, 2016 8:57 PM

It's coming along nicely goldhammer .Yes

  • Member since
    January 2003
  • From: Chantilly, Virginia
Posted by CNicoll on Sunday, March 13, 2016 7:15 PM

Sorry that its been a while since my last update - lots of business travel and a bit of vacation too!

Having fun working on weathering for both the paint and decals and finding pictures about what these aircraft looked like at the time.  Guessing on wheel wells but also the topside wear.

Here is the fuselage so far.  using one of the full canopies as a mask. I'll use the Malcom Hood option.

Underside shows the preshading and the work on the wheel wells.

And a close look at the wheel wells themselves.  Painted with Model Master Acryl, and used a Prismacolor pencil for silver highlights and using a rust-colored wash from Flory.  Will use a dark wash for further accents.

Here are the wheel doors.


Did some work on the wheels, painting some flat black to give it some depth.  I found a video on YouTube from the war of an aircraft similar to this - lots of dirt it seems.

With any luck will get the landing gear on this week, and more of the stencils and markings.

On the bench:  Academy 1/72 B-17G 'Blue Hen Chick';  1/48 Tamiya Mustang III; Kitty Hawk 1/32 P-39. 

Completed:  1/48 Tamiya P-51D Mustang - 'Show Bird', 1/32 Dragon P-51D  Flying Tigers 'What if'; 1/32 Tamiya P-51D Big Beautiful Doll

Group build:1/48 Tamiya Mustang III; 1/48 Tamiya P-51D Show Bird

  • Member since
    July 2014
Posted by modelcrazy on Sunday, March 13, 2016 10:50 PM

CN,

That's looking great! Wow did you mask off the camo? Very claen lines.

Steve

Building a kit from your stash is like cutting a head off a Hydra, two more take it's place.


http://www.spamodeler.com/forum/

  • Member since
    January 2003
  • From: Chantilly, Virginia
Posted by CNicoll on Monday, March 14, 2016 8:40 AM

modelcrazy

CN,

That's looking great! Wow did you mask off the camo? Very claen lines.


Thanks!  Actually, this is my first time using BlueTac as a mask.  I rolled it fairly thin, then filled in behind it with Post-it Notes.  I don't know why I didn't use this years ago!

On the bench:  Academy 1/72 B-17G 'Blue Hen Chick';  1/48 Tamiya Mustang III; Kitty Hawk 1/32 P-39. 

Completed:  1/48 Tamiya P-51D Mustang - 'Show Bird', 1/32 Dragon P-51D  Flying Tigers 'What if'; 1/32 Tamiya P-51D Big Beautiful Doll

Group build:1/48 Tamiya Mustang III; 1/48 Tamiya P-51D Show Bird

  • Member since
    January 2003
  • From: Chantilly, Virginia
Posted by CNicoll on Monday, March 14, 2016 8:45 AM

goldhammer


bvallot

Goldhammer, is the interior of this particular mustang grey?


According to MC, yes.  He has a friend on the crew, and said the interior is/was a light grey.  So that's what I went with, and OOB with some of my own colors for highlights.  We were hoping for some pit pics, but he never was able to send them.


Trying to decide between Guards Red or Insignia Red and then French Blue or Blue Angel Blue for her.  Or maybe something else if someone has better ideas.


Can't wait to see what you have in mind for this!  I tried to do a Thunderbirds P-51D but had so much trouble with the decals I gave up and went another direction.  Didn't have time to try and mask everything.  Good luck!

On the bench:  Academy 1/72 B-17G 'Blue Hen Chick';  1/48 Tamiya Mustang III; Kitty Hawk 1/32 P-39. 

Completed:  1/48 Tamiya P-51D Mustang - 'Show Bird', 1/32 Dragon P-51D  Flying Tigers 'What if'; 1/32 Tamiya P-51D Big Beautiful Doll

Group build:1/48 Tamiya Mustang III; 1/48 Tamiya P-51D Show Bird

  • Member since
    June 2010
Posted by 5-high on Monday, March 14, 2016 9:18 AM

Hello from golden b.c 

My mountain biking adventure continues...in the snow and rain ...MUD..

CN you did a great job on the camouflage. Just love it ..Yes.

Goldhammer can't wait to see how yours comes out ..as soon as I get back from my wirl wind tour of mountain biking. .I'm here in golden bc for 4 days then to rocky Mountain house for more punshment. .lol . .after that it's 8,000ft of pure downhill freeriding. In prince Rupert home to R.R in the hobby room .

Happy modeling guys 

P.S I'll be watching hopefully not in a hospital bed ha ha lol Stick out tongue

5-high 

  • Member since
    August 2014
  • From: Willamette Valley, Oregon
Posted by goldhammer on Monday, March 14, 2016 9:21 AM

Thanks, now i have a third blue to choose from as I found a couple of bottles of Insignia Blue in the box.  Still aways from that delimia though.  Going to be gone for the rest of the week.

  • Member since
    January 2003
  • From: Chantilly, Virginia
Posted by CNicoll on Monday, March 14, 2016 8:19 PM

5-high

Hello from golden b.c 

My mountain biking adventure continues...in the snow and rain ...MUD..

CN you did a great job on the camouflage. Just love it ..Yes.

Goldhammer can't wait to see how yours comes out ..as soon as I get back from my wirl wind tour of mountain biking. .I'm here in golden bc for 4 days then to rocky Mountain house for more punshment. .lol . .after that it's 8,000ft of pure downhill freeriding. In prince Rupert home to R.R in the hobby room .

Happy modeling guys 

P.S I'll be watching hopefully not in a hospital bed ha ha lol Stick out tongue

5-high 


Thanks and hang in there!!

On the bench:  Academy 1/72 B-17G 'Blue Hen Chick';  1/48 Tamiya Mustang III; Kitty Hawk 1/32 P-39. 

Completed:  1/48 Tamiya P-51D Mustang - 'Show Bird', 1/32 Dragon P-51D  Flying Tigers 'What if'; 1/32 Tamiya P-51D Big Beautiful Doll

Group build:1/48 Tamiya Mustang III; 1/48 Tamiya P-51D Show Bird

JOIN OUR COMMUNITY!

Our community is FREE to join. To participate you must either login or register for an account.

SEARCH FORUMS
FREE NEWSLETTER
By signing up you may also receive reader surveys and occasional special offers. We do not sell, rent or trade our email lists. View our Privacy Policy.