SEARCH FINESCALE.COM

Enter keywords or a search phrase below:

Mustang Build

80078 views
1582 replies
1 rating 2 rating 3 rating 4 rating 5 rating
  • Member since
    April 2014
  • From: Australia
Posted by lostagain on Tuesday, May 17, 2016 7:23 AM

Theuns, that tamiya detail is great. nice touch with the wheel well.

Britt, nice technique with the camera hole, very intricate.

Thunderbird continues on with gloss coats.

First was Tamiya and was very satin/gloss/satin streaky looking. Second coat was Gunze which was glossy, but high lighted the orange peel I had put in with the Tamiya.

So cut that back with 2400/4000/6000 grit befroe the third coat, a dilute Gunze. Came up much better apart from a couple of runs on the lower wings. I am giving it two weeks to dry (work) before cutting it back and giving it a final coat.

And someone asked about the decals - they are from Draw Decal, who do decals for race planes, firebombers, airliners (jet and prop),  helos and some miltary too.

  • Member since
    July 2014
Posted by modelcrazy on Tuesday, May 17, 2016 7:52 AM

Piers,

The T-bird is looking great. A lot of work goes into that auto like finish. I have Decal Draw for the 747 in the Boeing Build. How do they lay down?

Steve

Building a kit from your stash is like cutting a head off a Hydra, two more take it's place.


http://www.spamodeler.com/forum/

  • Member since
    April 2014
  • From: Australia
Posted by lostagain on Tuesday, May 17, 2016 9:33 PM

MC I have found the Draw Decal to be good. They are strong and react well to setting solution. There are limitations to the print quality of very small details with the digital print. I folded one decal over and creased it up and it was strong enough to withstand me pressing it back into shape.

For this build there is not a lot of surface details for the decals to go over but they did curve well around the tail.

  • Member since
    October 2009
  • From: Worcester, England.
Posted by aeroplanegripper on Wednesday, May 18, 2016 10:42 AM

Good day,

Is it too late for me to join this great GB?

I have the Academy 1/72 P-51D Mustang thats become available for a build, and I wondered if I could add it? I have an idea to do it as a Phot Recon escort fighter used by the 14th PRS in England in 1945.

If its too late, no problem. 


Best Regards

Mark

"bis vivit qui bene vivit"


  • Member since
    July 2014
Posted by modelcrazy on Wednesday, May 18, 2016 8:21 PM

Mark, welcome aboard.

We have 2 months left so there should be plenty of time. What make is your 51?

Steve

Building a kit from your stash is like cutting a head off a Hydra, two more take it's place.


http://www.spamodeler.com/forum/

  • Member since
    June 2013
Posted by bvallot on Wednesday, May 18, 2016 11:32 PM

That's building up fast Theuns. Lostagain, fantastic job on that gloss coat. Your hard work seems to be paying off. I have to add one that pretty to my line-up one day.

Welcome aboard Mark. =]

I managed a bit more with this camera bay. Now that I've got the bones up, I can move on to stringing up the cables for the elevators and rudder and other misc fiddly bits. Last will come the K-24 camera and "glass" for the camera ports.

 Untitled by Britt Vallot, on Flickr

 Untitled by Britt Vallot, on Flickr

I figured since I drilled a huge hole into the side of my Mustang, I might as well fill this space with everything that would've been seen. =D Glad I did.

On the bench:  

Tamiya F4U-1  Kenneth Walsh


  • Member since
    July 2014
Posted by modelcrazy on Wednesday, May 18, 2016 11:41 PM

Great looking work Britt. Wow, cables as well, man you are going all out. That's fantastic!

Steve

Building a kit from your stash is like cutting a head off a Hydra, two more take it's place.


http://www.spamodeler.com/forum/

  • Member since
    October 2009
  • From: Worcester, England.
Posted by aeroplanegripper on Thursday, May 19, 2016 10:51 AM

Hi,

Thanks for letting me join and for the welcome.

I will be building the old but reliable Academy P-51D.

Hope to have it started as soon as I have finished my current build a Spitfire XIVc.

Best Regards

Mark

"bis vivit qui bene vivit"


  • Member since
    July 2014
Posted by modelcrazy on Thursday, May 19, 2016 11:55 AM

Thanks Mark, I got you on the roster my friend.

Steve

Building a kit from your stash is like cutting a head off a Hydra, two more take it's place.


http://www.spamodeler.com/forum/

  • Member since
    June 2013
Posted by bvallot on Monday, May 23, 2016 11:50 PM

Back with some more folks. Still don't have my new work bench up yet but I have been working from the dinner table (excuse these lousy pictures). Still working on getting to a point where I can close up the fuselage...getting closer. I knocked out the tail gear which I decided to fix up a bit. I think I'll continue to do it this way when the tail gear is set up and molded as such. Much more gratifying and definitely an improvement over the original kit part.

It starts out with cutting off the wheel and trimming away the wheel spindle. Next, I drill a tiny hole into the housing for the tail wheel spindle to receive a small brass rod that I've sized to fit. Once that's measured and ready, I file down the inside portion of the new spindle, make my appropriate bends and then snip it when I'm ready. A drop of CA sets it into place and Voila! =] Easy. I dressed up the rest of the tail gear assembly with some pulleys and will later fit up some EZ line. I also put on the tail wheel steering part.

 Untitled by Britt Vallot, on Flickr

 Untitled by Britt Vallot, on Flickr

And here it is painted...apologies about the pics. My white balance is way off with these mats.

 Untitled by Britt Vallot, on Flickr

Next, I turned my attention to the K-24 camera that was used in reconnainsance for the F-6 Mustangs. A few various bits of plastic strip, rods, clear sprue for the lens, and some lead foil was used to get this banged out. Here's the gest of it. It is just a little bit off scale...probably about 1.5 times bigger than it ought to be, but it'll have to do this time. I currently have it primed and drying over night so it'll be ready to paint tomorrow.

 Untitled by Britt Vallot, on Flickr

 Untitled by Britt Vallot, on Flickr

And here's a quick view of it sitting in the camera bay and how it will generally look.

 Untitled by Britt Vallot, on Flickr

That's that for now...getting closer. =]

On the bench:  

Tamiya F4U-1  Kenneth Walsh


  • Member since
    July 2014
Posted by modelcrazy on Monday, May 23, 2016 11:59 PM

That is some awesome looking work and detail Britt Yes

Steve

Building a kit from your stash is like cutting a head off a Hydra, two more take it's place.


http://www.spamodeler.com/forum/

  • Member since
    October 2009
  • From: Worcester, England.
Posted by aeroplanegripper on Tuesday, May 24, 2016 10:20 AM

Best Regards

Mark

"bis vivit qui bene vivit"


  • Member since
    October 2009
  • From: Worcester, England.
Posted by aeroplanegripper on Tuesday, May 24, 2016 11:14 AM

Fantastic work, Britt Ill be following this build with interest. Well done.

Best Regards

Mark

"bis vivit qui bene vivit"


  • Member since
    July 2014
Posted by modelcrazy on Tuesday, May 24, 2016 12:40 PM

aeroplanegripper

Hello everyone,

Thanks again for letting me join.

I thought I would get started on the GB, and have chosen a real hangar queen that has been sat in my stash for an absolute age. It is the ever faithful Academy P-51D Mustang originating I believe from back in 1993.


Though when I inspected the box, I find that I have no Main undercarriage doors or exhausts, so my spares box will be raided for them! It will be built mainly OOB, plus the aftermarket Yahu IP, a partially used Eduard canopy mask, and a set of unknown resin wheels. 


Ill keep everyone posted on progress as I get along. The intention is to build this as a P-51D operated as a Photo Recon escort fighter by the 14th Photographic Reconnaisance Squadron that came to grief at Chalgrove in 1945.


I'll be looking forward to this.

Steve

Building a kit from your stash is like cutting a head off a Hydra, two more take it's place.


http://www.spamodeler.com/forum/

  • Member since
    October 2009
  • From: Worcester, England.
Posted by aeroplanegripper on Thursday, May 26, 2016 11:19 AM

Hello everyone, just a quick update on the build progress, in between work and life!

I have sprayed the cockpit Alclad interior USAAF Green, over a coat of primer, and done the same to the cockpit tub. The radio set I have painted Humbrol gun metal, which Ive also used to pick up the sidewall instruments etc. I had a couple of spare PE dials placards etc which i CA'd to the sides, but I dont think theyd be seen when all is put together.


I have also attached the Yahu IP to the kit part, which Im impressed with. I have also given the interior a wash of Flory clay wash (Grime) but think ive overdone it just a tad. Next up will be to put the fuselage together and attach wings.

Will attempt to get to it this weekend, and find all the spares I need, exhausts and wheel covers and whatever else I find!

Thanks for letting me share.


Best Regards

Mark

"bis vivit qui bene vivit"


  • Member since
    July 2014
Posted by modelcrazy on Thursday, May 26, 2016 11:25 AM

Wow Mark, that's really making that little Academy kit pop.

Steve

Building a kit from your stash is like cutting a head off a Hydra, two more take it's place.


http://www.spamodeler.com/forum/

  • Member since
    April 2005
  • From: Australia
Posted by taxtp on Thursday, May 26, 2016 5:30 PM

That looks great Mark, I really admire your cockpit work.

I'm finally starting on my build. It's the Hasegawa 1/72 P=51B with a Malcolm canopy hood.

It's this kit.

Here's what you get:

So far, I've just got the parts off the sprues.

Cheers

Tony


I'm just taking it one GB at a time.

  • Member since
    October 2009
  • From: Worcester, England.
Posted by aeroplanegripper on Friday, May 27, 2016 8:33 AM

Thanks Tony,

That is a great kit to build, especially a P-51 with a Malcolm Hood. I built that one some time back. Here it is. 

I guarantee youll enjoy building it mate. Look forward to watching your progress.

Best Regards

Mark

"bis vivit qui bene vivit"


  • Member since
    July 2013
Posted by lzdaily@comcast.net on Friday, May 27, 2016 1:05 PM

Hello, everyone.

Sorry to be away so long, but I had eye surgery several weeks ago and am just getting back to the point that I can see well enough to model or look at a computer screen. It's going to take me awhile to get caught up on what everyone is doing, but it looks like there's a lot of good stuff going on. Britt, what you're doing with your F-6 is amazing. I will definitely be referring back to your build when I start my F-6.

When last I posted, I was looking for a combination of paints that looked right to me for replicating a NMF. I think I finally have one that I like. You can see it in the photos of my latest test wing. I primed the whole thing with Alclad Black, except for the center section, which got Alclad Gray Primer. That center section then got Airframe Aluminum, while the rest of the wing got plain old Alclad Aluminum. The ailerons got Semi Matte Aluminum. The contrast between the Airframe Aluminum (even toned down a bit by the gray primer) and the Aluminum still seemed to great, but then I had a thought. I masked off a couple of panels and sprayed Airframe Aluminum over the Aluminum. I think it looks about right. I converted the image to grayscale to see how it compared to prototype photos and I still think it looks about right. So, I'm painting this thing very soon.

Best to all,Larry

  • Member since
    July 2014
Posted by modelcrazy on Friday, May 27, 2016 1:57 PM

Don’t worry about it Larry, you have more than earned your wing here. I love the look of Airframe Aluminum, looks great!
I hope you eye is doing better.

Steve

Building a kit from your stash is like cutting a head off a Hydra, two more take it's place.


http://www.spamodeler.com/forum/

  • Member since
    April 2005
  • From: Australia
Posted by taxtp on Friday, June 3, 2016 12:01 AM

Thanks heaps Mark. Hope mine is as good as yours. I'm leaning towards an olive drab machine too.

Cheers

Tony

I'm just taking it one GB at a time.

  • Member since
    October 2009
  • From: Worcester, England.
Posted by aeroplanegripper on Saturday, June 4, 2016 2:56 PM

Hello everyone,

I apologise for not posting for a while, things have got rather busy for me over the past few weeks. Nevertheless, some progress has been made with the Academy Mustang, the fuselage halves have been put together plus the main wings, and the stabilisers. These needed a touch of filler, plus a quite significant sink hole undernesath the port side of the cockpit.

As I mentioned before, there are quite a few pieces missing, so I have attached a spare set of Airfix underwing pylons, and attached some brass rod for support to the drop tanks.

I also had a resin gunsight in my spares so I have fitted this too. Next step will be to mate the wings to the fuselage and prep the Airfix prop and undercarriage doors for painting. Im off to our nations capital London, my birthplace, next weekend, so may be a couple of weeks before I post again. Thanks for letting me share.

Best Regards

Mark

"bis vivit qui bene vivit"


  • Member since
    July 2014
Posted by modelcrazy on Saturday, June 4, 2016 4:26 PM

Well have a safe trip and we'll hear from you when you get back. 

Steve

Building a kit from your stash is like cutting a head off a Hydra, two more take it's place.


http://www.spamodeler.com/forum/

  • Member since
    July 2013
Posted by lzdaily@comcast.net on Saturday, June 11, 2016 9:49 AM

Here's my latest progress on my P-51D:

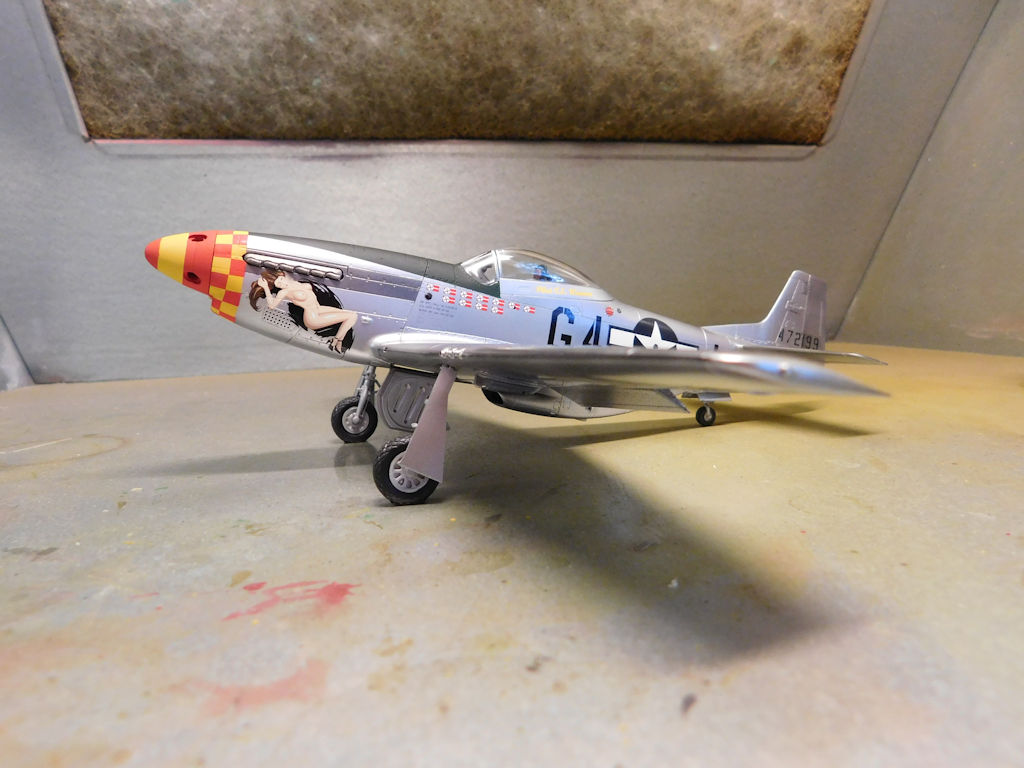
In this shot, the spinner has been painted and the nose end of the aircraft painted yellow in preparation for the checkboard squadron markings.

I put a lot of thought into how to deal with the checkerboard markings. I finally settled on a version of the method used by lawdog114 (see the post titled 1/48 Tamiya P51 B "Berlin Express" (FINISHED)). I first tried cutting out squares of tape like he did, but I could tell as I was applying them that it wasn’t working out. Then I hit on this: I photocopied the Tamiya decal, cut it out and rubber cemeted it to blue painter’s tape. Then using a straight edge and a really sharp Exacto blade, I cut out the individual “squares” (they’re not really square). I applied them all, then pulled off the tape over the areas to be painted red.

In this shot, I’ve applied the red paint. At this point, I used progressively finer grits of sandpaper to knock down the areas a raised paint where the masking tape had been. The checkerboard isn't great (nowhere near as nice as lawdog's), but I think I can live with it.

Using another copy of the kit decals, I prepared a solid mask to go over the checkerboard, applied it to the model and then painted the top of the nose olive drab. I masked off the antiglare panel and then sprayed the model with Alclad Gloss Black Base. After masking off the ailerons, the elevators, and the rudder (they’re going to get a coat of Alclad Semi Matte Aluminum), I sprayed the model with Alclad Aluminum. At this point, I really wish that I had sprayed the Semi Matte Aluminum first. I think it would handle masking better than the Airframe Aluminum.

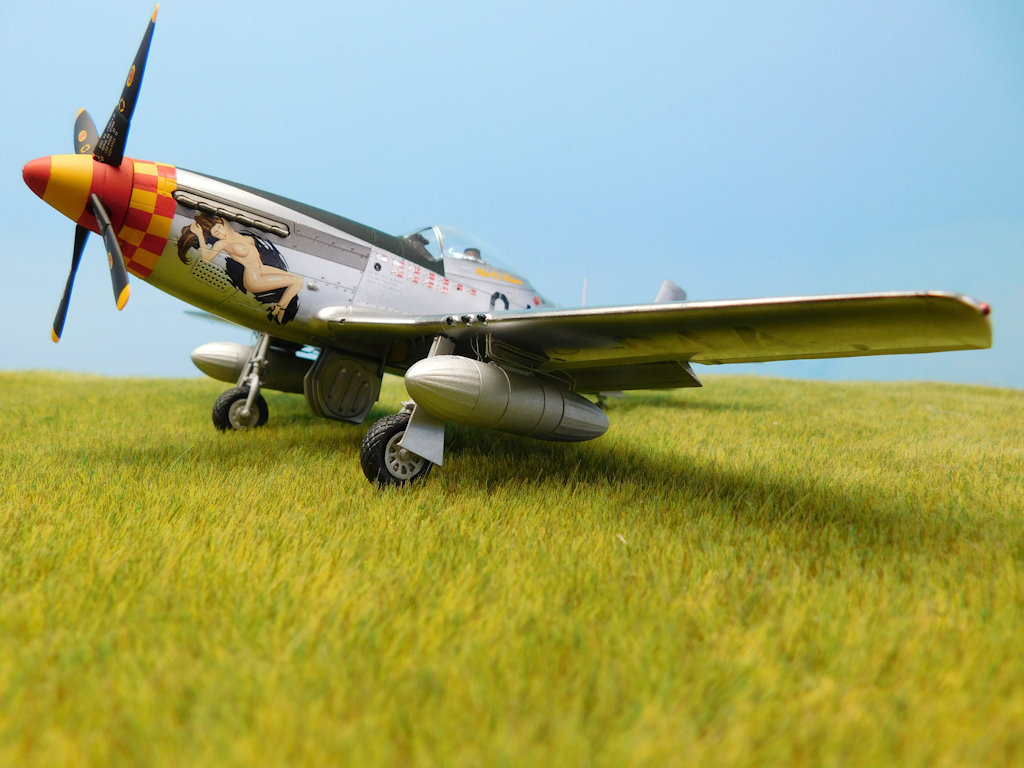
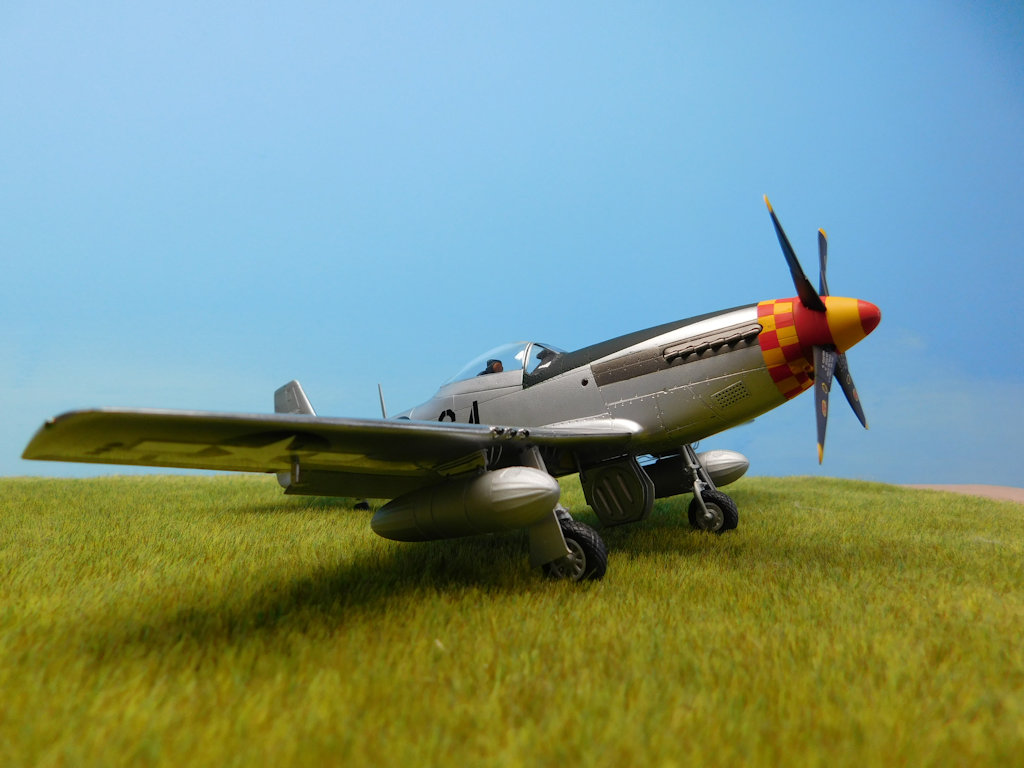
Finally, a question. Like a lot of modelers, my preference is to use aftermarket decals whenever possible; I like my models to be somewhat unique. Thus, I searched online for a source. What I found was a set of decals from Kit's-World for the P-51D (serial number 44-72199) flown by Captain Charles Weaver in the 362<sup>nd</sup> Fighter Squadron of the 357<sup>th</sup> Fighter Group in April of 1945. The markings include nose art of a nude woman in front of a splash of red. I ordered the decals and, when they arrived, put them in the box with the kit until it was time to build the model. Once that time came, I started doing research, looking for photographs of the aircraft. That's when the fun started. Most of the manufacturers who have released decals for this aircraft have used the red splash (Kit's World, Cutting Edge, Superscale). Cutting Edge and Kit's World have also both produced sets with a blue splash and Kit's World has a third set that includes a black splash. Confusing the issue even more, two different styles of kill markings were apparently used on this plane: either flags or winged swastikas. One site I found claimed that the blue splash with winged swastikas was used in summer 1944 and the red splash with flags in April 1945. However, Weaver was assigned this aircraft in March 1945! Does anyone have hard information on how this plane was painted?

Sorry for the long post. Best to all,
Larry

  • Member since
    July 2014
Posted by modelcrazy on Saturday, June 11, 2016 10:33 AM

Hi Larry,

Great job on the paint, I don't have the skill to try that.


As far as the markings, didn't planes get passed down to new pilots? I wonder if the markings were similar from pilot to pilot.

Steve

Building a kit from your stash is like cutting a head off a Hydra, two more take it's place.


http://www.spamodeler.com/forum/

  • Member since
    July 2013
Posted by lzdaily@comcast.net on Saturday, June 11, 2016 1:26 PM

Thanks for the kind words, Steve. The paint definitley looks better from three feet than close up (see below).

I know that planes got passed around as pilots moved or went home. Weaver's previous D - Passion Wagon - was a hand-me-down. This one, though, I'm not sure. All of the decal sets say that the plane was assigned to Weaver and those that list dates use approximately the same dates. Weaver was assigned the plane in March 1945. I can't believe they had time to paint it three different ways before VE day in May.

Anyway, here's a shot of where I am now:

I am not a happy camper. I masked off the wings and sprayed the fuselage with Airframe Aluminum. Then I removed all of the masking. I like the contrast between the fuselage and the wings, but some of the Alclad paint came up with the masking. You can see what I’m talking about along the edge of the antiglare panel just forward of the cockpit, along the edge of the checkerboard just below the exhaust, and — most noticeably — right over the wing root. In addition, there’s a fair bit of paint buildup along the edges of the checkerboard and the antiglare panel. I don’t know that going over it with really fine sandpaper would help. I suspect that I could cut down the paint buildup, but I’d probably ruin the metallic finish. I’m very tempted to strip the paint and try again, if I could be sure not to ruin the cockpit. Please excuse me while I go pound my head against the wall...

Thud, thud...

  • Member since
    July 2014
Posted by modelcrazy on Saturday, June 11, 2016 3:25 PM

I here you Larry, my builds go great until I pull paint off, then things go off the rails. I try to fix it and it just getts worse.Th prospect of stripping and repainting just kills the mood for me.

Edit: you would have to be trying a checkerboard using 2 of the 3 hardest colors to paint.

Steve

Building a kit from your stash is like cutting a head off a Hydra, two more take it's place.


http://www.spamodeler.com/forum/

  • Member since
    April 2005
  • From: Australia
Posted by taxtp on Sunday, June 12, 2016 6:17 AM

Good work on he checkerboard pattern, and thanks for sharing the technique as I may have to use it if I continue with my intention of doing 'Old Crow'.

Cheers

Tony

I'm just taking it one GB at a time.

  • Member since
    April 2014
  • From: Australia
Posted by lostagain on Tuesday, June 14, 2016 8:10 AM

Britt,

the detail in your F6 is excellent. Great to watch such good scratchbuilding developing.

Mark,

The -D is ripping along and looking good.

Larry well done/very brave with the checkerboard. I know that feeling when the tape comes off...

Thunderbird was waiting for me when I got back from 3 weeks in Japan. The forth coat of gloss had plenty of time to go off. Not bad but plenty of orange peel...

So I set to with 4000, 6000 and 8000 sheets, then the three stage tamiya polishes. It has come up pretty well but I have managed to get some scratches into the finish that are not polishing out:

And when I took off the canopy masking, there were too many coats of paint, so some of the paint on the framing came off as well. On top of that, it looks like I have managed to squeeze some of the polish in around the quater windows.

But the reflection of the body on the wing looks cool...

So there is still a bit of touch up work to do, but it looks okay from a distance...


  • Member since
    July 2014
Posted by modelcrazy on Tuesday, June 14, 2016 8:39 AM

Lost.

Hope you enjoyed the trip. 

That's really look great, the shine would make any car guy jealous. 

Steve

Building a kit from your stash is like cutting a head off a Hydra, two more take it's place.


http://www.spamodeler.com/forum/

JOIN OUR COMMUNITY!

Our community is FREE to join. To participate you must either login or register for an account.

SEARCH FORUMS
FREE NEWSLETTER
By signing up you may also receive reader surveys and occasional special offers. We do not sell, rent or trade our email lists. View our Privacy Policy.