SEARCH FINESCALE.COM

Enter keywords or a search phrase below:

The 2017/ 2018 Too Little Too Late Group Build

41549 views
1197 replies
1 rating 2 rating 3 rating 4 rating 5 rating
  • Member since
    April 2015
Posted by Mopar Madness on Thursday, July 27, 2017 5:20 PM

That's some fine detail in that cockpit!

Chad

God, Family, Models...

At the plate: 1/48 Airfix Bf109 & 1/35 Tamiya Famo

On deck: Who knows!

  • Member since
    September 2013
Posted by blackdog62 on Thursday, July 27, 2017 5:29 PM

 Ta-152 by Jerry Richards, on Flickr

 Ta-152 by Jerry Richards, on Flickr

another pic of the pit. and gun barrels i always get one centerd and 1 not centerd but its for efect and only i and you guys will ever look at them. lol practice makes perfectConfused

  • Member since
    September 2013
Posted by blackdog62 on Thursday, July 27, 2017 5:39 PM

 Ta-152 by Jerry Richards, on Flickr

 Ta-152 by Jerry Richards, on Flickr

 Ta-152 by Jerry Richards, on Flickr

wow im on a roll flikr is much nicer. ok so the pit cowling barrels drilled out and the drilling of the exaust. the holes are not perfect but its for effect somthing to show there hollow. they came in 2 pieces so i  cut a notch in each end and when i put them together there was a little hole to start drilling from seemed to help. not as nice as some i see on here but with time it may improve.

mopar.. thank you i mostly always button up my canopies but i try to make it the best im able to. i have some models in my stash that will need to be better i feel. such as my FW-189 the pit on that is all glass. so even buttoned up its all there to see.

  • Member since
    April 2015
Posted by Mopar Madness on Thursday, July 27, 2017 8:55 PM

It's a shame we spend so much time detailing cockpits and a large percentage of it will never be seen. But we have fun doing it and we also have the satisfaction of knowing the detail is in there!  Great effort on the exhaust too!

Chad

God, Family, Models...

At the plate: 1/48 Airfix Bf109 & 1/35 Tamiya Famo

On deck: Who knows!

  • Member since
    September 2013
Posted by blackdog62 on Friday, July 28, 2017 12:56 PM

Mopar. Lol that's so true on my 109-k I did a all resin pit painted all the detail buttoned it up and now it's hidden. But like you say I know it's there.

I would like to leave my canopy open but for me it's that I don't like cleaning the dust out. I break things.Confused

  • Member since
    September 2014
Posted by rooster513 on Friday, July 28, 2017 2:12 PM

blackdog that cockpit is coming along nicely! I like the added attention to detail.

-Andy

  • Member since
    December 2002
  • From: Bury St Edmunds, Suffolk, England
Posted by Bish on Friday, July 28, 2017 2:55 PM

Great work on the pit BD.

I am a Norfolk man and i glory in being so


On the bench: Airfix 1/72nd Harrier GR.3/Fujimi 1/72nd Ju 87D-3

  • Member since
    November 2003
  • From: Naples, FL
Posted by tempestjohnny on Saturday, July 29, 2017 7:44 AM

Theater bands painted


  • Member since
    November 2003
  • From: Naples, FL
Posted by tempestjohnny on Saturday, July 29, 2017 7:45 AM
Great start Blackdog


  • Member since
    August 2015
  • From: the redlands Fl
Posted by crown r n7 on Saturday, July 29, 2017 7:52 AM

blackdog 62 that fw is moving right along awesome.

tempest nice camo !!

here are some bits and peices . the curved canopy framing a bit of a pain using my triangle masking with some liquid mask I hope it works


 Nick.

  • Member since
    April 2015
Posted by Mopar Madness on Saturday, July 29, 2017 9:36 AM

Great camo on that 152! I love the theater bands too.

That's some nicely made masking right there!  My least favorite part of each build for sure.


Chad

God, Family, Models...

At the plate: 1/48 Airfix Bf109 & 1/35 Tamiya Famo

On deck: Who knows!

  • Member since
    September 2013
Posted by blackdog62 on Saturday, July 29, 2017 1:18 PM

thank you all for the kind words. im going to try and paint the next pit useing oils acrylic dont seem to stay wet long enoeugh.

 2017-07-27_03-07-39 by Jerry Richards, on Flickr

what i have done diffurent this time on this typ of kit is put on the upper wing on first. the last 2 kits like this i used a spredder bar in the fusalage to fill in the wing gap. 

  • Member since
    September 2013
Posted by blackdog62 on Saturday, July 29, 2017 1:24 PM

heres a better view of what im talking about.

and i started on the torpedo that will mount on this 1

 2017-07-27_03-07-15 by Jerry Richards, on Flickr

 2017-07-27_03-06-17 by Jerry Richards, on Flickr

  • Member since
    September 2013
Posted by blackdog62 on Saturday, July 29, 2017 1:26 PM

  tempest..the bands look nice. nice and tight on the edges i have yet to do a set.

  • Member since
    September 2013
Posted by blackdog62 on Sunday, July 30, 2017 6:14 PM

since i was working on the wing seam i thought i would try my hand at scribeing.

so i tryed to make the proper canon cover on this typ of a/c where the cover gos up on the wing root and dosent have the seem joint in the middle of the canon door cover.

lol first thing i learned is not to try and scribe free hand thats what the green puddy is fixing.

 2017-07-30_03-40-10 by Jerry Richards, on Flickr

  • Member since
    April 2015
Posted by Mopar Madness on Sunday, July 30, 2017 7:16 PM

Looking good!  Scribing freehand is always a tempting way to make the process more efficient.  I always end up using more filler too!

Chad

God, Family, Models...

At the plate: 1/48 Airfix Bf109 & 1/35 Tamiya Famo

On deck: Who knows!

  • Member since
    April 2006
  • From: ON, Canada
Posted by jgeratic on Monday, July 31, 2017 12:33 AM

blkhwkmatt, those wood grain decals are looking pro.
blackdog, very good work on pit, and admire the attention to those exhaust openings.  I've tried some freehand scribing on fuselage panels, certainly is tricky!
tj, slick work on those theater bands.
Nick, fine job with the canopy masking, and it's nice to see you have other details underway.

------------------------------

Thanks Mustang and Andy.

Can't believe a whole week went by while I tried to master nose spirals.  It took several tries, but it's almost there, just have to file down some paint build up on the nose tip.

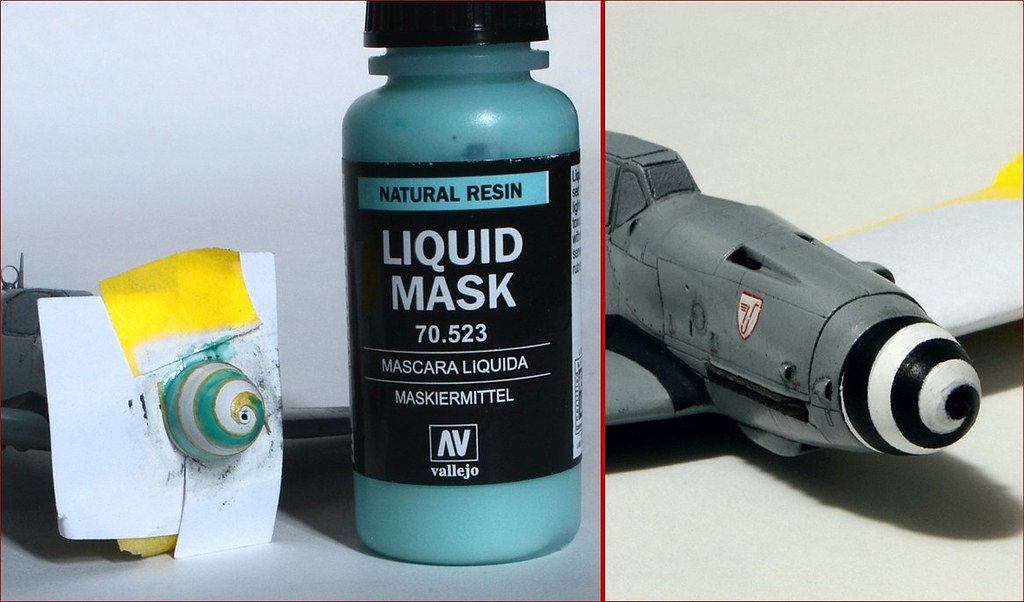
I found the scale is too small to use a single width of tamiya tape, as it would buckle trying to create the sharp curves.  Someone mentioned electrical tape, which is not much better.   Also, any lateral movement caused the adhesive to smear, resulting in a black mess.

So back to Tamiya tape, cut in very thin strips of less than 0.5mm, and some liquid mask to fill in between.   All I can say, it's not easy to achieve equal widths of black and white stripes with this method.

regards,
Jack

  • Member since
    December 2002
  • From: Bury St Edmunds, Suffolk, England
Posted by Bish on Monday, July 31, 2017 2:12 AM

Jack, big well done for masking and painting that spiral. I recently did my first ones and that was hard enough useing the decals. Might have to dig out some spare spinners and have a practice at masking.

I am a Norfolk man and i glory in being so


On the bench: Airfix 1/72nd Harrier GR.3/Fujimi 1/72nd Ju 87D-3

  • Member since
    December 2002
  • From: Bury St Edmunds, Suffolk, England
Posted by Bish on Monday, July 31, 2017 2:14 AM

tempestjohnny

Theater bands painted


Nice job on the bands Johnny.

I am a Norfolk man and i glory in being so


On the bench: Airfix 1/72nd Harrier GR.3/Fujimi 1/72nd Ju 87D-3

  • Member since
    December 2002
  • From: Bury St Edmunds, Suffolk, England
Posted by Bish on Monday, July 31, 2017 2:23 AM

crown, blackdog, nice work there.

I am a Norfolk man and i glory in being so


On the bench: Airfix 1/72nd Harrier GR.3/Fujimi 1/72nd Ju 87D-3

  • Member since
    September 2014
Posted by rooster513 on Monday, July 31, 2017 6:32 AM

johnny, that paint job is really coming together nicely!

jack, that's a heck of a job on that spinner! I don't know if I could pull that off.

blackdog, I know what you mean about trying to free hand. Seems like it should be easy enough but never turns out well for meBig Smile

-Andy

  • Member since
    February 2014
  • From: Michigan
Posted by silentbob33 on Monday, July 31, 2017 10:12 AM

The prop spinner looks great! I'm too timid to try them, so I tend to avoid those schemes.  There's been a lot of good stuff happening here, and too much of life getting in the way of my benchtime.  Hopefully that can change soon

On my bench: Academy 1/35 UH-60L Black Hawk

  • Member since
    September 2013
Posted by blackdog62 on Monday, July 31, 2017 5:31 PM

jgeratic thats a fine paint job on the spiral. i have tryd that once now i just use decals i even order the decals if i need them. hats off to ya that a fine job

now for a update on mine i decided to do some more work on the wing seam i have bin working on. the first product i used was tamyia puddy and it works ok. but im used to miliput becouse its easyer to form with a bit of water makes the sanding a bit nicer.

 Ta-152 wing joint with miliput by Jerry Richards, on Flickr

  • Member since
    September 2013
Posted by blackdog62 on Monday, July 31, 2017 5:35 PM

heres a pick of working the miliput down with water.

 Ta-152 wing joint with miliput by Jerry Richards, on Flickr


  • Member since
    September 2013
Posted by blackdog62 on Tuesday, August 1, 2017 5:38 PM

ok i did not intend to turn this into a wing root project but thats how its turned out.

i was thinking it was like the panel on the fw-190f but after sanding the final puty i got out my ta-152 schamatics and i was wrong. there are mutible panels over the canons. hobby boss dose a good job at runing there seem close to what it should be.

so this time useing tape to guide my scribe tool it went well. i did mess up a few lines i erased during sanding. ill see how they look after sanding. hopfully i can just move on.

 2017-08-01_03-04-33 by Jerry Richards, on Flickr

  • Member since
    March 2012
  • From: Corpus Christi, Tx
Posted by mustang1989 on Wednesday, August 2, 2017 1:56 PM

blackdog: Yeah that scribing freehand is alot like dancing with the devil. It gets dicey. I've tried it more than once and I always get snakebit.  Dude I've gotta say that you are fiercly battling that wing root and coming out on the winning side. Keep at it brutha.

Jack: I've got the utmost respect for not only blackdog but you for sticking with those spirals. This thing is going to have a great turn out.

Johnny: Those bands turned out fabulous!!!!!!!!!!!


 Forum | Modelers Social Club Forum (proboards.com) 

  • Member since
    September 2013
Posted by blackdog62 on Wednesday, August 2, 2017 4:59 PM

mustang.. thank you its a learning curve for sure. and i like to add my next kit for the group build its another hobby boss kit #80374 1/48 i have seen this jet in old war photos so its one that was completed and tested. its a 262 with FuG lichtenstein SN-2 90 MHZ radar transceiver and Hirschgeweih antenna array [so says the box] to be used as anight fighter. the diffurence with this one is its a single seater. so pilot dose it all. ill be painting and decal as the box shows.the paint on this is also a bit diffurent not planing on any after market parts at this time.

 20170728_145103 by Jerry Richards, on Flickr

 20170728_145211 by Jerry Richards, on Flickr

probably start test fitting parts tonight and have some pics up shortly. i had mentioned this kit here befor its the one that did not come with the drop tanks.its in the cover art and the main reson for purchaseing being i have never seen them on a 262 befor the other hobby boss 262 in this group had them in that kit . there not in the intructions i just found that strange.

  • Member since
    September 2013
Posted by blackdog62 on Wednesday, August 2, 2017 5:50 PM

i decided to prime the torpedo before calling it quits at the desk tonight. i have tryed to remove the seem and show it some extra attention. i plan on putting a detinator on the tip the dragon kit has 1 on theres so ill do some resurch to see what it needs. i have german plans showing this plane and a fw-190f with the torpedo undr it. and i have seen fw-190d kits with them. i dont know if they ever used them in combat? maybe some of you pros have the answer on this.

 2017-08-02_03-37-30 by Jerry Richards, on Flickr

  • Member since
    April 2006
  • From: ON, Canada
Posted by jgeratic on Wednesday, August 2, 2017 11:12 PM

blackdog, scribing looks good - could not of been easy on the curved surface of the wing root.  Do you apply fine liquid cement after cleanup?

About the torpedo loadout, it seems it was just an idea on paper, that was scraped before it materialized into something pysical.  Read intro from this review:

http://aeroscale.kitmaker.net/modules.php?op=modload&name=Reviews&file=index&req=showcontent&id=6827


--------------------------------

Thanks Bish, Andy, silentbob33, blackdog62, and Mustang.
In the home stretch now ...

regards,
Jack

  • Member since
    December 2002
  • From: Bury St Edmunds, Suffolk, England
Posted by Bish on Thursday, August 3, 2017 1:46 AM

blackdog, some nice scribing tehre, and i like the look of the 262. Nice subject.

I am a Norfolk man and i glory in being so


On the bench: Airfix 1/72nd Harrier GR.3/Fujimi 1/72nd Ju 87D-3

JOIN OUR COMMUNITY!

Our community is FREE to join. To participate you must either login or register for an account.

SEARCH FORUMS
FREE NEWSLETTER
By signing up you may also receive reader surveys and occasional special offers. We do not sell, rent or trade our email lists. View our Privacy Policy.