SEARCH FINESCALE.COM

Enter keywords or a search phrase below:

Monogram Mafia III

106931 views
1369 replies
1 rating 2 rating 3 rating 4 rating 5 rating
  • Member since
    July 2004
  • From: Sonora Desert
Posted by stikpusher on Thursday, January 22, 2015 8:55 PM

Your F-80 is coming along real nice there SB! NMF birds are a matter of trial and error until you find a method that you really like and run with it. Thank you for the kind words on my Tiffy. I just need to do a few more things and then I can get all that stuff installed and close up the fuselage.


F is for FIRE, That burns down the whole town!

U is for URANIUM... BOMBS!

N is for NO SURVIVORS...

       - Plankton

LSM


  • Member since
    February 2014
  • From: Michigan
Posted by silentbob33 on Thursday, January 22, 2015 8:40 PM

Looks fantastic Stik!  I finally finished masking and painting my F-80.  I just have a few touch-ups to do and the major parts of the painting will be done.  I haven't built many NMF planes, and I tried spraying Testor's silver over gloss black.  I think the paint is a little too thick, but it polished up nice using an old t-shirt.  Next time, I think I'll just use the silver.  Now onto the wheel wells and then decals.

On my bench: Academy 1/35 UH-60L Black Hawk

  • Member since
    July 2004
  • From: Sonora Desert
Posted by stikpusher on Thursday, January 22, 2015 7:57 PM

Ok, a weeks worth of nickle and dime progress, with a bit more solid work done today...

I started simple with basic airbrushing of black where needed... and learning how to do tighter fine lines with the DA airbrush

then detail painting...

then I added some Pro Modeler wash

and some Monogram ProModeler decals on the IP

PM wash cleaned up with a damp cloth...

and finally dry brushed highlights then sealed with a flat coat... I also added some exterior colors into the oil cooler opening inner surfaces.. and a touch up of Flat Black on the pilot's armor plate

More tomorrow...


F is for FIRE, That burns down the whole town!

U is for URANIUM... BOMBS!

N is for NO SURVIVORS...

       - Plankton

LSM


  • Member since
    June 2003
  • From: Rowland Heights, California
Posted by Duke Maddog on Thursday, January 22, 2015 12:33 PM

cbaltrin

Ok, Ok Don Stick. But In all seriousness, for this modeler who absolutely loves Monogram kits, the best way to show them respect is to make them the best they can be and show that they still can hold their own against today's uber kits!

I second that enthusiastically. Well said!

  • Member since
    July 2004
  • From: Sonora Desert
Posted by stikpusher on Thursday, January 22, 2015 11:35 AM
cbaltrin

Ok, Ok Don Stick. But In all seriousness, for this modeler who absolutely loves Monogram kits, the best way to show them respect is to make them the best they can be and show that they still can hold their own against today's uber kits!

Now that I agree in wholeheartedly...


F is for FIRE, That burns down the whole town!

U is for URANIUM... BOMBS!

N is for NO SURVIVORS...

       - Plankton

LSM


  • Member since
    May 2004
  • From: Land of Lakes
Posted by cbaltrin on Thursday, January 22, 2015 11:28 AM

Ok, Ok Don Stick. But In all seriousness, for this modeler who absolutely loves Monogram kits, the best way to show them respect is to make them the best they can be and show that they still can hold their own against today's uber kits!

On the Bench: Too Much

  • Member since
    July 2004
  • From: Sonora Desert
Posted by stikpusher on Thursday, January 22, 2015 11:06 AM
cbaltrin
stikpusher

cb, nah, the kit guns do not make me ill at all. But that is some truly beautiful work that you did to replace them! Simply outstanding!

Stik, I think you've been in 'the business' too long. When I open that box top and see those half hearted blobs of plastic that are supposed to represent the business end of this fighter plane, It feels a bit like waking up in the morning, throwing the sheets off and finding a horses head in bed with me.... :-)
Nah, I look at it in the context of time. let's face it, many of these kits are several decades old. The P-51D kit dates back to the mid to late 70s or so, so nearly 35-40 years old. What was cutting edge mold technology then (which it was) is not today. That is depending upon the age of the kit itself. Obviously the older boxings such as a original white box like I saw at a kit swap meet last weekend will have more crisp moldings, than a current re issue. And simple techniques such as some swipes with needle files to clean up the seams and hollowing out the bores with a pin vise will improve the "blobs" as you call them. Let's face it, Ann Margaret is still a beautiful woman, but comparing her looks today to those of, oh lets say 1975, will let you know that time marches on. I says again, very nice work, but remember the reason for this family in the first place... it's an appreciation and respect for bloodline... ;-)


F is for FIRE, That burns down the whole town!

U is for URANIUM... BOMBS!

N is for NO SURVIVORS...

       - Plankton

LSM


  • Member since
    March 2005
  • From: Lancaster, South Carolina
Posted by Devil Dawg on Thursday, January 22, 2015 8:49 AM

Tal Afar Dave

Hey Devil Dawg, I don't remember that Hun being so difficult; what gives?? Is that one of the recent re-pops?  I've got a couple that I scavenged off of eBay, but I think they are pretty vintage.  Looks like you are working through the tough spots.

TAD

You know, Dave, I don't ever remember having this issue with past builds of this kit, either (I've built two). I bought it at Hobby Lobby a few years ago. The box and instruction sheet both say "Made In The USA" (thanks goodness!!), and have a copyright date of 2001. The box even shows that Benny & Smith own Revell-Monogram (the company that makes Crayons). The two that I previously built were built before 2001, so maybe the new molds aren't up to the same standards, assuming that new molds are in use. I've already closed up the wings and fuselage, so I don;t remember if there was a date imprinted on the insides of those parts. Regardless, it hasn't been the relatively easy kit build that I remember from the past. Oh, well. It's still gonna get built.............

Devil Dawg

On The Bench: Tamiya 1/32nd Mitsubishi A6M5 Model 52 Zeke For Japanese Group Build

Build one at a time? Hah! That'll be the day!!

  • Member since
    May 2004
  • From: Land of Lakes
Posted by cbaltrin on Thursday, January 22, 2015 5:25 AM

Heya ajd3530, have you decided on markings yet?  I think I'm going to do something with checkers or diamonds on the nose...

On the Bench: Too Much

  • Member since
    May 2004
  • From: Land of Lakes
Posted by cbaltrin on Thursday, January 22, 2015 5:14 AM

Thank you "Reasoned"!

On the Bench: Too Much

  • Member since
    May 2004
  • From: Land of Lakes
Posted by cbaltrin on Thursday, January 22, 2015 5:13 AM
stikpusher

cb, nah, the kit guns do not make me ill at all. But that is some truly beautiful work that you did to replace them! Simply outstanding!

Stik, I think you've been in 'the business' too long. When I open that box top and see those half hearted blobs of plastic that are supposed to represent the business end of this fighter plane, It feels a bit like waking up in the morning, throwing the sheets off and finding a horses head in bed with me.... :-)

On the Bench: Too Much

  • Member since
    February 2011
  • From: Bent River, IA
Posted by Reasoned on Wednesday, January 21, 2015 1:45 PM

cbaltrin
Question. Do these "guns" make you want to vomit? It's supposed to be a fighter plane! If I leave these like this I might as well not even fill an sand any seams on the entire airplane...and brush paint the whole thing while I'm at it...and why not attach the windscreen with Testores tube cement...and leave the framing unpainted... :-)

Ahh... A few hours later (after some work with files, filler and tubing...).

Quite simply outstanding work.

Science is the pursiut of knowledge, faith is the pursuit of wisdom.  Peace be with you.

On the Tarmac: 1/48 Revell P-38

In the Hanger: A bunch of kits

  • Member since
    July 2004
  • From: Sonora Desert
Posted by stikpusher on Tuesday, January 20, 2015 6:07 PM

MV, ya can't go wrong with a Bugs Bunny motivational cheer! Thanks for that!

AJD, I liked that Hi Tech Bubbletop Jug kit! Not that they give you much PE to dress her up. But I understand the time saving reasons to pass on it...

cb, nah, the kit guns do not make me ill at all. But that is some truly beautiful work that you did to replace them! Simply outstanding!

Baron, I just can't leave well enough alone. But I am trying not to get carried away here, mainly due to time constraints. And, I have been nickle and diming progress on my Tiffy when and where I can before work over the past few days. I even have been taking progress photos... But not enough time to get them uploaded and posted right now...


F is for FIRE, That burns down the whole town!

U is for URANIUM... BOMBS!

N is for NO SURVIVORS...

       - Plankton

LSM


  • Member since
    September 2006
  • From: Bethlehem PA
Posted by the Baron on Monday, January 19, 2015 12:49 PM

Stik, I love your Tiffy!  You're putting more effort into detailing yours than I did.

I've been inactive for a while.  We had a loss in my family at the beginning of December, so I haven't really spent any time at the bench since then.

My Typhoon is assembled and awaiting painting.  The Helldiver is still in parts.

I should be able to resume work this week and get some photos up.

The bigger the government, the smaller the citizen.


  • Member since
    May 2004
  • From: Land of Lakes
Posted by cbaltrin on Monday, January 19, 2015 12:31 PM

ajd3530, my mouth is watering.... :-)  Love this kit.  Almost certain my 2nd build is going to be a Monogram Jug. Keep the updates coming bro!

On the Bench: Too Much

  • Member since
    May 2004
  • From: Land of Lakes
Posted by cbaltrin on Monday, January 19, 2015 12:29 PM
Question. Do these "guns" make you want to vomit? It's supposed to be a fighter plane! If I leave these like this I might as well not even fill an sand any seams on the entire airplane...and brush paint the whole thing while I'm at it...and why not attach the windscreen with Testores tube cement...and leave the framing unpainted... :-)

Ahh... A few hours later (after some work with files, filler and tubing...).

On the Bench: Too Much

  • Member since
    October 2013
Posted by ajd3530 on Monday, January 19, 2015 2:37 AM
Alright. The Monogram P-47D bubbletop. This kit is actually the "Hi-Tech" boxing, which is exactly the same as the normal boxing aside from a 2"x 3" fret of PE, which I have decided not to use, just to keep this build more simple and time efficient. Don't worry. I have 4 other Monogram Thunderbolts I can use it on.

The thing I love about the Monogram P-47 is it is so darn simple, but still builds up into a very good model. Sucker consists of only about 34 pieces (37 on the Razorback i think, as it comes with more ordnance) so she is very builder friendly. The cockpit tub is simple, yet adequate. For me at least it is.


One extra step I took was adding some plasticard inside the intercooler doors, to avoid anyone peeking up and seeing all the way through her.


Well now I have the fusalage buttoned up, and we'll see how she looks later when the glue is dried.
  • Member since
    January 2011
  • From: Commonwealth of Virginia
Posted by Tal Afar Dave on Friday, January 16, 2015 10:50 PM

Hey Devil Dawg, I don't remember that Hun being so difficult; what gives?? Is that one of the recent re-pops?  I've got a couple that I scavenged off of eBay, but I think they are pretty vintage.  Looks like you are working through the tough spots.

Stick- you gotta love that Typhoon!  One of my all time favorites.  That was the first kit that I got the invasion stripes on and they actually looked good!  Coming along nicely; like your modifications!!

Keep up the great work, gentlemen!

TAD

2022 New Year's Resolution:  Enter 1 group build and COMPLETE a build this year!!  Why Photobucket did you rob me of my one Group Build Badge???  Must be part of the strong anti-Monogram cartel!!!

 ]

  • Member since
    November 2003
  • From: State of Mississippi. State motto: Virtute et armis (By valor and arms)
Posted by mississippivol on Friday, January 16, 2015 9:29 PM
  • Member since
    July 2004
  • From: Sonora Desert
Posted by stikpusher on Friday, January 16, 2015 12:55 AM

You and me both... I have only a few weeks myself...


F is for FIRE, That burns down the whole town!

U is for URANIUM... BOMBS!

N is for NO SURVIVORS...

       - Plankton

LSM


  • Member since
    October 2013
Posted by ajd3530 on Friday, January 16, 2015 12:18 AM
Well I had made a promise to myself to not start any new builds until I completed my three unfinished builds from last year. I was doing well, having all three of them to the painting stage at this point. But then I realized that I was coming uncomfortably close to the six month deadline I had to complete my second build for the family. I did some archiving, and I discovered that I have less than 3 weeks to complete my second build. So I decided to break my promise, and start on my Bubbletop Jug, so I can avoid having the wife recieve a message like this...


Updates momentarily!!
  • Member since
    July 2004
  • From: Sonora Desert
Posted by stikpusher on Thursday, January 15, 2015 11:12 PM

It was not brand new. I got it used, from a family friend, via my wife. It had belonged to a deceased parent, and apparently was not cleaned after last use (or perhaps any use)... I had another thread going  about the airbrush find... It was new to me, but not brand new... "used secondhand 'as is' " would be a better description...


F is for FIRE, That burns down the whole town!

U is for URANIUM... BOMBS!

N is for NO SURVIVORS...

       - Plankton

LSM


  • Member since
    March 2005
  • From: Lancaster, South Carolina
Posted by Devil Dawg on Thursday, January 15, 2015 10:34 PM

Lookin' good, Stik! One question, though - why would a new airbrush (I'm assuming that it had never been used) need to be cleaned?

Devil Dawg

On The Bench: Tamiya 1/32nd Mitsubishi A6M5 Model 52 Zeke For Japanese Group Build

Build one at a time? Hah! That'll be the day!!

  • Member since
    July 2004
  • From: Sonora Desert
Posted by stikpusher on Thursday, January 15, 2015 7:15 PM

Devil Dawg, nice progress on your Hun! And I do agree that the egg carton bottom is a good idea for holding stuff on the work table...

Today was back to work on my Tiffy. And I tried out my new airbrush and compressor as well. Which ended up causing a speed bump, as the airbrush did not want to work at first. So after some troubleshooting I found that it needed even more cleaning in the tip, but now it is fully operational and I am working on the learning curve of double action airbrushing...

So anyways first up I applied Humbrol primer to all areas that had bare white strip and rod styrene, resin, brass, or PE... I tried to use the new airbrush here, but this is when I found it did not work yet. So I dug out my cheapo Pasche....

cockpit parts

lower wing interior

oil cooler rear face

oil cooler front face w/air filter in place

and then after I got the new DA airbrush working, I used it airbrush on a coat of Humbrol RAF Cockpit Grey Green
all the grey green parts

floor troughs, stick & rudder

pilot's seat and rear armor plate

fuselage sidewalls

lower wing interior (still drying when I took this photo)

I will let this dry overnight and then start on detail work tomorrow...


F is for FIRE, That burns down the whole town!

U is for URANIUM... BOMBS!

N is for NO SURVIVORS...

       - Plankton

LSM


  • Member since
    March 2005
  • From: Lancaster, South Carolina
Posted by Devil Dawg on Tuesday, January 13, 2015 9:38 PM

cbaltrin

Got the fuselage buttoned up and started filling and sanding...

Spinner is becoming usable (I was having my doubts). I coated it with filler, chucked it in the drill press and went after it with a coarse sanding stick.

You know, I had never ever considered using upside-sown egg cartons for holding the fuselage of a build. That's a danged great idea!!

Devil Dawg

On The Bench: Tamiya 1/32nd Mitsubishi A6M5 Model 52 Zeke For Japanese Group Build

Build one at a time? Hah! That'll be the day!!

  • Member since
    March 2005
  • From: Lancaster, South Carolina
Posted by Devil Dawg on Tuesday, January 13, 2015 9:34 PM

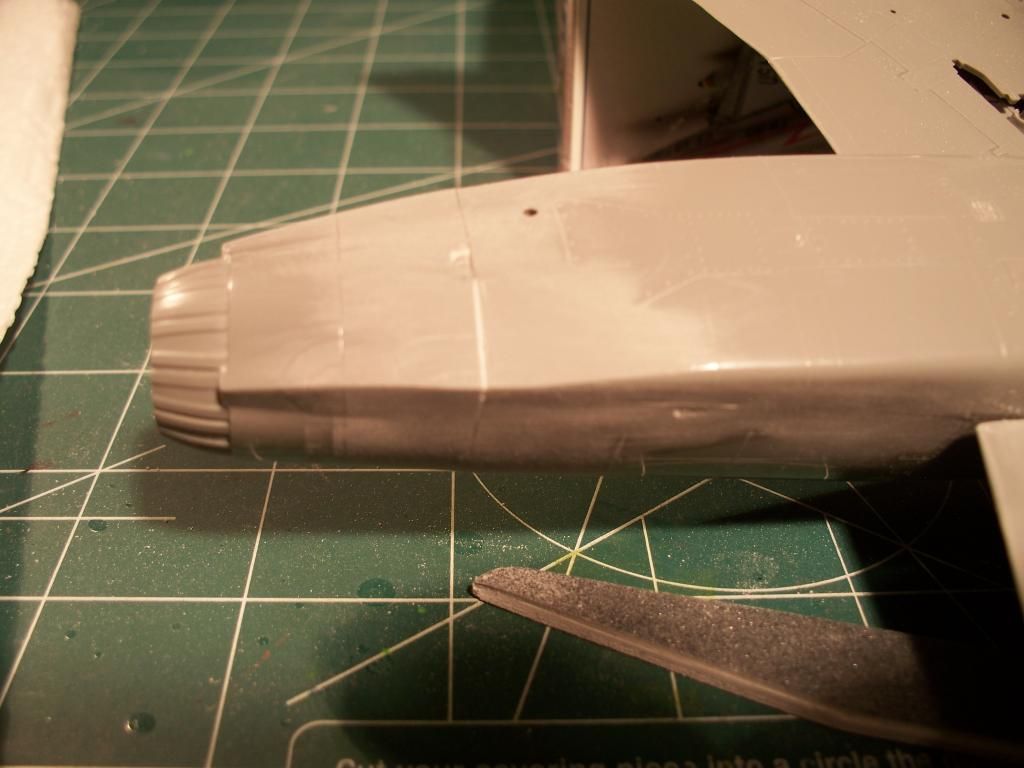
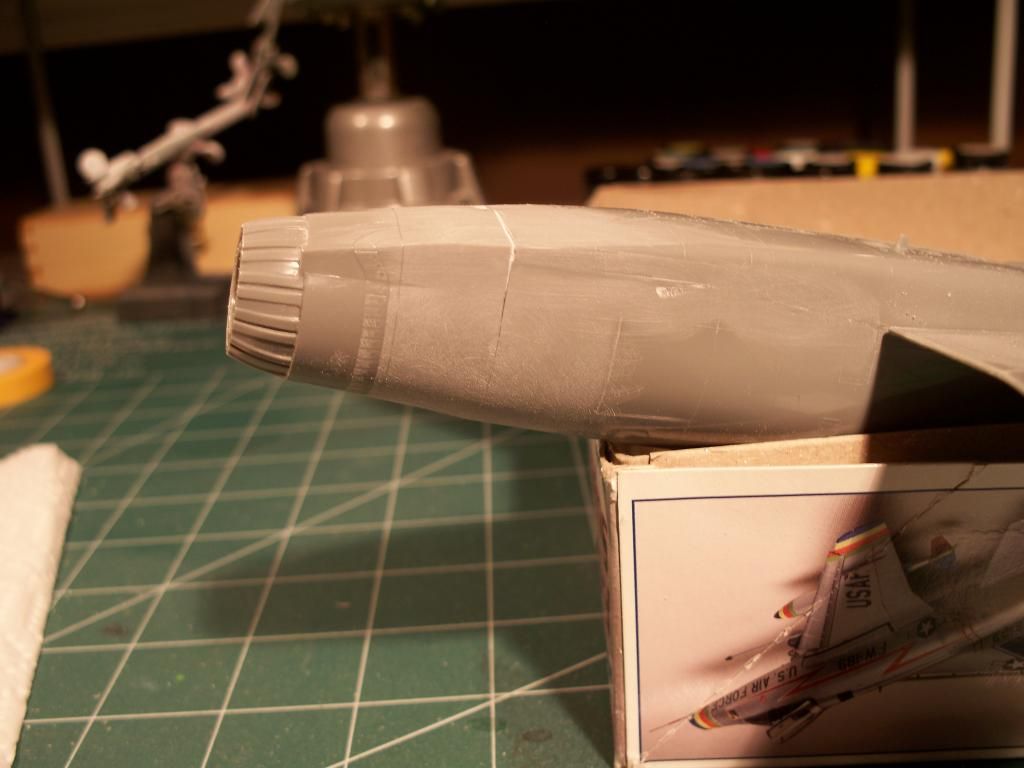
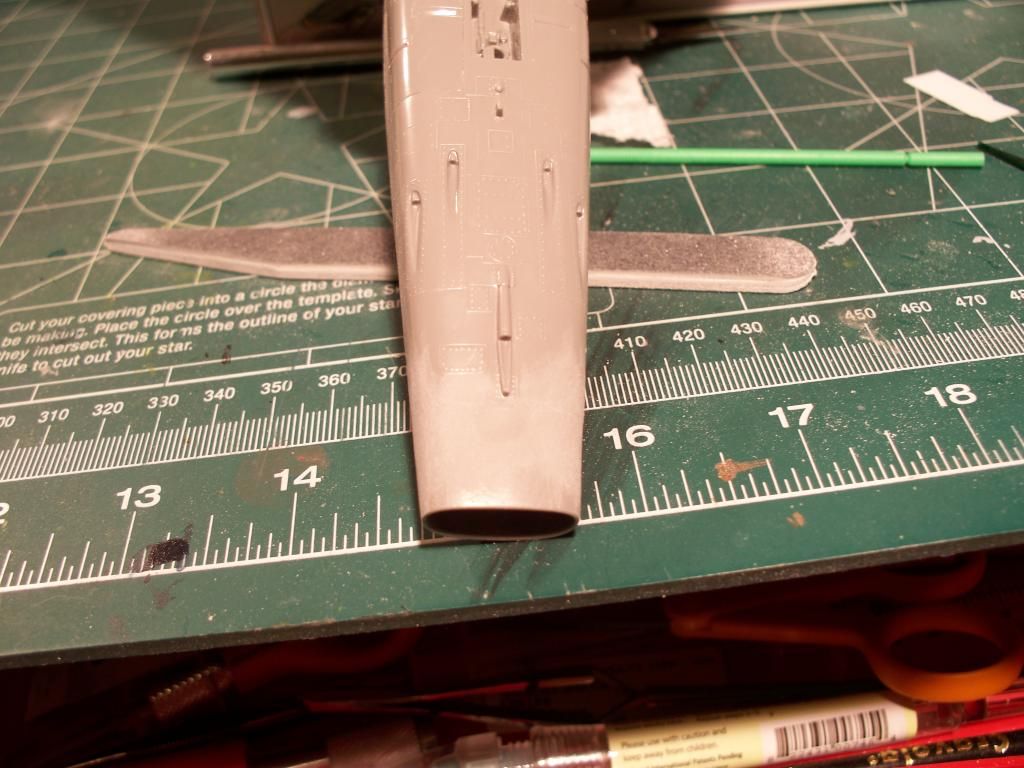
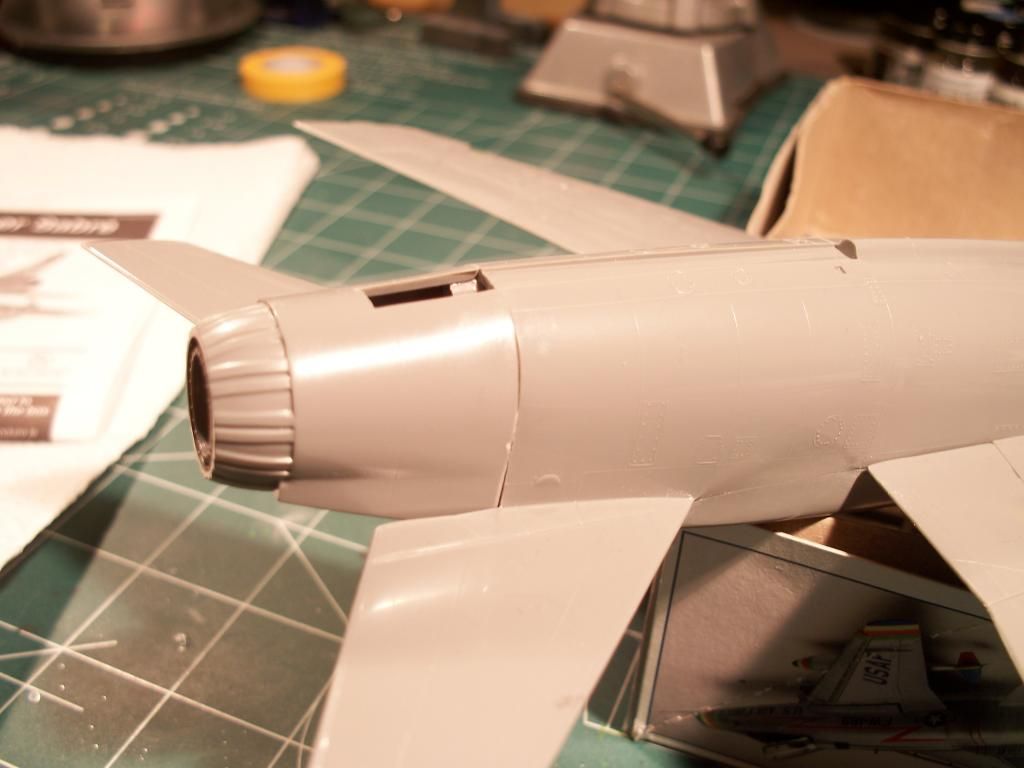
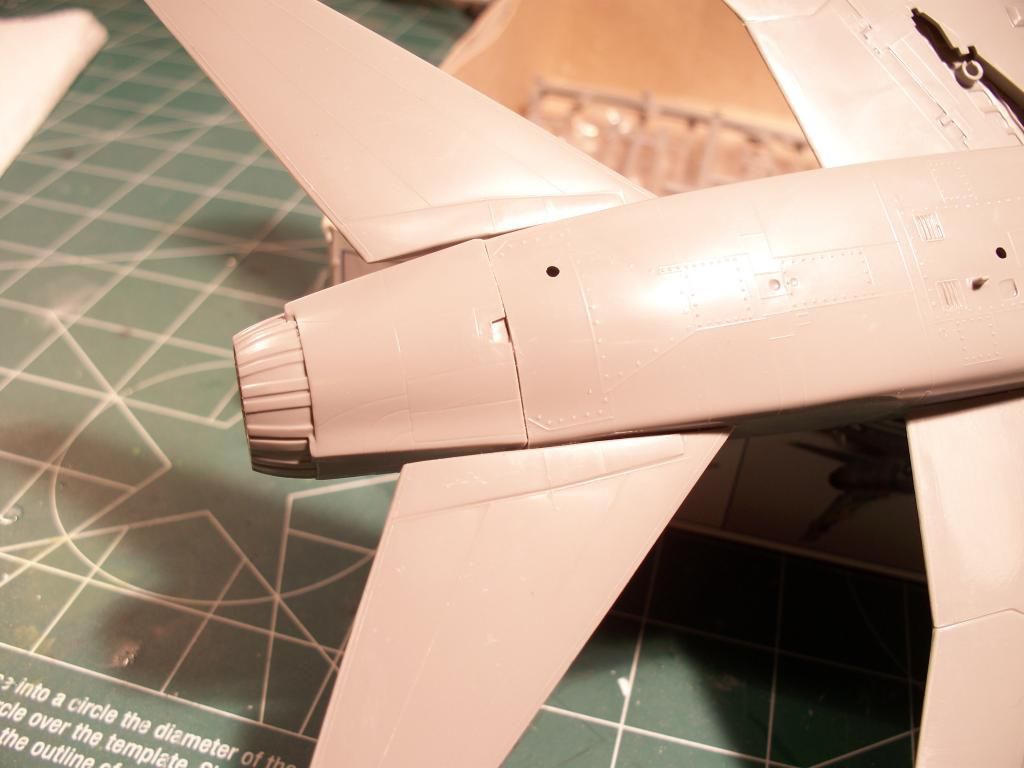
I got frustrated with this build due to the very poor fit of the exhaust cone, and had to let it sit for awhile while I put it on the back-burner of my brain and let it simmer for a bit. The gaps and poor fit were something that I hadn't experienced on my previous two builds of this same kit, so I was actually ready to throw it in the trash. But, then I read some of the other posts in this Group Build where others had had worse fit problems than this, but they persevered, and finished what they started. And that inspired me to get this one finished. I ain't gonna let a piece of plastic kick my butt! That just ain't the American/Marine Corps way, by golly!!

So, I finally pulled the kit back to the bench tonight & glued the exhaust cone on. And, as you can see, lots of gaps and a very poor fit to contend with, but how?
.

So, after much consideration about what to do about the gaps and very poor fit, I decide that, regardless of how I approached the issue, the horizontal stabilizers were gonna have to come off. So, with a rarely-used razor saw, I performed my first plastic surgery on my F-100.......
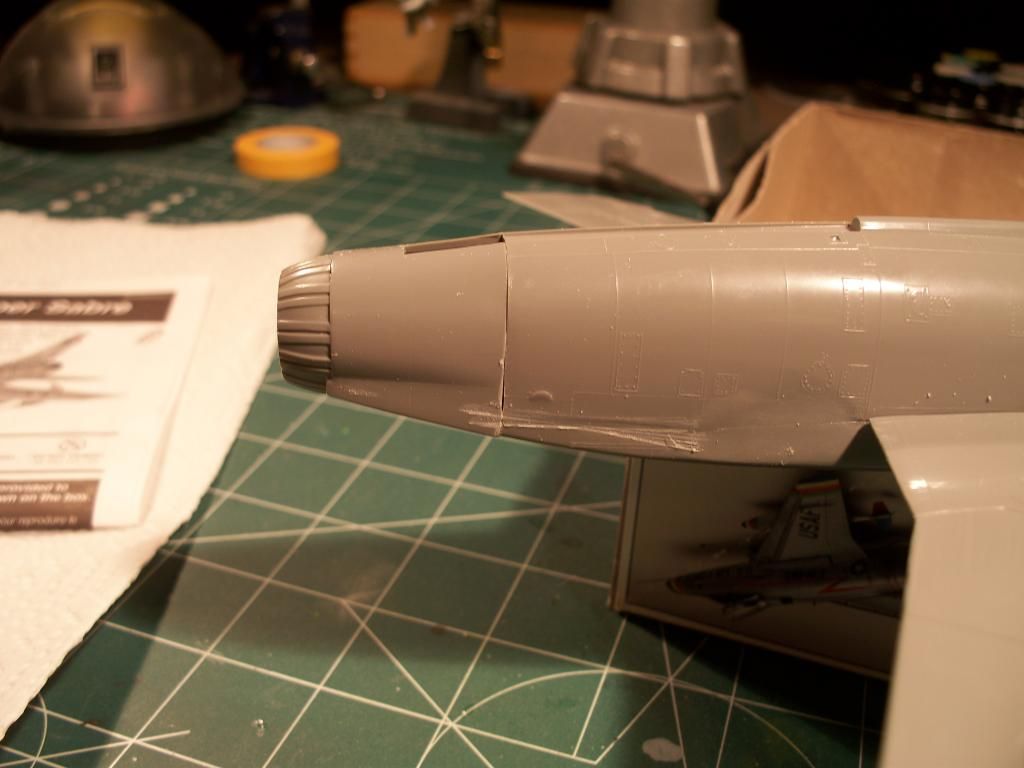
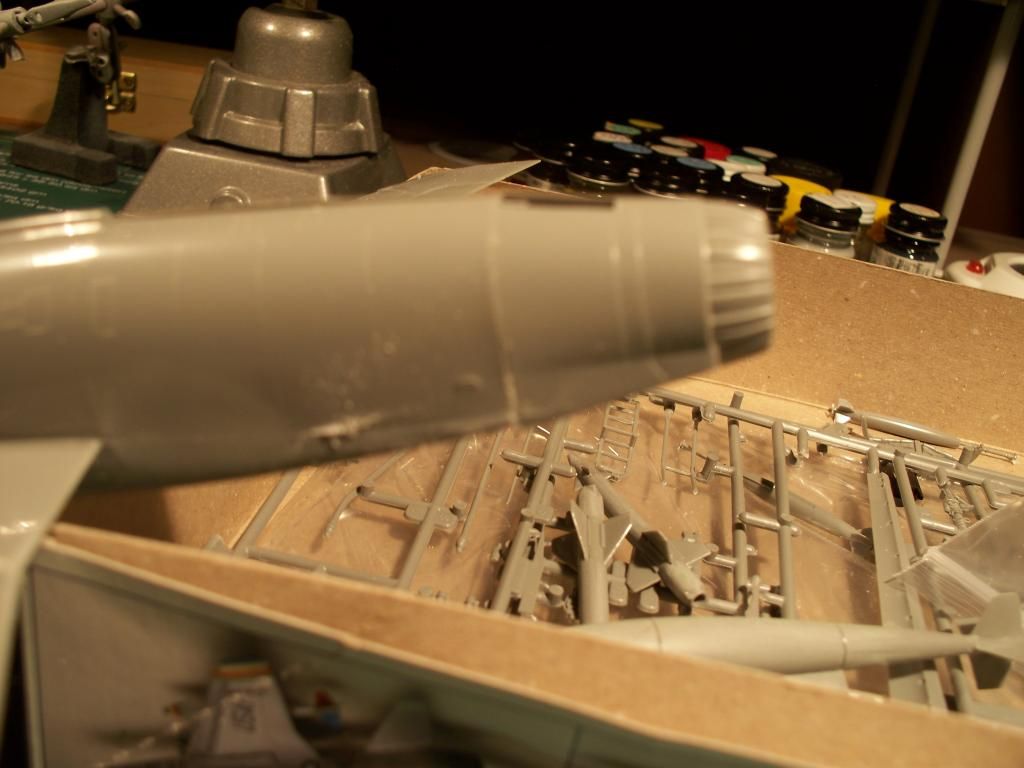
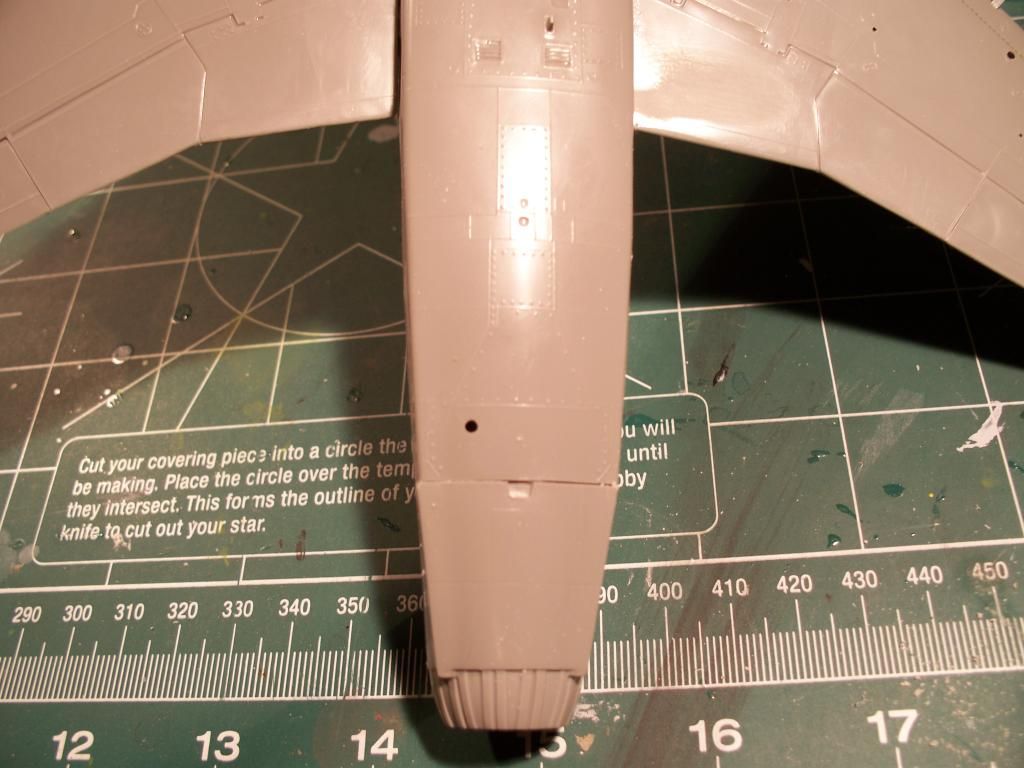
 Not too bad. I thought that the razor saw would take off more plastic than it did, but my assumptions were way off base; very little plastic was removed. I made sure to mark the stabilizers once off to make sure that I put them back on the correct sides upon re-installation. 

.

And so, after a lot of gap-filling with super glue and accelerator, plus using some .005" sheet plastic for the wider gaps, I finally got it looking decent. I used a 150-grit sanding stick to get it this far. Quite a bit of raised panels lines were lost to this. I'll worry about replacing those later on.    Although it still looks as though the gaps are still present, they are actually filled with super glue and sanded smooth. The clear super glue gives the effect that gaps are still present. You can see in the third & fourth photos immediately above where I had to use some .005" sheet plastic to fill the wider gaps. worked very well.
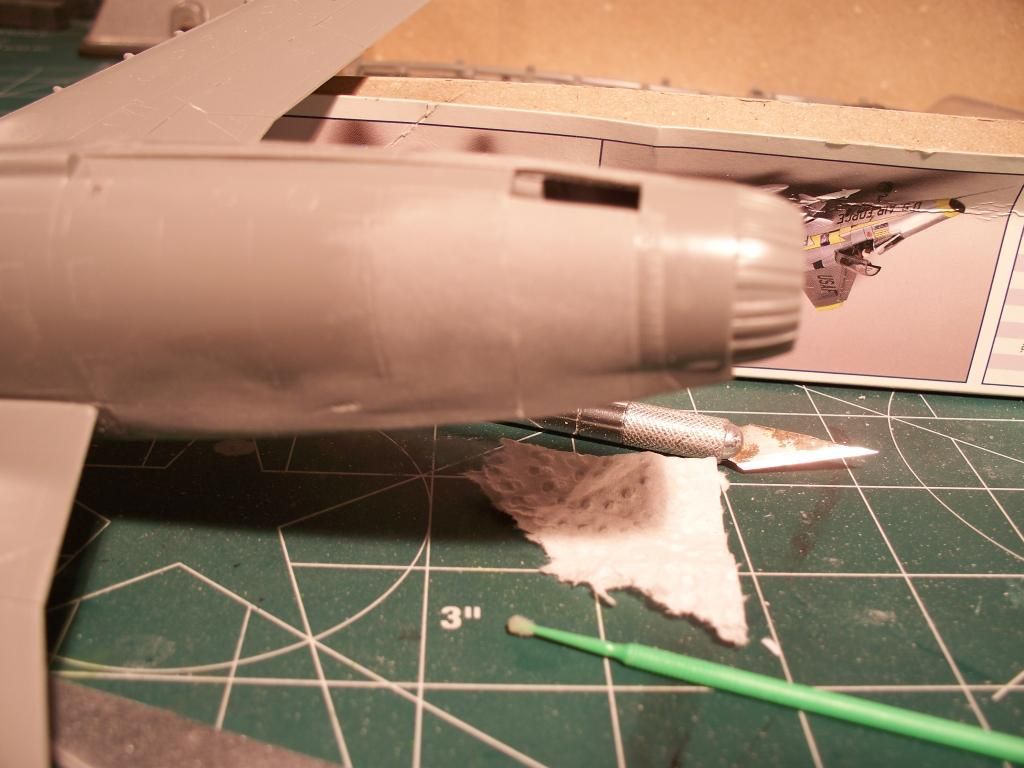
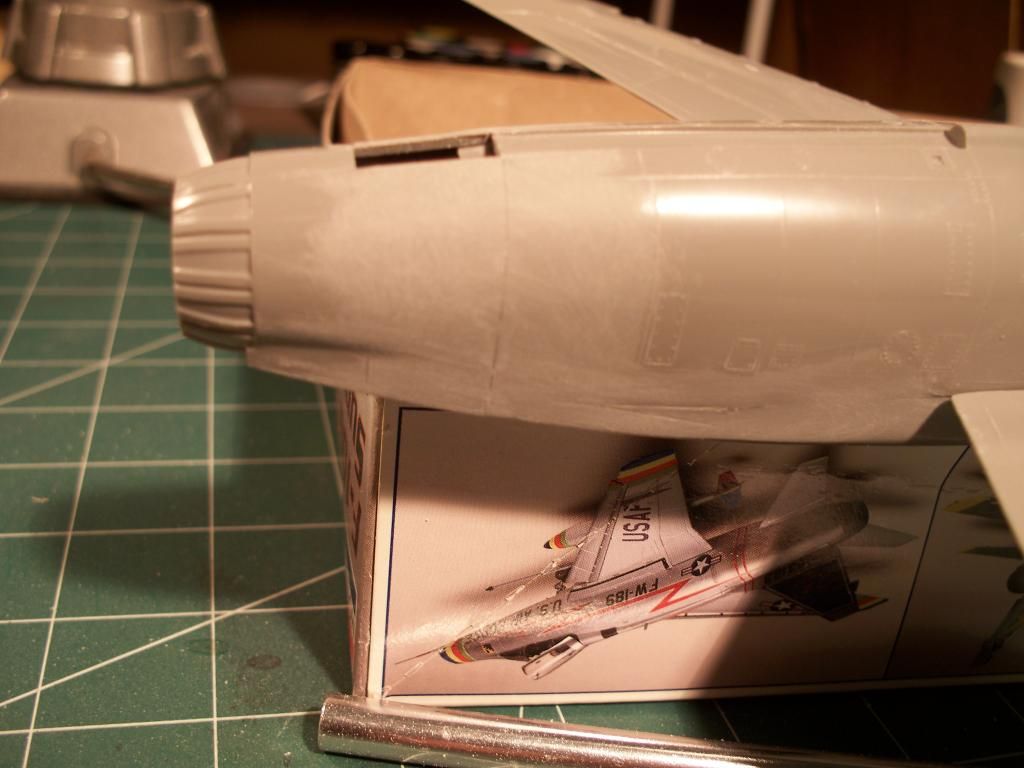
.

And now, for the nose cone.......   It had a few fit issues, too, but 150-grit sanding sticks will do wonders for ill fits. More raised panel lines were lost here, too, but I'll replace those later on, once I figure out how.........
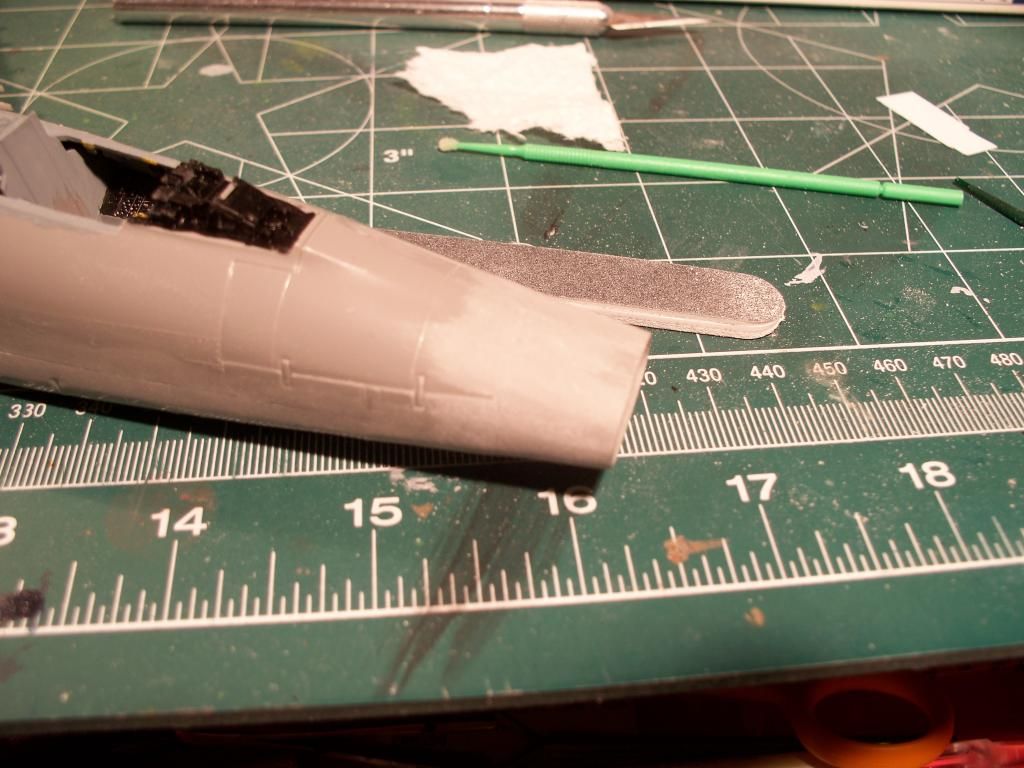
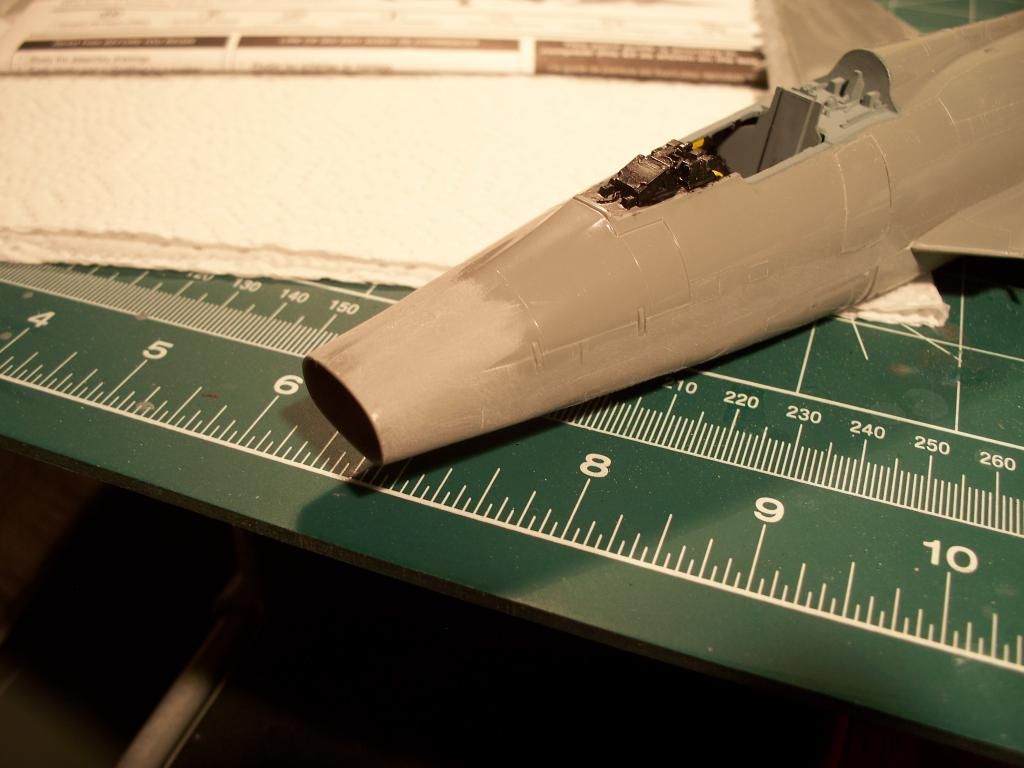
More to come soon (I hope!!).

Devil Dawg

On The Bench: Tamiya 1/32nd Mitsubishi A6M5 Model 52 Zeke For Japanese Group Build

Build one at a time? Hah! That'll be the day!!

  • Member since
    December 2002
  • From: Coldwater, Mich
Posted by MKelley on Tuesday, January 13, 2015 8:13 PM

Silentbob33 and Tal Afar Dave, thanks the kind words. It was a lot of work but, it was worth it. Thanks again.

  • Member since
    January 2011
  • From: Commonwealth of Virginia
Posted by Tal Afar Dave on Tuesday, January 13, 2015 8:00 PM

-MKelley- your Checkmates Crusader looks awesome!!  Hope mine comes out that good when I get to build it!!

TAD

2022 New Year's Resolution:  Enter 1 group build and COMPLETE a build this year!!  Why Photobucket did you rob me of my one Group Build Badge???  Must be part of the strong anti-Monogram cartel!!!

 ]

  • Member since
    February 2014
  • From: Michigan
Posted by silentbob33 on Sunday, January 11, 2015 7:46 PM

Awesome Crusader!  I've always liked the look of it

On my bench: Academy 1/35 UH-60L Black Hawk

  • Member since
    December 2002
  • From: Coldwater, Mich
Posted by MKelley on Sunday, January 11, 2015 7:11 PM

mississippivol

MK,that is a beautiful Crusader!

Nice work on your Typhoon, Stik!

Thank you mississippivol Toast

JOIN OUR COMMUNITY!

Our community is FREE to join. To participate you must either login or register for an account.

SEARCH FORUMS
FREE NEWSLETTER
By signing up you may also receive reader surveys and occasional special offers. We do not sell, rent or trade our email lists. View our Privacy Policy.