SEARCH FINESCALE.COM

Enter keywords or a search phrase below:

Monogram Mafia III

106820 views
1369 replies
1 rating 2 rating 3 rating 4 rating 5 rating
  • Member since
    September 2006
  • From: Bethlehem PA
Posted by the Baron on Thursday, December 4, 2014 11:47 AM

mississippivol

Aw, nuts, I hate to hear putty/sprue mentioned as fillers...

Why is that?

The bigger the government, the smaller the citizen.


  • Member since
    November 2003
  • From: State of Mississippi. State motto: Virtute et armis (By valor and arms)
Posted by mississippivol on Wednesday, December 3, 2014 7:47 PM

Aw, nuts, I hate to hear putty/sprue mentioned as fillers....I passed on building mine for the Airfix Buccaneer that's on the deck now; another putty bomb....

  • Member since
    October 2004
  • From: Northern Virginia
Posted by ygmodeler4 on Tuesday, December 2, 2014 10:31 PM

Got some progress done on the 106 today, got the remainder of putty and stretched sprue put on to fill the gaps...thursday night/ friday I should be able to do some sanding depending on the mood I'm in.

It might be warm enough for me to airbrush though which would be good, the Mig-21 is waiting for another layer of its camo.

So nothing picture worthy, but I'm making baby steps ;)

-Josiah

  • Member since
    July 2004
  • From: Sonora Desert
Posted by stikpusher on Monday, December 1, 2014 10:58 PM

Let me know when you do.


F is for FIRE, That burns down the whole town!

U is for URANIUM... BOMBS!

N is for NO SURVIVORS...

       - Plankton

LSM


  • Member since
    May 2004
  • From: Land of Lakes
Posted by cbaltrin on Monday, December 1, 2014 7:28 PM

Great, I'll look through my stash and be back. Maybe I'll do a pair of Thunderbolts... or a P-38..... or if I am feeling especially nutty... I'll try to get a F-14 done in 6 months!

On the Bench: Too Much

  • Member since
    July 2004
  • From: Sonora Desert
Posted by stikpusher on Monday, December 1, 2014 12:56 AM

Yes Chris, you are welcome to join, there is no end date at this time. You get 6 months to complete two kits form the date you start the first build.


F is for FIRE, That burns down the whole town!

U is for URANIUM... BOMBS!

N is for NO SURVIVORS...

       - Plankton

LSM


  • Member since
    May 2004
  • From: Land of Lakes
Posted by cbaltrin on Sunday, November 30, 2014 6:40 PM

First, let me say that I have been Browsing this group build and enjoyed seeing all your work very much. I especially liked the F6F and F-84F.

What exactly is the status of this GB?   I got the impression that this GB has no end date and once can still join? If so, I might be interested in signing up. Happy Modeling & Merry Christmas. Chris

On the Bench: Too Much

  • Member since
    May 2004
  • From: Land of Lakes
Posted by cbaltrin on Sunday, November 30, 2014 6:31 PM

Nice work MKelley. I love the F-84F

On the Bench: Too Much

  • Member since
    November 2003
  • From: State of Mississippi. State motto: Virtute et armis (By valor and arms)
Posted by mississippivol on Sunday, November 30, 2014 6:28 PM

MK, that's a really cool build! I think that kit has been in my stash since '85. Love the choice of markings too!

  • Member since
    May 2004
  • From: Land of Lakes
Posted by cbaltrin on Sunday, November 30, 2014 6:26 PM

I love your Hellcat! Love that kit. Might need to build the one I have in my stash now.

On the Bench: Too Much

  • Member since
    December 2002
  • From: Coldwater, Mich
Posted by MKelley on Sunday, November 30, 2014 5:30 AM
All right gentlemen, here is some of the pain put myself through for the F-84. Humbrol actually makes two different Extra Dark Ocean gray, one is with a definite green hue to it. The other is the gray tone. Of course I used the green one before I really checked my information on the colors.  Once I realized that I had used the wrong color it was back to bench  Here is the finished product. I think that this kit is really underappreciated. It finishes up quite nicely.   A poor photo fo the cockpit. I really need a better camera.
  • Member since
    July 2004
  • From: Sonora Desert
Posted by stikpusher on Sunday, November 30, 2014 12:46 AM

Oh I do like it MK. More photos when you can please!


F is for FIRE, That burns down the whole town!

U is for URANIUM... BOMBS!

N is for NO SURVIVORS...

       - Plankton

LSM


  • Member since
    December 2002
  • From: Coldwater, Mich
Posted by MKelley on Saturday, November 29, 2014 3:17 PM
OK Stik, I have the F-84F completed. It is in the markings of the Royal Netherlands Air Force. This one was a struggle, all self inflicted. At first I used the wrong Dark Ocean gray, then I placed the Netherland insignia wrong. The insignia should have the white at the bottom.   I am short of time right now I will add more in progress photos.
  • Member since
    February 2014
  • From: Michigan
Posted by silentbob33 on Thursday, November 20, 2014 12:08 PM

Thanks Dave!  For the greens I used Model Master medium green and dark green enamels, and the tan is Model Master dark tan acrylic.  I sprayed with varying pressures to get a sort of weathered, uneven appearance that I saw of different F-4s that were in and around Vietnam, and to keep sharper edges around the different colors to limit overspray.

On my bench: Academy 1/35 UH-60L Black Hawk

  • Member since
    January 2011
  • From: Commonwealth of Virginia
Posted by Tal Afar Dave on Thursday, November 20, 2014 10:00 AM

Silent Bob- Incredible job on the SEA camo job; really well executed; very envious on this end of the results.  What paints did you use??

Devil Dawg- I got a few F-100s in my stash as well; like the trick with the wheel well reinforcement.  I will have to borrow that idea when I get to my builds.  

Look forward to seeing your builds progress.......

TAD

2022 New Year's Resolution:  Enter 1 group build and COMPLETE a build this year!!  Why Photobucket did you rob me of my one Group Build Badge???  Must be part of the strong anti-Monogram cartel!!!

 ]

  • Member since
    February 2014
  • From: Michigan
Posted by silentbob33 on Wednesday, November 19, 2014 12:07 PM

Thanks guys!

On my bench: Academy 1/35 UH-60L Black Hawk

  • Member since
    July 2004
  • From: Sonora Desert
Posted by stikpusher on Tuesday, November 18, 2014 11:49 PM

Bootyful!!!!!


F is for FIRE, That burns down the whole town!

U is for URANIUM... BOMBS!

N is for NO SURVIVORS...

       - Plankton

LSM


  • Member since
    November 2003
  • From: State of Mississippi. State motto: Virtute et armis (By valor and arms)
Posted by mississippivol on Tuesday, November 18, 2014 8:48 PM

Great job on the paint!

  • Member since
    February 2014
  • From: Michigan
Posted by silentbob33 on Tuesday, November 18, 2014 6:55 PM

I finished painting the SEA camo on the Phantom.  I'm pretty pleased with the results, despite some airbrush problems and some touch-ups here and there.  Now on to the wheel wells...

On my bench: Academy 1/35 UH-60L Black Hawk

  • Member since
    March 2005
  • From: Lancaster, South Carolina
Posted by Devil Dawg on Saturday, November 15, 2014 12:32 PM

Yep, Woody, that's where I bought my F-100. I think I got it with the 40%-off coupon. So, maybe around $10 with the coupon, minus tax. Thanks for the compliments on mine. I've built a couple of these for my dad, who was a crew chief on them back in the late '50s - early '60s. Finally doing one for me. They're a good build, and even if you load them up with aftermarket stuff, still don't cost a heckuva lot.

Devil Dawg

On The Bench: Tamiya 1/32nd Mitsubishi A6M5 Model 52 Zeke For Japanese Group Build

Build one at a time? Hah! That'll be the day!!

  • Member since
    February 2003
  • From: USA
Posted by woody0369 on Friday, November 14, 2014 2:33 PM

Lookin great DD. I'm gonna have to pick this one up at HL. I keep looking at it but just haven't pulled the trigger. Keep up the great work.

  • Member since
    March 2005
  • From: Lancaster, South Carolina
Posted by Devil Dawg on Thursday, November 13, 2014 9:56 PM

Another update on my Super Sabre...........

.

Got the cockpit tub/intake trunk mounted in the upper fuselage half, but noticed that the tub wanted to sag just a bit. I noticed that the rear of the tub didn't come close to touching anything on the lower fuselage half, so I added a couple of pieces of T-shaped sprue on the bottom of the tub for a shim, and test fitted to make sure that the shim made contact with the top of the nose wheel well. Had to sand the shim just a bit to get the height just right. This keeps the tub from sagging.

.

.

Here is the cockpit tub mounted in the upper fuselage half. The instrument panel is mounted, and most of the cockpit detail has been painted. As mentioned before, I used mainly white for the detail, with a few switches picked out in silver. I studied my reference a little closer, and saw that yellow was used on quite a few areas as a caution color, mainly on emergency levers and switches, plus some small covers on the side panels and the front of the control stick. So, a little yellow was used, too. If I ever build this kit again (and I probably will....), I'll get a photo-etch detail set for it. The kit stuff is adequate, but hard to paint the details. Maybe a Zoom Color Etch set will be in my next one......... Still need to add the HUD glass, and pick out the details on the coaming.

.

.


The seat is coming along. I painted the seat belts with some Polly Scale acrylic Flesh tone, as that was the closest I could come to matching what I saw in my reference. I'm gonna wait for that to dry, then pick out the metal buckles by dry-brushing with silver. Hoping to have the seat finished by this weekend. The seat has adequate detail for this scale, but it's hard to detail-paint it, as all the details are molded together. It would be much easier to paint the details as separate pieces first, then glue them together.

.

.

And that's all for tonight, folks. Thanks for looking at it. Gimme some comments!!

Gary Mason

Devil Dawg

On The Bench: Tamiya 1/32nd Mitsubishi A6M5 Model 52 Zeke For Japanese Group Build

Build one at a time? Hah! That'll be the day!!

  • Member since
    March 2005
  • From: Lancaster, South Carolina
Posted by Devil Dawg on Thursday, November 13, 2014 9:38 PM

I'm going natural metal finish on this one, Steve, plus lots of colorful decals. Super Sabres look so much better with color. Phantoms and Thunderchiefs look better in camouflage.

Devil Dawg

On The Bench: Tamiya 1/32nd Mitsubishi A6M5 Model 52 Zeke For Japanese Group Build

Build one at a time? Hah! That'll be the day!!

  • Member since
    July 2014
Posted by modelcrazy on Thursday, November 13, 2014 10:02 AM

Nice start there Gary,

That Monogram kit does seem to hide the seams well. I had to add just a few raise panel lines to replace the ones I sanded off on the fuse on mine, but not too many. I didn't have too many complaints of the kit, I felt it was a very nice offering from Monogram. Are you going for NMF or camo?

Steve

Steve

Building a kit from your stash is like cutting a head off a Hydra, two more take it's place.


http://www.spamodeler.com/forum/

  • Member since
    March 2005
  • From: Lancaster, South Carolina
Posted by Devil Dawg on Thursday, November 13, 2014 9:58 AM

Oh, and I forgot to mention:

Everyone is doing OUTSTANDING work on this Group Build!! I'm very impressed with everything that I'm seeing here. Too bad that we all can't get together somehow with our builds from this Group Build, and take a group photo of them all together. THAT would be AWESOME!!

Gary Mason

Devil Dawg

On The Bench: Tamiya 1/32nd Mitsubishi A6M5 Model 52 Zeke For Japanese Group Build

Build one at a time? Hah! That'll be the day!!

  • Member since
    March 2005
  • From: Lancaster, South Carolina
Posted by Devil Dawg on Thursday, November 13, 2014 9:52 AM

Fellow Group Build members,

Sorry that I haven't posted in quite a while. When I first signed up for this group build, work was relatively quiet (I'm an on-call 24/7 medical electronics repair field service tech), so I figured I could knock out two models with no problems in just a couple of months. This group build would give me the incentive to do so. As soon as I signed up for this group build and the USMC Group Build, my work load piled up exponentially! I'm signed up for the F-100D and OA-4M, and started the F-100D on 06 Sept 2014. Two months later, on 09 Nov 2014 (this past Sunday), I FINALLY got my second day of work completed on the Super Sabre. I still haven't started the OA-4M yet. Hopefully, I can get a lot more done in the next four months, if work permits. Anyways, here is an update on the Super Sabre:

On Day 01, I glued the wings together, then glued together the external fuel tanks & Bull Pups, plus cleaned up the flash on the parts. On Day 02 (two months later!!), I hand-painted the Interior Black on the cockpit side consoles, instrument panel, coaming, and canopy insert, plus I used Medium Gray on the rest of the cockpit and seat, and let everything dry for a few days. On Day 03 (last night), I did a little sanding on the places that I put some putty on (mainly the external tanks & Bull Pups), and dry-brushed the details in the cockpit & instrument panel. I painted the headrest Red, along with the seat cushion, and painted the back-rest RLM 23 (LichtGrun (light green)). It's an almost-perfect match for the the green found on the seat cushions - it has that satiny look to it (is "satiny" a word??). I'm using Len Lundh's F-100D/F Super Sabre Walk Around 48 for my reference (Squadron Signal Publication 5548). The seat still has some work to be done. I'm awaiting the paint to dry/cure a bit more before I continue with it. Below are some pictures.......

.

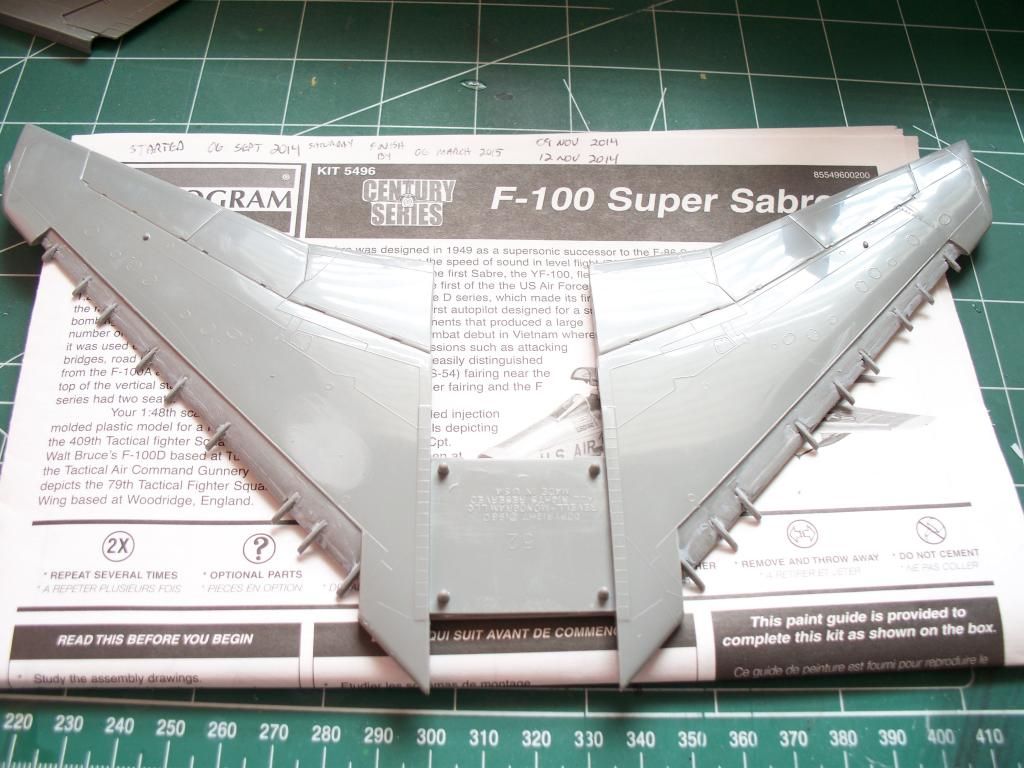
The wing assembly. I tried to putty (Tamiya putty in a tube) the seams under the leading edge slats, but sanding in between the rails proved to be a little more than frustrating, although it can be done. I finally test-fitted the slats after sanding, and they seem to cover the seams adequately, so I'll leave the seams as they are.

.

.

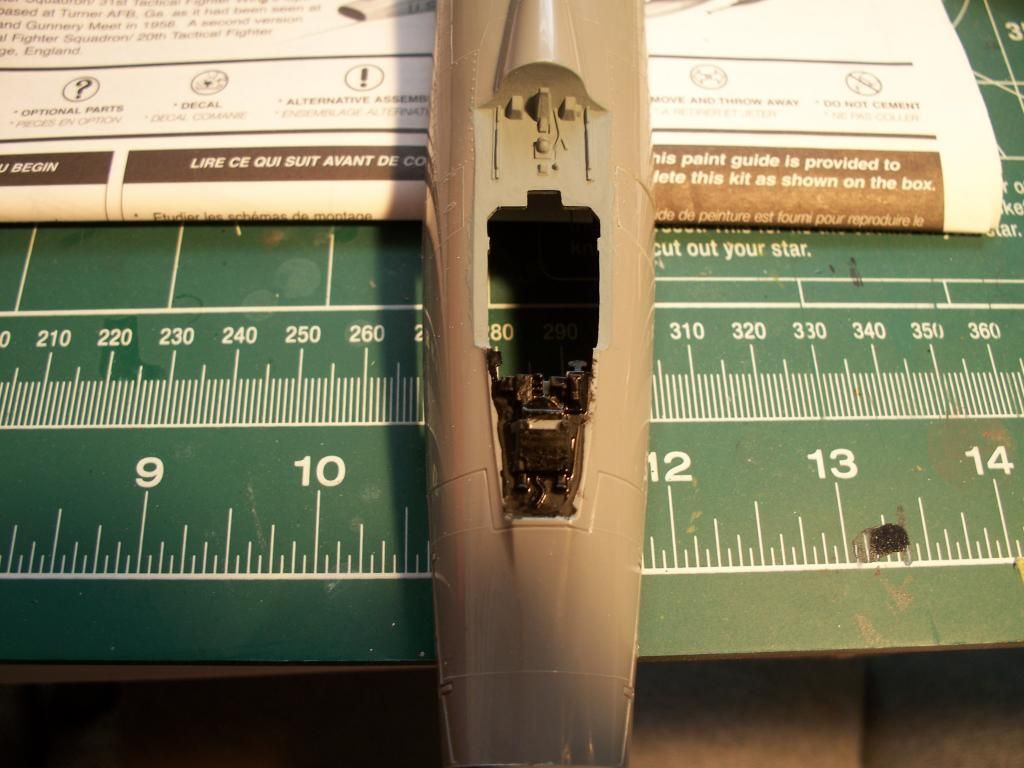
Here's the seat. Sorry that it didn't focus well. I used RLM 23 for the green seat-back cushion, Medium Gray for the seat frame, Yellow for the Emergency Eject handles, and Red for the seat cushion and arm-rests. I'm awaiting the paint to cure a bit longer before continuing on with the detail painting, such as the seat belts. I'll probably shoot a touch of flat on the red parts to knock down the sheen.

.

.

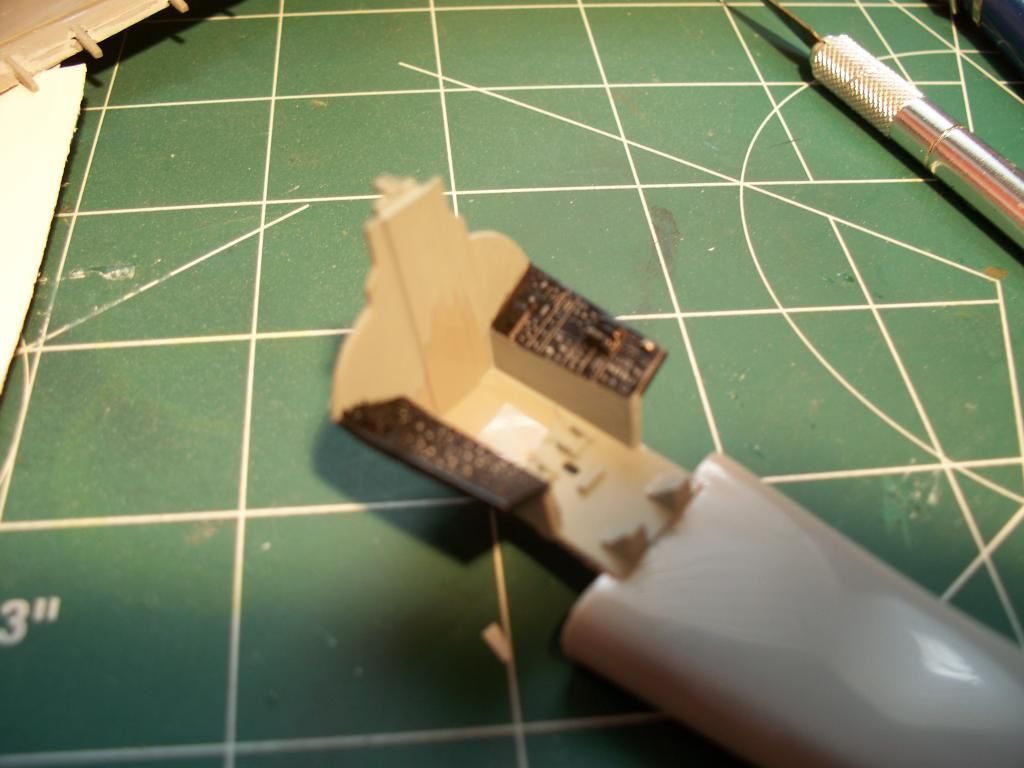
The cockpit tub/intake scoop was pretty easy to paint (sorry about the focus on this one as well). I used Medium Gray on the tub in general, and Interior Black on the console panels. I dry-brushed Flat White on the console panels to pick out the various switches and knobs. I started to use a few different colors to add some color, but then realized that most real aircraft use mainly white or silver for those details, so I'm using white. 

.

.

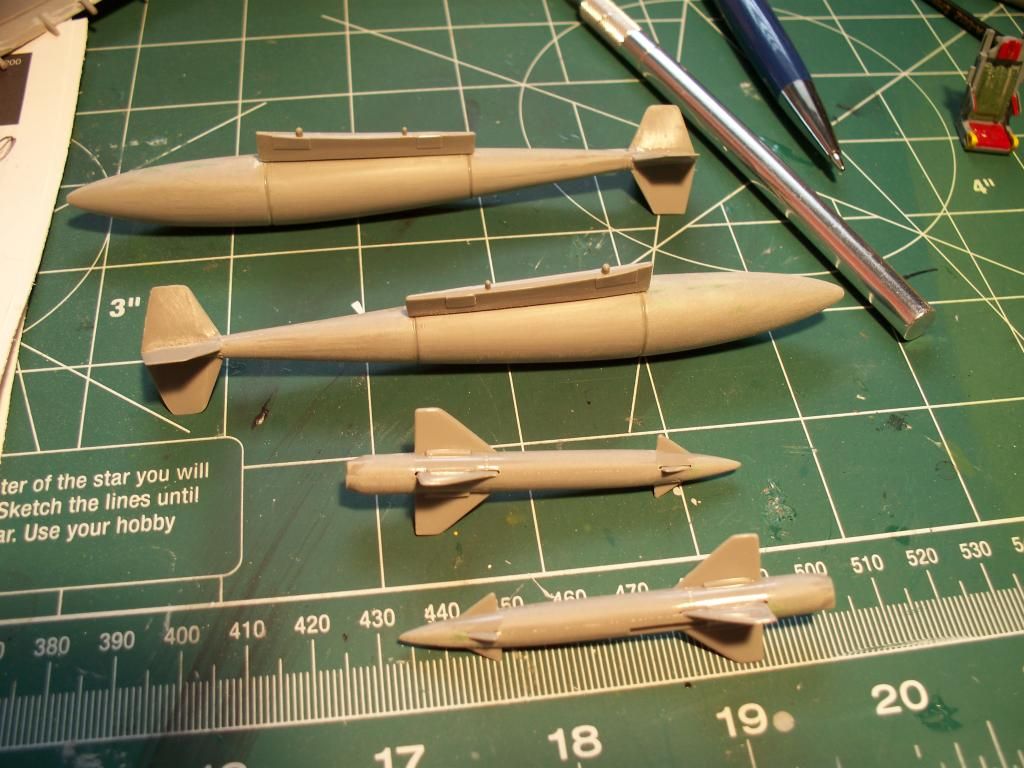
The easiest parts of the build (so far) - the external tanks and the Bull Pups. The Bull Pups needed very little putty (just a bit on each end), but the tanks had some severe waves along the front seams, so a bit more putty was needed on both of them. I used Squadron Green putty on both. Now, it's been a long time since I had opened a tube of Squadron Green (I usually use Tamiya putty), but I just don't remember it being as thick and dry as this tube is. The putty was drying almost as fast as I was applying it. It's possible that this tube has dried out (I don't know how long I've had it - it's still almost full), and I need a new one. Or, maybe that's the way Squadron green is. Not sure. Any comments on that would be appreciated.

.

.

The coaming was painted with Interior Black and allowed to dry. I'll pick out the details on it just before the windscreen is glued in place.

.

.

Hope you like what you see so far. I hope to post a few more pictures soon (like, maybe, hopefully this weekend).

Gary Mason

Devil Dawg

On The Bench: Tamiya 1/32nd Mitsubishi A6M5 Model 52 Zeke For Japanese Group Build

Build one at a time? Hah! That'll be the day!!

  • Member since
    February 2003
  • From: USA
Posted by woody0369 on Tuesday, November 11, 2014 9:17 PM

Thank you so much Stik. It's much appreciated.

  • Member since
    July 2004
  • From: Sonora Desert
Posted by stikpusher on Tuesday, November 11, 2014 1:24 PM

The Academy 21 kits also come with some rocket pods in addition to their Atoll Missiles (Soviet reverse engineered copies of the Sidewinder). Have a look at the sprues there.


F is for FIRE, That burns down the whole town!

U is for URANIUM... BOMBS!

N is for NO SURVIVORS...

       - Plankton

LSM


  • Member since
    November 2010
  • From: Florida-West Central
Posted by Eagle90 on Tuesday, November 11, 2014 9:47 AM

stikpusher

Woody, your Widow has been added to the front page roster. Once again, beautiful work on that ol horrible unbuildable POS everybody seems to bag on, yet once again built into a lovely finish.

Bob, nice work on your Phantom. I am looking forward to seeing some paint on it. Nice fix on the tail short shot.

Eagle, the Fishbed is starting to look like a proper Mig now. An Afghan War 21 sounds intriguing to me. Are you gonna put some air to ground weapons on it?

Good Afternoon Dom! Wink

You know, I'm not extremely familiar with Soviet load outs, but the kit comes with 2 sidewinder looking missiles and a fuel tank...that's it.  I do have another 1/48 Mig-21 in the stash (Academy), but it too is a PF so it only has 2 missiles and a fuel tank.  So, not sure yet if I'll stick to that or change it.  Guess I need to figure it out soon, as soon as I do a couple of seams, she'll be just about ready to spray!

Eagle90


  • Member since
    July 2004
  • From: Sonora Desert
Posted by stikpusher on Monday, November 10, 2014 2:54 PM

Woody, your Widow has been added to the front page roster. Once again, beautiful work on that ol horrible unbuildable POS everybody seems to bag on, yet once again built into a lovely finish.

Bob, nice work on your Phantom. I am looking forward to seeing some paint on it. Nice fix on the tail short shot.

Eagle, the Fishbed is starting to look like a proper Mig now. An Afghan War 21 sounds intriguing to me. Are you gonna put some air to ground weapons on it?


F is for FIRE, That burns down the whole town!

U is for URANIUM... BOMBS!

N is for NO SURVIVORS...

       - Plankton

LSM


JOIN OUR COMMUNITY!

Our community is FREE to join. To participate you must either login or register for an account.

SEARCH FORUMS
FREE NEWSLETTER
By signing up you may also receive reader surveys and occasional special offers. We do not sell, rent or trade our email lists. View our Privacy Policy.