SEARCH FINESCALE.COM

Enter keywords or a search phrase below:

The 2015 /16 Red Hot and Rollin Automotive Group Build--Ended

121084 views
2225 replies
1 rating 2 rating 3 rating 4 rating 5 rating
  • Member since
    January 2015
Posted by MOPAR - D on Sunday, January 8, 2017 8:13 PM

I've been working on getting the frame together and have now a coat of primer on it and have been dechromeing the wheels and fuel tanks. I'm going to use Testors Star-Spangled Blue I think it is close to what I see in the pictures. 


  • Member since
    January 2015
Posted by MOPAR - D on Sunday, January 8, 2017 9:28 AM

Joe lets use the first one's on inside and outside. 

  • Member since
    March 2012
  • From: Corpus Christi, Tx
Posted by mustang1989 on Saturday, January 7, 2017 9:23 PM

Tim...................................whadda shine!!! YesYesYesYesYes


And I loooooooooooooove me some RB motion stuff too. I just got a big order in myself.


 Forum | Modelers Social Club Forum (proboards.com) 

  • Member since
    March 2012
  • From: Corpus Christi, Tx
Posted by mustang1989 on Saturday, January 7, 2017 7:42 PM

MOPAR - D

Joe here's my next build to list. 

This is a build that I've been planning for many years after I found pictures of this rig. The story behind the rig is that Chrysler sponsored the Spurrlow singing group in the late 60's. They went around the country preforming at schools. I'm starting with an resin Dodge LS 1000 cab from AITM, AMT White-Frightliner SD and Bill Elliott stock car transporter. The trailer still has some hurdles for me I would like to change out the the wheels to the smaller size and I'm not sure how I'm going to paint or decal the trailer to match. I'm open for any ideas anyone may have. 

So far I've started on the frame. 


Reference pictures of what I'm building


This'll be one for the books Dan. Watching with great interest! I'll get you posted pal.


 Forum | Modelers Social Club Forum (proboards.com) 

  • Member since
    March 2012
  • From: Corpus Christi, Tx
Posted by mustang1989 on Saturday, January 7, 2017 7:40 PM

MOPAR - D

Joe. Can you post one out side and one inside?


Gaaaaaaaaaaaah!!! Dude that thing is KILLER Dan!!! You taking that one to San Antonio for Model Fiesta?? I really enjoyed watching this one come together bud and am really glad that you are a part of this GB. I'm going to have to change the title of it I can see already to reflect the new year. lol

Let me know which one's of those inside and outside pics you want posted.


 Forum | Modelers Social Club Forum (proboards.com) 

  • Member since
    May 2009
  • From: Poland
Posted by Pawel on Saturday, January 7, 2017 6:03 PM

Nice colour!

All comments and critique welcomed. Thanks for your honest opinions!

www.vietnam.net.pl

  • Member since
    January 2015
Posted by taaron76 on Saturday, January 7, 2017 5:21 PM

I found some time to lay some color down.  2 base coats and 3 clear coats.... now to let it sit and start on the engine and interior.  2 weeks should be plenty of time to dry before I get to wet sand and polish.

Tim

  • Member since
    January 2015
Posted by taaron76 on Wednesday, January 4, 2017 11:14 PM

Happy New Year!!!

Slow progress over the last couple of weeks, but making the door jambs and everything else that doesn't magically appear when you cut and hinge the doors is tedious work. Since this will have a 4-link, I deleted the back seat and boxed the rear compartment in. All of my parts came in to make the 4-link functional, but still making the coilovers and the rest of the hardware that attaches to the axle housing and frame. The ride height isn't exactly set, but when I finish the suspension, it will be pretty close to this. The 4-link will be function, so I will be able to adjust it as needed. Still debating on putting the 427 in it, or the 5.0 Coyote engine.

Tim


  • Member since
    May 2009
  • From: Poland
Posted by Pawel on Wednesday, January 4, 2017 1:30 PM

Seabe - Your bike is looking nice - busy and complicated! Good luck with your build and have a nice day

Paweł

All comments and critique welcomed. Thanks for your honest opinions!

www.vietnam.net.pl

  • Member since
    January 2015
Posted by MOPAR - D on Wednesday, January 4, 2017 12:53 PM

Thanks Seabe the sun light makes it change. 

  • Member since
    January 2014
Posted by Seabe on Monday, January 2, 2017 9:47 PM

Mopar-D I really like what you've done there! Very well built and that nail polish/paint is just killing it! Does the colour change based on heat or light reaction?

Lo and behold, a first quick update from me. No glamour shot... but just wanted to show that the reat swingarm and wheel assembly has been completed - and also attached. Getting there slowly!

  • Member since
    May 2009
  • From: Poland
Posted by Pawel on Sunday, January 1, 2017 4:01 PM

Hello!

I think you should seriously think about letting a custom decal printing company print the decals for you! I don't know about the United States, but in Poland we have at least one company that would print something like that for 30 - 40 $.

Good luck with your project and have a nice day

Paweł

All comments and critique welcomed. Thanks for your honest opinions!

www.vietnam.net.pl

  • Member since
    January 2015
Posted by MOPAR - D on Sunday, January 1, 2017 3:35 PM

Joe here's my next build to list. 

This is a build that I've been planning for many years after I found pictures of this rig. The story behind the rig is that Chrysler sponsored the Spurrlow singing group in the late 60's. They went around the country preforming at schools. I'm starting with an resin Dodge LS 1000 cab from AITM, AMT White-Frightliner SD and Bill Elliott stock car transporter. The trailer still has some hurdles for me I would like to change out the the wheels to the smaller size and I'm not sure how I'm going to paint or decal the trailer to match. I'm open for any ideas anyone may have. 

So far I've started on the frame. 


Reference pictures of what I'm building


  • Member since
    May 2009
  • From: Poland
Posted by Pawel on Sunday, January 1, 2017 1:56 PM

Dan - like I wrote, it looks really good! Very interesting comparison of the colours! Thanks for sharing and have a nice day

Paweł

All comments and critique welcomed. Thanks for your honest opinions!

www.vietnam.net.pl

  • Member since
    January 2015
Posted by MOPAR - D on Sunday, January 1, 2017 1:48 PM

Joe. Can you post one out side and one inside?

  • Member since
    January 2015
Posted by MOPAR - D on Sunday, January 1, 2017 12:33 PM

It's finished with the inside white and out side red paint. 


Inside


Outside


  • Member since
    May 2009
  • From: Poland
Posted by Pawel on Friday, December 30, 2016 5:14 AM

Dan, thanks for the info! That Corvette is looking good, I especially like the flames!

Thanks for sharing and have a nice day

Paweł

All comments and critique welcomed. Thanks for your honest opinions!

www.vietnam.net.pl

  • Member since
    March 2011
Posted by ewheeler454 on Thursday, December 29, 2016 10:51 PM
Dan, That Gasser is sharp! I use nail polish sometimes, but use either lacquer or enamel thinner depending on the type of polish. The semi-gloss parts I painted for the RR is called black on black that I originally was going to use on the Camaro but it didn't have any shine to it so I resprayed it with Model Master Classic Black. Works great for Interiors though as it is between flat and Semi-gloss. I'm off work tomorrow and plan to get the body stuff done and maybe even paint it. L8TR, Eric

  • Member since
    January 2014
Posted by Seabe on Thursday, December 29, 2016 9:11 PM

Wow! That just looks awesome!

  • Member since
    January 2015
Posted by MOPAR - D on Thursday, December 29, 2016 8:56 PM

Getting close to calling this one finished. Just some little trim pieces to add. 


  • Member since
    January 2015
Posted by MOPAR - D on Wednesday, December 28, 2016 4:10 PM

Patel I was on vacation and one of the tee shirts shops was selling shirts and  the nail polish that turns colors. I got to thinking that I've seen other builders use nail polish to paint cars with so I picked up a bottle to try it out. I usee nail polish remover to thin it out for the air brush. I'm using Model Master custom lacquer system ultra gloss clear 

Let me know if you have any other questions. 

  • Member since
    May 2009
  • From: Poland
Posted by Pawel on Wednesday, December 28, 2016 3:38 PM

Hello!

Cool thing - how did you find it? How do you apply that stuff? Might come in handy for other projects!

Good luck with your build and have a nice day

Paweł

All comments and critique welcomed. Thanks for your honest opinions!

www.vietnam.net.pl

  • Member since
    January 2015
Posted by MOPAR - D on Wednesday, December 28, 2016 3:30 PM

Eric nice start on your road runner. 

Heres the web site for the color changing nail polish that that I'm using. 

https://www.delsol.com/nails/nail-polish/nail-polish.html

  • Member since
    May 2009
  • From: Poland
Posted by Pawel on Wednesday, December 28, 2016 4:15 AM

Hello!

Thanks a lot for your kind words!

Dan - can you tell me more about that paint you're using? From what you're writing it changes colour when hit by UV? Who makes that paint?

Eric - that Roadrunner is a classic, no doubt about it!

Joe - Yeah, it's almost there, isn't it? I'm glad to inform you, that the throttle pedal is 100% scratchbuilt by me! I just looked at the real thing photos long enough!

The new seats look good on your bus. As for the bulkhead I'd recommend getting rid of it - in real life this part isn't structural and is often removed. You could replace it with a large X-shaped tubular frame, that would give the car the impression of strength and rigidity and at the same time allowing to show off the engine, what do you think about it?

Good luck with your builds and have a nice day

Paweł

All comments and critique welcomed. Thanks for your honest opinions!

www.vietnam.net.pl

  • Member since
    March 2012
  • From: Corpus Christi, Tx
Posted by mustang1989 on Wednesday, December 28, 2016 3:53 AM

Dan: Great progress on the Vette man!!

Pawel: Looks like the final details are under way with yours and I'm diggin that accelerator pedal. Is that from the Detail Master PE set?

Eric: Roadrunner is looking VERY cool so far!!

Ok folks. I did some interior tinkering because I've got to figure out the seating and with that comes the question of how much of the forward part of the engine will be visible when the seating area is installed. I mean look..................this is the OOB seating:

Image

The whole front of the engine will not be visible at all given that arrangement. So I got to thinking :What if I recline the firewall a few degrees and stick some better seats in there and widen the distance between the seats? This will allow the whole center section to have a clear panel in which to display everything up there since the engine is pretty much the showcase of this build AND what the entire build is constructed around. So I mocked everything up using the seats from the J2000 kit. Imagine this, with racing seat harnesses and everything in the middle clear. It's still in the idea stage at this point and may very well get changed up one more time but this looks like the way I'll be going at this point.

Image

I've got to move the seats back just a tad which means the firewall is going to have to be scooted back about 1/8-3/16 of an inch. Additionally I'll have to relocate the steering column to the drivers side to line up with the seats. Everything seems to clear the roofline as well:

Image

While I'm on modifications, I had to correct a boo-boo. It seems when I tried to make the transmission cut out a little deeper the dremel got away from me and marred the cut out somewhat and I tried to correct it by widening it across the face panel:

Remember I started here:

Image

and ended up here. See how the cut out is now more of an arc than a half moon shape?

Image

the only way around this was to cut the whole panel out:

Image

and drill a whole in some styrene sheet stock and cut a new panel out.

Image

This is the kind of stuff that I really enjoy about custom builds. It seems like when I change one thing then it bleeds over into something else and then something else again and again. The vision I start out with on any given custom auto project often gets changed several times and dictates to me how it's going to go and before I know it's happening the build takes on a while new direction and life of its own. It's really a cool thing to watch unfold.


 Forum | Modelers Social Club Forum (proboards.com) 

  • Member since
    March 2011
Posted by ewheeler454 on Tuesday, December 27, 2016 8:13 PM

Joe,

Glad to hear everything is going good. I'm diggn's the stance on that van lol.

Dan,

The color change on that paint is cool. Do they have it in Lime Green? I've got a 70 Superbee that would look nifty with a Lime Green/Plum Crazy PUrple paint job. hmmmm.

Pawel, nice work with the Alclad. 

I started back up on the Road Runner. Finished up the engine, assembled the interior tub and filled in some scratches from scribing the panel lines. Also painted all the black parts including the stuff to be chromed. I'm redoing the speaker grilles, didn't like the way they turned out lol.

L8TR,

Eric.


  • Member since
    January 2015
Posted by MOPAR - D on Tuesday, December 27, 2016 5:03 PM

Joe, Patel, nice work on those VW buses.

Well I finally got around to get some better out side and inside pictures with a better contrast in the color change. Much better out side than with the UV light. Also glued the glass to the frame's that are just sitting on the body. Still polishing out the clear coat. 


  • Member since
    May 2009
  • From: Poland
Posted by Pawel on Monday, December 26, 2016 3:30 PM

Hello!

Joe - that was a real horror story, I'm glad everybody is OK, hope you had good and nice Christmas! Your Bus is looking so much nicer than the OOB version, good luck with the rest of the build!

I have another update on my bus:


I have finally installed the engine and put on the wheels. I also installed my scratchbuilt schock absorbers - they are painted yellow:


1:24 Hasegawa Volkswagen Type 2 by Pawel


 In the photo below you can see the complete chassis with the wheels - only thing missing is the front cover - that will be installed after I mate the chassis to the body
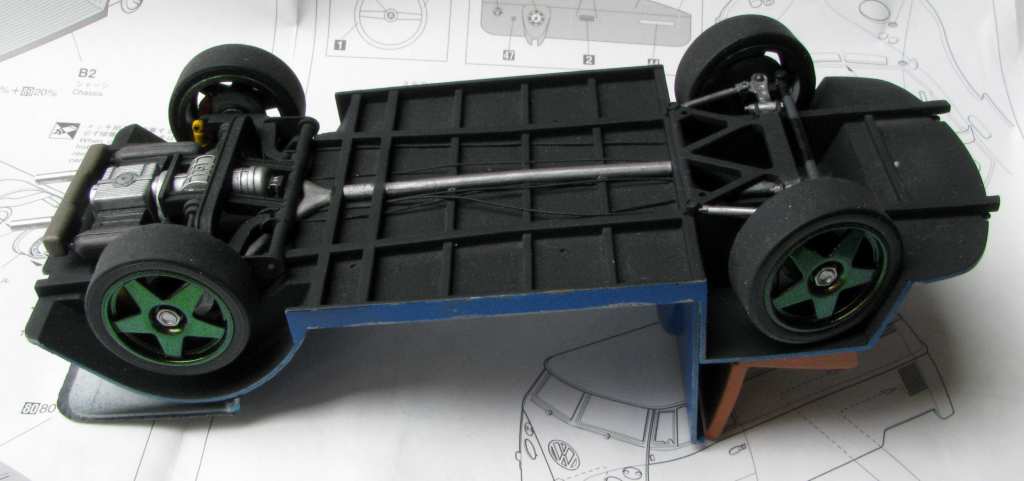
 

1:24 Hasegawa Volkswagen Type 2 by Pawel


I have also installed the glass, the headliner and the interior. The headliner is made out of yoghurt can lid - it's this funny wrinkled aluminium foil. It can be embossed really well and has an interesting texture to it. It is painted with Motip primer gray - makes the interior a little brighter:
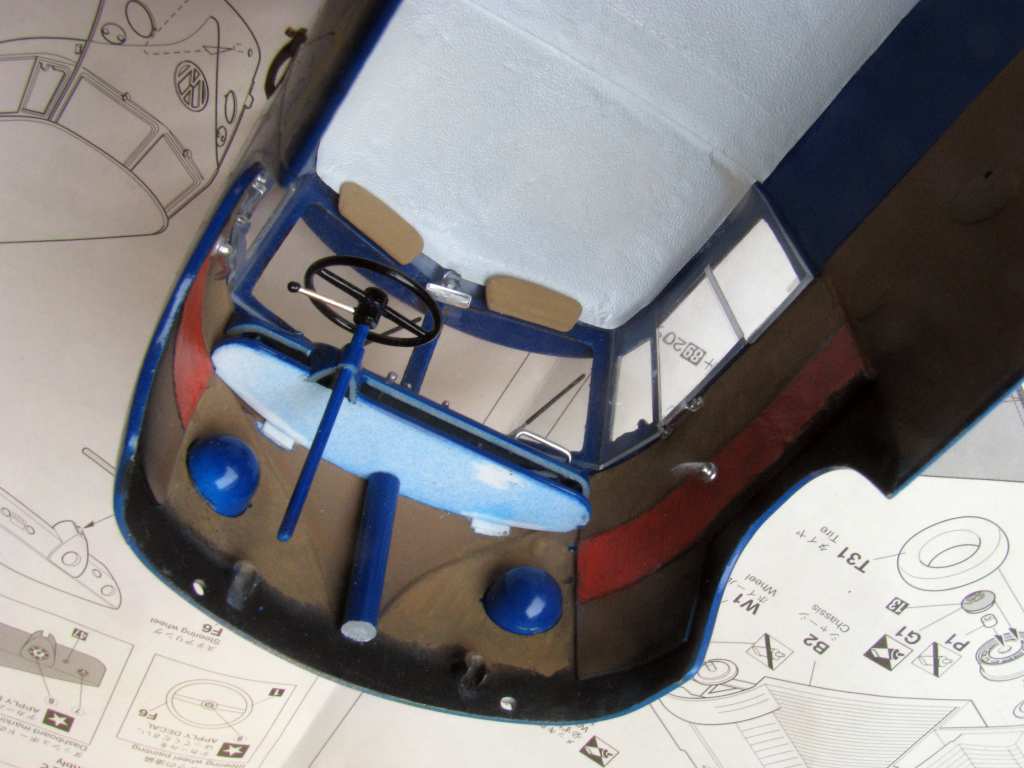
 

1:24 Hasegawa Volkswagen Type 2 by Pawel


I have also installed the scratchbuilt sun shades and interior handles. The air heating tube is also there. In process I discovered that I have lost the emergency brake handle, so I had to scratchbuild it one more time:
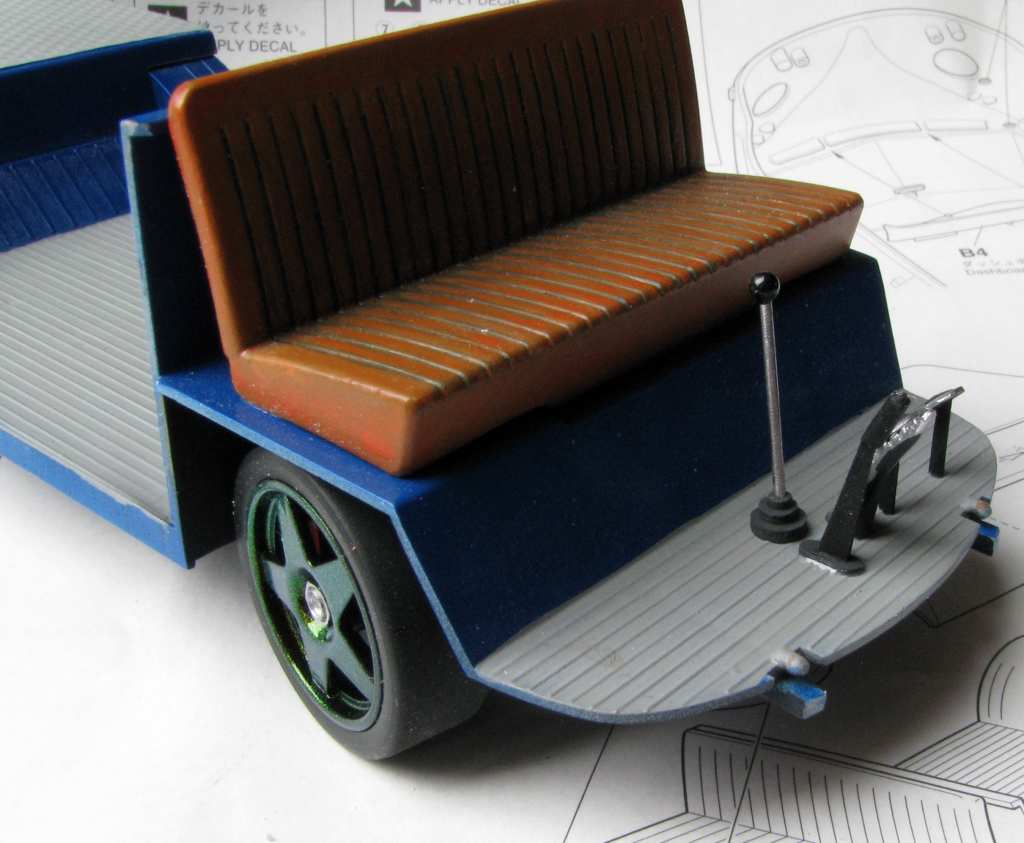
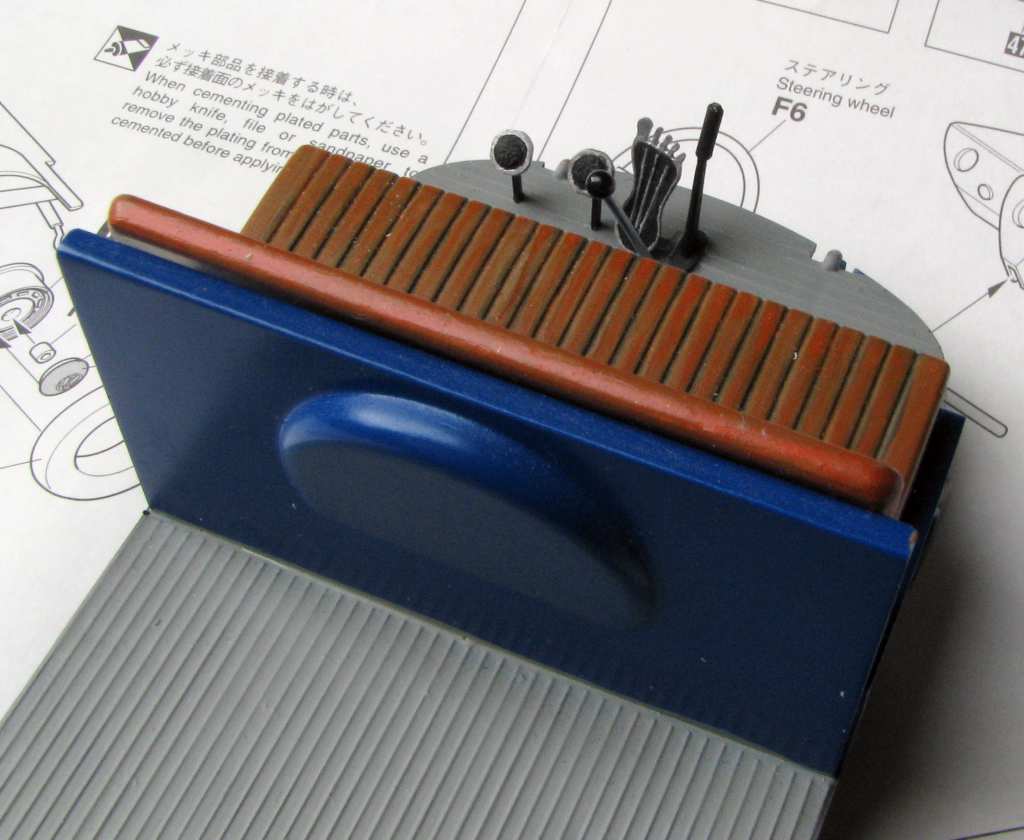
 

1:24 Hasegawa Volkswagen Type 2 by Pawel


1:24 Hasegawa Volkswagen Type 2 by Pawel


I have also finally re-chromed the bumpers - this time with Alclad 2. Much better now:
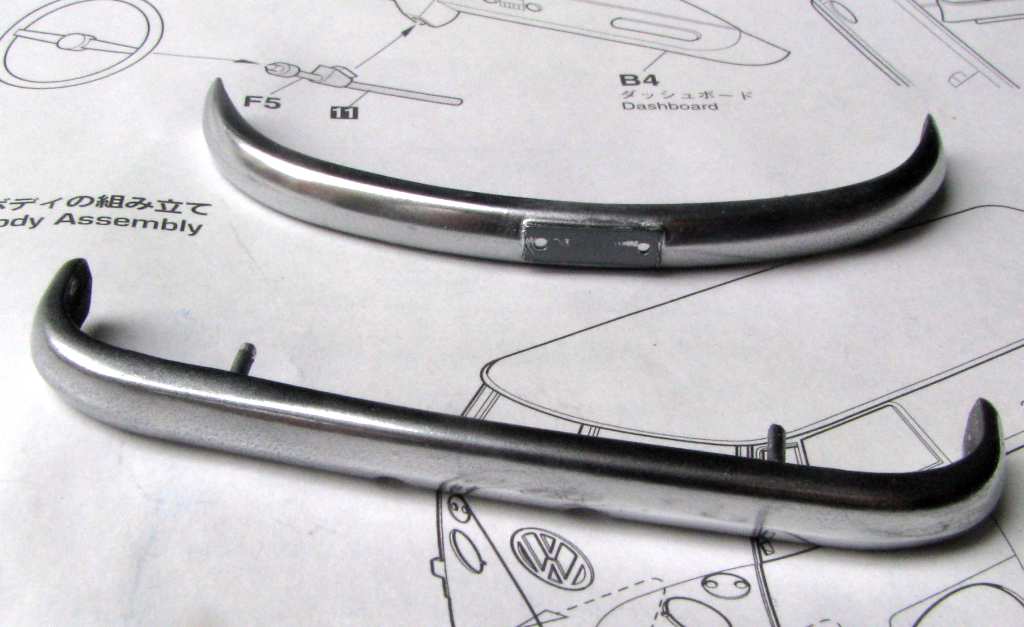
 

1:24 Hasegawa Volkswagen Type 2 by Pawel


So now I'm actually only waiting for my custom-printed decals to do the tags on this one. I hope to have this baby done before the end of the year! Thanks for looking and have a nice day


Paweł

All comments and critique welcomed. Thanks for your honest opinions!

www.vietnam.net.pl

  • Member since
    March 2012
  • From: Corpus Christi, Tx
Posted by mustang1989 on Sunday, December 25, 2016 8:56 PM

To get all caught up in here I'll be posting a few shots over the next few days.

Here's the mock up with the replacment wheels and tires that I've recently acquired...


 Forum | Modelers Social Club Forum (proboards.com) 

  • Member since
    March 2012
  • From: Corpus Christi, Tx
Posted by mustang1989 on Sunday, December 25, 2016 5:47 PM

MOPAR - D


 Joe, don't kick your self be glad that you are still here and have your family. I glad that you and your wife are doing better and I will be continue praying for your wife's complete healing.
 
I like our group here and hope to see it continue next year.
 
Merry Christmas    


No worries Dan. There aint no way I'm kicking myself. I just mean to say that no matter what's happening we're not going to let life get us down is all. Thanks for the uplifting words buddy.


 Forum | Modelers Social Club Forum (proboards.com) 

JOIN OUR COMMUNITY!

Our community is FREE to join. To participate you must either login or register for an account.

SEARCH FORUMS
FREE NEWSLETTER
By signing up you may also receive reader surveys and occasional special offers. We do not sell, rent or trade our email lists. View our Privacy Policy.