SEARCH FINESCALE.COM

Enter keywords or a search phrase below:

The 2015 /16 Red Hot and Rollin Automotive Group Build--Ended

121084 views
2225 replies
1 rating 2 rating 3 rating 4 rating 5 rating
  • Member since
    February 2006
  • From: Smithers, BC, Canada
Posted by ruddratt on Monday, March 16, 2015 10:32 PM

OK fellas, the dragster is done (sort of).  I'm still waiting on the AM spokes & rims for the front tires, so for the photos here I went with the kit rims.  They're not bad, but the AM ones are much more to scale and will make a huge difference since they are such a prominent feature.  Nevertheless, I couldn't resist showing it as is. Hope you enjoy.


Mike

 "We have our own ammunition. It's filled with paint. When we fire it, it makes pretty pictures....scares the hell outta people."


  • Member since
    January 2012
  • From: Hatfield
Posted by Misty on Tuesday, March 17, 2015 3:18 AM

that a fantastic dragster, Mike/ i never really thought about building a dragster  or custom car, but its tempting seeing some of the great builds here.

  • Member since
    January 2015
Posted by MOPAR - D on Tuesday, March 17, 2015 6:02 AM

Mike your dragster is awesome looking already and your new front wheels will put it over the top. What's next?

  • Member since
    December 2009
  • From: Laurel, MD
Posted by Tucohoward on Tuesday, March 17, 2015 9:09 PM

Alittle progress tonight. Worked on the fuel line. Made with soft wire and styrene strip and rod drilled out. Kind of a pain to do in scale, but I am from the school of, if you can't do it in scale, don't do it at all. Added the carb linkage rods and distributor. Painted the alternator.

Jay

The Mighty Mo says no.

  • Member since
    January 2015
Posted by MOPAR - D on Wednesday, March 18, 2015 8:22 AM

Jay - those fuel lines are going to look nice

  • Member since
    March 2012
  • From: Corpus Christi, Tx
Posted by mustang1989 on Wednesday, March 18, 2015 9:27 AM

Jay: Those fuel lines and filters as well as that alternator looks really sharp Jay. A trick I learned from MCM is to go to Radio Shack and purchase some little electrical diodes with leads. They have the "fuel line" and a "filter" all made together and it works perfect!!

Mike: Dude that dragster is da bomb!!!!! Wow man you really hit a homer there!!!!!!!!! Where in the world are you gonna display that big bad boy????


 As of now I had to ditch the idea of the trailing arm suspension just because it just wouldn't work here. What I did do instead was, from my way of thinking, a little unorthodox in the fact that I removed the original spring perches from the build frame and graphed the ones from the spare parts frame onto the one from the build. I know it's not icon_quotes.GIFcorrecticon_quotes.GIF but I'll be able to lower the rear suspension down about 1/4" to put the wheel/ tire assy where I want it and have about 1/8" tweeking room. I've still got to brace them up a little better with some spare resin stock that I've got to clean up the appearance and have to trim up some on the truck bed so that it sits all the way down on the frame in the front (about 1/32"-1/16")  but here's the current progress so I can at least show that I'm building on this.


and a little closer:


This is going to be the location of the wheel/ tire....or at least that I'm shootin' for:


 Forum | Modelers Social Club Forum (proboards.com) 

  • Member since
    January 2015
Posted by MOPAR - D on Wednesday, March 18, 2015 1:40 PM

Joe - glad to see some progress pictures your ride stance is going to look cool on your truck.

  • Member since
    February 2006
  • From: Smithers, BC, Canada
Posted by ruddratt on Wednesday, March 18, 2015 7:43 PM

Many thanks fellas!  This is a fantastic GB and man did I learn a ton from you guys. There will be another entry from me here, just not sure what at this point.  I do have my eye on another dragster, same scale (1/16), but rear-engine (Don Garlits' ride from '75, also a Revell kit).  We'll see. For now, it sits in a display case next to a Tony Schumacher 1/16 die-cast.  The size difference blows me away!  Today's dragsters are HUGE!  My model is about 2/3 the length!


Joe, man that's gonna look sweet!  Love what you're doing there!  Yes

Mike

 "We have our own ammunition. It's filled with paint. When we fire it, it makes pretty pictures....scares the hell outta people."


  • Member since
    January 2015
Posted by taaron76 on Wednesday, March 18, 2015 8:37 PM

I'm just about done fitting everything into place, so I can start on the body work.  This kit will have a lot of it.

I hate the lines and gaps in the front grill, so I am filling them and cleaning them up a little.

Here are the gaps filled with putty... just got to let them dry a little more and then hit them tomorrow with sanding and a file.

Here are the rear springs.  The mounting location didn't change from the NASCAR kit.  Luckily, it lined up good with the frame and they will actually have a little bounce to them. 

  • Member since
    January 2015
Posted by MOPAR - D on Wednesday, March 18, 2015 8:50 PM

Nice update.

  • Member since
    July 2014
Posted by modelcrazy on Wednesday, March 18, 2015 11:55 PM

OK, to take a break from my other builds on occasion, I'm going to start on the Beemer. It looks like a pretty easy build. I need to finish it before May for my son-in-laws birthday. He's a BMW salesman.

Steve

Building a kit from your stash is like cutting a head off a Hydra, two more take it's place.


http://www.spamodeler.com/forum/

  • Member since
    March 2012
  • From: Corpus Christi, Tx
Posted by mustang1989 on Thursday, March 19, 2015 11:49 AM

Lookin' forward to it MC!


 Forum | Modelers Social Club Forum (proboards.com) 

  • Member since
    May 2009
  • From: Poland
Posted by Pawel on Thursday, March 19, 2015 4:48 PM

Mike - your dragster is a real beauty! The amount of detail is something to see and at the same time I can learn something about dragsters from your model - a good thing, there are not so many of them where I live!

Joe - what you are doing reminds me of what's going on under my T1 bus! It's just that my progress is really slow, so no photos yet - but I almost got the front suspension under control. The Tamiya model is really simplified as to the underside, so I still have to do a lot of research.

Good luck with your builds and have a nice day

Paweł

All comments and critique welcomed. Thanks for your honest opinions!

www.vietnam.net.pl

  • Member since
    January 2015
Posted by taaron76 on Thursday, March 19, 2015 7:23 PM

Finished up the front grill body work and got the cab primed.  That's much better compared to those nasty line and sloppiness.  lol

Tim

  • Member since
    January 2015
Posted by MOPAR - D on Thursday, March 19, 2015 7:55 PM

Tim that cleaned up nice.

  • Member since
    January 2012
  • From: Hatfield
Posted by Misty on Friday, March 20, 2015 3:18 AM

yep, great job on the clean-up!

  • Member since
    December 2009
  • From: Laurel, MD
Posted by Tucohoward on Friday, March 20, 2015 5:33 AM

Coming along slowly on the engine, but I am making progress.

Jay

The Mighty Mo says no.

  • Member since
    January 2015
Posted by MOPAR - D on Friday, March 20, 2015 6:04 AM

Jay -  your engine detail looks very real keep it coming.

  • Member since
    January 2015
Posted by MOPAR - D on Friday, March 20, 2015 10:52 AM

I worked on the air cleaner I modified the ford one to face the front grill and added some PE and painted Model Master aluminum plate and a little buffing. I also reworked the fire wall to clear the engine it's was not to much to trim to get the clearance. I was able to rework the radiator so the it fits. All I can say is I would not like to be the one that would have to go in and work on the engine as every thing is tight. Here's my update pictures. Thanks for all the comments so far on this build I really appreachate them.

  • Member since
    February 2013
  • From: Podunkville, USA
Posted by rommelkiste on Friday, March 20, 2015 4:58 PM

Man, you guys are putting out some really killer models in this GB.  I envy you guys!  Thought I might jump in here to let some of you know I am still alive and post a pic of the project that has had me away from the bench for a while.  I am ready to get back to the bench to some "light" work and less mashed fingers.  I HAVE to get this done and then I can get back to smearing some gloo.

Nothing ever fits……..and when it does, its the wrong scale.

To make mistakes is human.  To blame it on someone else shows management potential. 


  • Member since
    January 2015
Posted by MOPAR - D on Friday, March 20, 2015 5:47 PM

Now that looks like a project.

  • Member since
    January 2015
Posted by taaron76 on Saturday, March 21, 2015 1:33 PM

Jay - That motor is spectacular!!!

Dan - Your build is going to be fun to watch.  Nice!!!

I wanted to be able to use all of the front NASCAR suspension, so I chopped the front rollbar clip from the front part of the chassis and transplanted it.  This will make the NASCAR front shocks useable and able to mount up like they do on the NASCAR model.  This is the last piece of cutting and fitting.  Now its time to primer everything up and get to painting and building.

The shocks aren't actually mounted in these pics since I can't do that until final installation.

Tim

FrontChassis1-vi.jpg

FrontChassis2-vi.jpg

FrontChassis3-vi.jpg

  • Member since
    January 2014
  • From: Toronto
Posted by Rob S. on Saturday, March 21, 2015 2:26 PM

The detial on that engine, Jay, is astounding. Very wicked!!

______________________________________________________________________________


On the Bench: Nothing on the go ATM

  • Member since
    January 2014
Posted by Seabe on Saturday, March 21, 2015 11:22 PM

At long last, the Jordan is done. Again, amazing how photography enhances errors, like the mirror looking totally skew... There is one thing I left out, by accident. The F1 guru's should pick it up, but when I realised I should have added it, it was too late. Pity this one had so many delays in it, partly cause of the previous error...

For those who weren't part of the origin of this - it is a Tameo 43rd scale, so hardly larger than a match box. Kit itself was really nice, rain tyres came out very well. Oh, I wanted to add Ralf's helmet. Yesterday, adding the visor, I just wanted to grip it and the tool I used ripped off all the decals. There goes that idea.

  • Member since
    January 2012
  • From: Hatfield
Posted by Misty on Sunday, March 22, 2015 3:54 AM

Aw c'mon you gotta give us more than one pick of that lovely little Jordan! I have  never seen a 1/43 scale car before , any chance of a pic with a £1 coin or something so I can visualise it's actual size too?

  • Member since
    March 2012
  • From: Corpus Christi, Tx
Posted by mustang1989 on Sunday, March 22, 2015 5:31 AM

Jay: That Hemi looks great man! Is that alclad on the rocker covers? The carburetor linkage and springs are absolutely killer and help bring the engine to a lot more realistic look!!

Tim: Dude! You're really throwing everything at this kit aren't you? Can't wait to see what the under hood detail is going to be like!!!!

rommelkiste: I've had plenty of 1:1 scale projects in the past and understand completely. Any before and during pics of this?

Seabe: First off what you have here looks great! Secondly being of the 43nd scale size some of those scale shots at some different angles would be awesome!


 Forum | Modelers Social Club Forum (proboards.com) 

  • Member since
    January 2015
Posted by MOPAR - D on Sunday, March 22, 2015 8:20 AM

Tim - your engine bay is going to be killer when you get it detailed out!

Seabe -  nice looking Jorden I'm with the others how about some more pictures

  • Member since
    February 2013
  • From: Podunkville, USA
Posted by rommelkiste on Sunday, March 22, 2015 10:10 AM

Nice work there Seabe.  You must have Superman eyes, I have a real problem seeing the 1/25 scale stuff with glasses AND a visor!!!!!   I bow to you sir.

Mustang, I was too busy mashing fingers and thrashing that poor mess together and only took the photo with the axle bell removed.  That was after I mated the trans with the front half of the tractor back together.  I have a finished pic I can share and now maybe I can get back to Glooin' something and save my back.  I just hope I can build something that will be worthy of being seen with all the wonderful builds I see here.

Nothing ever fits……..and when it does, its the wrong scale.

To make mistakes is human.  To blame it on someone else shows management potential. 


  • Member since
    May 2009
  • From: Poland
Posted by Pawel on Sunday, March 22, 2015 1:47 PM

Hello!

rommelkiste - nice tractor! I especially like the front brush guard.

Finally I managed to put something together thet could be photographed. Here's the chassis of my VW Bus so far:
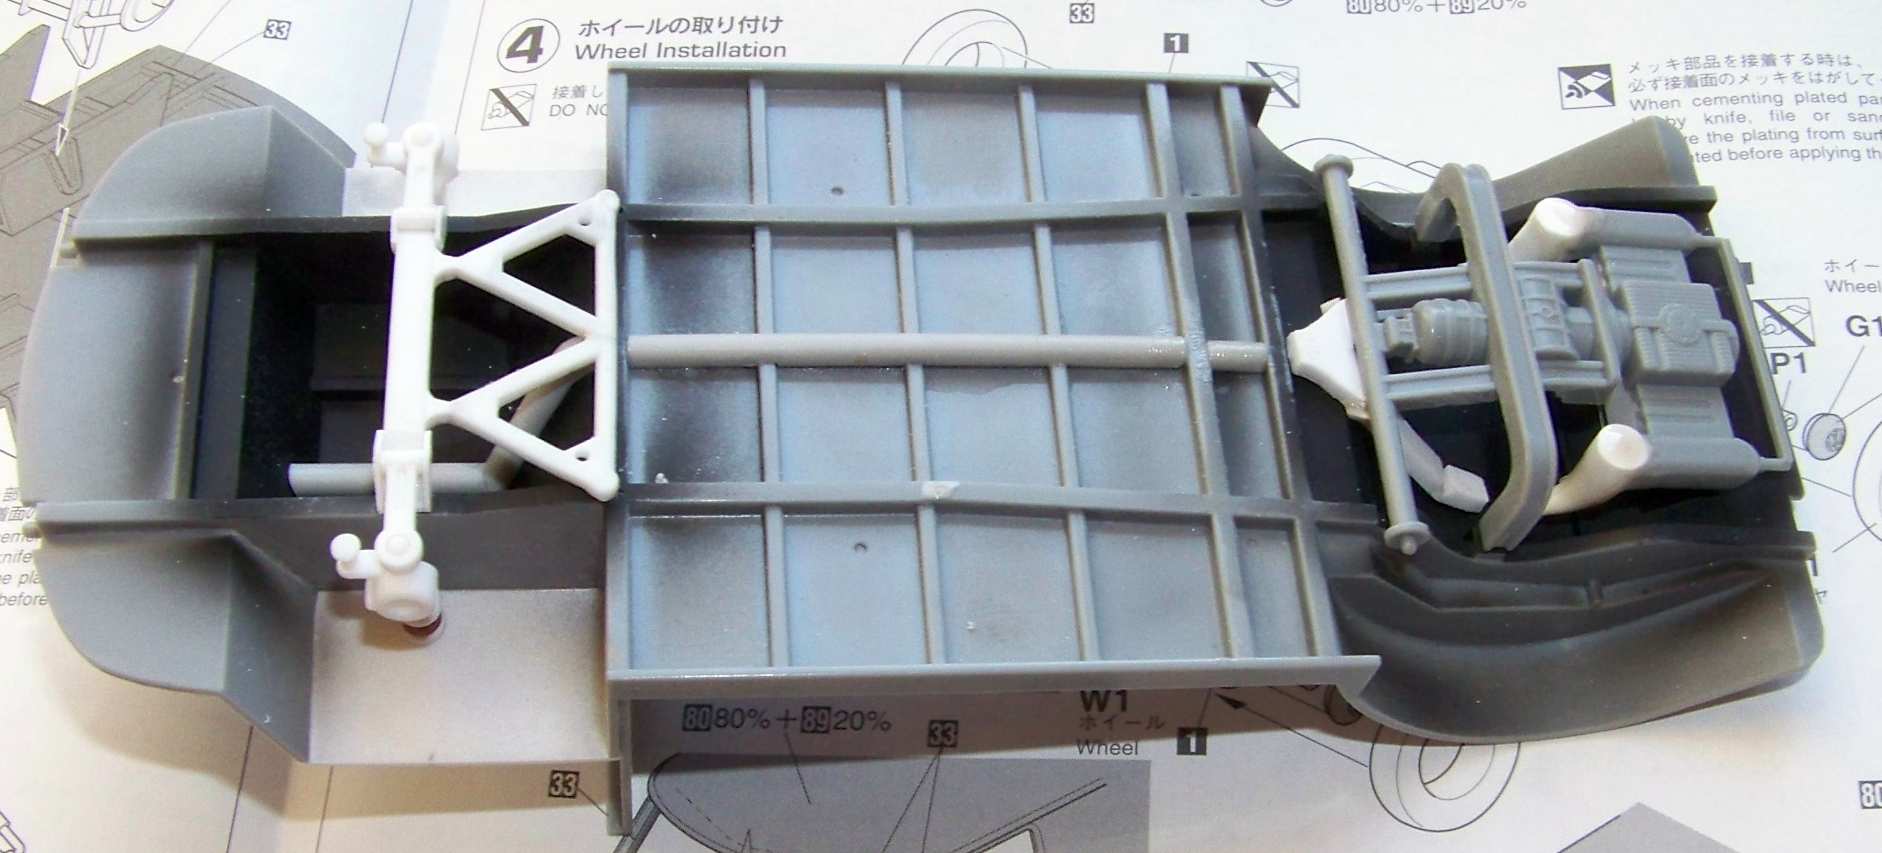
As you can see I've got the front suspension almost done, with only the track bar to be narrowed some 4mm and springs replaced with copper wire. A prominent feature missing from the Tamiya model was the hot air pipe running from around the engine exhaust to the front of the vehicle for heating. On air-cooled vehicle this was a way to provide heat for the cab and in theory it's a very cool concept - gives you hot air just seconds after starting the engine - if it would only be operable.

I'm also trying to give the enigine some volume by building side walls to it, because Tamiya only gives you the underside, and after looking slightly from the side you notice there's nothing there!

Thanks for reading, good luck with your projects and have a nice day

Paweł

All comments and critique welcomed. Thanks for your honest opinions!

www.vietnam.net.pl

  • Member since
    January 2015
Posted by MOPAR - D on Sunday, March 22, 2015 5:04 PM

Pawel - nice progress on the VW. 


I've been working all over this yesterday and today so here's most of the items I've been working on. First I ground the backs off the heat light buckets to mont on the resin head light mounts I picked up. Worked on removing the dips in the ramp I covered them with some checker plate and added some strips on the sides and filer where I made the cuts to lower the ramps. I've glued the fuel tanks and have them in the tub de chromeing. I've started checking out the exhaust fit up to the stacks and will be moving the fuel tanks forward that will put them under the door foot steps and provide room for the stacks to pass through. Painted the interior yellow and primer on the cab. Here's the pictures.


JOIN OUR COMMUNITY!

Our community is FREE to join. To participate you must either login or register for an account.

SEARCH FORUMS
FREE NEWSLETTER
By signing up you may also receive reader surveys and occasional special offers. We do not sell, rent or trade our email lists. View our Privacy Policy.