SEARCH FINESCALE.COM

Enter keywords or a search phrase below:

The 2015 /16 Red Hot and Rollin Automotive Group Build--Ended

121084 views
2225 replies
1 rating 2 rating 3 rating 4 rating 5 rating
  • Member since
    March 2012
  • From: Corpus Christi, Tx
Posted by mustang1989 on Friday, January 30, 2015 5:51 PM

No problem Rob!

Dang Dan!!! What a beauty that thing is! I dunno if you saw it on MCM but how much more paint did you end up using?

Here's another photo just to show the gloss. I'm really stoked about this as I think I surprised myself!!


 Forum | Modelers Social Club Forum (proboards.com) 

  • Member since
    January 2014
  • From: Toronto
Posted by Rob S. on Friday, January 30, 2015 5:07 PM

Mopar, that beasty is looking more epic everyday!!!

Thanks for the link Mustang..(Geez, 'that' website looks darn familiar, eh?? Stick out tongue)

______________________________________________________________________________


On the Bench: Nothing on the go ATM

  • Member since
    January 2015
Posted by MOPAR - D on Friday, January 30, 2015 4:46 PM

Sprayed clear coar on the cab and another 2oz of red on the trailer. Seeing how the sun was out I decided to get some pictures. This is a lot of red. I still have some areas on the under side of the trailer to paint and I think next time I'm going to paint some of these parts before assembling them as it is very hard to reach a lot of these areas.

  • Member since
    March 2012
  • From: Corpus Christi, Tx
Posted by mustang1989 on Friday, January 30, 2015 3:54 PM

On this one a series of light coats all the while wincing and praying that I wouldn't have to re-do it all over again. This application is my second attempt. I've read that the way it's supposed to be done is with misting coats and then a final coat. Lemme see if I can find that article.......gimme 5

Ok I'm back. The following article (in case you haven't seen this one yet) deals with Tamiya aerosol cans but the technique is all the same.

Go here: http://www.scaleautomag.com/How%20to%20and%20Models/How%20To/2008/12/Great%20paint%20from%20spray%20cans%20Part%20I.aspx?utm_source=SilverpopMailing&utm_medium=email&utm_campaign=BGNSCA_Basictraining_Step3%20(1)&utm_content=


 Forum | Modelers Social Club Forum (proboards.com) 

  • Member since
    January 2014
  • From: Toronto
Posted by Rob S. on Friday, January 30, 2015 3:36 PM

Wow, great results. I always had trouble with spray cans. I was getting runs and orange peel symptoms. Did you hit it once or a series of light coats?

______________________________________________________________________________


On the Bench: Nothing on the go ATM

  • Member since
    March 2012
  • From: Corpus Christi, Tx
Posted by mustang1989 on Friday, January 30, 2015 3:20 PM

Thanks fellas. I used Model Master Ultra Gloss Clearcoat in the 3 oz. spray can. No28139.


 Forum | Modelers Social Club Forum (proboards.com) 

  • Member since
    January 2014
  • From: Toronto
Posted by Rob S. on Friday, January 30, 2015 3:03 PM

I was gonna ask the same thing?

______________________________________________________________________________


On the Bench: Nothing on the go ATM

  • Member since
    January 2015
Posted by MOPAR - D on Friday, January 30, 2015 2:51 PM

Joe your clear coat looks nice and shiny. What did you use for your clear coat?

  • Member since
    March 2012
  • From: Corpus Christi, Tx
Posted by mustang1989 on Friday, January 30, 2015 12:27 PM

First things first I got my dang truck fixed!! 360,000 miles on the ol' 94 Silverado and still truckin' right along. I just loove me some throttle body fuel injection. No complexity, easy to work on and reliable.  Anyways after I replaced virtually everything ignition wise(and believe me it needed it!!) it runs beautifully! Actually the problem was with the ignition rotor and cap and the rest was because I have neglected her.

  Now on to what really matters here. It's update time and man I'll tell you guys I'm happier than a tornado in a trailer park after the successful glossing of the T/A body. The weather has been garbage for the last three friggin' weeks, today is beautiful outside and I've been just waitin' for this opportunity to gloss this thing after I finished the corrections from the last gloss disaster over a month ago! I'll be moving on to the rest of the interior while I wait on the body to gas out.


 I'll just let the pic do the talkin' here:

After she cures out I'll polish it up with the Novus , break out the BMF and paint all the detail up. This is the best gloss I've ever applied to a car body so I'm dang near on cloud 9 right now!! 


 Forum | Modelers Social Club Forum (proboards.com) 

  • Member since
    March 2012
  • From: Corpus Christi, Tx
Posted by mustang1989 on Friday, January 30, 2015 11:53 AM

That's a good question. Lots of times I'm able to get on at work and thats a big help!!  Other than that I get up at 3:30 a.m. and get alot done then. The real question is where to I find time to get any sleep in?? Indifferent


 Forum | Modelers Social Club Forum (proboards.com) 

  • Member since
    July 2014
Posted by modelcrazy on Friday, January 30, 2015 8:17 AM

Mustang,

Between this build and the 109 build, where do you find time to get any building in? Especially the beautiful builds you do.

Steve

Building a kit from your stash is like cutting a head off a Hydra, two more take it's place.


http://www.spamodeler.com/forum/

  • Member since
    March 2012
  • From: Corpus Christi, Tx
Posted by mustang1989 on Friday, January 30, 2015 7:28 AM

Good mornin' Dan! First you download one of the three GB Badges in the intro post. Then you go to  http://www.zazzle.com/ , pic your mug ( I got the 15 oz. mug) and upload an image to go on it. I also usually get  the image on both sides of the mug. From there it's all down hill.Big Smile


 Forum | Modelers Social Club Forum (proboards.com) 

  • Member since
    January 2015
Posted by MOPAR - D on Friday, January 30, 2015 6:46 AM

Joe my question is how do get a mug for the 2015 Automotive Red Hot & Rolling GB?

  • Member since
    March 2012
  • From: Corpus Christi, Tx
Posted by mustang1989 on Friday, January 30, 2015 6:21 AM

taxtp

Nice, think I need some KFC....

it's a good cup actually.

Cheers

Tony

Does KFC sell Bf109 kits? lol  I've actually a cup for pzl66's GB back in 12 as well.

I may have to get one for this GB too!!! Big Smile


 Forum | Modelers Social Club Forum (proboards.com) 

  • Member since
    April 2005
  • From: Australia
Posted by taxtp on Thursday, January 29, 2015 9:55 PM

Nice, think I need some KFC....

it's a good cup actually.

Cheers

Tony

I'm just taking it one GB at a time.

  • Member since
    March 2012
  • From: Corpus Christi, Tx
Posted by mustang1989 on Thursday, January 29, 2015 8:17 PM

mustang1989
I'm going to place my 2015 Bf109 GB cup behind it next time but bring it in closer! lol

As promised Stick out tongue LOL 


 Forum | Modelers Social Club Forum (proboards.com) 

  • Member since
    March 2012
  • From: Corpus Christi, Tx
Posted by mustang1989 on Thursday, January 29, 2015 2:30 PM

First off thanks for the comments Tony. Secondly I happened to notice the cup after I posted the pic and thought the same thing. I'm going to place my 2015 Bf109 GB cup behind it next time but bring it in closer! lol


 Forum | Modelers Social Club Forum (proboards.com) 

  • Member since
    April 2005
  • From: Australia
Posted by taxtp on Thursday, January 29, 2015 2:26 PM

That looks to be a nice smooth finish Tim. It will be outstanding after you polish it.

Mustang - That's looking really good now. It's amazing how often one wheel sits up and needs to be coerced to behave itself. I noticed the strategically placed Messerschmitt cup in the background. That kind of advertising usually makes me go out and buy KFC :)

Cheers

Tony

I'm just taking it one GB at a time.

  • Member since
    March 2012
  • From: Corpus Christi, Tx
Posted by mustang1989 on Thursday, January 29, 2015 11:56 AM

Well between my truck breaking down the day before yesterday and the whole child adoption paperwork shuffle and meetings it's a true wonder I've been able to do anything the last couple of days on my Challenger but even if its only 15 minutes bench time at a whack I'll take it. I managed to get all of the suspension together to include shocks and I managed to paint the wheel backing plates ( I hate these things but money is tight at the moment so I can't go all out on a disk brake conversion like I wanted to) and install them onto the tires and get all the wheel/ tire assemblies mounted up and glued this morning. I'll have pics of the bottom side after everything here cures out. The L/H front wheel is up off of the ground every so slightly but I can fix it. The frame is a little tweeked!! The kit that I robbed this frame / chassis piece from is the same age as the one I built originally so I'm not surprised at the warpage factor.

Here's the latest with the wheels on the ground!!!  (I just may end up finishing this thing yet!!! )


 Forum | Modelers Social Club Forum (proboards.com) 

  • Member since
    January 2015
Posted by taaron76 on Thursday, January 29, 2015 9:00 AM

Thanks, Joe!  I'm looking forward to seeing all of these builds come to fruition.  I love progress pics!

Tim

  • Member since
    March 2012
  • From: Corpus Christi, Tx
Posted by mustang1989 on Thursday, January 29, 2015 8:45 AM

I've got you added to the roster Tim and you're ready to go. Looks like you're able to post normally already! Let's see, 1.) he's here and posting, 2.) he's added to the roster 3) build is in progress..............and we're rolling!!!! Awesome!


 Forum | Modelers Social Club Forum (proboards.com) 

  • Member since
    January 2015
Posted by taaron76 on Thursday, January 29, 2015 8:34 AM

Hi Joe!  Yep, I only use acrylics now with denatured alcohol as thinner, as well.

Tim

  • Member since
    March 2012
  • From: Corpus Christi, Tx
Posted by mustang1989 on Thursday, January 29, 2015 8:33 AM

taaron76

Looking forward to this build and seeing these wonderful cars.  I'll be adding a 1966 Shelby.

Tim

I'll get you added to the roster right away Tim and welcome aboard again pal!Big Smile


 Forum | Modelers Social Club Forum (proboards.com) 

  • Member since
    March 2012
  • From: Corpus Christi, Tx
Posted by mustang1989 on Thursday, January 29, 2015 8:27 AM

Tony what you have so far looks outstanding!!!!


 Forum | Modelers Social Club Forum (proboards.com) 

  • Member since
    March 2012
  • From: Corpus Christi, Tx
Posted by mustang1989 on Thursday, January 29, 2015 8:25 AM

Welcome aboard Tim!!  Welcome Sign Good to see you made it over here!!! If I'm right these are acrylic paints...right Tim?


 Forum | Modelers Social Club Forum (proboards.com) 

  • Member since
    January 2015
Posted by taaron76 on Thursday, January 29, 2015 7:16 AM

Here's my '66 Shelby after Tamiya gold leaf and clear orange.  I'll throw some clear on it and wet sand and buff next week.

Tim

  • Member since
    April 2005
  • From: Australia
Posted by taxtp on Wednesday, January 28, 2015 9:38 PM

Thanks Seabe, the marks are pretty obvious now that you've mentioned them. I would use TS15 too, but I am always looking for other opinions or better ways to do it.

Cheers

Tony

I'm just taking it one GB at a time.

  • Member since
    January 2014
Posted by Seabe on Wednesday, January 28, 2015 9:18 PM

Blue is just the plastic, still have to lay down the primer. Which is why there's still some scratch marks from cleaning up mold and glue seepage lines. Plan is to simply use TS15 over white primer.

  • Member since
    April 2005
  • From: Australia
Posted by taxtp on Wednesday, January 28, 2015 6:40 PM

Thanks again guys. Seabe, that Tyrrell is going to look great next to your other F1s. What brand and colour blue did you use for the body ?

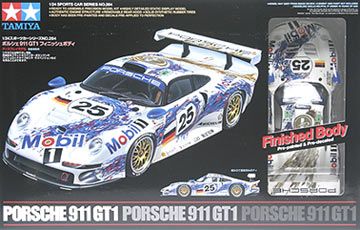
Here is the kit I started with for my Porsche 911 GT1 EVO
and my progress so far:
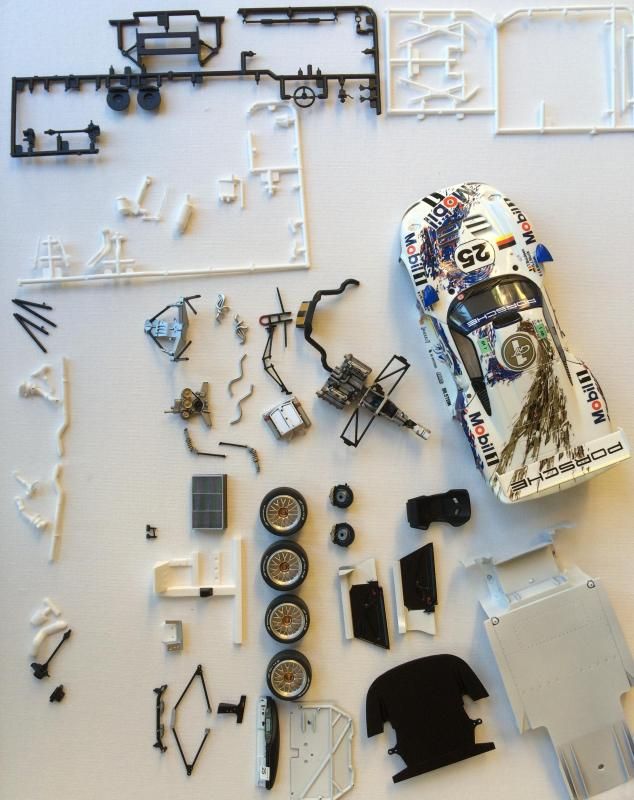
The body itself was pre-finished, as the box top states. It's actually not bad, good enough to live with. Everything else is as you would find it in a normal kit.

I've stripped the chrome, and done some preparation of the parts to the left and below of the body. All of the other parts are shown and I haven't really started on them yet, although some have been removed from the sprues. The engine and rear suspension assembly is complex, I am looking forward to seeing how it looks once assembled. Unfortunately it won't be very visible once it's assembled.

As always, I am thinking about building more than one of these in different liveries. Revell released the same subject in STP and History Channel liveries as seperate releases, and I have the STP one, as well as another one with these decals. There are plenty of aftermarket decals in my stash too.

That being said, my next build will be a Tamiya 1/24 Ford Sierra RS500, not sure of which liverie yet. You can jot me down for that one too please Mustang.

Cheers

Tony

I'm just taking it one GB at a time.

  • Member since
    January 2015
Posted by MOPAR - D on Wednesday, January 28, 2015 6:07 PM

Nice engine Seabe

JOIN OUR COMMUNITY!

Our community is FREE to join. To participate you must either login or register for an account.

SEARCH FORUMS
FREE NEWSLETTER
By signing up you may also receive reader surveys and occasional special offers. We do not sell, rent or trade our email lists. View our Privacy Policy.