SEARCH FINESCALE.COM

Enter keywords or a search phrase below:

Fourth Annual Berny Memorial Group Build

35361 views
489 replies
1 rating 2 rating 3 rating 4 rating 5 rating
  • Member since
    November 2010
  • From: Lafayette, Indiana
Posted by Son Of Medicine Man on Friday, May 22, 2015 5:46 AM

Rob S.

looking forward to this Steve...watching with great interest.

I got a lot done today, but, not worth photos. I spent a considerable amount of time masking and filling/sanding. Not much in the construction, but, that'll continue tomorrow.

Hi Rob,

I don't envy you on the masking, especially all that glass.  Looking forward to seeing it when you are done!

Ken

  • Member since
    November 2010
  • From: Lafayette, Indiana
Posted by Son Of Medicine Man on Friday, May 22, 2015 5:43 AM

modelcrazy

That looks wicked cool Rob  Yes

OK, here I go with the base, this will be the first time I try this method.

First I made the base out of an old piece of house siding and made poster board walls and used hot glue to attach them to the sides. I also stiffened the walls with some cardboard backing.
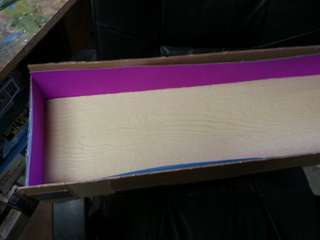
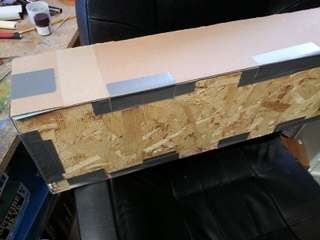
Then I placed the ship inside the box and laid in sawdust, and formed some crests and troughs. I then squirted some thin CA onto the sawdust to stabilize it. That worked remarkably well but use an enormous amount of glue. 
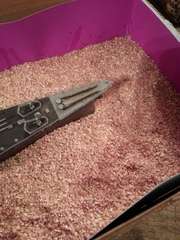
Once dried, I applied Mod Podge for a base for the acrylic gel.

I will use the acrylic gel to form the wave peaks and smooth the texture. After the gel will be applied, I'll paint dark blue mixed with turquoise at the foam. After the paint will come the cotton, but I'll show that when I get there.

That's all for now.

Steve

Wow Steve.  You have put a lot of thought into making that base!  Nice work!  Yes  Yes

Ken

  • Member since
    November 2010
  • From: Lafayette, Indiana
Posted by Son Of Medicine Man on Friday, May 22, 2015 5:39 AM

Rob S.

So, this kit has such a spartan interior, I'm not unhappy that she's gonna bit pinned up tight. Nothing to see but a few rows of seats. This just means that the exterior has to be the main focus. Anyway, for a lower quality kit, I was quite pleased with how well the fuselage went together. Well sealed. The clear canopy went on perfectly too. That I didn't expect..

I 'smoked' the glass inside the top of the canopy cover prior to installing. There's an instrumentation decal on the interior cockpit roof too, but, it'll never be seen again!! Too bad. More tomorrow.

Hi Rob,

Nice work so far.  Very clean and great job on smoking the top glass!  Yes  Yes 

Ken

  • Member since
    November 2009
  • From: SW Virginia
Posted by Gamera on Thursday, May 21, 2015 8:03 AM

Not surprising Rob with all those windows masking seems like a serious job. Guess that's one reason I don't build more choppers!  

"I dream in fire but work in clay." -Arthur Machen


  • Member since
    January 2014
  • From: Toronto
Posted by Rob S. on Wednesday, May 20, 2015 7:07 PM

looking forward to this Steve...watching with great interest.

I got a lot done today, but, not worth photos. I spent a considerable amount of time masking and filling/sanding. Not much in the construction, but, that'll continue tomorrow.

______________________________________________________________________________


On the Bench: Nothing on the go ATM

  • Member since
    July 2014
Posted by modelcrazy on Wednesday, May 20, 2015 2:35 PM

I don't know yet. It is MUCH easier to form into swells and the like, and weighs less, however I used a whole 8 oz refill bottle of thin CA to get the job done. If I use this method again it will be for 1/700 and not 1/350.

I believe I will use foam on my next dio, which should be the Yamato for your GB. That is if I can scrape up enough cash for a PE set for that monster.

Steve

Building a kit from your stash is like cutting a head off a Hydra, two more take it's place.


http://www.spamodeler.com/forum/

  • Member since
    November 2009
  • From: SW Virginia
Posted by Gamera on Wednesday, May 20, 2015 1:28 PM

Rob: For a cheap kit she's coming together quite well!

Steve: Wow, never thought about using sawdust and superglue! I've seen people use plaster before- does the sawdust work better?

"I dream in fire but work in clay." -Arthur Machen


  • Member since
    June 2009
Posted by jimbot58 on Wednesday, May 20, 2015 1:25 PM
modelcrazy

That looks wicked cool Rob  Yes

OK, here I go with the base, this will be the first time I try this method.

First I made the base out of an old piece of house siding and made poster board walls and used hot glue to attach them to the sides. I also stiffened the walls with some cardboard backing.

Then I placed the ship inside the box and laid in sawdust, and formed some crests and troughs. I then squirted some thin CA onto the sawdust to stabilize it. That worked remarkably well but use an enormous amount of glue. 

Once dried, I applied Mod Podge for a base for the acrylic gel.
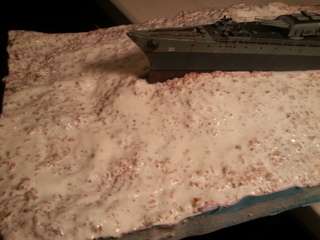
I will use the acrylic gel to form the wave peaks and smooth the texture. After the gel will be applied, I'll paint dark blue mixed with turquoise at the foam. After the paint will come the cotton, but I'll show that when I get there.

That's all for now.

Steve

Wow! I wonder if you could have used Model railroad techniques instead of all that CA. I won't go into it as you are already this far.

*******

On my workbench now:

It's all about classic cars now!

Why can't I find the "Any" key on my keyboard?


  • Member since
    June 2009
Posted by jimbot58 on Wednesday, May 20, 2015 1:18 PM

Woops! Think I hit the "quote" button twice...oh well!

*******

On my workbench now:

It's all about classic cars now!

Why can't I find the "Any" key on my keyboard?


  • Member since
    June 2009
Posted by jimbot58 on Wednesday, May 20, 2015 1:16 PM
Rob S.

So, this kit has such a spartan interior, I'm not unhappy that she's gonna bit pinned up tight. Nothing to see but a few rows of seats. This just means that the exterior has to be the main focus. Anyway, for a lower quality kit, I was quite pleased with how well the fuselage went together. Well sealed. The clear canopy went on perfectly too. That I didn't expect..

I 'smoked' the glass inside the top of the canopy cover prior to installing. There's an instrumentation decal on the interior cockpit roof too, but, it'll never be seen again!! Too bad. More tomorrow.

It looks fine from this end to me! Just wondering if that yellow plastic is hard to cover with the paint? I would be satisfied if all kits just came in plain ol' grey! jim

*******

On my workbench now:

It's all about classic cars now!

Why can't I find the "Any" key on my keyboard?


  • Member since
    January 2014
  • From: Toronto
Posted by Rob S. on Wednesday, May 20, 2015 4:36 AM

Steve...very ambitious base, that I'm sure, you will pull off!! Looking forward to that.

Yeah, Mikey, it's got a low part count, so, it's going together quick.

______________________________________________________________________________


On the Bench: Nothing on the go ATM

  • Member since
    September 2010
  • From: California
Posted by mikeymize on Wednesday, May 20, 2015 12:31 AM

Looks like a fair amount of progress Rob; you're doing very well on a kit that sounds to be not too great. One good thing about the color I realized; makes it easier not to lose unpainted parts off the tree!

"Time you enjoy wasting is not wasted time".


  • Member since
    July 2014
Posted by modelcrazy on Tuesday, May 19, 2015 11:22 PM

That looks wicked cool Rob  Yes

OK, here I go with the base, this will be the first time I try this method.

First I made the base out of an old piece of house siding and made poster board walls and used hot glue to attach them to the sides. I also stiffened the walls with some cardboard backing.

Then I placed the ship inside the box and laid in sawdust, and formed some crests and troughs. I then squirted some thin CA onto the sawdust to stabilize it. That worked remarkably well but use an enormous amount of glue. 

Once dried, I applied Mod Podge for a base for the acrylic gel.

I will use the acrylic gel to form the wave peaks and smooth the texture. After the gel will be applied, I'll paint dark blue mixed with turquoise at the foam. After the paint will come the cotton, but I'll show that when I get there.

That's all for now.

Steve

Steve

Building a kit from your stash is like cutting a head off a Hydra, two more take it's place.


http://www.spamodeler.com/forum/

  • Member since
    January 2014
  • From: Toronto
Posted by Rob S. on Tuesday, May 19, 2015 8:24 PM

So, this kit has such a spartan interior, I'm not unhappy that she's gonna bit pinned up tight. Nothing to see but a few rows of seats. This just means that the exterior has to be the main focus. Anyway, for a lower quality kit, I was quite pleased with how well the fuselage went together. Well sealed. The clear canopy went on perfectly too. That I didn't expect..

I 'smoked' the glass inside the top of the canopy cover prior to installing. There's an instrumentation decal on the interior cockpit roof too, but, it'll never be seen again!! Too bad. More tomorrow.

______________________________________________________________________________


On the Bench: Nothing on the go ATM

  • Member since
    January 2014
  • From: Toronto
Posted by Rob S. on Tuesday, May 19, 2015 3:32 PM

Thanks Ken, more to follow tonight.

______________________________________________________________________________


On the Bench: Nothing on the go ATM

  • Member since
    November 2010
  • From: Lafayette, Indiana
Posted by Son Of Medicine Man on Tuesday, May 19, 2015 6:06 AM

jimbot58
modelcrazy

Thanks Gamera and Ken,

Ken,

I know you're getting tied of commenting on what looks like the same thing. but I am at the building the base stage.

I'll show the making of the base and water and some close-ups of the ship, but it may diminish the impact of the whole thing to show the finished ship out if it's base. It does look good though, and I'm never impressed with my work. I was putting some final touches to the weathering last night with my optivisor on, you know how you don't see the whole picture with those on, I took them off to look at the whole thing and Bamm! I was thinking to myself, I did that? Too bad some of it will be hidden by the water and spray.

It won't be long now, the hard part is finished, Yea!

It all looks good to me, glad you are making great progress! No progress for me this weekend as part of my tasks included replacing a seal on my rear axle! I got an unintended bike run in as I had everything apart and discovered I needed one minor tool and rather than reassemble it all, I made a run on the bike! Got my exercise in anyway! The rest of it was household chores. Did take a small break Sunday and went to spend a little time to wet some worms in a little nearby pond! Jim

Hi Jim,

Glad to hear you got some relaxing time in!  You deserve it!

Ken

  • Member since
    November 2010
  • From: Lafayette, Indiana
Posted by Son Of Medicine Man on Tuesday, May 19, 2015 6:04 AM

Rob S.

A bit of progress. The cockpit is done. NO detail to speak of, so, it went ok. The more I work with and handle this kit, the more I realize it is of pretty poor quality, detail and fit. She's gonna be a challenge to seal up. Oh, well, it's the only version of a RCAF Cormorant, so, I'll muscle through it.

Nice work Rob!  Very clean detail!  Yes  Yes 

Ken

  • Member since
    November 2010
  • From: Lafayette, Indiana
Posted by Son Of Medicine Man on Tuesday, May 19, 2015 6:03 AM

modelcrazy

Thanks Gamera and Ken,

Ken,

I know you're getting tied of commenting on what looks like the same thing. but I am at the building the base stage.

I'll show the making of the base and water and some close-ups of the ship, but it may diminish the impact of the whole thing to show the finished ship out if it's base. It does look good though, and I'm never impressed with my work. I was putting some final touches to the weathering last night with my optivisor on, you know how you don't see the whole picture with those on, I took them off to look at the whole thing and Bamm! I was thinking to myself, I did that? Too bad some of it will be hidden by the water and spray.

It won't be long now, the hard part is finished, Yea!

Hi Steve,

Trust me, I am not getting tired of seeing your work.  It is outstanding!  Please keep the pics coming!


Ken

  • Member since
    January 2014
  • From: Toronto
Posted by Rob S. on Monday, May 18, 2015 9:04 PM

Ain't that something, eh!! It does cover well though....Smile

______________________________________________________________________________


On the Bench: Nothing on the go ATM

  • Member since
    November 2009
  • From: SW Virginia
Posted by Gamera on Monday, May 18, 2015 8:10 PM

Very cool Rob- that's some bright yellow plastic there though!

"I dream in fire but work in clay." -Arthur Machen


  • Member since
    January 2014
  • From: Toronto
Posted by Rob S. on Monday, May 18, 2015 7:45 PM

A bit of progress. The cockpit is done. NO detail to speak of, so, it went ok. The more I work with and handle this kit, the more I realize it is of pretty poor quality, detail and fit. She's gonna be a challenge to seal up. Oh, well, it's the only version of a RCAF Cormorant, so, I'll muscle through it.

______________________________________________________________________________


On the Bench: Nothing on the go ATM

  • Member since
    June 2009
Posted by jimbot58 on Monday, May 18, 2015 1:33 PM
modelcrazy

Thanks Gamera and Ken,

Ken,

I know you're getting tied of commenting on what looks like the same thing. but I am at the building the base stage.

I'll show the making of the base and water and some close-ups of the ship, but it may diminish the impact of the whole thing to show the finished ship out if it's base. It does look good though, and I'm never impressed with my work. I was putting some final touches to the weathering last night with my optivisor on, you know how you don't see the whole picture with those on, I took them off to look at the whole thing and Bamm! I was thinking to myself, I did that? Too bad some of it will be hidden by the water and spray.

It won't be long now, the hard part is finished, Yea!

It all looks good to me, glad you are making great progress! No progress for me this weekend as part of my tasks included replacing a seal on my rear axle! I got an unintended bike run in as I had everything apart and discovered I needed one minor tool and rather than reassemble it all, I made a run on the bike! Got my exercise in anyway! The rest of it was household chores. Did take a small break Sunday and went to spend a little time to wet some worms in a little nearby pond! Jim

*******

On my workbench now:

It's all about classic cars now!

Why can't I find the "Any" key on my keyboard?


  • Member since
    January 2014
  • From: Toronto
Posted by Rob S. on Monday, May 18, 2015 1:26 PM

Well folks, I'm finally caught up with my GB's and I've come to this GB and I am ready to start the EH-101. I'm going to jump in feet first and get this big yellow bird off and running! Glad to be finally on board!

______________________________________________________________________________


On the Bench: Nothing on the go ATM

  • Member since
    July 2014
Posted by modelcrazy on Monday, May 18, 2015 9:21 AM

Thanks Gamera and Ken,

Ken,

I know you're getting tied of commenting on what looks like the same thing. but I am at the building the base stage.

I'll show the making of the base and water and some close-ups of the ship, but it may diminish the impact of the whole thing to show the finished ship out if it's base. It does look good though, and I'm never impressed with my work. I was putting some final touches to the weathering last night with my optivisor on, you know how you don't see the whole picture with those on, I took them off to look at the whole thing and Bamm! I was thinking to myself, I did that? Too bad some of it will be hidden by the water and spray.

It won't be long now, the hard part is finished, Yea!

Steve

Building a kit from your stash is like cutting a head off a Hydra, two more take it's place.


http://www.spamodeler.com/forum/

  • Member since
    November 2009
  • From: SW Virginia
Posted by Gamera on Monday, May 18, 2015 7:37 AM

Steve & Mike: Sounds like you guys are making some significant progress. Wish I could say the same!

"I dream in fire but work in clay." -Arthur Machen


  • Member since
    November 2010
  • From: Lafayette, Indiana
Posted by Son Of Medicine Man on Monday, May 18, 2015 5:59 AM

mikeymize

Quick update; managed to start on the cockpit, RLM 66 painted and much PE work accomplished. The detail on this one is impressive and will post pics once I get the seat belts in. I'm using Squadron Singnal's "Bf-109G Walk Around" for a reference and it's very well done. The rest of my weekend was laundry and cleaning the house along with some yard work; so much for relaxing!

BTW, Jim, as you mentioned it was sad to hear about BB. The guy was a great guitarist and influenced so many; he'll be missed.

Sounds like a full weekend to me Mike! 

Ken

  • Member since
    November 2010
  • From: Lafayette, Indiana
Posted by Son Of Medicine Man on Monday, May 18, 2015 5:58 AM

modelcrazy

Hi gents,

Here's the latest on the Indy. I will be able to get  a bit done this weekend, but I just wanted to post an update. I will install the superstructures, rigging and railing next.

Steve

Great work there Steve once again!  You are really moving on this project!  Yes  Yes 

Ken

  • Member since
    September 2010
  • From: California
Posted by mikeymize on Sunday, May 17, 2015 11:57 PM

Quick update; managed to start on the cockpit, RLM 66 painted and much PE work accomplished. The detail on this one is impressive and will post pics once I get the seat belts in. I'm using Squadron Singnal's "Bf-109G Walk Around" for a reference and it's very well done. The rest of my weekend was laundry and cleaning the house along with some yard work; so much for relaxing!

BTW, Jim, as you mentioned it was sad to hear about BB. The guy was a great guitarist and influenced so many; he'll be missed.

"Time you enjoy wasting is not wasted time".


  • Member since
    July 2014
Posted by modelcrazy on Sunday, May 17, 2015 7:55 PM

I have completed a considerable amount of work to The Indy this weekend.  I added the superstructures, railings,  small boats and weathering.  I still need to add the Low Frequency long wire antennas and HF whip antennas. After, I will start on the base.

I have to say, I am really pleased with it.

I will hold off on pictures of her until I'm finished so I don't ruin the final reveal.

Steve

Steve

Building a kit from your stash is like cutting a head off a Hydra, two more take it's place.


http://www.spamodeler.com/forum/

  • Member since
    July 2014
Posted by modelcrazy on Saturday, May 16, 2015 8:19 PM

Hi gents,

Here's the latest on the Indy. I will be able to get  a bit done this weekend, but I just wanted to post an update. I will install the superstructures, rigging and railing next.

Steve

Steve

Building a kit from your stash is like cutting a head off a Hydra, two more take it's place.


http://www.spamodeler.com/forum/

JOIN OUR COMMUNITY!

Our community is FREE to join. To participate you must either login or register for an account.

SEARCH FORUMS
FREE NEWSLETTER
By signing up you may also receive reader surveys and occasional special offers. We do not sell, rent or trade our email lists. View our Privacy Policy.