SEARCH FINESCALE.COM

Enter keywords or a search phrase below:

War In The Pacific Group Build 2009 - 2010

225051 views
2012 replies
1 rating 2 rating 3 rating 4 rating 5 rating
  • Member since
    March 2006
Posted by simpilot34 on Wednesday, November 25, 2009 7:20 PM
Anthony, looking good mate!!!! Far cry from the OLD monogram kit I built back in the 80's!!!!! Believe it was Monogram.Confused [%-)] Been so long honestly can't remember who made it, anyhoo, keep up the good work. Going to look stellar with some paint!!!Thumbs Up [tup]
Cheers, Lt. Cmdr. Richie "To be prepared for war, is one of the most effectual means of preserving the peace."-George Washington
  • Member since
    September 2003
  • From: South Central Wisconsin
Posted by Daywalker on Wednesday, November 25, 2009 10:38 PM

I am calling this one finished!  Managed to get the replacement gunsight installed without incident, and attached the canopy parts.  Hope you like her! Big Smile [:D]

Propeller [8-]


Frank 


  • Member since
    March 2006
Posted by simpilot34 on Wednesday, November 25, 2009 11:51 PM
Bow [bow]Bow [bow]Bow [bow]Frank, that is an outstanding build mate!!!!!!!!! Stunning work for al of it!!!!!! I expect it to be in a future issue or FSM??!!!
Cheers, Lt. Cmdr. Richie "To be prepared for war, is one of the most effectual means of preserving the peace."-George Washington
  • Member since
    September 2004
  • From: Vernon, BC, Canada
Posted by razordws on Wednesday, November 25, 2009 11:56 PM
Beautiful target build Frank!  Bow [bow]Bow [bow]Bow [bow]  Just don't put it too close to your Corsairs or they might get spinner envy and shoot it up some. Wink [;)]  Seriously outstanding mate!

Dave

  • Member since
    September 2003
  • From: South Central Wisconsin
Posted by Daywalker on Thursday, November 26, 2009 7:54 AM
Thank you very much guys!  I think I will submit it for the Reader's Gallery, maybe they will put it in there! Big Smile [:D]

Frank 


  • Member since
    November 2003
  • From: Naples, FL
Posted by tempestjohnny on Thursday, November 26, 2009 8:12 AM
Nice Zeke Frank.  Is that the 5 or 5a?  I'm just learning about the subtypes of the Japanese aircraft.


  • Member since
    September 2003
  • From: South Central Wisconsin
Posted by Daywalker on Thursday, November 26, 2009 8:16 AM
Thanks John!  Actually, this is an A6M3 Model 22.  The same wings planform as the A6M2 Model 21 (like those at Pearl Harbor) but with a refined, more aerodynamic cowl. Thumbs Up [tup]

Frank 


  • Member since
    March 2006
Posted by simpilot34 on Thursday, November 26, 2009 8:38 AM

Well finally got the canopy masked and in place to see how it looks. Man what a chore, really looking forward to my Ca.311 when i get to it, NOT!!!! lol Well the patient masking will have it's rewards. Here's some pics:

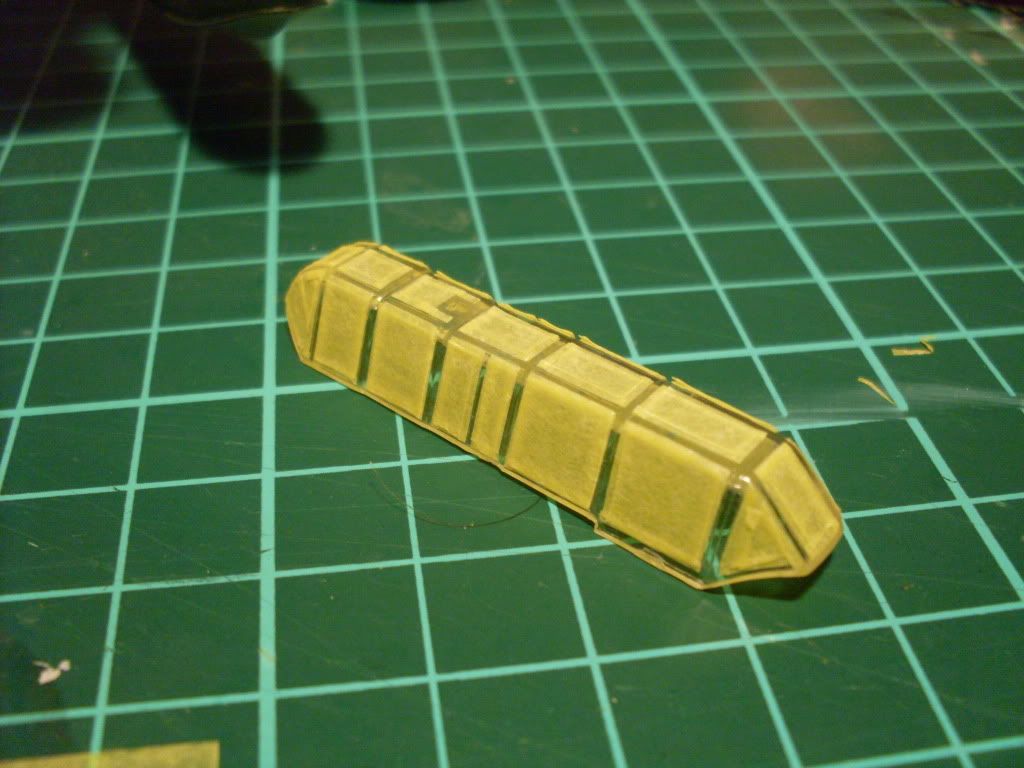
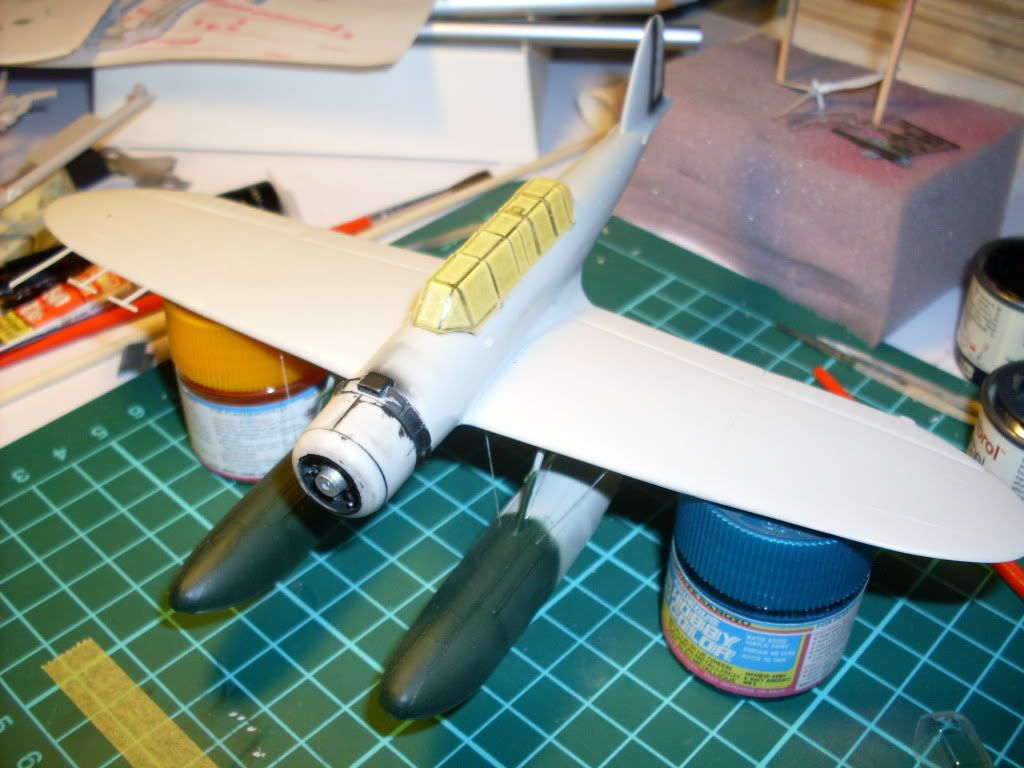
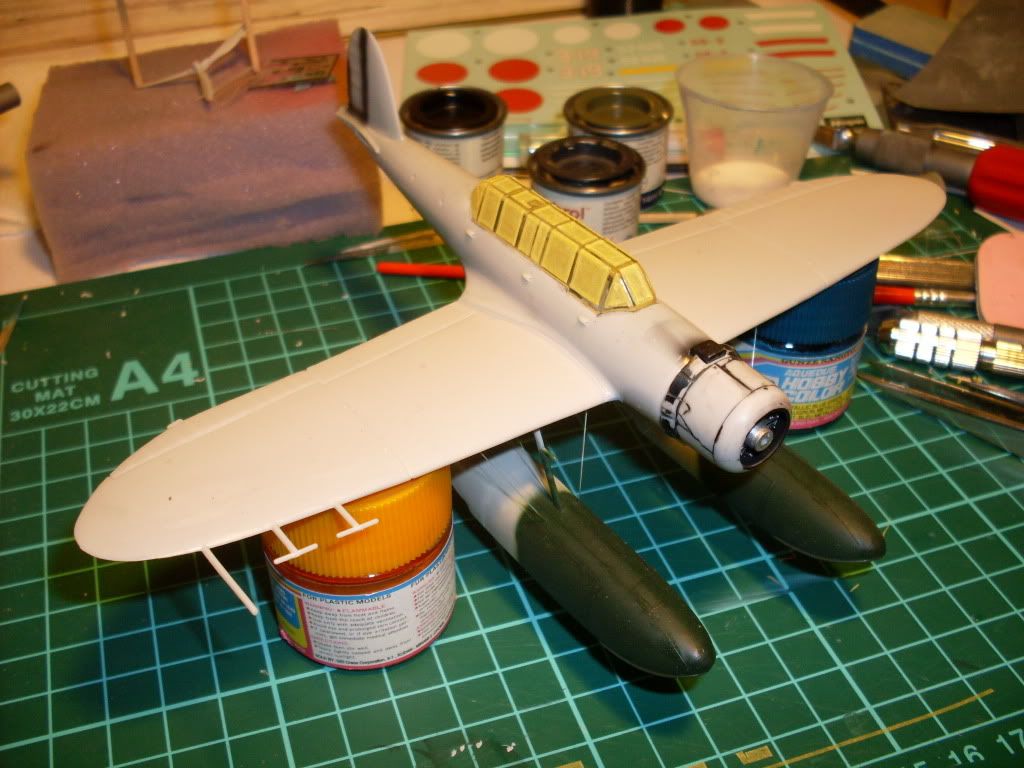
Footnote to the canopy. The sub frame on the 3rd bay is supposed to be one bay forward. The vac form canopy I had originally planned to use corrected this , however, the fit was horrible and the kit canopy fits like a glove. So, I can deal with a minor inaccuracy for a better fit, and if I hadn't said anything, who would've known. lol anyways have a HAPPY THANKSGIVING TO ALL!!!!

Cheers, Lt. Cmdr. Richie "To be prepared for war, is one of the most effectual means of preserving the peace."-George Washington
  • Member since
    March 2003
  • From: Western North Carolina
Posted by Tojo72 on Thursday, November 26, 2009 8:48 AM

Daywalker.......outstanding build+great camo job.

Simpilot34..........thanks,yours is coming along,that masking on the canopy,could not have been fun !!

  • Member since
    September 2003
  • From: South Central Wisconsin
Posted by Daywalker on Thursday, November 26, 2009 8:52 AM
Richie- That Jake is really coming along, sure glad it wasn't me doing all of that masking- especially in 1/72! Shock [:O]  You have more patience than I my friend.  Looking very good, can't wait for more pics! Tongue [:P]

Frank 


  • Member since
    July 2003
  • From: Pennsylvania
Posted by jay12472 on Thursday, November 26, 2009 6:16 PM

Anthony great start on halftrack

Frank love the zero especially the pics with the spinning prop

Richie Thats alot of masking but will sure look nice when done

Jason

  • Member since
    August 2015
Posted by sf_plane_nut on Thursday, November 26, 2009 9:01 PM
i cant remember who it was that was talking about building the tamiya 1/48 corsair and putting a TD cockpit in there but if you see this PM me...i wanted to ask a few questions....

got some stuff done today...got the detail removed to add the resin side walls....for some reason they seem a little weird...one fits the angle of the lip but the other is at a weird tilt...i dont know...any suggestions?..


these side consoles are very nice..


broke off one of the legs on the foot gear...no sweat...
  • Member since
    March 2006
Posted by simpilot34 on Friday, November 27, 2009 1:43 AM

Thanks guys!!!!!!Make a Toast [#toast] Wasn't that hard to do really, just patience and working a pain... err i mean pane at a time until they are all covered. The worst bit was trying to lay down the boundary strips cuz the molding fr the framework is very faint. Not much as a guide but just enough to tell where to put it.

Dave(plane nut) that resin is going to look great when painted!!! Looking forward to more picsThumbs Up [tup]

Cheers, Lt. Cmdr. Richie "To be prepared for war, is one of the most effectual means of preserving the peace."-George Washington
  • Member since
    April 2005
  • From: Monster Island-but vacationing in So. Fla
Posted by carsanab on Friday, November 27, 2009 2:56 AM

Richie....nice looking Jake cant wait to see more....gotta love the floatie thingies.....it will make a nice addition to the ones in the GB so far.

Carlos

 Photobucket

  • Member since
    March 2006
Posted by simpilot34 on Friday, November 27, 2009 3:11 AM
Thanks Carlos!! Not perfect by any means but overall so far a pleasing build. Pays to try and find any kind of build review you can find for the kits you are about to build. Prepared me for the gap issues that weren't nasty surprises when it came down to those points. One thing that wasn't covered by the review I read, was the age of my kit and the brittleness I have encountered lol. But I'm getting there.
Cheers, Lt. Cmdr. Richie "To be prepared for war, is one of the most effectual means of preserving the peace."-George Washington
  • Member since
    April 2005
  • From: Monster Island-but vacationing in So. Fla
Posted by carsanab on Friday, November 27, 2009 3:14 AM

Well the elves have earned their turkey dinner...they are thankful that they are DONE with this beast!!!! They finally got the thing looking halfway decent...I'm going to give them the day off and so I can plan their next challenge, I'm open to suggestions..

Well here are some pics....little touch ups still needed but I think this is it. The last problem was the canopy fit...left some gaps around the telescopic gunsight which was too wide for the groove in the canopy so I had to widen that. Then the antenna mast broke so I had to make a new one. Oh well...not my best but there it is. for such a little plane it took lots of work and patience. Added an extra pic in the end for scale purposes..actually looking at it against my HE-177 it looks real tiny!

Comments are welcomed...as always...ignore the little rough spots....Whistling [:-^]

Carlos

 Photobucket

  • Member since
    March 2006
Posted by simpilot34 on Friday, November 27, 2009 3:35 AM
WOW Carlos that looks great mate!!!!!!!!! Stunning build!!!!!!!!Bow [bow]Make a Toast [#toast] Only thing I picked up immediately was that both ailerons are down, one should be up. Other than that, AWESOME!!!!
Cheers, Lt. Cmdr. Richie "To be prepared for war, is one of the most effectual means of preserving the peace."-George Washington
  • Member since
    April 2005
  • From: Monster Island-but vacationing in So. Fla
Posted by carsanab on Friday, November 27, 2009 4:06 AM

would have if I could have but I couldn't...when i cut them out turns out the top side is smaller than the lower half by about 4mm and the remaining wing then had a gap..like an over bite, so without going into major surgery to make them hinge properly......the rest is history..

here you can see where the top and bottom didnt line up and the deformed tip I had to deal with too..

 Photobucket

  • Member since
    March 2006
Posted by simpilot34 on Friday, November 27, 2009 4:18 AM
Fair enough lolMake a Toast [#toast] Still looks great!!!!!!!!
Cheers, Lt. Cmdr. Richie "To be prepared for war, is one of the most effectual means of preserving the peace."-George Washington
  • Member since
    November 2003
  • From: Naples, FL
Posted by tempestjohnny on Friday, November 27, 2009 5:51 AM
Finally got some color on the Kingfisher last night.  Painted the sky for the bottom since this is a British floatty thingy.


  • Member since
    March 2006
Posted by simpilot34 on Friday, November 27, 2009 6:15 AM
Glad to hear Johnny!!!!!!!!! I know it felt good to spray again!!!Thumbs Up [tup]
Cheers, Lt. Cmdr. Richie "To be prepared for war, is one of the most effectual means of preserving the peace."-George Washington
  • Member since
    March 2006
Posted by simpilot34 on Friday, November 27, 2009 7:34 AM

Not much extra from the other day but a lil progress nonetheless. Got the tail feathers on at last and the canopy is anchored now with white glue. Starting to really look like an airplane floaty thing now. A couple pics.

Cheers, Lt. Cmdr. Richie "To be prepared for war, is one of the most effectual means of preserving the peace."-George Washington
  • Member since
    September 2003
  • From: South Central Wisconsin
Posted by Daywalker on Friday, November 27, 2009 8:38 AM
Carlos- Amazing what you were able to do with that kit!  Too bad about the wing fit issues, but I can understand why you would do what you did to avoid the gaps on the top surface of the wing.  Nicely done my friend! Big Smile [:D]

Frank 


  • Member since
    September 2004
  • From: Vernon, BC, Canada
Posted by razordws on Friday, November 27, 2009 11:10 AM

Carlos, beautiful job on the Buffalo.  I really like those early war markings.  Thumbs Up [tup]Thumbs Up [tup]

Ritchie, the floaty thingy is looking grand.  Lots of masking I see. Yuck [yuck]

Dave

  • Member since
    October 2004
  • From: League City, Texas
Posted by sfcmac on Friday, November 27, 2009 11:15 AM

 Holy cow!  Frank finished his Zero!  Talk about yer land speed record!  That was a quicky!  Looks great too!  Love the spinning prop!  I need to try one of those effects!

 Great Buffallo!  Mean and fat!

Ritchie!  I love the Jake! One of my Favs for sure!

Too much building!  Making me want to do a little of everything!  Working on a big project  at the moment!  A real time stealer but having fun with it.  But like MacArthur! I shall return!

  • Member since
    July 2004
  • From: Northern KY
Posted by mucker on Friday, November 27, 2009 8:09 PM

Nice Buffalo, Carlos! Yet another Special hobby kit for you, eh? ou must be a glutton for puishment!

Great looking bird sofar, Richie!

  • Member since
    April 2005
  • From: Monster Island-but vacationing in So. Fla
Posted by carsanab on Saturday, November 28, 2009 2:47 AM

Thanks Charles....I know....but I think they are all out of my system and stash!!! I thought its such a tiny simple little plane what could go wrong!!!...worst thing...I brought that aileron disaster on myself...should have left them alone...at least I didnt try and light this one up...that would have never worked with this beast!

Oh well....now to ponder....whats next??

CS

 Photobucket

  • Member since
    March 2006
Posted by simpilot34 on Saturday, November 28, 2009 4:25 AM
Thanks guys for the comments!!!!Much appreciated!!!Make a Toast [#toast]
Cheers, Lt. Cmdr. Richie "To be prepared for war, is one of the most effectual means of preserving the peace."-George Washington
  • Member since
    February 2003
  • From: Melbourne, Australia
Posted by darson on Saturday, November 28, 2009 5:43 PM

Frank congratulations on a fantastic build she looks great, Bow [bow]Bow [bow]Bow [bow] I particularly like the spinning prop shots, they really look good.

Carlos Excellent work on the Buffalo and I don't know what you are talking about with rough spots as I can't see any from where I'm sitting, nice one Bow [bow]Bow [bow]Bow [bow].

I've updated you both on Page 1

Richie that aero floaty thing is coming along really nicely, can't wait to see a coat of paint on her.

Cheers

  • Member since
    July 2004
  • From: Sonora Desert
Posted by stikpusher on Saturday, November 28, 2009 6:39 PM

Here is my progress on my F6F so far

a few shots of the cockpit prior to installation

fuselage side halves interior

cockpit placed into fuselage side half

engine

close ups of cockpit area after gluing fuselage halves together

and all parts so far assembled


F is for FIRE, That burns down the whole town!

U is for URANIUM... BOMBS!

N is for NO SURVIVORS...

       - Plankton

LSM


JOIN OUR COMMUNITY!

Our community is FREE to join. To participate you must either login or register for an account.

SEARCH FORUMS
FREE NEWSLETTER
By signing up you may also receive reader surveys and occasional special offers. We do not sell, rent or trade our email lists. View our Privacy Policy.