SEARCH FINESCALE.COM

Enter keywords or a search phrase below:

Star Trek Group build

21479 views
317 replies
1 rating 2 rating 3 rating 4 rating 5 rating
  • Member since
    July 2014
Posted by modelcrazy on Thursday, June 25, 2015 11:24 PM

I finished painting the interior and ran the wires in to the wings and nacelles. I also epoxied the light board onto the bottom hull, I laid the top hull down to show what the lights will look like. I must say, this is turning out better than I thought.

Steve

Steve

Building a kit from your stash is like cutting a head off a Hydra, two more take it's place.


http://www.spamodeler.com/forum/

  • Member since
    March 2010
  • From: Boston
Posted by mach71 on Thursday, June 25, 2015 2:02 PM

Yah, you can go nuts on this kit. There is just so much to fix.

I think AMT was just phoning it in when this kit came out.

  • Member since
    July 2014
Posted by modelcrazy on Thursday, June 25, 2015 9:12 AM

Oh.

Yeah, I'm not going that far. I was thinking of doing all this cool stuff to it, but then I thought differently.

With the exception of the lights, it will be pretty much an OTB build. One day I go all out. I really like this ship, always have.

By the way, I started a WIP thread in case your interested.

Steve

Building a kit from your stash is like cutting a head off a Hydra, two more take it's place.


http://www.spamodeler.com/forum/

  • Member since
    March 2010
  • From: Boston
Posted by mach71 on Thursday, June 25, 2015 9:00 AM

A great start!

This is what I meant by the lower aft concaveing.

  • Member since
    July 2014
Posted by modelcrazy on Thursday, June 25, 2015 8:33 AM

I've started on the BOP, well on the kit that is, I already completed the lighting circuit.

I drilled holes for view ports and sensors, then I painted the inside black. I will paint a coat of chrome on the black, hopefully this will stop any light from shining through, if not, I'll line some aluminum foil on the inside. The view ports will then be lined with wax paper for light diffusion and the sensor ports will be backed with sheet styrene to prevent light from shinning through. I also coated the engine nacelles with black and they will follow the same process.

Steve

Building a kit from your stash is like cutting a head off a Hydra, two more take it's place.


http://www.spamodeler.com/forum/

  • Member since
    July 2014
Posted by modelcrazy on Monday, June 22, 2015 1:39 PM

Right?

Steve

Building a kit from your stash is like cutting a head off a Hydra, two more take it's place.


http://www.spamodeler.com/forum/

  • Member since
    November 2009
  • From: SW Virginia
Posted by Gamera on Monday, June 22, 2015 7:29 AM

Oh... those LEDs are gonna look cool!

"I dream in fire but work in clay." -Arthur Machen


  • Member since
    July 2014
Posted by modelcrazy on Friday, June 19, 2015 3:25 PM

I'm Planning on lighting both. As far as beveling the sides and adding a step, I wasn't going to go that far. What indentation on the lower aft hull? I hadn't run across that yet, oh and the tail fin needs modification.

If one really wanted to go all out, one could scribe panel lines and add impulse engines as seen on some renderings on an internet image search. Although, I thought the BoP was sub-light, so what's the need for impulse engines? The original show model doesn't have impulse engines or panel lines. "OK Chewy, lock in the sub-light engines". Sorry, wrong Galaxy and time frame.

Here is my crude lighting circuit. The LED's on the wires (yellow, red and blue. I could have sworn I had green in there) will go to the engine nacelles, Although, again, the original model just had a white glow, but were's the fun in that? I will frost the nacelle caps and hopefully the different light colors will have the results I want them to. The rest of the LED's will bathe the interior of the hull for the windows (I added blue just to see what that would do, probably nothing). I'm going to paint the interior of the hull with chrome and line the windows with wax paper to diffuse. I will leave the senor holes black by placing a piece of styrene behind them.
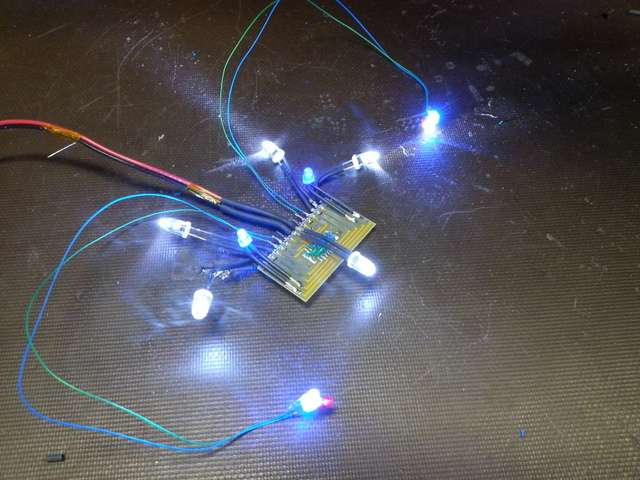
OK, so I guess I've officially started.

Steve

Steve

Building a kit from your stash is like cutting a head off a Hydra, two more take it's place.


http://www.spamodeler.com/forum/

  • Member since
    March 2010
  • From: Boston
Posted by mach71 on Friday, June 19, 2015 2:49 PM

Steve, I'm really looking forward to your build!

Some modifications that can easily be made are:

Beveling the front of the ship

Adding the indentation/concave on the lower aft section

Adding the "step" around the top of the ship.

Are you planing on lighting just the nacelle caps? or the sensor/windows also?

  • Member since
    July 2014
Posted by modelcrazy on Friday, June 19, 2015 2:29 PM

Yeah, The AMT kit leaves a lot to be desired when it comes to accuracy, but what the heck. I got it sale, and I really beginning to enjoy modifications and improvements.

Steve

Building a kit from your stash is like cutting a head off a Hydra, two more take it's place.


http://www.spamodeler.com/forum/

  • Member since
    November 2009
  • From: SW Virginia
Posted by Gamera on Friday, June 19, 2015 1:10 PM

Looking forward to this Steve, personally as to Romulan ships I like the looks of the Warbird better than the BoP but this is going to be cool!

"I dream in fire but work in clay." -Arthur Machen


  • Member since
    July 2014
Posted by modelcrazy on Friday, June 19, 2015 12:11 PM

I will be starting on the Bird of Prey after I complete the Musashi or the 24 pounder cannon, whichever comes first. I have however, been researching and am going to do some modifications. The AMT kit is lacking detail such as front hull observation windows and sensor ports as well as missile launcher ports in the wings (I've been studding the blueprints...I know....nerd). I am also going to use a lighting kit of my own design. So I'll be starting her soon.

Steve

Steve

Building a kit from your stash is like cutting a head off a Hydra, two more take it's place.


http://www.spamodeler.com/forum/

  • Member since
    July 2014
Posted by modelcrazy on Tuesday, June 16, 2015 8:52 PM

Mark,

Yes, that was the first thing I opened after my Fathers Day spree. The instructions give you an option to attach the old engine caps, or replace them with clear plastic parts. They also state the Plasma weapon is an option. What in the world (space) would I be doing galavanting around in the neutral zone, in a sublight spaceship WITHOUT a weapon,... geesh.

Steve

Steve

Building a kit from your stash is like cutting a head off a Hydra, two more take it's place.


http://www.spamodeler.com/forum/

  • Member since
    March 2010
  • From: Boston
Posted by mach71 on Tuesday, June 16, 2015 3:11 PM

Steve,

Have you opened the box yet? R2 has added correct nacelle caps and added the plasma weapon.

Have plenty of filler, the gaps are huge, but I love this kit if only for nostalgia.  

  • Member since
    July 2014
Posted by modelcrazy on Monday, June 15, 2015 7:42 PM

Right?

Steve

Building a kit from your stash is like cutting a head off a Hydra, two more take it's place.


http://www.spamodeler.com/forum/

  • Member since
    January 2014
  • From: Toronto
Posted by Rob S. on Monday, June 15, 2015 6:34 PM

Classic!

______________________________________________________________________________


On the Bench: Nothing on the go ATM

  • Member since
    March 2010
  • From: Boston
Posted by mach71 on Monday, June 15, 2015 12:37 PM

Nice Steve!

I'll add it to your name.

It may be a simple kit, But its not an easy kit. I look forward to your Build.

  • Member since
    November 2009
  • From: SW Virginia
Posted by Gamera on Monday, June 15, 2015 11:14 AM

So for Father's Day you got 'the bird' Steve? Stick out tongue

All joking aside that's a very nice haul. 

"I dream in fire but work in clay." -Arthur Machen


  • Member since
    July 2014
Posted by modelcrazy on Monday, June 15, 2015 11:05 AM

Mach,

I got it!!

I found this on sale at my LHS. I love this bird, I just wish there were more to it.

This is officially my entry.

Steve

Steve

Building a kit from your stash is like cutting a head off a Hydra, two more take it's place.


http://www.spamodeler.com/forum/

  • Member since
    January 2010
Posted by Klik on Thursday, June 4, 2015 12:01 AM

Thanks guys!

I appreciate the comments. I spent so much time on getting the look of the ship "just right", so the final product makes me so happy. This was probably the most ambitious build I've ever done, so to hear it called "star fleet" is greatly appreciated ( cue sobbing sounds).

Thank you for the group build, it was fun to participate in. I'll lurk as long as the GB continues. Perhaps another kit?

Klik

oneyearwar1

The hardest part of flying isn't flying...it's landing.

  • Member since
    November 2009
  • From: SW Virginia
Posted by Gamera on Wednesday, June 3, 2015 11:14 PM

Hey Mach71, sorry for the lack of progress but I'm still stuck at about 50% on 'Bones'. It's been hot and I''ve been coming home from work, turning on the AC and taking a nap. On the weekends I've been working at finishing up a Wildcat and Hellcat that are both around 95%+ done.

"I dream in fire but work in clay." -Arthur Machen


  • Member since
    January 2014
  • From: Toronto
Posted by Rob S. on Tuesday, June 2, 2015 6:03 PM

Looks great Klik! Great subject and very Starfleet! Well done...YesCoolYes

______________________________________________________________________________


On the Bench: Nothing on the go ATM

  • Member since
    March 2010
  • From: Boston
Posted by mach71 on Tuesday, June 2, 2015 5:11 PM

Thanks,

Anyone have any progress to report?

I'm mulling doing another kit, not sure what yet,

  • Member since
    November 2009
  • From: SW Virginia
Posted by Gamera on Friday, May 29, 2015 8:46 AM

Klik: She came out fantastic! Love how the Aztec paneling worked out, there but subtle.

Mach71: The beacon looks perfect! Maybe you can signal the USS Lake to come beam you up!

"I dream in fire but work in clay." -Arthur Machen


  • Member since
    March 2010
  • From: Boston
Posted by mach71 on Friday, May 29, 2015 8:13 AM

Great looking ship Kilk!

And it was an impressive build.

  • Member since
    July 2014
Posted by modelcrazy on Thursday, May 28, 2015 2:53 PM

Nice build Klik.

I got the Lake up.

Steve

Building a kit from your stash is like cutting a head off a Hydra, two more take it's place.


http://www.spamodeler.com/forum/

  • Member since
    January 2010
Posted by Klik on Thursday, May 28, 2015 2:37 PM

Love the beacon!

I'm back, with Decals!

I simply cut up the kit-supplied decals in the laziest way possible to get the registry number and name.

With a quick clear flat spray, I took "Final" photos on a fluffy black pillow (to simulate "Space"):

That is all I have for now. Let me know if you all want more pictures, and I'll do my best to get them for you. Feel free to pick whatever one for the front page.

I am very proud of this ship: it turned out well, and I put more effort into finishing this ship up right than I put into the Brattain. The only major difference (other than the nacelles) from the original Curry-type is that the secondary hull has a slight downward cant (to allow the torpedo launchers to fire over the forward hanger bay).

Comments welcome!

Klik

oneyearwar1

The hardest part of flying isn't flying...it's landing.

  • Member since
    July 2014
Posted by modelcrazy on Thursday, May 28, 2015 2:07 PM

Oh yeah, now I remember.

Pic 1, you got it.

Steve

Steve

Building a kit from your stash is like cutting a head off a Hydra, two more take it's place.


http://www.spamodeler.com/forum/

  • Member since
    March 2010
  • From: Boston
Posted by mach71 on Thursday, May 28, 2015 1:50 PM

Thanks Steve.

The 1st I guess.

It's the laser beacon from "The Squire of Gothos" episode

  • Member since
    July 2014
Posted by modelcrazy on Thursday, May 28, 2015 1:37 PM

Mach'

I'm still not sure what that is, but which picture did you want on the wall?

Steve

Steve

Building a kit from your stash is like cutting a head off a Hydra, two more take it's place.


http://www.spamodeler.com/forum/

JOIN OUR COMMUNITY!

Our community is FREE to join. To participate you must either login or register for an account.

SEARCH FORUMS
FREE NEWSLETTER
By signing up you may also receive reader surveys and occasional special offers. We do not sell, rent or trade our email lists. View our Privacy Policy.